
There are recipes that sneak into your weekly dinner plans and become favorites without warning, and then there are recipes like these Spicy Chicken Pepper Jack Sliders—the kind that instantly earn a permanent spot on your “must-make-again” list after just one bite. They’re small but mighty, packed with bold flavor, creamy cheese, juicy chicken, and a punch of spice that keeps you coming back for more.
This recipe came about on a day when I had leftover rotisserie chicken in the fridge, a few half-used bell peppers, and not much else. I wasn’t in the mood for soup or salad—I wanted something hearty, hot, and a little indulgent. Sliders felt like the right move, and once I added pepper jack cheese and created a quick chili salt seasoning, I realized I had stumbled onto something delicious. Now these spicy little sandwiches are one of my go-to recipes whenever I need something comforting, quick, and universally loved.
One of the best things about this recipe is how adaptable it is. Whether you’re throwing a game day party, hosting a casual get-together, or just looking to spice up dinner on a weeknight, these sliders deliver. And because they’re made with pre-cooked chicken, they come together fast—meaning less time in the kitchen and more time enjoying the people you’re cooking for.
The flavor balance is what makes this dish really shine. You get the richness of melted pepper jack cheese, the smoky heat of chili powder and cayenne, the sweetness of sautéed bell peppers and onions, and the savory, seasoned chicken holding it all together. Plus, everything gets baked inside fluffy slider buns until warm and melty, which is pretty much irresistible.
If you’re someone who enjoys meals that feel special but don’t require a culinary degree to pull off, you’re going to love this one. Let’s dig into all the reasons why these sliders deserve a spot on your table.
Why You’ll Love This Spicy chicken sliders Recipe
If you’re anything like me, you’re always on the lookout for recipes that strike the perfect balance between effortless and impressive. These Spicy Chicken Pepper Jack Sliders hit that sweet spot. Let me tell you exactly why this recipe is worth bookmarking.
First off, let’s talk convenience. These sliders come together quickly thanks to one key shortcut: pre-cooked chicken. Whether you use rotisserie chicken from the store or leftovers from last night’s dinner, the meat is already cooked and ready to absorb all those bold flavors from the chili salt seasoning and green chiles. That means less time at the stove and more time enjoying your meal.
Next up is flavor—and trust me, these sliders have plenty of it. The homemade chili salt adds a smoky, spicy punch that makes the chicken anything but boring. When paired with the melted pepper jack cheese, you get a creamy, slightly spicy finish that feels indulgent without being overwhelming. The sautéed bell peppers and onions bring in a sweetness that balances the spice perfectly, making every bite complex and satisfying.
Another reason to love this recipe is its versatility. These sliders are just as perfect for a weeknight dinner as they are for a party. They’re easy to make in bulk, and they reheat beautifully, so you can prepare them in advance if you’re entertaining. They also scale down nicely if you’re just cooking for one or two people.
These sliders are also incredibly family-friendly. You can easily control the heat level by adjusting the amount of chili salt or using a milder cheese. And since they’re bite-sized, kids love them just as much as adults do.
Finally, let’s not forget about presentation. When you pull a tray of these golden, cheesy sliders out of the oven, it’s impossible not to feel a little proud. They look just as good as they taste, making them ideal for potlucks, parties, or any occasion where you want to wow a crowd without stressing in the kitchen.
Health Benefits
While these sliders might sound like an indulgent treat—and they definitely taste like one—they also have some redeeming nutritional qualities, especially if you pay attention to the ingredients you use. For starters, the base of this recipe is chicken breast, which is a lean, high-protein meat. It’s an excellent source of essential nutrients like niacin (vitamin B3), selenium, and vitamin B6. When shredded and seasoned properly, it becomes a flavorful and satisfying centerpiece without being overly fatty or calorie-dense.
The bell peppers and onions add more than just color and flavor. They’re packed with vitamins and antioxidants that make every bite a little more nourishing. Bell peppers are rich in vitamin C and beta-carotene, which support your immune system and skin health. Onions bring fiber, vitamin C, and natural compounds that are believed to support heart health and reduce inflammation. When sautéed lightly in oil, they retain their nutrients and become sweet and tender—perfect for balancing out the spice.
The homemade chili salt seasoning lets you control the sodium and spice content of your sliders. Store-bought spice blends can be loaded with preservatives and excess salt, but making your own ensures a fresher, cleaner ingredient list. Using sea salt and natural spices like chili powder, cayenne, and paprika means you’re flavoring your food with real, beneficial ingredients.
Pepper jack cheese, while indulgent, also brings calcium and protein to the table. If you’re watching your dairy intake, you can easily reduce the amount or choose a lower-fat cheese alternative. And if you want to boost the fiber content of your meal, opt for whole wheat or sprouted slider buns instead of the traditional white ones.
Ultimately, these sliders offer a satisfying mix of protein, vegetables, and carbs in each portion. They’re not meant to be diet food, but with a few small tweaks, they can absolutely fit into a balanced, health-conscious meal plan.
Preparation Time, Servings, and Nutritional Information
Let’s break down the logistics of this recipe so you know exactly what to expect before you start cooking. One of the best parts about these sliders is how quickly they come together—and how easy they are to scale up or down depending on your needs.
Preparation Time
Prep time: 15 minutes
Cook time: 20 minutes
Total time: 35 minutes
Servings
This recipe makes 12 sliders, which typically serves about 4 to 6 people, depending on appetites. If you’re serving these at a party alongside other snacks and appetizers, you could stretch them further. For dinner, plan on 2 to 3 sliders per person.
Nutritional Information (per 2-slider serving)
Calories: Approximately 390
Protein: 25g
Fat: 18g
Carbohydrates: 28g
Fiber: 2g
Sugar: 4g
Sodium: 720mg (depending on your chili salt and cheese choices)
These numbers will vary slightly depending on the specific brands and types of cheese, buns, and oil you use. For a lighter option, use part-skim cheese, reduce the oil slightly, or choose a smaller bun.
Overall, these sliders provide a well-rounded combination of macronutrients. The protein keeps you full, the fat provides richness, and the carbs make this a satisfying comfort food dish.
Ingredients List of these Spicy chicken sliders
Here’s exactly what you’ll need to bring this recipe to life. Every ingredient plays an important role in the overall flavor and texture of the sliders, so try not to skip anything unless you’re substituting intentionally.
Main Ingredients
- 2 to 3 cooked chicken breasts, shredded (rotisserie chicken works great for convenience)
- 1 (4 oz) can of green chiles – adds moisture, mild heat, and flavor depth
- 1 small green bell pepper, thinly sliced – brings a fresh, slightly bitter crunch
- 1 small red bell pepper, thinly sliced – adds sweetness and vibrant color
- 1 small onion, thinly sliced – enhances sweetness and complexity when sautéed
- 2 tablespoons oil (any neutral oil like olive oil or canola works) – for sautéing vegetables
- 9 slices of pepper jack cheese – creamy, spicy, and perfect for melting
- 1 (12-count) package of slider buns – use soft, fluffy buns for best results
Chili Salt Seasoning Mix
- 1/8 cup sea salt – the base for the seasoning blend
- 1/8 cup chili powder – brings smoky, earthy flavor
- 1/8 teaspoon cayenne powder – adds heat (adjust to your spice preference)
- Dash of paprika – gives a subtle smokiness and color
- Dash of black pepper – for warmth and complexity
You’ll only need about 2 tablespoons of the chili salt for this recipe, so store the extra in an airtight jar to use on grilled meats, roasted vegetables, or even popcorn. It’s versatile and delicious.
With your ingredients ready, it’s time to move on to the fun part—cooking. Let’s walk through each step so you can confidently make these sliders in your own kitchen.
Step-By-Step Cooking Instructions
Making these Spicy Chicken Pepper Jack Sliders is simple, satisfying, and actually kind of fun. It’s one of those recipes that feels easy but turns out so flavorful, you’ll want to make it again the next day. Follow these steps carefully and you’ll have a tray of melty, spicy sliders ready to impress.
Step 1: Preheat the oven
Before doing anything else, set your oven to 350°F (175°C). This gives it plenty of time to heat up while you prep the filling. A properly preheated oven ensures your sliders bake evenly and the cheese melts perfectly.
Step 2: Prepare your vegetables
Slice the green and red bell peppers thinly, along with the onion. Thin slices cook more quickly and evenly, and they melt into the chicken mixture just right.
Step 3: Sauté the peppers and onion
In a medium skillet, heat 2 tablespoons of oil over medium heat. Once the oil is hot and shimmering, add your sliced vegetables.
Cook them for about 6–8 minutes, stirring occasionally, until they’re softened and slightly caramelized around the edges. You want them to be tender but not mushy—they should still hold some shape. Remove them from the skillet and set aside in a bowl.
Step 4: Make the chili salt
While the veggies are sautéing or once they’re done, mix up your chili salt. In a small bowl, combine:
- 1/8 cup sea salt
- 1/8 cup chili powder
- 1/8 teaspoon cayenne powder
- A dash of paprika
- A dash of black pepper
Stir everything together until the spices are evenly mixed. You’ll only use about 2 tablespoons of this for the sliders, so pour the rest into an airtight spice jar or container. It keeps well and is amazing sprinkled over grilled chicken, eggs, or roasted veggies.
Step 5: Season and heat the chicken
In the same skillet (no need to wash it—those flavorful bits at the bottom add depth), add your shredded chicken. Pour in the can of green chiles, including the juices, and sprinkle in 2 tablespoons of the chili salt.
Give everything a good stir to make sure the chicken is well-coated with the spices and chiles. Cook over medium heat for about 4–5 minutes until everything is heated through and slightly sizzling. Taste and adjust the seasoning if needed—if you like it spicier, add a pinch more chili salt or a sprinkle of cayenne. Remove from heat.
Step 6: Assemble the sliders
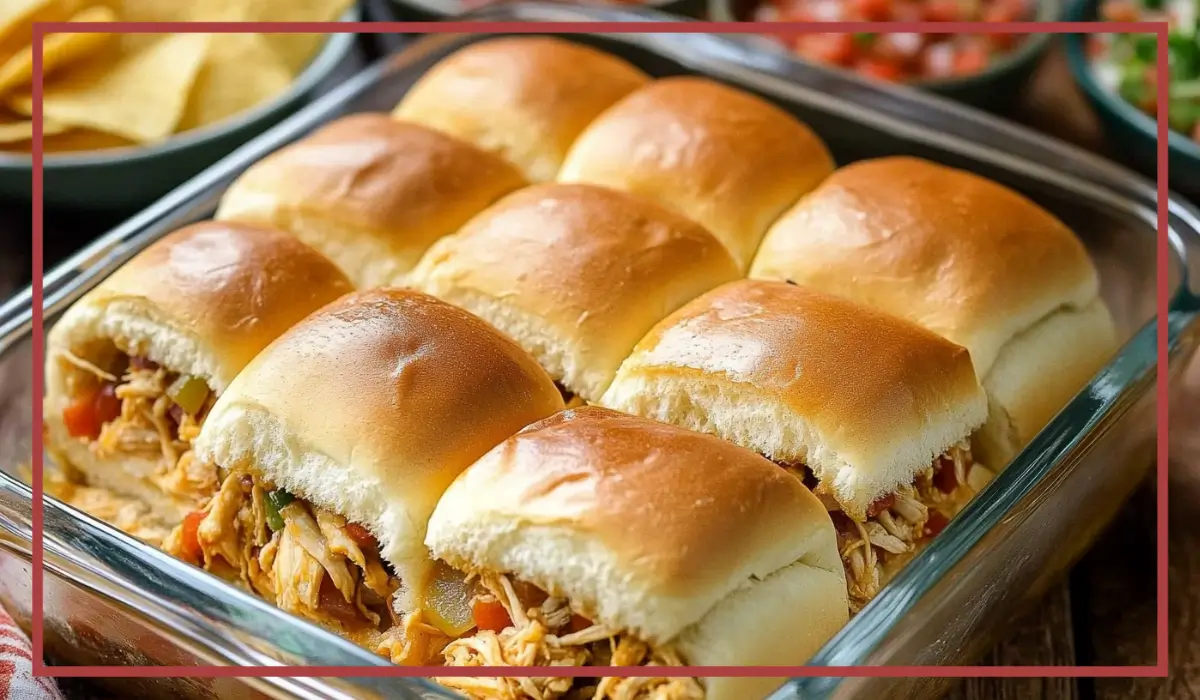
Now for the fun part—layering the sliders. Grab an 11×7 inch baking dish or something similar that fits all 12 buns snugly. You want the buns to fit close together so they bake up soft and steamy.
Slice the slider buns in half horizontally, keeping the tops and bottoms connected in two solid sheets if possible. Place the bottom halves in your baking dish.
Spoon the spicy chicken mixture evenly over the buns, making sure every piece is covered. Next, layer the sautéed peppers and onions over the chicken. Spread them out so each slider gets a nice mix of sweet and spicy.
Lay the slices of pepper jack cheese over the veggies. You may need to tear the slices to fit them across all 12 buns, but don’t stress—once they melt, everything blends beautifully.
Finally, place the top halves of the slider buns on top.
Step 7: Bake to melty perfection
Cover the dish tightly with foil. This helps trap steam so the buns stay soft and the cheese melts evenly.
Place the dish in your preheated oven and bake for 15 to 20 minutes, until the sliders are warmed through and the cheese is completely melted.
If you like the tops of your buns a little crispier, you can remove the foil during the last 3 to 5 minutes of baking. Just keep an eye on them so they don’t over-brown.
Optional: Brush with butter or oil
If you’re feeling a little extra (and who isn’t when cheese is involved?), brush the tops of the buns with melted butter or a bit of olive oil before baking. You can even sprinkle a tiny pinch of chili salt on top for an extra hit of flavor.
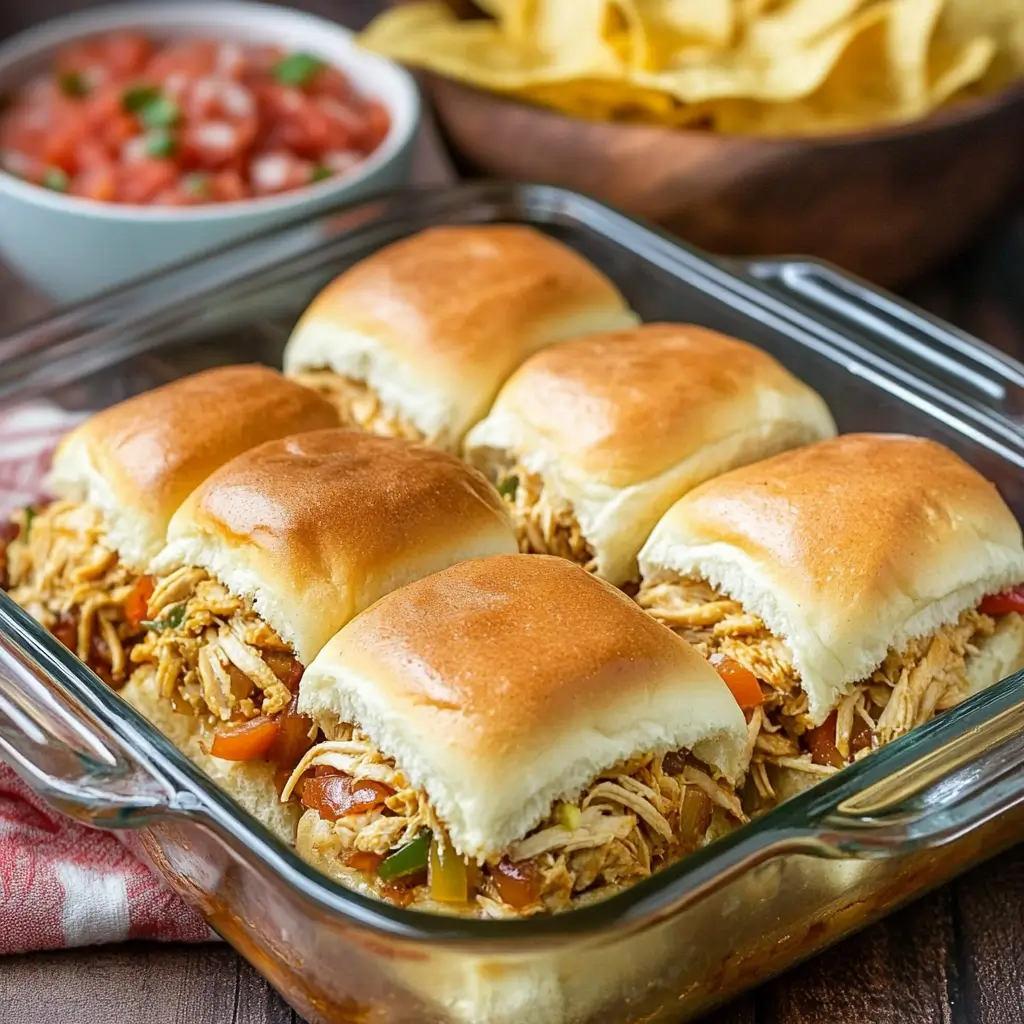
Step 8: Slice and serve
Once out of the oven, let the sliders rest for 3 to 5 minutes. This helps everything set and makes slicing easier.
Use a sharp knife or a spatula to cut and lift each slider. The cheese will be gooey, the buns warm, and the filling absolutely packed with flavor. Serve hot and watch them disappear fast.
These steps may seem simple, but together, they create a slider experience that’s absolutely loaded with flavor, color, and texture. The spicy chicken, sweet sautéed veggies, and melty cheese all work together to make every bite unforgettable.
How to Serve these Spicy chicken sliders
There’s no wrong way to enjoy these sliders, but a few smart serving choices can really elevate the whole meal. Here are some of my favorite ways to make these sliders feel even more special—whether you’re hosting a group or just plating dinner for your family.
Serve them hot out of the oven. These sliders are at their absolute best when they’re warm and the cheese is gooey. As soon as they come out, give them a few minutes to settle, then dig in while everything is still melty and toasty.
If you’re serving them as a main dish, pair the sliders with a few simple sides. A crisp green salad adds freshness and balances out the richness of the cheese and seasoned chicken. Think something bright like arugula with lemon vinaigrette, or a cucumber tomato salad with a light olive oil dressing.
Roasted or grilled veggies make a great side dish too. Zucchini, corn, and asparagus all work well, especially with the spicy notes of the sliders. For something heartier, consider baked sweet potato fries or even seasoned potato wedges.
If you’re putting these out for a party, cut them all apart in the baking dish and arrange them on a serving platter. Add a few dipping sauces on the side—something creamy like ranch or a cool avocado yogurt dip helps balance the heat. A smoky chipotle mayo is another fun option for those who like a little extra kick.
And for a more casual family meal, don’t be afraid to go classic: sliders + corn on the cob + fruit salad. It’s a laid-back combo that’s kid-friendly and delicious every single time.
No matter how you serve them, these sliders are always a hit. Keep it simple or dress it up—it all works.
Pairing Suggestions
Pairing the right sides and drinks with these sliders can take your meal to the next level. Because the sliders are bold, cheesy, and spicy, you want your pairings to either contrast or complement those elements.
For a fresh and vibrant pairing, start with a chilled cucumber salad or coleslaw. The crunch and coolness of fresh vegetables offer a nice contrast to the richness of the sliders. A vinegar-based slaw with cabbage, carrots, and a tangy dressing adds brightness without overwhelming the flavor.
If you prefer something warm and cozy, try serving your sliders with a side of baked beans, corn pudding, or even cheesy grits. These Southern-inspired sides bring a comforting, down-home feel that pairs beautifully with the chili-spiced chicken and gooey cheese.
For drinks, a sparkling citrus mocktail or iced lemonade helps cool down the spice. If you’re serving these at a gathering, a pitcher of cucumber lime water or a citrusy fruit punch makes for a refreshing, alcohol-free option that still feels festive.
If you want something bubbly, sparkling water with a splash of pomegranate or mango juice is a simple and sophisticated match.
For kids, sliders go great with simple options like apple slices, veggie sticks with ranch dip, or buttered corn on the cob.
Whether you’re going for bold flavors, cooling contrasts, or fun sides for a party spread, there’s no shortage of ways to round out the perfect slider experience.
Storage, Freezing & Reheating Instructions
One of the best things about these sliders—aside from how ridiculously tasty they are—is how well they store. You can easily make a batch ahead of time and enjoy leftovers without sacrificing flavor or texture.
Storing in the refrigerator
Once the sliders are fully cooked and cooled, store any leftovers in an airtight container. If the baking dish has a lid, even better—just pop the whole thing in the fridge. These sliders stay fresh for up to 3 days. If you’re stacking them, place parchment paper or wax paper between layers to keep the buns from sticking together.
Freezing for later
To freeze, it’s best to wrap each slider individually in foil or plastic wrap, then place them all in a large freezer-safe bag or container. This method prevents freezer burn and makes it easier to grab just one or two at a time. They’ll keep well for up to 2 months.
Reheating instructions
To reheat from the fridge, place the sliders on a baking sheet and warm in a 350°F oven for about 10–12 minutes, or until heated through. Cover them with foil to keep the buns from drying out.
If you’re reheating from frozen, let the sliders thaw in the refrigerator overnight before following the oven method above. In a pinch, you can reheat from frozen—just extend the bake time to 18–20 minutes, and keep them covered for most of that time.
Microwaving is an option, too, especially if you’re only warming one or two sliders. Just be sure to wrap them in a damp paper towel and heat in 30-second bursts to prevent the buns from getting rubbery or too dry.
Stored and reheated properly, these sliders taste just as good the second time around—making them perfect for meal prepping or weekday lunches.
Common Mistakes to Avoid in this Spicy chicken sliders
Even though this recipe is pretty straightforward, there are a few common pitfalls that can affect the final outcome. Whether you’re a first-time slider maker or just want to perfect your technique, keeping these in mind will help you avoid any kitchen missteps.
Using chicken that’s too dry
This is probably the most frequent issue. If your shredded chicken is overcooked or wasn’t stored properly, it can turn out dry and stringy. To avoid this, always use moist, well-cooked chicken. Rotisserie chicken works beautifully because it’s naturally juicy and already seasoned. If you’re using home-cooked chicken breasts, don’t overcook them, and consider mixing in a tablespoon of broth or even a splash of olive oil when seasoning to add back some moisture.
Not draining the green chiles
Green chiles add great flavor and a touch of heat, but if you don’t drain them well, they can make your chicken mixture soggy. If the liquid from the can is too watery, it may affect the texture of the filling and make the buns soggy on the bottom. Use a fine mesh strainer or press gently with the back of a spoon to remove excess moisture.
Overloading the sliders
It’s tempting to pile on the fillings, but overstuffing can make the sliders difficult to eat and cause them to fall apart. Stick to the recommended quantities and spread the chicken and vegetables evenly across the buns. A balanced ratio ensures you get all the flavors in each bite without the sliders becoming messy.
Forgetting to cover while baking
This step is crucial for keeping the buns soft and letting the cheese melt evenly. If you skip the foil cover or take it off too early, the tops of the buns might over-toast while the cheese inside stays half-melted. Always bake covered for at least the first 15 minutes, then uncover for the last few if you want a golden finish.
Not letting them rest before serving
Right out of the oven, the cheese will be super hot and the filling might slide out if you try to cut or serve them too quickly. Let the sliders rest for a few minutes before slicing to allow the cheese to set slightly and the flavors to settle.
Skipping seasoning adjustments
Everyone’s taste buds are different, so don’t be afraid to adjust the chili salt to your liking. Before assembling the sliders, taste the seasoned chicken and tweak the spice level. A little more chili powder, a pinch of cayenne, or even a dash of garlic powder can customize the flavor to your preference.
By avoiding these simple mistakes, you’ll get perfect sliders every time—crispy where they should be, gooey where they need to be, and loaded with flavor in every single bite.
Pro Tips of this Spicy chicken sliders
Want to take your Spicy Chicken Pepper Jack Sliders from great to unforgettable? These pro tips will help you bring out the best flavor, texture, and presentation every time you make them.
1. Toast your buns lightly before assembling (optional but great)
If you want to add a little crunch and prevent soggy bottoms, you can briefly toast the inside of the buns before assembling. Just place them cut-side-up on a baking sheet and broil for 1–2 minutes until lightly golden. It adds a subtle layer of texture and helps them hold up to the juicy filling.
2. Customize the chili salt for your heat level
The beauty of a homemade spice blend is that it’s totally customizable. If you’re cooking for kids or those sensitive to spice, reduce or skip the cayenne. On the flip side, if you love heat, try adding a pinch of crushed red pepper flakes or smoked chipotle powder for deeper flavor.
3. Add fresh herbs after baking for brightness
A sprinkle of freshly chopped cilantro or parsley just before serving adds color and a fresh finish. It’s not essential, but it can brighten the flavors and give your sliders a little visual pop—perfect for parties or serving guests.
4. Use fresh cheese slices for better melt
Pre-sliced cheese works in a pinch, but freshly sliced or deli-cut pepper jack cheese melts smoother and tastes better. Look for a block of good-quality pepper jack and slice it yourself for the best results.
5. Make ahead for parties
These sliders are a host’s best friend. Assemble the entire tray up to a day in advance, cover tightly with foil, and refrigerate. When you’re ready to serve, just pop the tray in the oven and bake as directed. This makes entertaining so much easier and keeps you out of the kitchen during the party.
6. Add a spread under the chicken
For an extra flavor boost, try spreading a thin layer of chipotle mayo, avocado mash, or even sour cream mixed with lime juice on the bottom buns before adding the chicken. It adds moisture and a punch of flavor that complements the filling perfectly.
7. Serve with toothpicks or skewers
If you’re presenting these at a party or potluck, use decorative toothpicks or small skewers to keep each slider neatly together. It makes them easier to grab, looks festive, and helps prevent the tops from sliding off when people serve themselves.
With these tips, your sliders will not only taste better but also come together more smoothly—and look even more impressive on the plate.
Frequently Asked Questions (FAQs)
Can I use other types of cheese besides pepper jack?
Absolutely. Pepper jack adds a creamy texture and mild heat, but you can substitute with Monterey Jack, cheddar, mozzarella, or a blend. For more heat, try habanero cheese. For a milder flavor, mozzarella or provolone are good options.
What if I don’t have green chiles?
If you can’t find canned green chiles, you can substitute with chopped fresh jalapeños (for more heat) or roasted green bell pepper (for a milder taste). Just make sure whatever you use is finely chopped so it mixes well with the chicken.
Can I make these gluten-free?
Yes, just use gluten-free slider buns and double-check that your seasoning blend doesn’t contain any gluten additives. Some store-bought chili powders include thickeners, so check the label or make your own from scratch.
How do I store leftover chili salt?
Store any extra chili salt in an airtight container or spice jar at room temperature. It’ll stay fresh for up to 6 months. Use it as a seasoning on roasted vegetables, grilled meat, fries, or even popcorn.
Can I make the filling ahead of time?
Yes. You can sauté the veggies and mix the chicken filling up to 2 days in advance. Store it in the fridge, and when you’re ready to bake, just assemble the sliders and continue with the recipe as normal.
How spicy are these sliders?
They’re moderately spicy with the suggested amount of chili salt and pepper jack cheese. If you’re sensitive to spice, reduce the cayenne or use a milder cheese. If you love heat, feel free to add more chili powder or even hot sauce to the chicken mixture.
What’s the best way to reheat sliders?
Reheat in a covered baking dish in the oven at 350°F for about 10–15 minutes. For a quicker method, microwave in 30-second intervals, but wrap in a damp paper towel to keep the buns soft.
Can I freeze these sliders after baking?
Yes. Let them cool completely, then wrap each slider tightly in foil or plastic wrap. Store in a freezer-safe bag or container for up to 2 months. Thaw in the fridge overnight and reheat in the oven for best results.
Can I add more vegetables?
Of course! Sliced mushrooms, spinach, or even corn would be tasty additions. Just sauté any extra vegetables with the peppers and onions so they soften up before assembling.
Do I have to use oil, or can I substitute something else?
You can use any neutral oil like canola, avocado oil, or even a bit of butter for sautéing. Olive oil works great too, just note that it adds a slightly different flavor.
Conclusion & Call to Action
There’s something deeply satisfying about a meal that’s easy to make, full of bold flavor, and always a hit with everyone at the table. These Spicy Chicken Pepper Jack Sliders are exactly that. They’re cheesy, spicy, savory, and perfectly handheld—making them ideal for everything from weeknight dinners to game day gatherings.
What I love most is how customizable they are. Whether you want to dial up the heat or keep it mild for the kids, this recipe can flex to suit your tastes. And with simple ingredients and straightforward steps, you don’t need to be an experienced cook to pull them off. It’s one of those meals that looks impressive but feels completely doable.
If you’ve been searching for something new and exciting to add to your recipe rotation, give these sliders a try. They’ll quickly earn a spot on your regular menu, I promise. Once you’ve made them once, you’ll be craving them again—especially when that cheesy, spicy aroma fills your kitchen.
If you do try this recipe, I’d love to hear how it turned out. Did you add any fun twists or make it exactly as written? Share your experience in the comments or snap a photo of your finished sliders and tag me on social media. I’m always so excited to see what you’re cooking up!
Happy cooking, and enjoy every melty, spicy, delicious bite.
Print
Spicy Chicken Sliders – Easy Baked Party Sandwiches
- Total Time: 35 minutes
- Yield: 4-6 servings 1x
- Diet: Halal
Description
These sliders are the perfect blend of spicy, cheesy, and savory. Made with shredded chicken, sautéed peppers, green chiles, and melty pepper jack cheese, all tucked into soft slider buns and baked to golden perfection. Ideal for parties, game day, or an easy weeknight meal.
Ingredients
-
2–3 cooked chicken breasts, shredded
-
1 (4 oz) can green chiles
-
1 small green bell pepper, sliced
-
1 small red bell pepper, sliced
-
1 small onion, sliced
-
2 tablespoons oil
-
9 slices pepper jack cheese
-
1 (12-count) package slider buns
Chili Salt (Seasoning Mix):
-
1/8 cup sea salt
-
1/8 cup chili powder
-
1/8 teaspoon cayenne powder
-
Dash of paprika
-
Dash of black pepper
Instructions
-
Preheat oven to 350°F (175°C).
-
Sauté peppers and onions in oil until tender. Set aside.
-
Mix chili salt ingredients in a bowl.
-
In the same skillet, combine shredded chicken, green chiles, and 2 tbsp chili salt. Stir and heat through.
-
Lay bottom halves of slider buns in baking dish.
-
Layer chicken, peppers, and cheese. Top with bun tops.
-
Cover with foil and bake 15–20 minutes, until cheese melts and sliders are warmed through.
Notes
-
Use rotisserie chicken for quick prep.
-
Adjust chili salt for more or less spice.
-
Optional: brush buns with butter before baking for added flavor.
- Prep Time: 15 minutes
- Cook Time: 20 minutes
- Category: Main Course, Party Food
- Method: Baking
- Cuisine: American