
There’s something magical about sliders, don’t you think? They’re small, snackable, and absolutely loaded with flavor. Whether you’re hosting a weekend get-together, planning a cozy family dinner, or just craving something indulgent and cheesy, sliders hit the spot every single time. And these Creamy Chicken Bacon Ranch Sliders? Oh, they take it to a whole new level.
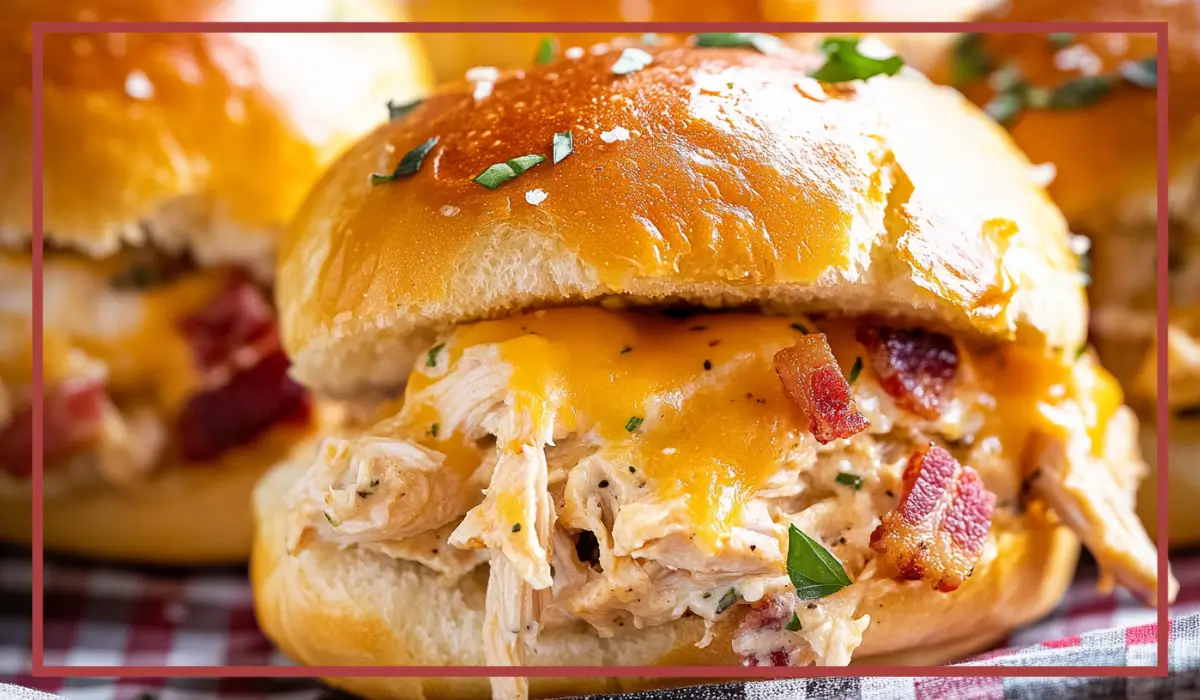
Let me paint the picture for you. Imagine biting into a warm, toasted Hawaiian roll stuffed with a creamy, savory filling made of shredded chicken, crispy turkey bacon, melted cheddar cheese, green onions, and ranch-seasoned cream cheese. As the cheese melts into every corner and the garlic-butter-brushed tops turn golden brown in the oven, you already know you’re in for something special. Every bite is a perfect mix of creamy, salty, tangy, and cheesy goodness—with just enough crunch on top to keep things interesting.
I first started making these sliders a few years ago when I needed a crowd-pleasing appetizer for a casual game night. I had some leftover rotisserie chicken in the fridge, a half-pack of cream cheese that needed to be used, and a box of Hawaiian rolls sitting on the counter. I threw them together with some turkey bacon and ranch seasoning, and that was it. What started as a pantry-clearing experiment turned into one of the most requested recipes in our house. Now they make regular appearances at family movie nights, birthday parties, and even lazy Sunday dinners when we just want something warm and comforting without a lot of fuss.
They’re also super adaptable. Want to make them a little spicier? Toss in some jalapeños. Prefer it lighter? Go with low-fat cream cheese or use Greek yogurt instead. The base recipe is strong enough to stand on its own, but flexible enough to play around with, depending on what you have on hand or what you’re in the mood for.
So if you’re looking for a dish that brings big flavor with minimal effort, these sliders are your answer. Once you try them, you’ll see why they’ve become a staple in our kitchen—and I’m betting they’ll earn a permanent spot in yours too.
Why You’ll Love This Creamy Chicken Sliders Recipe
These sliders are more than just delicious—they’re the kind of meal that checks all the right boxes. For starters, they’re incredibly easy to prepare. You don’t need any fancy equipment or advanced cooking skills. If you can stir ingredients in a pot and layer rolls in a baking dish, you can make these. Everything comes together in one pan, and the total cook time is less than an hour. Perfect for busy weeknights or when you need a no-stress dish that looks and tastes like you went all out.
Another reason to love this recipe is how versatile it is. You can make it work for just about any occasion. Hosting a game day gathering? These sliders are tailgate gold. Need a hearty lunch or dinner option that the whole family will actually agree on? Done. Planning a potluck? These are guaranteed to disappear before anything else on the table.
And then there’s the flavor. Let’s talk about that for a second. You’ve got rich, creamy cream cheese as the base. Add in tender shredded chicken, crispy turkey bacon for a salty crunch, and sharp cheddar cheese that gets perfectly gooey in the oven. The ranch mix adds just the right amount of zesty seasoning—herby, tangy, and savory all at once. Plus, the green onions bring a fresh bite that cuts through the richness and ties everything together beautifully.
Let’s not forget the texture. Soft, slightly sweet Hawaiian rolls soak up all the cheesy filling without falling apart. The tops get golden brown and slightly crispy thanks to a buttery garlic-Parmesan topping. Every bite is balanced—creamy, crunchy, cheesy, and just a little toasty.
These sliders also reheat surprisingly well, which means leftovers (if there are any!) are just as tasty the next day. And because the ingredients are pretty standard pantry and fridge staples, it’s easy to whip them up whenever the craving hits.
All in all, this is a recipe that’s as comforting as it is crowd-pleasing. It hits that perfect intersection of simple and satisfying, making it one of those go-to meals you’ll come back to again and again.
Health Benefits of these Creamy Chicken Sliders
At first glance, you might not expect sliders—especially cheesy, creamy ones—to bring much to the table in terms of nutrition. But believe it or not, there are some real health perks hiding in this recipe, especially when you choose your ingredients with intention.
To start, let’s talk about the protein. This recipe is loaded with it, thanks to the shredded chicken and cheddar cheese. Using rotisserie chicken or home-cooked breast meat gives you lean, high-quality protein that helps keep you full and supports muscle maintenance and repair. Each slider delivers a good hit of protein, making it a more balanced option than many traditional appetizers.
Turkey bacon, which is used here in place of traditional pork bacon, is another smart swap. It’s lower in saturated fat and calories, but still brings that smoky, savory crunch that bacon lovers crave. It adds texture and flavor without going overboard on the unhealthy fats.
The inclusion of green onions may seem like a small thing, but they add more than just color. Green onions are a great source of vitamins A and C, and they also contain antioxidants that support immune function and overall health. It’s those little pops of freshness that help balance out the richness of the rest of the dish.
Cream cheese does add fat, but you can easily lighten things up by using a reduced-fat or whipped version. Greek yogurt also makes a great substitute if you’re looking to boost the nutrition even more—it adds protein, cuts down on saturated fat, and still gives you that creamy texture.
Let’s not overlook the Hawaiian rolls. While they do contain sugar, they’re portion-controlled, which helps keep things reasonable. Because each slider is its own little package, it’s easier to enjoy a satisfying serving without going overboard.
Finally, making meals like this at home gives you complete control over your ingredients. You can use organic chicken, low-sodium cheese, or even whole grain slider rolls if you want to up the nutritional profile. When compared to fast food or takeout, these sliders are a much healthier indulgence that doesn’t sacrifice flavor.
So yes, while these sliders are definitely a comfort food at heart, they can still be a part of a well-rounded, wholesome meal—especially when served with a fresh salad or a side of roasted vegetables. It’s all about balance, and this recipe gives you a delicious way to enjoy both indulgence and nourishment in every bite.
Preparation Time, Servings, and Nutritional Information
Before we dive into the full ingredient list and step-by-step instructions, let’s take a quick look at what you can expect in terms of time commitment, servings, and overall nutritional impact.
Preparation Time:
- Prep Time: 20 minutes
- Cook Time: 20 minutes
- Total Time: 40 minutes
This recipe is designed to be efficient. From start to finish, you’re looking at under an hour—making it ideal for weeknight dinners, last-minute party dishes, or satisfying a weekend craving without spending the whole day in the kitchen.
Servings:
- Yield: 12 sliders
- This recipe serves approximately 4 to 6 people, depending on appetite and what else you’re serving alongside it. For a party or larger gathering, you can easily double or triple the recipe.
Nutritional Information (Per Slider, Approximate):
- Calories: 280
- Protein: 15g
- Carbohydrates: 18g
- Fat: 16g
- Saturated Fat: 7g
- Fiber: 1g
- Sugar: 4g
- Sodium: 450mg
These sliders are definitely indulgent, but not over the top. With a good balance of protein, fat, and carbs, they can fit into a variety of meal plans. You can also make easy adjustments to lighten them up—like using low-fat dairy, skipping the extra butter on top, or serving with veggie-packed sides.
This breakdown helps you make an informed decision about how these sliders fit into your daily nutrition, and it shows that comfort food doesn’t have to mean throwing all your health goals out the window.
Ingredients List of these Creamy Chicken Sliders
Let’s break down everything you’ll need to make these Creamy Chicken Bacon Ranch Sliders. We’ll divide it into two parts: the filling and the sliders themselves.
For the Filling:
- 6 slices turkey bacon, cooked and chopped
Provides a smoky, savory flavor and adds a crispy texture to the creamy filling. - 8 oz cream cheese, cut into small pieces
Acts as the creamy, tangy base of the filling. Feel free to use reduced-fat if desired. - ¼ cup chicken broth
Thins out the cream cheese and helps make the filling smooth and spreadable. - 1 oz ranch dressing mix (1 packet)
This seasoning blend is key to achieving that signature ranch flavor. - 2 cups cooked chicken, chopped or shredded
Rotisserie chicken works beautifully here and saves time. You can also use leftover grilled or baked chicken. - 1½ cups shredded cheddar cheese, divided
Adds melty, cheesy goodness. Use sharp cheddar for more punch or mild cheddar for a creamier taste. - ¼ cup green onions, thinly sliced
Brings a fresh, slightly spicy contrast to the rich filling.
For the Sliders:
- 12 Hawaiian rolls
Soft, slightly sweet rolls that hold everything together and toast up beautifully. - 2 tablespoons butter, melted
Used to brush the tops of the rolls for a golden, buttery finish. - ½ teaspoon garlic, minced
Adds a subtle garlic flavor to the tops of the buns. - 1 teaspoon grated Parmesan cheese
Sprinkled on top for a salty, nutty finish. - 1 tablespoon chives, thinly sliced
Used as a garnish to add color and freshness after baking.
Every ingredient in this list plays a role in building flavor, texture, and that crave-worthy, cheesy goodness that makes these sliders unforgettable. Up next, we’ll walk through each step in the cooking process so you can make them perfectly the first time—and every time after that.
Step-By-Step Cooking Instructions
Now that you’ve got everything you need ready to go, let’s dive into the step-by-step instructions to bring these creamy chicken bacon ranch sliders to life. This process is super straightforward, and once you’ve made it once, you’ll be surprised at how quickly you can whip up a batch without even glancing at the recipe.
Step 1: Cook the Turkey Bacon
Start by preheating your oven to 425°F (220°C). While it’s heating, line a baking sheet with foil. This not only helps with easy cleanup but also prevents sticking and ensures the bacon crisps up evenly.
Lay your turkey bacon slices in a single layer on the foil-lined sheet. They can be close together, but try not to overlap them. Bake the bacon in the preheated oven for 15 to 20 minutes, or until it’s golden brown and crispy. Keep an eye on them toward the end of the cook time to avoid burning.
Once the bacon is done, carefully remove the pan from the oven and transfer the bacon to a paper towel-lined plate to cool. When it’s cool enough to handle, chop it into small bite-sized pieces. Reduce the oven temperature to 350°F (175°C) so it’s ready for baking the sliders later.
Step 2: Make the Creamy Chicken Filling
Next, you’ll move on to preparing the delicious, cheesy filling. Grab a large pot or saucepan and set it over medium heat. Add the cream cheese, chicken broth, and ranch dressing mix to the pot. At first, the cream cheese will be a little stubborn, but as it heats up, it will begin to melt and smooth out.
Whisk continuously for about 5 minutes, or until the mixture is creamy and fully combined. The broth helps thin the cream cheese just enough to make it smooth and scoopable, while the ranch mix infuses everything with flavor.
Once the base is smooth, stir in the chopped turkey bacon you just prepared, followed by the cooked shredded chicken. Mix everything together gently to evenly distribute the ingredients.
Then, add ½ cup of the shredded cheddar cheese and the sliced green onions. Stir until the cheese starts to melt into the mixture and everything is well combined. The result should be a thick, creamy, cheesy filling that’s packed with flavor.
Step 3: Prepare the Rolls
Now it’s time to prepare the foundation of your sliders—the Hawaiian rolls. Without separating the individual rolls, slice the entire block of 12 rolls in half horizontally using a serrated knife. Try to keep the top and bottom halves intact as much as possible.
Place the bottom half of the rolls on a parchment-lined baking sheet or a baking dish large enough to hold them comfortably. The parchment will help prevent sticking and make cleanup easier.
Step 4: Assemble the Sliders
Once your rolls are in place, grab your warm chicken mixture and spread it evenly across the bottom half of the rolls. Use a spatula or the back of a spoon to smooth it out, making sure to cover all the way to the edges so every bite is packed with filling.
Sprinkle the remaining 1 cup of shredded cheddar cheese over the top of the chicken mixture. This will melt down beautifully in the oven and help hold everything together.
Now, carefully place the top half of the rolls over the filling. Gently press down just enough to help the tops adhere, but not so much that the filling squishes out the sides.
Step 5: Make and Apply the Garlic Butter Topping
To give your sliders that irresistible golden finish, it’s time to make the garlic butter topping. In a small bowl, combine the melted butter and minced garlic. Stir until well blended. If you’re a garlic lover, feel free to add a bit more garlic for extra flavor.
Use a pastry brush or spoon to gently brush the garlic butter mixture over the tops of the rolls. Try to get an even layer across the entire surface.
Once the rolls are brushed, sprinkle the grated Parmesan cheese over the top. This adds a wonderful nutty flavor and helps the tops get that perfect golden crust.
Finally, scatter the sliced chives over everything. They add a touch of color and a mild oniony freshness that complements the richness of the filling.
Step 6: Bake the Sliders
Place your assembled sliders in the oven and bake at 350°F (175°C) for 8 to 10 minutes, or until the tops are golden brown and the cheese inside is melted and bubbly.
If you like an extra crispy top, you can pop the tray under the broiler for the last 1 to 2 minutes—just be sure to keep a close eye on them so they don’t burn.
When the sliders are done, remove them from the oven and let them cool for 5 minutes before slicing. This short resting time helps everything set up a bit, making it easier to cut and serve.
Use a sharp knife to cut the sliders into individual pieces along the natural seams of the rolls. Serve them warm and watch them disappear.

How to Serve these Creamy Chicken Sliders
These creamy chicken bacon ranch sliders are super versatile when it comes to serving. Depending on the occasion, you can dress them up or keep them casual. Here are a few of my favorite ways to serve them:
Serve as a main dish with a light salad on the side—something crisp and citrusy to cut through the richness of the sliders. Think arugula with lemon vinaigrette or a simple romaine salad with cucumbers and cherry tomatoes.
Plate them on a platter and serve as finger food for parties, game days, or casual gatherings. They’re easy to grab and eat, no utensils required.
Serve alongside a bowl of soup for a cozy, comforting lunch. A creamy tomato basil or a light chicken and vegetable soup would pair beautifully.
Make them the star of a weeknight dinner and serve with roasted vegetables, sweet potato fries, or even coleslaw on the side.
For a more indulgent touch, pair them with a side of seasoned waffle fries or onion rings. The textures and flavors play off each other perfectly.
Whatever the setting, these sliders adapt easily. They’re great warm from the oven but also delicious at room temperature, which makes them perfect for potlucks or events where they may sit out for a little while.
Pairing Suggestions for these Creamy Chicken Sliders
Pairing these sliders with the right side dishes and drinks can really elevate your meal. Here are some tasty suggestions to help round out your menu:
Side Dishes
Crispy sweet potato fries – Their natural sweetness complements the savory filling perfectly.
Garlic roasted broccoli or green beans – Add some crunch and a burst of freshness to balance the richness.
Classic potato salad – A creamy, chilled potato salad makes a great contrast to the warm, melty sliders.
Corn on the cob – Whether grilled or boiled, corn adds a juicy pop that pairs beautifully with the creamy filling.
Macaroni salad – The tangy, cool dressing complements the cheesy sliders without overpowering them.
Beverage Pairings
Sparkling water with lemon or lime – Refreshing and light, it helps cleanse the palate between bites.
Iced herbal tea – Mint or citrus-based teas add brightness and keep things balanced.
Lemonade – Its sweet-tart flavor works really well with the savory sliders, especially in warmer weather.
For a richer, heartier pairing, serve with a non-alcoholic malt beverage or spiced apple cider in cooler months.
Kid-Friendly Options
Serve with baby carrots, apple slices, or pretzel sticks for a fun, dippable side plate that kids will love.
Pair with homemade fruit punch or a splash of 100% fruit juice for a sweet, satisfying combo.
The beauty of these sliders is that they’re as flexible as you need them to be. They can star as a fun, casual dinner or take center stage at your next gathering—whatever the setting, you’ll find the perfect pairing to match.
Storage, Freezing & Reheating Instructions
Let’s be honest—these sliders are so delicious, they might not leave you with many leftovers. But if you do have a few extras or want to make them ahead of time, here’s how to store, freeze, and reheat them properly to keep them tasting great.
Storing Leftovers
Once baked, let the sliders cool completely to room temperature. Transfer them to an airtight container or wrap them tightly in foil. You can refrigerate them for up to 3 days.
To keep the tops from getting soggy, place a paper towel in the container to absorb excess moisture, or reheat them uncovered to crisp the top layer again.
Freezing Instructions
These sliders freeze surprisingly well. To freeze, follow these simple steps:
Cool the baked sliders completely. Then, slice them into individual portions.
Wrap each slider tightly in plastic wrap or foil. For added protection, place the wrapped sliders in a freezer-safe zip-top bag or container.
Label the container with the date, and store in the freezer for up to 2 months.
When you’re ready to eat, thaw the sliders in the refrigerator overnight before reheating.
Reheating Tips
For best results, reheat sliders in the oven or toaster oven to preserve that crispy top.
Preheat your oven to 350°F (175°C) and place the sliders on a baking sheet. Cover loosely with foil and bake for 10 to 15 minutes, or until heated through.
If you want the tops to get crispy again, remove the foil for the last 2 to 3 minutes of baking.
Avoid using the microwave if possible, as it can make the bread soggy and the filling unevenly heated. However, if you’re in a rush, microwave individual sliders on a plate for about 30 to 45 seconds, then finish in a toaster oven to crisp them up.
These make-ahead and leftover options mean you can enjoy sliders anytime—even on your busiest days.
Common Mistakes to Avoid in these Creamy Chicken Sliders
Even though these sliders are incredibly simple to make, there are a few common missteps that can affect the final result. Avoiding these will ensure your sliders come out just right every time—melty, flavorful, and perfectly balanced.
Using Cold Cream Cheese
One of the most common issues happens right at the beginning: using cream cheese straight from the fridge. Cold cream cheese takes longer to melt and may result in a lumpy filling. For the smoothest, creamiest base, let your cream cheese sit at room temperature for at least 30 minutes before cooking. This will make it much easier to blend with the chicken broth and ranch mix.
Not Draining Moisture from the Chicken
If your cooked chicken is very moist or waterlogged—like some rotisserie chickens can be—it might water down your filling. This can result in a soupy texture that soaks through the rolls. To avoid this, lightly pat the chicken dry with paper towels before mixing it into the cheese sauce.
Overbaking the Sliders
While it’s tempting to leave the sliders in the oven for extra time to ensure the tops get golden and crispy, be careful not to overbake them. Ten minutes at 350°F is usually plenty of time. Any longer, and you risk drying out the chicken or hardening the rolls. If you’re craving extra crisp, use the broiler briefly—but always watch closely to avoid burning.
Skipping the Garlic Butter Topping
Don’t underestimate the power of that simple garlic butter topping. It adds so much flavor and gives the rolls that irresistible golden shine. Skipping this step makes the sliders feel a little flat. So, even if you’re short on time, try to make space for this small but impactful finishing touch.
Not Letting the Sliders Cool Before Slicing
Once the sliders come out of the oven, the filling will be piping hot and very melty. If you try to cut them immediately, the cheese may ooze out and the rolls might tear. Give them at least 5 minutes to rest before slicing. This short wait makes them easier to handle and much prettier to serve.
By keeping these potential pitfalls in mind, you’ll ensure each batch of sliders turns out perfectly melty, beautifully crisped on top, and packed with flavor in every bite.
Pro Tips of these Creamy Chicken Sliders
To elevate your sliders from great to unforgettable, here are a few expert tips and small upgrades that make a big difference. Whether you’re a first-time cook or a seasoned kitchen pro, these insights will help you get the most out of this recipe.
Use Rotisserie Chicken for Convenience
One of the easiest ways to speed up prep time is to use a store-bought rotisserie chicken. It’s already seasoned, tender, and easy to shred or chop. Plus, it adds great flavor to the filling without any extra effort.
Shred Cheese Fresh for Best Melt
Pre-shredded cheese is convenient, but it often contains anti-caking agents that can affect how it melts. For ultra-gooey sliders, buy a block of sharp cheddar and shred it yourself. It’ll melt more smoothly and create a silkier texture in the filling.
Toast the Bottoms of the Rolls
If you like a little extra texture contrast, try toasting just the bottom halves of the rolls in the oven for a few minutes before adding the filling. This helps them hold up better under the creamy mixture and adds a subtle crunch that really enhances the eating experience.
Add Heat with Jalapeños or Hot Sauce
If you enjoy a little spice, finely dice some fresh jalapeños and mix them into the filling. You can also stir in a splash of hot sauce or a pinch of crushed red pepper flakes to the cream cheese mixture. The contrast of spicy heat with the creamy, cheesy filling is absolutely irresistible.
Keep Rolls Connected When Slicing
Instead of slicing each roll individually before baking, keep the rolls connected and slice them as a group once they’ve been baked and cooled for a few minutes. This not only makes assembly easier but also keeps the sliders more uniform in size and appearance.
These tips are all about refining the process to suit your preferences while also ensuring a smooth cooking experience. The best part? You’ll start to develop your own favorite tweaks over time—and that’s when a recipe truly becomes yours.
Frequently Asked Questions (FAQs)
If you’re planning to make these sliders for the first time, chances are you have a few questions. Here are some of the most common ones people ask—and the answers that will help you get the best results possible.
Can I make these sliders ahead of time?
Yes, absolutely. You can assemble the sliders ahead of time (up to the point before baking), cover the tray tightly with foil or plastic wrap, and refrigerate for up to 24 hours. When you’re ready to bake, let them sit at room temperature for about 15 minutes before popping them in the oven.
Can I use other types of meat?
Definitely. While chicken is classic here, cooked turkey or even shredded beef can work really well. Just make sure whatever meat you use is fully cooked and well shredded or chopped to blend nicely with the creamy filling.
Is there a vegetarian version?
Yes. For a meatless option, you can use sautéed mushrooms, cooked lentils, or even chickpeas in place of the chicken. Add extra cheese or swap in a vegetarian ranch mix to keep it flavorful.
Can I use homemade ranch seasoning?
Of course. If you prefer to skip store-bought packets, you can make your own ranch mix using a combination of dried dill, parsley, garlic powder, onion powder, salt, and pepper. This gives you more control over sodium and flavor balance.
How can I make this Creamy Chicken Sliders recipe gluten-free?
To make it gluten-free, use gluten-free rolls or bread and ensure that your ranch mix and other ingredients are certified gluten-free. There are many great gluten-free roll options available that will work just as well.
How long do leftovers last?
Leftovers will keep in the refrigerator for up to 3 days. Just be sure to store them in an airtight container or tightly wrapped in foil to maintain freshness and prevent sogginess.
What’s the best way to reheat sliders?
For the best texture, reheat them in the oven at 350°F for 10–15 minutes. This keeps the rolls crisp and the filling warm without turning everything mushy. Microwaving works in a pinch but may soften the bread too much.
Can I freeze unbaked Creamy Chicken Sliders?
Yes, you can assemble the sliders, wrap them tightly in foil, and freeze them before baking. When ready to use, let them thaw overnight in the fridge, then bake as directed. Add the butter topping right before baking for best results.
Can I double the Creamy Chicken Sliders recipe?
Absolutely. This recipe scales up easily. Just double all the ingredients and use a larger baking dish or two smaller ones. The cooking time remains about the same—just make sure everything is heated through.
What if I don’t have Hawaiian rolls?
While Hawaiian rolls bring a touch of sweetness that pairs beautifully with the savory filling, you can use any soft dinner rolls or slider buns. Brioche buns or potato rolls also work well and provide great texture.
These answers should help you feel confident going into the kitchen. And if you ever have your own questions as you go, just know that this recipe is flexible and forgiving—perfect for experimenting and adjusting to your needs.
Conclusion & Call to Action
There’s something so satisfying about a recipe that delivers big comfort with minimal effort. These creamy chicken bacon ranch sliders check every single box—easy, cheesy, flavorful, and crowd-approved. Whether you’re serving them at a weekend get-together, packing them up for a potluck, or simply making a cozy family dinner, these sliders always hit the mark.
From the first bite, you’ll taste the perfect balance of creamy ranch-spiced chicken, crispy turkey bacon, and melty cheddar cheese—all tucked into warm, pillowy Hawaiian rolls with a golden garlic-Parmesan crust. It’s the kind of food that makes people pause mid-bite and say, “Wow.” And let’s be honest, we all need more of those moments around the dinner table.
What’s even better is how versatile and forgiving this recipe is. You can tweak it to match your tastes, swap in ingredients you have on hand, or prep it ahead for a stress-free hosting experience. It’s one of those rare dishes that’s just as satisfying on a weeknight as it is at a celebration.
So here’s your invitation to give them a try. Head to your kitchen, gather your ingredients, and whip up a batch. I promise—they’ll earn a spot in your regular rotation in no time. And when you do make them, I’d love to hear how it goes. Leave a comment, share your favorite variations, or tag your creations on social media so I can see the cheesy deliciousness you’ve created.
Happy cooking—and even happier eating!
Print
Creamy Chicken Sliders with Bacon Ranch – Easy Party Appetizer
- Total Time: 40 minutes
- Yield: 12 sliders 1x
- Diet: Halal
Description
These Creamy Chicken Bacon Ranch Sliders are the ultimate comfort food—packed with cheesy goodness, crispy turkey bacon, ranch-seasoned chicken, and topped with buttery garlic-Parmesan rolls. They’re easy to make, full of flavor, and perfect for parties, potlucks, or cozy weeknight dinners.
Ingredients
-
For the filling:
-
6 slices turkey bacon, cooked and chopped
-
8 oz cream cheese, softened
-
¼ cup chicken broth
-
1 oz ranch dressing mix (1 packet)
-
2 cups cooked chicken, chopped or shredded
-
1½ cups shredded cheddar cheese, divided
-
¼ cup green onions, thinly sliced
For the sliders:
-
12 Hawaiian rolls
-
2 tbsp butter, melted
-
½ tsp garlic, minced
-
1 tsp grated Parmesan cheese
-
1 tbsp chives, thinly sliced
-
Instructions
-
Preheat oven to 425°F. Line a baking sheet with foil and cook turkey bacon for 15–20 minutes. Let cool and chop. Reduce oven to 350°F.
-
In a pot over medium heat, combine cream cheese, broth, and ranch mix. Stir until smooth. Add chopped bacon, chicken, ½ cup cheddar, and green onions. Mix well.
-
Slice rolls in half horizontally without separating. Place bottom halves in a baking dish.
-
Spread chicken mixture evenly on the rolls. Top with remaining cheddar and the top halves of the rolls.
-
Mix butter and garlic. Brush over tops. Sprinkle with Parmesan and chives.
-
Bake for 8–10 minutes or until golden and melty. Let cool 5 minutes, slice, and serve.
Notes
-
Use rotisserie chicken for easy prep.
-
Substitute low-fat cream cheese or Greek yogurt for a lighter option.
-
Toast roll bottoms before assembly for extra texture.
- Prep Time: 20 minutes
- Cook Time: 20 minutes
- Category: Appetizer / Main Dish
- Method: Baking
- Cuisine: American