
There’s something undeniably comforting about sticky honey garlic chicken. It’s the kind of meal that makes you close your eyes after the first bite and savor every sweet, savory, slightly tangy moment. Whether you’re a seasoned home cook or just beginning to find your way around the kitchen, this recipe is one of those go-to dishes that always delivers big flavor with surprisingly simple steps. It’s the kind of recipe that feels like takeout but tastes even better because it’s homemade—and healthier too.
This sticky honey garlic chicken has been a repeat performer in my household for years. It started as a Sunday meal experiment after a craving for something rich and sticky but not too heavy. I remember flipping through a handful of recipes online, all promising that “perfect balance,” but none quite hit the spot. So I started playing with what I had—some honey, soy sauce, ketchup, garlic, and a bit of sesame oil. The result? A sticky, golden-brown sauce that clings lovingly to tender, flash-fried chicken pieces. It was an instant win.
Over time, this dish has turned into a family favorite. My kids practically cheer when they smell it in the oven, and it’s been my go-to for casual dinner parties where I need something that feels impressive but doesn’t require hours in the kitchen. It also holds a special place in my heart because it’s so versatile. Serve it with fluffy white rice for that classic comfort food feel, or swap in quinoa or noodles when you want to change things up.
Most importantly, it’s one of those recipes that builds confidence in the kitchen. If you’ve ever felt intimidated by frying chicken or worried about sauces coming out too runny or too thick, this recipe guides you through every step with ease. It’s forgiving, reliable, and endlessly satisfying. You’ll learn a few great techniques along the way—like flash frying and oven-baking with sauce—which open the door to dozens of other dishes.
So if you’re ready to impress your family, wow your dinner guests, or just treat yourself to something incredibly delicious, you’re in the right place. Let’s get started on this sweet and savory sticky honey garlic chicken—because once you try it, there’s no going back.
Why You’ll Love This Recipe
There are so many reasons why this sticky honey garlic chicken will win your heart, starting with how incredibly flavorful it is. The sauce is the star of the show—equal parts sweet, salty, tangy, and garlicky. With ingredients like honey, soy sauce, ketchup, brown sugar, and garlic, the flavor profile hits every note without being overwhelming. Each bite is coated in a glossy glaze that’s sticky in the best way possible.
Another reason you’ll love this recipe is how easy it is to prepare. Even though it looks and tastes like something you’d order from a trendy Asian-fusion restaurant, it’s totally doable in your own kitchen with pantry staples. The steps are straightforward, and you’ll find yourself confidently navigating the process—even if you’re not usually one for frying or baking proteins. Once you see how golden and crispy the chicken turns out after just a quick pan-fry, you’ll be hooked.
It’s also super customizable. Don’t eat rice? No problem—try it over cauliflower rice, noodles, or even tucked into lettuce wraps for a low-carb option. Want a bit more heat? Add a pinch of crushed red pepper to the sauce. Craving some crunch? Toss in steamed broccoli or toasted cashews at the end. The recipe is as flexible as you need it to be.
Moreover, this dish is family-friendly and a guaranteed crowd-pleaser. Kids love the sweetness of the sauce, and adults appreciate the balance of flavors. It’s also perfect for gatherings because you can easily double the batch and keep it warm in the oven without losing texture or flavor.
Finally, one of the best things about this recipe is that it offers that deeply satisfying comfort food experience without relying on heavy cream, butter, or overly processed ingredients. You control what goes into it, and that means you can make it as wholesome as you want. It’s the kind of dish that tastes indulgent, but you can feel good about serving it, too.
Whether you’re cooking for one or feeding a hungry crowd, sticky honey garlic chicken is one of those recipes you’ll find yourself coming back to again and again. It’s reliable, impressive, and downright delicious.
Health Benefits
While sticky honey garlic chicken is definitely a comfort food dish, it actually offers several health benefits, especially when you prepare it at home using fresh, whole ingredients. By skipping deep frying and avoiding overly processed sauces, you can enjoy a balanced, satisfying meal that’s packed with flavor and nutrients.
Let’s start with the protein—chicken breasts are a lean source of high-quality protein. Protein is essential for muscle repair, hormone production, and keeping you full and satisfied after meals. Chicken breast is naturally low in fat and, when cooked properly, stays juicy and tender. By cutting the chicken into bite-sized pieces and flash-frying instead of deep frying, you reduce the amount of oil absorbed while still achieving a golden, crispy texture.
Honey, while sweet, is a natural sweetener and contains trace amounts of antioxidants. In moderation, honey can help satisfy sugar cravings without relying on refined white sugar. Plus, it contributes a lovely richness and depth to the sauce that’s hard to replicate with any other ingredient.
Garlic is another powerhouse ingredient in this recipe. It’s not just here for flavor—garlic contains compounds like allicin, which have been linked to immune-boosting properties and cardiovascular health benefits. When combined with sesame oil and rice vinegar, both of which are used sparingly, you get a blend of healthy fats and beneficial plant compounds that support digestion and heart health.
Soy sauce does contribute sodium, so it’s important to balance that out by using a low-sodium version if you’re watching your salt intake. Still, soy sauce adds umami—the deep savory taste that makes food incredibly satisfying. Pairing the chicken with fiber-rich sides like brown rice, quinoa, or vegetables helps balance the meal, slow digestion, and keep blood sugar levels stable.
Even the method of cooking adds to the health profile of this dish. Instead of frying the chicken until fully cooked, you’re just browning it to lock in moisture and then baking it with the sauce. Baking allows the flavors to meld while keeping the fat content lower than traditional frying methods.
So, while this dish tastes indulgent and restaurant-worthy, it’s actually a smart way to enjoy something delicious without compromising your health goals. Pair it with veggies or whole grains, and you’ve got a meal that’s not only comforting but nourishing too.
Preparation Time, Servings, and Nutritional Information
Understanding how much time a recipe takes and what kind of yield you can expect is key to planning your meals, especially on busy weeknights or when entertaining. The good news? Sticky honey garlic chicken is incredibly efficient and easy to fit into your routine.
Let’s break it down:
Total Preparation Time
- Prep Time: 20 minutes
- Flash Frying Time: 10 minutes
- Bake Time: 45 minutes
- Total Time: 1 hour and 15 minutes
Although the total time stretches past an hour, most of it is hands-off. After the quick pan-fry and sauce prep, you simply pop everything into the oven and give it a stir every 15 minutes.
Servings
This recipe makes enough to serve 4 generous portions, but it can easily be doubled if you’re feeding a larger crowd or planning for leftovers. Because it reheats so well, it’s perfect for meal prepping lunches for the next few days.
Nutritional Information (per serving):
- Calories: 490
- Protein: 36g
- Carbohydrates: 42g
- Sugar: 23g
- Fat: 18g
- Fiber: 1g
- Sodium: 780mg
These numbers are estimates and can vary depending on the specific ingredients used (for example, if you choose low-sodium soy sauce or substitute brown rice vinegar). While this dish does contain sugar from the honey and brown sugar, the high protein content and moderate fat help balance out the glycemic impact. Pairing it with a whole grain like brown rice or quinoa further supports blood sugar control and satiety.
Overall, this meal is hearty, satisfying, and relatively balanced, making it a smart choice when you’re craving something sweet and savory without reaching for takeout. And now that we’ve got the basics covered, let’s dive into what you’ll need to make it.
Ingredients List
Here’s everything you’ll need to bring this sticky honey garlic chicken to life. Each ingredient plays a key role in building that perfect sweet-salty-garlicky flavor profile, so don’t skip any unless absolutely necessary. You probably have most of these in your pantry already.
For the Chicken:
- 4 boneless, skinless chicken breasts, cut into bite-sized pieces
This is your main protein. Chicken breast is lean, tender, and soaks up the sauce beautifully. - Salt and pepper, to taste
Essential for seasoning the chicken before it gets coated. Don’t skip this step—it brings the chicken to life. - 1 cup cornstarch
Cornstarch is what gives the chicken its crispy outer coating. It creates a light crust when flash-fried, which helps the sauce stick better later. - 3 large eggs, lightly beaten
The eggs help the cornstarch adhere to the chicken and provide a soft, fluffy barrier between the meat and the hot oil. - 1/4 cup canola oil
Used for flash frying. Canola oil has a high smoke point and neutral flavor, making it ideal for this purpose.
For the Sauce:
- 3/4 cup honey
Adds that beautiful sweetness and makes the sauce gloriously sticky. - 3/4 cup soy sauce
Provides the salty, umami base. You can opt for a low-sodium version to reduce salt content. - 1/2 cup ketchup
Balances the sweetness with tang and a little acidity. - 1/2 cup brown sugar
Enhances the caramel notes in the sauce and gives a deeper sweetness than white sugar. - 1/2 cup rice wine vinegar (or substitute apple cider vinegar)
Cuts through the richness with just the right amount of acidity. - 1 tsp sesame oil
Adds a nutty, toasty finish. A little goes a long way, so don’t overdo it. - 1 tsp minced garlic
Brings sharpness and depth. Feel free to add more if you’re a garlic lover. - 1 tbsp cornstarch
Helps thicken the sauce as it bakes. Make sure to dissolve it completely in the sauce mixture before pouring it over the chicken. - Sesame seeds (optional, for garnish)
They add a subtle crunch and a beautiful finishing touch.
Before you start cooking, take a few minutes to gather and prep everything. Having your ingredients ready to go will make the cooking process smoother and more enjoyable. Now that you know what you need, let’s move on to the fun part—making it.
Step-By-Step Cooking Instructions
Making sticky honey garlic chicken is easier than you think, and the process is super satisfying. From prepping the chicken to mixing the glossy sauce and baking it all together until perfectly sticky, each step builds toward that delicious final bite. Let’s walk through it together with plenty of helpful tips along the way to ensure success—even if it’s your first time trying a dish like this.
Step 1: Preheat Your Oven
Set your oven to 325°F (163°C). It’s important to start with this step so your oven is ready by the time the chicken is prepped and flash-fried. This moderate temperature allows the chicken to finish cooking gently while the sauce thickens and caramelizes beautifully.
Step 2: Prepare the Chicken
First, take your 4 chicken breasts and cut them into bite-sized pieces, about 1 to 1½ inches in size. Try to keep them fairly uniform so they cook evenly.
Place the chicken pieces into a large mixing bowl and season generously with salt and pepper. Toss well so every piece is coated with a little seasoning.
Next, set up your breading station:
- In one shallow bowl, pour in 1 cup of cornstarch.
- In another bowl, lightly beat 3 large eggs.
Now comes the coating process. One by one, dip each piece of chicken into the cornstarch first, then into the egg mixture. For an extra crispy coating, you can go back into the cornstarch after the egg, but this is totally optional.
Lay the coated pieces on a plate or tray while you heat your oil.
Step 3: Flash Fry the Chicken
In a large skillet or wok, heat 1/4 cup of canola oil over medium-high heat. You don’t need to deep fry the chicken—just a shallow fry to give it a golden crust. Once the oil is hot (test it by dropping a tiny piece of chicken in—it should sizzle right away), add the chicken in batches. Don’t overcrowd the pan; you want the pieces to brown, not steam.
Flash fry each batch for about 2–3 minutes per side, until lightly golden but not cooked through. The goal here is just to set the crust. The chicken will finish cooking in the oven. As each batch is done, transfer the pieces to a greased 9×13-inch baking dish, spreading them out evenly.
Step 4: Make the Sauce
While your chicken is flash frying or cooling slightly in the dish, mix together the sauce.
In a medium-sized mixing bowl, combine the following:
- 3/4 cup honey
- 3/4 cup soy sauce
- 1/2 cup ketchup
- 1/2 cup brown sugar
- 1/2 cup rice wine vinegar (or apple cider vinegar)
- 1 tsp sesame oil
- 1 tsp minced garlic
- 1 tbsp cornstarch
Whisk everything together until the cornstarch is fully dissolved and the mixture looks smooth. This sauce will thicken and become sticky as it bakes.
Step 5: Pour Sauce Over Chicken
Once all your chicken is in the baking dish, slowly pour the prepared sauce over the top. Use a spoon to ensure the sauce is distributed evenly and all the pieces are coated. It may look like a lot of sauce at first, but don’t worry—it reduces and thickens beautifully in the oven.
Step 6: Bake the Chicken
Place the baking dish in your preheated oven and set a timer for 45 minutes. Every 15 minutes, take the dish out and gently stir or flip the chicken pieces. This helps the sauce coat every piece evenly and ensures the edges don’t burn while the middle stays too soft. You’ll start to see the sauce thicken and cling to the chicken beautifully.
As the baking time finishes, you’ll notice the color deepen into that signature sticky, caramelized hue. It should smell absolutely mouthwatering—sweet, garlicky, and a little tangy.
Step 7: Garnish and Serve
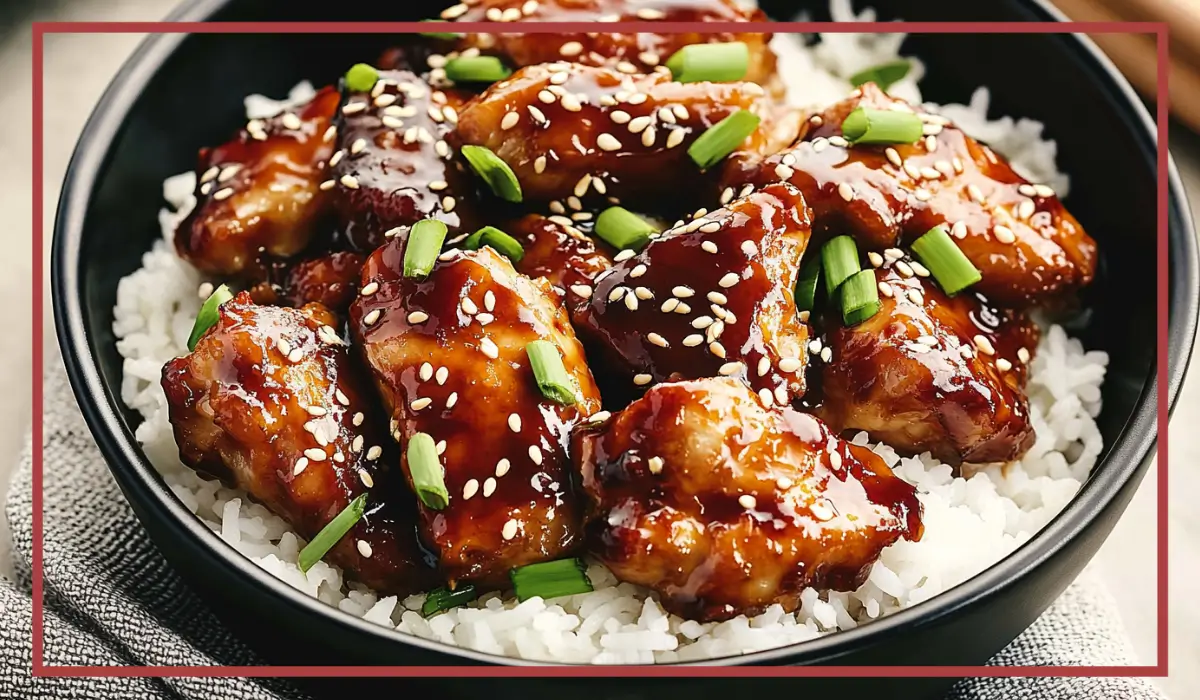
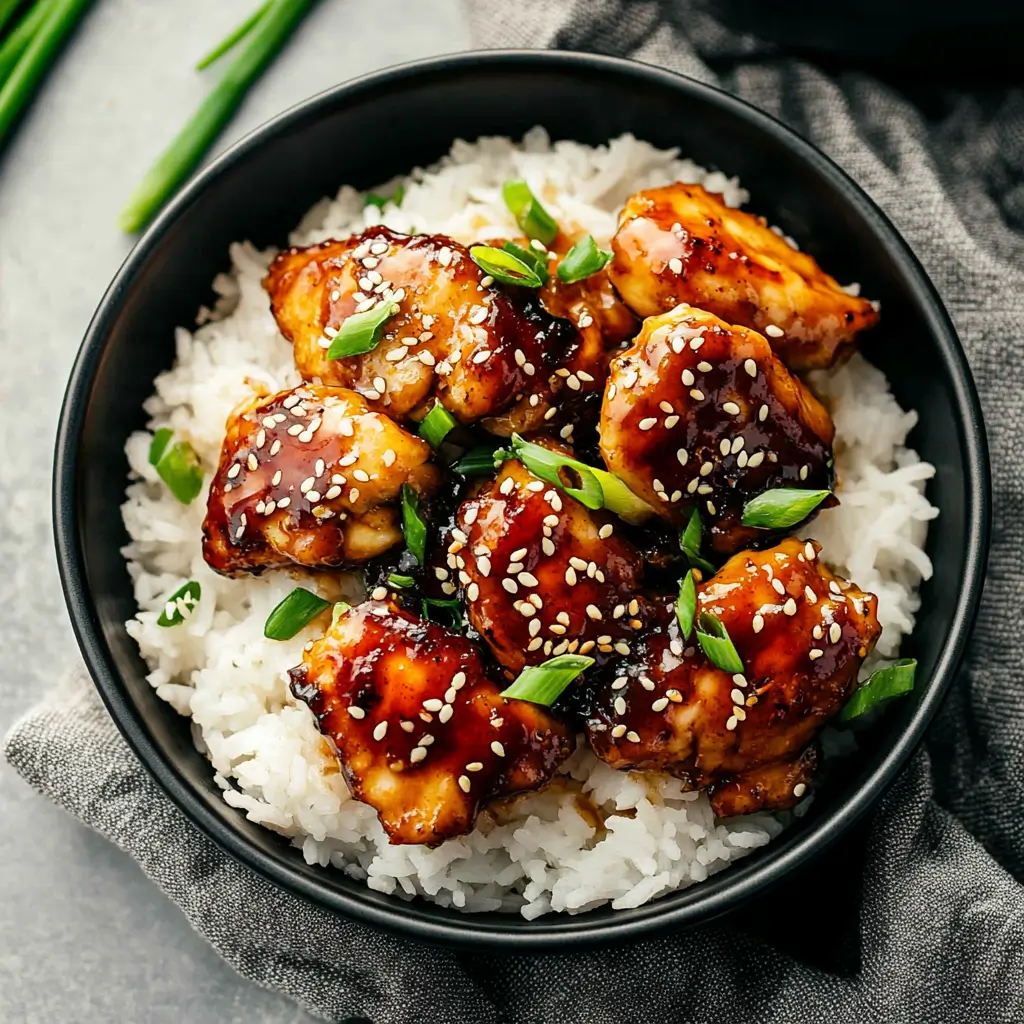
Once the chicken is done baking, remove it from the oven and give it one final stir to coat everything in that thickened sauce. Sprinkle with toasted sesame seeds for a bit of crunch and a pretty finishing touch.
Now it’s ready to serve. But before we get into plating ideas and pairing options, take a moment to admire your handiwork. Sticky honey garlic chicken has a glossy, irresistible finish that looks just as good as it tastes. And if you’ve followed the steps above, your kitchen should smell amazing.
Let’s talk about how to serve this sticky, saucy masterpiece.
How to Serve
Sticky honey garlic chicken is a wonderfully versatile dish, and there are so many ways to serve it depending on your mood, your guests, or what you have on hand in the pantry.
Serve Over Grains
One of the most classic ways to enjoy this dish is over a bed of steamed white rice. The fluffy rice soaks up the sweet and savory sauce, making every bite a perfect balance of texture and flavor. If you’re looking for a more nutritious option, try:
- Brown rice: Slightly nutty and more filling due to its fiber content.
- Quinoa: A great gluten-free option with extra protein.
- Jasmine or Basmati rice: Light, fragrant varieties that pair beautifully with the sauce.
Pair with Noodles
For something a bit more indulgent or fun, serve the chicken over lo mein-style noodles, udon, or even spaghetti. Toss the noodles with a little sesame oil and scallions for an easy upgrade.
Create a Bowl Meal
Turn it into a full meal bowl by layering:
- A base of grains
- Roasted or steamed vegetables like broccoli, carrots, snap peas, or bok choy
- Sliced avocado or cucumber for freshness
- A sprinkle of sesame seeds and chopped green onions for garnish
Stuff into Lettuce Wraps
For a lighter take, serve the chicken in butter lettuce cups with thinly sliced carrots, cucumbers, and a drizzle of extra sauce. This is great for parties or when you want something handheld and refreshing.
Make It a Sandwich
If you have leftover sticky chicken, pile it onto a soft bun with pickled vegetables and fresh herbs for a quick and flavorful sandwich. Think of it as an Asian-style sloppy joe—sweet, sticky, and packed with flavor.
No matter how you serve it, one thing is guaranteed: this dish brings the kind of flavor that sticks in your memory long after the last bite.
Pairing Suggestions
Sticky honey garlic chicken brings bold flavors to the table, so it’s important to pair it with side dishes and beverages that complement the sweetness and richness without overwhelming the palate.
Perfect Side Dishes
- Steamed or Roasted Vegetables: Try broccoli, bok choy, snow peas, or carrots. Their mild flavor and crunch are the perfect counterbalance to the sticky sauce.
- Simple Arugula Salad: Toss arugula with a light lemon vinaigrette to add some bitterness and freshness.
- Cucumber Salad: A chilled cucumber salad with rice vinegar and sesame seeds adds a crisp, cooling contrast.
- Garlic Fried Rice: Amp up your rice with garlic, peas, and a little sesame oil for extra flavor.
Best Bread Options
If you’re serving guests or want something extra to soak up the sauce:
- Soft dinner rolls
- Naan or flatbread
- Scallion pancakes for a more traditional twist
Beverage Pairings
Since this recipe is meant to be halal-friendly, here are non-alcoholic beverage options that go beautifully with the dish:
- Sparkling water with lime or cucumber
- Ginger beer or ginger ale: The spice in ginger cuts through the sweetness of the sauce.
- Cold green tea: A refreshing and slightly astringent drink that resets your palate.
- Lemonade with mint: Bright and citrusy, this drink pairs especially well with the sweet elements of the sauce.
Whether you’re preparing this dish for a family dinner or a casual gathering with friends, these pairings will round out your meal beautifully and leave everyone satisfied.
Now that we’ve explored how to serve and pair your sticky chicken, let’s talk about how to store it, reheat it, and even freeze it for later. This dish is just as good the next day—and we’re going to show you how to keep it that way.
Storage, Freezing & Reheating Instructions
One of the best parts about this sticky honey garlic chicken recipe is that it keeps and reheats beautifully. That makes it perfect for meal prepping, planning ahead for busy weeknights, or simply enjoying the leftovers without sacrificing texture or flavor. With just a little know-how, your chicken can taste just as amazing on day two—or even day ten—if frozen properly.
How to Store in the Fridge
Once the chicken has cooled to room temperature, transfer it into an airtight container. You can store it as a complete dish, with sauce and all, or separate the sauce if you prefer to reheat it separately.
- Refrigeration Time: Up to 3 days
- Storage Tip: Try to press out as much air as possible if using a zip-top bag, or use a container with a tight-fitting lid to keep the chicken from drying out.
Reheating Instructions
To reheat without drying out or losing the stickiness of that lovely sauce, you’ll want to choose the method that works best for you:
- Oven (Best for Crispiness):
Preheat your oven to 350°F (175°C). Place the chicken in an oven-safe dish and cover loosely with foil. Bake for 15–20 minutes, stirring once halfway through. If you want to restore a bit of that crisp edge, remove the foil for the last 5 minutes of baking. - Stovetop (Quick and Easy):
Add a splash of water or chicken broth to a skillet, then toss in the chicken and sauce. Heat over medium-low, stirring frequently until warmed through. The sauce will loosen slightly and coat the chicken beautifully again. - Microwave (Convenient):
Place the chicken in a microwave-safe dish and cover with a microwave-safe lid or damp paper towel. Heat in 30–45 second intervals, stirring in between, until hot. Be careful not to overheat or the sauce can separate.
Freezing Instructions
This dish freezes very well, especially if you store it properly. Freezing allows you to make a double batch in advance and have a quick homemade dinner ready whenever you need it.
- Freezing Cooked Chicken:
Place fully cooked and cooled chicken (with sauce) on a baking sheet lined with parchment paper and freeze until solid—about 2–3 hours. Then transfer to a freezer-safe bag or container. - Freezer Storage Time: Up to 3 months
- Thawing & Reheating Frozen Chicken:
Thaw in the refrigerator overnight. Reheat using the oven or stovetop methods above for best results. - Freezing Uncooked Chicken:
You can also freeze the raw, coated chicken pieces (after dipping in egg and cornstarch) before flash frying. Lay them out on a tray, freeze until solid, then store in a freezer-safe bag. When you’re ready to cook, thaw them in the fridge and proceed with frying and baking as directed.
By following these storage and reheating tips, you can keep the deliciousness going long after the first night. Whether you’re making a big batch on purpose or simply lucky enough to have leftovers, this sticky honey garlic chicken holds up like a champ.
Now let’s move on to some of the common pitfalls people run into when making this dish—and how you can avoid them for perfect results every time.
Common Mistakes to Avoid
Even the most straightforward recipes have a few tricky spots that can trip you up, especially the first time around. Sticky honey garlic chicken is pretty forgiving, but here are some common mistakes and how to avoid them so you get restaurant-quality results on your first try.
1. Overcrowding the Pan During Flash Frying
When you add too many chicken pieces to the pan at once, the temperature of the oil drops significantly. Instead of browning, the chicken steams, and you lose that beautiful crispy texture.
Solution: Fry the chicken in small batches. It might take a little longer, but it’s worth it for that golden crust.
2. Not Stirring the Chicken During Baking
Since the sauce is thick and sticky, it can easily cling to certain areas more than others or even burn in places if left untouched.
Solution: Set a timer and stir every 15 minutes while baking. This helps coat each piece evenly and prevents caramelized bits from sticking to the edges.
3. Forgetting to Dissolve the Cornstarch in the Sauce
If you don’t fully whisk the cornstarch into the sauce mixture before pouring it over the chicken, you could end up with clumps.
Solution: Use a whisk to thoroughly combine all the sauce ingredients before adding them to the baking dish. You can even mix the cornstarch separately in a little water first to make a slurry if needed.
4. Using Too Much Oil
While the recipe calls for flash frying, this does not mean deep frying. Using too much oil can make the chicken greasy and overwhelm the delicate balance of flavors.
Solution: Stick to just 1/4 cup of oil and use a nonstick skillet or wok. You’re not trying to cook the chicken through at this stage—just give it some color and texture.
5. Skipping the Garnish
While optional, the sesame seeds add more than just looks. They offer a subtle crunch and nuttiness that complements the sauce perfectly.
Solution: Don’t skip the garnish. You can even toast your sesame seeds in a dry skillet for an extra pop of flavor.
6. Not Letting the Chicken Rest After Baking
If you serve the chicken straight from the oven, the sauce can still be very hot and runny.
Solution: Let the dish rest for 5 minutes out of the oven before serving. The sauce will thicken slightly and cling even better to the chicken pieces.
Avoiding these simple mistakes can make a world of difference in the final outcome of your dish. And once you’ve got these techniques down, you’re golden—literally and figuratively.
Now, let’s take things up a notch with some pro tips that can make your version of this recipe even more amazing.
Pro Tips
Sometimes, it’s the little things that turn a good dish into an unforgettable one. Here are a few pro tips that can help you take your sticky honey garlic chicken to the next level—whether you’re making it for the first time or the fiftieth.
1. Marinate for Even More Flavor
If you have a bit of extra time, season the chicken and let it sit in the fridge for 20–30 minutes before coating it. This gives the salt and pepper a chance to penetrate the meat and enhances the overall flavor.
2. Use Fresh Garlic
While pre-minced garlic works in a pinch, freshly minced garlic will give your sauce a sharper, more vibrant bite. You can even sauté it in the pan after frying the chicken if you want a deeper, roasted garlic flavor.
3. Toast Your Sesame Seeds
Take your garnish game up a notch by toasting the sesame seeds in a dry skillet over medium heat until golden brown. This brings out their nutty aroma and adds a little extra crunch.
4. Make It a Meal Prep Hero
This dish holds up beautifully in the fridge and freezer, so consider doubling the recipe. You can portion it into containers with rice and veggies for an entire week of flavorful lunches.
5. Broil for an Extra Caramelized Finish
If you want that restaurant-style glossy char, place the baking dish under the broiler for 2–3 minutes at the very end. Keep a close eye to prevent burning, but this step can add incredible depth and a sticky, slightly crisp finish.
6. Add Heat If You Love Spice
For a spicy twist, stir 1/2 teaspoon of crushed red pepper flakes or a splash of hot chili oil into the sauce. You’ll still get the signature sweet stickiness with a slow-building heat that lingers in the best way.
7. Don’t Skip the Stirring While Baking
Yes, it’s tempting to set it and forget it, but stirring every 15 minutes is key to achieving that thick, even coating and perfectly tender chicken.
8. Serve Immediately for Best Texture
While leftovers are great, nothing beats this dish straight out of the oven when the sauce is at peak stickiness and the chicken still has that crisp edge.
Implementing these pro tips doesn’t require any special tools or ingredients—just a little extra attention to detail. Each tweak helps you build flavor, improve texture, and give your sticky chicken that signature homemade touch that everyone will rave about.
Next up, let’s tackle some of the most frequently asked questions so you feel totally confident before diving into this recipe.
Frequently Asked Questions (FAQs)
Even with a simple and delicious recipe like sticky honey garlic chicken, it’s totally normal to have a few questions before getting started—or even after you’ve made it once or twice. Below are answers to the most common questions I’ve heard from readers and home cooks. Whether you’re wondering about substitutions, techniques, or prep tips, you’re covered.
Can I use chicken thighs instead of chicken breasts?
Absolutely. In fact, boneless, skinless chicken thighs are a fantastic alternative to chicken breasts in this recipe. They’re slightly fattier, which means they stay extra juicy and tender—even after baking. Just make sure to trim off any excess fat and cut them into bite-sized pieces, just like you would with the breasts.
What’s the best oil for flash frying?
I recommend canola oil because it has a neutral flavor and a high smoke point, making it ideal for quick, high-heat cooking. However, you can also use vegetable oil, sunflower oil, or peanut oil if you prefer. Avoid oils like olive oil, which have a lower smoke point and can burn quickly at frying temperatures.
Can I make this gluten-free?
Yes, you can! To make this recipe gluten-free, simply:
- Use gluten-free soy sauce or tamari.
- Double-check that your ketchup and vinegar are gluten-free.
- Replace regular cornstarch with a certified gluten-free version if you’re cooking for someone with Celiac disease.
Can I prepare the chicken in advance?
You can definitely get ahead of the game. Here are a few ways to prep in advance:
- Coat the chicken with cornstarch and egg and keep it in the fridge for up to 4 hours before flash frying.
- Flash fry the chicken and refrigerate it for up to 1 day before baking. Just pour the sauce over and bake when you’re ready to eat.
- Make the sauce ahead of time and store it in an airtight jar or container in the fridge for 3–5 days.
My sauce came out too runny. What did I do wrong?
A runny sauce usually means the cornstarch wasn’t fully dissolved or the sauce didn’t have enough time to thicken in the oven. Make sure you whisk the cornstarch thoroughly into the sauce before pouring it over the chicken. Also, be sure to stir the chicken every 15 minutes during baking. This helps distribute the sauce and encourages even thickening.
Can I make this dish in a slow cooker?
You can adapt this recipe for the slow cooker, but you’ll lose the crispy texture from the flash frying. If you’re okay with that tradeoff, here’s how:
- Add the raw, seasoned chicken to your slow cooker.
- Mix the sauce ingredients separately, then pour over the chicken.
- Cook on low for 4–5 hours or high for 2–3 hours, until the chicken is cooked through.
- For a thicker sauce, remove the lid during the last 30 minutes of cooking.
Is it possible to make this recipe spicy?
Yes, and it’s delicious that way. If you like a bit of a kick, try one or more of these:
- Add 1/2 teaspoon red pepper flakes to the sauce.
- Stir in 1 teaspoon of hot chili paste like sambal oelek.
- Finish with a drizzle of chili oil just before serving.
Can I use pre-cooked or leftover chicken?
This dish is really designed to be made with raw chicken that gets flash-fried for texture. However, if you have leftover cooked chicken, you can still enjoy the sauce. Just warm the chicken gently in the sauce on the stovetop, allowing it to simmer for about 10–15 minutes so the flavors can meld.
How do I keep the coating from falling off during frying?
This can happen if the oil isn’t hot enough or the chicken is too wet. To prevent this:
- Pat your chicken dry with paper towels before coating.
- Make sure your oil is hot (a drop of water should sizzle when it hits the pan).
- Don’t move the chicken too much once it’s in the pan—let it sit until it forms a crust, then turn it.
Can I double the recipe?
Yes! This recipe doubles easily. Just make sure to use a larger baking dish or two smaller ones so the chicken isn’t overcrowded. If you’re doubling, you may want to bake for a few extra minutes and stir more frequently to ensure even cooking.
Hopefully, these answers clear up any questions you have. Still unsure about something? Leave a comment or reach out—I love helping fellow home cooks feel confident in the kitchen.
Now that you’ve got all the tools, tips, and confidence you need, let’s wrap things up with one last boost of encouragement—and a reminder of just how satisfying this dish is to make and share.
Conclusion & Call to Action
Sticky honey garlic chicken isn’t just a meal—it’s an experience. From that first moment the sauce hits the pan and the sweet, garlicky aroma fills your kitchen, to the satisfying final stir as the chicken emerges from the oven thickly glazed and golden, this dish is pure comfort in every sense. It’s the kind of recipe that makes you want to gather your favorite people around the table, pass a bowl of steaming rice, and just dig in.
What makes this dish so special is that it delivers on every level. It’s easy enough for a beginner but impressive enough to serve guests. The ingredients are familiar, the steps are manageable, and the end result is better than takeout. You get all the flavor without the fuss—and that’s something worth celebrating.
I hope this recipe becomes a regular in your rotation, just like it has in mine. Maybe you’ll tweak it to your tastes—make it a little spicier, add broccoli or bell peppers, or turn it into a rice bowl masterpiece. That’s the beauty of cooking at home: you get to make it your own.
If you give this sticky honey garlic chicken a try, I’d love to hear how it goes. Did your kids devour it? Did it become your new go-to for Sunday dinners? Share your version in the comments below, or better yet, tag me on social media with your photos—I love seeing your creations and hearing how recipes come to life in real kitchens.
Now, what are you waiting for? Grab your chicken, whisk up that sauce, and get ready for one of the tastiest, most rewarding dinners you’ll make all year. You’ve got this.
And remember—sometimes the best meals come from simple ingredients, a bit of patience, and a whole lot of love. Happy cooking!
Print
Sticky Honey Garlic Chicken – Easy Sweet and Savory Dinner
- Total Time: 1 hour 15 minutes
- Yield: 4 servings 1x
- Diet: Halal
Description
This Sticky Honey Garlic Chicken is a mouthwatering, better-than-takeout meal made with crispy chicken bites baked in a glossy, sweet-savory sauce. Perfect for weeknights, family dinners, or meal prep. Simple ingredients, big flavor.
Ingredients
-
4 chicken breasts, cut into bite-sized pieces
-
Salt and pepper, to taste
-
1 cup cornstarch
-
3 large eggs, lightly beaten
-
1/4 cup canola oil (for flash frying)
-
3/4 cup honey
-
3/4 cup soy sauce
-
1/2 cup ketchup
-
1/2 cup brown sugar
-
1/2 cup rice wine vinegar (or apple cider vinegar)
-
1 tsp sesame oil
-
1 tsp minced garlic
-
1 tbsp cornstarch
-
Sesame seeds for garnish
Instructions
-
Preheat oven to 325°F (163°C).
-
Season chicken with salt and pepper.
-
Dip chicken in cornstarch, then beaten egg.
-
Flash fry in canola oil until lightly browned.
-
Place in a greased 9×13″ baking dish.
-
In a bowl, mix honey, soy sauce, ketchup, brown sugar, vinegar, sesame oil, garlic, and cornstarch.
-
Pour sauce over chicken and stir to coat.
-
Bake for 45 minutes, stirring every 15 minutes.
-
Garnish with sesame seeds. Serve hot.
Notes
-
You can substitute chicken thighs for chicken breasts.
-
Low-sodium soy sauce works great.
-
Add chili flakes if you prefer a spicy kick.
-
Pairs well with rice, noodles, or steamed vegetables.
-
Make it gluten-free by using tamari and gluten-free cornstarch.
- Prep Time: 20 minutes
- Cook Time: 55 minutes
- Category: Main Course
- Method: Baking
- Cuisine: Asian-Inspired