
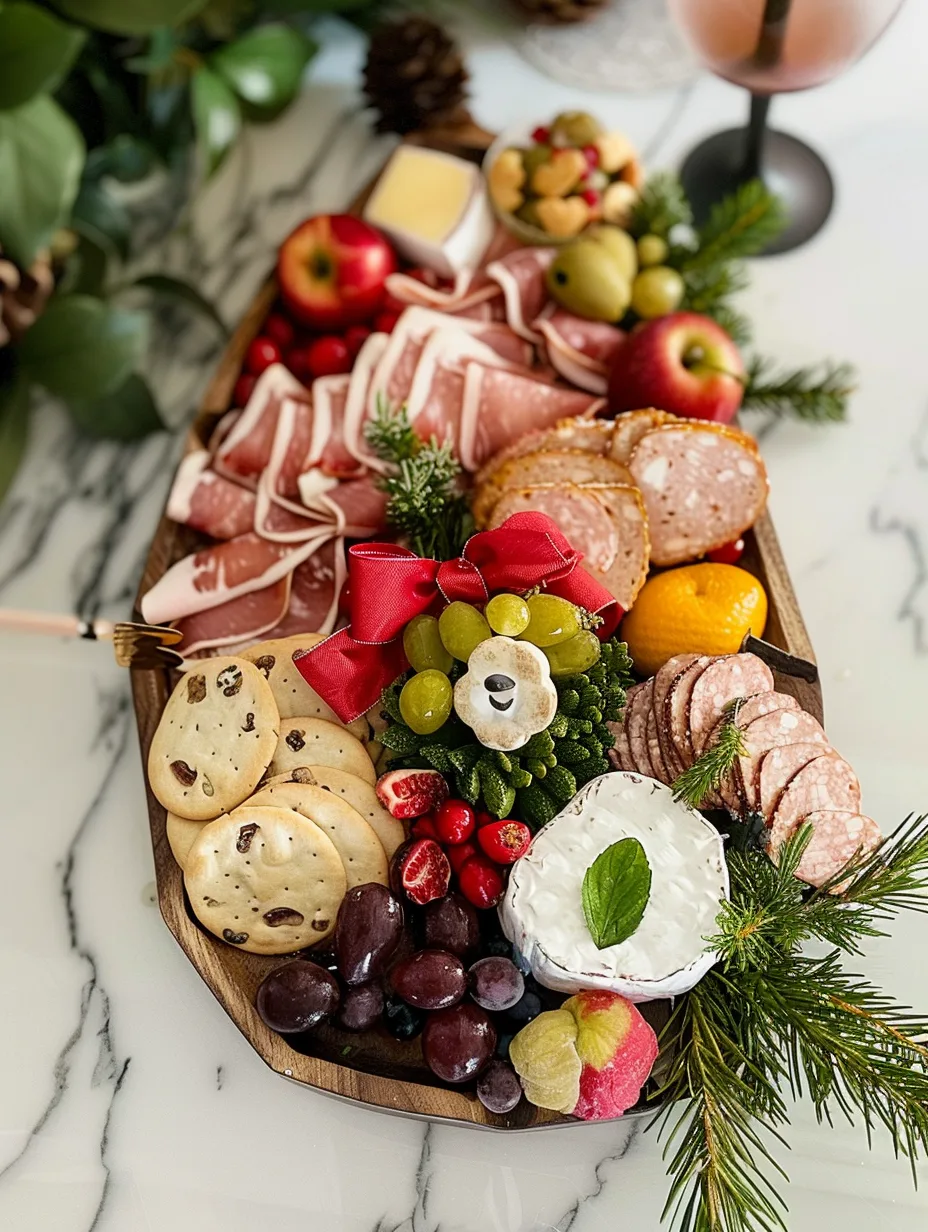
Santa Charcuterie Board is a delightful way to celebrate the holiday season with friends and family. This festive spread transforms your typical charcuterie into a whimsical holiday display that will impress your guests and bring joy to your gatherings. Imagine a vibrant assortment of meats, cheeses, fruits, and nuts artfully arranged to resemble Santa Claus himself. Not only is it visually stunning, but it also offers a variety of flavors and textures that cater to every palate.
Creating a Santa Charcuterie Board is more than just assembling food; it’s about crafting a memorable experience. Whether you’re hosting a holiday party, a cozy family gathering, or simply looking to indulge yourself, this festive board will elevate your occasion. The combination of savory meats and sweet treats creates a balanced offering that encourages sharing and mingling, making it the perfect appetizer or snack.
If you’re looking to impress your guests this holiday season, you’re in the right place. This guide will walk you through everything you need to know about making a Santa Charcuterie Board that is both amazing and easy to prepare. From the ingredients you’ll need to the step-by-step instructions, you’ll have all the information necessary to create this incredible centerpiece for your holiday celebrations.
Why You’ll Love This Recipe
You’ll absolutely adore the Santa Charcuterie Board for several reasons. Here are a few highlights:
1. Festive Presentation – The board’s design captures the spirit of Christmas, making it a hit at any holiday gathering.
2. Customizable – You can tailor the ingredients to suit your guests’ tastes, dietary restrictions, or preferences.
3. Easy to Assemble – With just a bit of creativity, you can put together a stunning board in no time.
4. Perfect for Sharing – This charcuterie board encourages interaction, making it a social experience for everyone involved.
5. Variety of Flavors – The combination of sweet and savory elements ensures there’s something for every palate.
6. Great for All Ages – Kids and adults alike will enjoy the playful presentation and delicious flavors.
These factors contribute to why the Santa Charcuterie Board has become a holiday favorite. Not only does it taste amazing, but it also creates a warm and inviting atmosphere for your celebrations.
Preparation and Cooking Time
Creating a Santa Charcuterie Board is quick and straightforward, requiring minimal cooking. Here’s a breakdown of the time involved:
– Preparation Time: 30 minutes
– Assembly Time: 15 minutes
Overall, you can expect the entire process to take about 45 minutes, making it an efficient yet impressive addition to your holiday festivities.
Ingredients
– 1 large round wooden board or platter
– 8 oz. of assorted cured meats (salami, prosciutto, and pepperoni)
– 8 oz. of assorted cheeses (brie, cheddar, and gouda)
– 1 cup of fresh strawberries (for Santa’s hat)
– 1 cup of red and green grapes
– 1 cup of mixed nuts (almonds, walnuts, and pecans)
– 1 cup of baby carrots (for the beard)
– ½ cup of cherry tomatoes (for the eyes)
– ½ cup of black olives (for the eyes)
– 1 small round cheese (for the nose)
– 1 jar of honey or fig jam (for dipping)
– Fresh rosemary sprigs (for decoration)
Step-by-Step Instructions
Creating your Santa Charcuterie Board involves several simple steps that will guide you through the process:
1. Choose Your Board: Select a large round wooden board or platter as your base. This will be the canvas for your Santa creation.
2. Arrange the Meats: Start by folding the cured meats into decorative shapes. Place them on one side of the board to form Santa’s body.
3. Add the Cheeses: Cut the cheeses into various shapes and sizes. Arrange them near the meats to create a pleasing contrast.
4. Create Santa’s Face:
– Use a small round cheese for Santa’s nose.
– Place cherry tomatoes above it for his eyes, using black olives for pupils.
5. Craft the Beard: Arrange baby carrots in a zigzag pattern around the nose to represent Santa’s beard.
6. Make Santa’s Hat: Position the fresh strawberries at the top to resemble Santa’s hat. Add a small piece of cheese or a grape at the tip for the pom-pom.
7. Fill in with Fruits and Nuts: Scatter grapes and mixed nuts around the board to fill any gaps and add more color.
Once everything is arranged, take a step back and admire your creation!
How to Serve
Serving your Santa Charcuterie Board can enhance the overall experience for your guests. Here are some tips to ensure a memorable presentation:
1. Presentation: Place the board at the center of the table for easy access. Consider using a festive tablecloth or decorations to enhance the holiday vibe.
2. Serving Utensils: Provide small forks or toothpicks for guests to easily pick their favorite items off the board.
3. Pairing Suggestions: Offer a selection of drinks like mulled wine, hot chocolate, or sparkling cider to complement the flavors.
4. Encourage Interaction: Invite guests to serve themselves and mingle around the board, fostering a warm, communal atmosphere.
5. Leftover Storage: If you have leftovers, store them in airtight containers in the fridge. The ingredients can be reused in salads or sandwiches.
With these serving suggestions, your Santa Charcuterie Board will be the highlight of your holiday gathering, bringing joy and deliciousness to all!
Additional Tips
– Use Fresh Ingredients: For the best flavor, ensure your fruits and vegetables are fresh. This enhances both taste and presentation.
– Arrange Strategically: Place larger items first, then fill in gaps with smaller items to create a visually appealing layout.
– Experiment with Textures: Mix soft cheeses with hard cheeses and crunchy nuts to create a delightful variety of textures on the board.
– Include a Dipping Sauce: A small bowl of honey or fig jam can add a delightful sweetness that pairs perfectly with the savory elements.
– Seasonal Touches: Incorporate seasonal items like cranberries or pomegranate seeds for an extra festive touch.
Recipe Variation
Feel free to explore different variations of your Santa Charcuterie Board! Here are some ideas:
1. Cheese Lover’s Delight: Add a wider variety of cheeses, such as goat cheese and blue cheese, for a more complex flavor profile.
2. Sweet and Savory Mix: Include chocolate-covered pretzels or festive cookies alongside the traditional elements for a sweet twist.
3. Vegetarian Option: Replace meats with additional cheeses, marinated artichokes, and roasted peppers for a hearty vegetarian board.
4. Spicy Kick: Incorporate spicy salami or pepper jack cheese to add a bit of heat to the board.
5. All Fruit Board: Create a sweet version using only fruits, cheeses, and a selection of spreads like honey or yogurt.
Freezing and Storage
– Storage: Leftover components should be stored in an airtight container in the refrigerator. Most ingredients will last 3-5 days.
– Freezing: While it’s not ideal to freeze a charcuterie board, you can freeze certain components. Meats can be frozen for up to 2 months. However, cheeses and fresh produce are best enjoyed fresh.
Special Equipment
No special equipment is required to create your Santa Charcuterie Board, but a few helpful tools include:
– A large round wooden board or platter for presentation.
– A sharp knife for cutting cheeses.
– Small bowls for dips or spreads.
– Toothpicks or small forks for serving.
Frequently Asked Questions
What if I can’t find some of the ingredients?
You can easily substitute items. Use different fruits, nuts, or cheeses based on availability and preference.
How do I make the board more interactive?
Encourage guests to create their own combinations by providing a variety of serving utensils and small plates.
Can I prepare the board in advance?
Yes, you can prepare most of the ingredients in advance. Assemble the board just before serving to keep everything fresh.
Is this Santa Charcuterie Board suitable for kids?
Absolutely! The fun and festive presentation, along with a variety of flavors, makes it appealing to both kids and adults.
How can I make the board more festive?
Consider adding holiday-themed decorations, such as small ornaments or festive napkins, to enhance the holiday spirit.
Conclusion
The Santa Charcuterie Board is a delightful and creative way to celebrate the holiday season. Its whimsical presentation and variety of flavors make it a crowd-pleaser at any gathering. By following the simple steps outlined in this guide, you can create an impressive centerpiece that will bring joy to your holiday festivities. With a little creativity and the right ingredients, your charcuterie board will be a memorable highlight of the season.

Santa Charcuterie Board: An Amazing Ultimate Guide with 7 Steps
- Total Time: 15 minutes
Ingredients
– 1 large round wooden board or platter
– 8 oz. of assorted cured meats (salami, prosciutto, and pepperoni)
– 8 oz. of assorted cheeses (brie, cheddar, and gouda)
– 1 cup of fresh strawberries (for Santa’s hat)
– 1 cup of red and green grapes
– 1 cup of mixed nuts (almonds, walnuts, and pecans)
– 1 cup of baby carrots (for the beard)
– ½ cup of cherry tomatoes (for the eyes)
– ½ cup of black olives (for the eyes)
– 1 small round cheese (for the nose)
– 1 jar of honey or fig jam (for dipping)
– Fresh rosemary sprigs (for decoration)
Instructions
Creating your Santa Charcuterie Board involves several simple steps that will guide you through the process:
1. Choose Your Board: Select a large round wooden board or platter as your base. This will be the canvas for your Santa creation.
2. Arrange the Meats: Start by folding the cured meats into decorative shapes. Place them on one side of the board to form Santa’s body.
3. Add the Cheeses: Cut the cheeses into various shapes and sizes. Arrange them near the meats to create a pleasing contrast.
4. Create Santa’s Face:
– Use a small round cheese for Santa’s nose.
– Place cherry tomatoes above it for his eyes, using black olives for pupils.
5. Craft the Beard: Arrange baby carrots in a zigzag pattern around the nose to represent Santa’s beard.
6. Make Santa’s Hat: Position the fresh strawberries at the top to resemble Santa’s hat. Add a small piece of cheese or a grape at the tip for the pom-pom.
7. Fill in with Fruits and Nuts: Scatter grapes and mixed nuts around the board to fill any gaps and add more color.
Once everything is arranged, take a step back and admire your creation!
- Prep Time: 15 minutes
- Cook Time: 0 minutes
Nutrition
- Serving Size: 8
- Calories: 350 kcal
- Fat: 20g
- Protein: 12g