
If you’re looking for a fun, family-friendly recipe that brings together creativity, nostalgia, and pure deliciousness, you’ve come to the right place. Rice Krispies Easter Eggs are the perfect treat for any festive occasion, especially around springtime when pastel-colored desserts are everywhere. This recipe is not only a delightful twist on the classic Rice Krispies treats we all know and love, but it’s also incredibly easy to make and requires just a few basic ingredients. Whether you’re planning to surprise the kids with a fun Easter activity or preparing something special for a party, these Rice Krispies Easter Eggs will surely be a hit.
I remember making these colorful treats for the first time with my nieces and nephews. It was a messy, sticky, and completely hilarious experience, but the smiles on their faces when they popped the treats out of the plastic eggs made it all worth it. And let’s be honest—who doesn’t love a classic Rice Krispies treat, especially when shaped like adorable little Easter eggs?
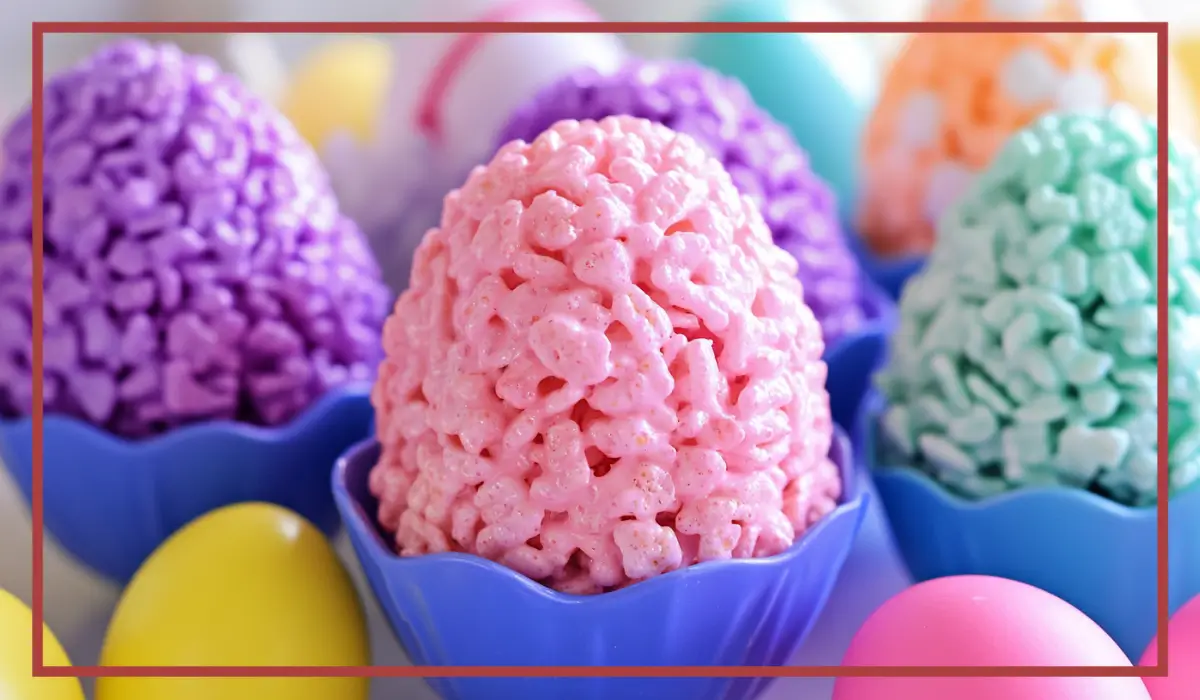
This recipe is also super customizable. You can add food coloring to make them as bright and cheery as you want, or even toss in some sprinkles for extra fun. Plus, they make fantastic gifts when wrapped in clear cellophane bags with a cute ribbon. Let’s dive into how you can whip up these delightful treats in your own kitchen!
Why You’ll Love This Recipe
There are countless reasons why these Rice Krispies Easter Eggs should be your next kitchen project, especially if you love simple, crowd-pleasing desserts. Here’s why you’re going to fall head over heels for this recipe:
- Easy to Make: With only three main ingredients—Rice Krispies cereal, butter, and mini marshmallows—this recipe couldn’t be simpler. Even if you’re not much of a baker, you’ll find these treats practically foolproof.
- Family-Friendly Activity: This is one of those recipes where the kids can genuinely get involved. They’ll love mixing, coloring, and molding the treats into adorable egg shapes. Plus, it’s a fun bonding experience everyone will enjoy.
- Perfect for Gifting: If you’re looking for a thoughtful homemade gift idea, these Rice Krispies Easter Eggs wrapped in little gift bags are charming and delicious.
- Totally Customizable: You can make them any color you like, add sprinkles, drizzle them with chocolate, or even stuff them with tiny candies if you want to get fancy.
- Quick Preparation: From start to finish, you’ll have these treats ready in under an hour. They’re ideal for last-minute dessert emergencies or spontaneous sweet cravings.
- No-Bake Goodness: Since this recipe requires no baking, it’s perfect for those hot days when turning on the oven feels like a punishment.
These treats have the perfect balance of sweetness, chewiness, and that signature crunch that only Rice Krispies can deliver. And let’s not forget the satisfaction of cracking open those plastic eggs to reveal a perfectly shaped, colorful little treat!
Health Benefits
Okay, let’s be real. These Rice Krispies Easter Eggs aren’t exactly what you’d call a health food. However, there are a few factors worth noting if you’re looking for some silver linings while indulging in these sweet bites:
- Portion Control: Since these treats are shaped like small eggs, it’s easy to control portion sizes. You can make them as small or as large as you prefer. Having bite-sized options helps curb overeating while still satisfying your sweet tooth.
- Low-Fat Content: While this recipe does contain butter, the amount per serving is relatively low. It’s a nice treat for those who want something rich-tasting without an overload of fat.
- Gluten-Free Option: If you’re using certified gluten-free Rice Krispies cereal, this recipe can be entirely gluten-free. It’s a fantastic way to accommodate those with dietary restrictions while still offering something fun and delicious.
- Mindful Ingredients: With only a handful of basic ingredients, you know exactly what’s going into your treats. There are no preservatives or artificial fillers—just pure, simple goodness.
- Energy Boost: Thanks to the carbohydrates from the cereal and the quick-release energy from the marshmallows, these treats provide a little energy boost, perfect for a playful afternoon with the kids.
Now, while these treats aren’t going to win any awards for being a superfood, they do offer a playful way to indulge in moderation. Plus, with a few simple adjustments like using gluten-free cereal or reduced-sugar marshmallows, you can cater them to your dietary preferences.
Preparation Time, Servings, and Nutritional Information
Before we jump into the fun part of making these treats, let’s break down the essential details so you can plan accordingly:
- Preparation Time: 30 minutes
- Cooling Time: 15-20 minutes
- Total Time: About 50 minutes
- Servings: Makes approximately 18 Rice Krispies Easter Eggs
Nutritional Information (Per Egg, Approximately):
- Calories: 110
- Carbohydrates: 21g
- Protein: 1g
- Fat: 3g
- Sugars: 10g
- Fiber: 0g
The nutritional values may vary slightly depending on the exact ingredients you use, but this should give you a good estimate. If you’re aiming to make these treats a bit healthier, feel free to substitute certain ingredients to suit your preferences.
Ingredients List
Here’s everything you’ll need to bring these delightful Rice Krispies Easter Eggs to life. The ingredient list is short and straightforward, but that’s part of what makes this recipe so appealing.
Ingredients (Makes About 18 Eggs):
- 6 cups Rice Krispies Cereal: This is the star of the show, providing that irresistible crispy texture. Make sure to use fresh cereal for the best results.
- 1 (10 oz) bag Mini Marshmallows: The marshmallows act as the binding agent and provide that perfect gooey sweetness.
- 6 tablespoons Butter: Adds richness and helps smooth out the marshmallow mixture.
- Plastic Easter Eggs (for molding): These will be your molds, so make sure you have enough for shaping all your treats.
- Nonstick Spray (e.g., Pam): To prevent the sticky mixture from getting stuck in the plastic eggs.
- Food Coloring (optional): This is where the fun really begins. You can stick to classic pastel shades or go wild with vibrant, eye-catching colors.
These ingredients are super affordable and can be found at pretty much any grocery store. Now that you’ve gathered everything you need, let’s dive into the fun part—the actual cooking process!
Ready to shape some Rice Krispies Easter Eggs? Let’s get into it.
Step-By-Step Cooking Instructions
Alright, it’s time to transform those simple ingredients into delightful, colorful Rice Krispies Easter Eggs. Whether you’re making these with kids or just treating yourself to a nostalgic dessert, this process is so much fun. Let’s break it down step-by-step so you can nail this recipe without any stress.
Step 1: Prepare Your Workspace
Before you begin, make sure your kitchen workspace is clean and organized. You’ll want everything within arm’s reach because once the marshmallow mixture is ready, you need to move quickly before it cools and hardens.
- Gather your ingredients and equipment.
- Spray your plastic Easter eggs with nonstick spray. This step is crucial to ensure the treats easily release from the molds.
- Lay out a piece of parchment paper or a large plate for cooling your treats once they’re molded.
Step 2: Melt Butter and Marshmallows
The marshmallow mixture is the magic glue that holds everything together. You can either do this on the stove or in the microwave, but the microwave method is quicker and easier.
Microwave Method:
- In a large microwave-safe bowl, add 6 tablespoons of butter and 1 (10 oz) bag of mini marshmallows.
- Microwave on high for 1 minute. Remove and stir well.
- Continue microwaving in 15-second intervals, stirring each time, until the mixture is smooth and fully melted. This should take around 1.5 to 2 minutes in total.
Stovetop Method (If you prefer):
- In a large saucepan, melt 6 tablespoons of butter over medium-low heat.
- Add the mini marshmallows and stir constantly until the mixture is completely smooth and melted.
- Remove from heat immediately to prevent burning.
Step 3: Add Food Coloring (Optional)
If you want to create colorful eggs, this is the moment to add food coloring.
- Divide the melted marshmallow mixture evenly into two or more bowls if you’re making multiple colors.
- Add a few drops of food coloring to each bowl and stir until the color is evenly distributed.
- Feel free to go wild with your color choices—soft pastels, vibrant neon shades, or even classic white. It’s all up to you!
Step 4: Mix in the Rice Krispies Cereal
Now comes the fun part—turning that marshmallow goo into crispy magic.
- Gradually add 6 cups of Rice Krispies cereal to the melted marshmallow mixture. If you divided the mixture for multiple colors, split the cereal proportionally.
- Stir well with a spatula or wooden spoon until all of the cereal is evenly coated with the marshmallow mixture.
- This process can be a bit sticky, but just keep folding the mixture until everything is well-combined.
Step 5: Shape the Rice Krispies Mixture
Now it’s time to form those adorable Easter eggs. This step can be a bit tricky, but once you get the hang of it, it’s super satisfying.
- Grab your nonstick-sprayed plastic Easter eggs.
- Take a small handful of the cereal mixture and press it firmly into one half of the plastic egg mold. Repeat with the other half.
- Press the two halves of the egg mold together firmly, then carefully open the egg and gently remove the molded treat.
- Place the shaped egg on the parchment paper or plate to cool.
- Repeat the process until you’ve used all the cereal mixture.
Step 6: Let the Eggs Cool
Once all your eggs are shaped, allow them to cool and harden for about 15 to 20 minutes. This makes them easier to handle and gives them that perfect, slightly chewy texture we all love.
Step 7: Optional Decorating
If you want to get extra fancy, now’s the time to add some flair to your Rice Krispies Easter Eggs.
- Drizzle with melted chocolate: White, milk, or dark chocolate all work beautifully.
- Add sprinkles or edible glitter: While the eggs are still slightly sticky, sprinkle on your favorite colorful decorations.
- Stuff them with candies: If your plastic eggs are large enough, you can hide tiny candies inside before pressing the two halves together.
Step 8: Serve and Enjoy
Once your Rice Krispies Easter Eggs are fully cooled and decorated to your liking, they’re ready to be served! Enjoy them as is or package them in cute little bags for gift-giving.
You’ve just made the most adorable, colorful treats with minimal effort. And the best part? They taste just as amazing as they look!

How to Serve
These treats are so versatile and cute, you’ll want to make them for more than just Easter. Here are some fun serving ideas to make them extra special:
- Easter Basket Goodies: Arrange them in a festive Easter basket along with chocolate eggs and other sweets for a delightful holiday surprise.
- Dessert Platters: Serve them on a colorful platter at spring-themed parties, birthdays, or baby showers.
- Gift Bags: Wrap individual eggs in clear cellophane bags tied with pastel ribbons for a charming homemade gift.
- Kids’ Parties: Arrange them on a tray alongside other finger foods and treats. They’re guaranteed to be a hit!
- Ice Cream Toppers: Crumble them over ice cream or use them as edible decorations for cakes and cupcakes.
Whether you’re enjoying them on their own or adding them to other desserts, these Rice Krispies Easter Eggs are a delicious and playful addition to any occasion.
Pairing Suggestions
While these treats are delicious on their own, you can certainly elevate the experience with some complementary pairings.
- Hot Chocolate or Warm Milk: Serve your Rice Krispies Easter Eggs with a steaming mug of hot chocolate or warm milk for the ultimate cozy experience.
- Fruit Platters: The sweetness of the marshmallow and cereal pairs wonderfully with fresh berries, sliced apples, or juicy grapes.
- Vanilla Ice Cream: As mentioned before, crumbling these treats over vanilla ice cream adds a delightful crunch.
- Flavored Milkshakes: Pair them with strawberry or chocolate milkshakes for a fun and decadent dessert spread.
- Coffee or Tea: If you’re making these treats for adults, serve them with a rich coffee or light, fruity tea for a sophisticated twist.
Up next, we’ll cover how to store, freeze, and reheat your Rice Krispies Easter Eggs to keep them fresh and delicious. Ready to keep going? Let’s do this!
Storage, Freezing & Reheating Instructions
You’ve successfully made a batch of colorful, fun, and absolutely delicious Rice Krispies Easter Eggs. But what if you made more than you can eat in one sitting? No problem! Let’s go over the best ways to store, freeze, and even reheat these treats so they stay fresh and enjoyable.
Storing Your Rice Krispies Easter Eggs (Short-Term Storage)
If you’re planning to enjoy your treats within the next few days, follow these steps:
- Room Temperature: Store your Rice Krispies Easter Eggs in an airtight container at room temperature for up to 3 days.
- Separate Layers: To avoid them sticking together, place parchment paper or wax paper between layers.
- Avoid Moisture: Keep them in a cool, dry place. Humidity can make them soggy and ruin that perfect chewy-crispy texture.
Refrigerating (If Necessary)
If you need them to last a bit longer, you can refrigerate them, but be aware that they might become firmer.
- Refrigeration: Place the treats in an airtight container with parchment paper between layers and refrigerate for up to 1 week.
- Softening Tip: Let refrigerated treats sit at room temperature for about 15 minutes before serving to allow them to soften slightly.
Freezing Your Rice Krispies Easter Eggs (Long-Term Storage)
If you want to make a big batch ahead of time or save some for a future craving, freezing is your best bet.
- Individually Wrap: Wrap each egg tightly in plastic wrap to prevent freezer burn.
- Place in an Airtight Container: After wrapping, place all the wrapped eggs in an airtight container or a heavy-duty freezer bag.
- Freeze Time: You can freeze these treats for up to 6 weeks.
- Thawing: When you’re ready to enjoy them, simply let them thaw at room temperature for about 30 minutes. They should be just as delicious as when you first made them.
Reheating (If Needed)
Though these treats are best enjoyed as-is, if they’ve become too firm from refrigeration or freezing, here’s a quick fix:
- Microwave Method: Pop one Rice Krispies Easter Egg in the microwave for 5 to 8 seconds. This should soften it just enough to regain that chewy, satisfying texture.
- Avoid Overheating: Be careful not to microwave them for too long, as this can cause the marshmallow to melt and create a sticky mess.
Following these steps ensures your treats stay fresh, delicious, and ready to be enjoyed whenever you’re craving something sweet and crunchy.
Common Mistakes to Avoid
Even with a straightforward recipe like this, there are a few common pitfalls that can affect the outcome. Here’s how to avoid them:
1. Overheating the Marshmallow Mixture
When melting your butter and marshmallows, especially in the microwave, it’s crucial not to overheat them.
- Why It’s a Problem: Overheating causes the marshmallows to become too hard, resulting in tough, overly sticky treats.
- Solution: Always microwave in short intervals and stir frequently. If you’re using the stovetop method, keep the heat on medium-low and stir constantly.
2. Not Using Enough Nonstick Spray
If you forget to spray your plastic eggs with nonstick spray, removing the shaped treats can be a nightmare.
- Why It’s a Problem: The marshmallow mixture is incredibly sticky and will cling to the plastic.
- Solution: Be generous with the nonstick spray to make the unmolding process smooth and easy.
3. Not Working Quickly Enough
Once the cereal mixture is ready, you need to shape it quickly before it cools and hardens.
- Why It’s a Problem: If the mixture cools too much, it becomes difficult to mold into shapes.
- Solution: Make sure your workspace is prepped and your plastic eggs are sprayed before you start mixing.
4. Over-Packing the Molds
Pressing the mixture too firmly into the plastic eggs can result in dense, overly chewy treats.
- Why It’s a Problem: The texture won’t have that light, crispy finish you want.
- Solution: Press the mixture firmly but gently into the molds—just enough to hold its shape.
5. Storing in Open Containers
Leaving your Rice Krispies Easter Eggs exposed to air will dry them out.
- Why It’s a Problem: The treats will lose their soft, chewy texture and become unpleasantly hard.
- Solution: Always store them in airtight containers, especially if you’re planning to enjoy them later.
Avoiding these common mistakes will make your Rice Krispies Easter Eggs not only adorable but perfectly delicious every single time.
Pro Tips
Want to take your Rice Krispies Easter Eggs to the next level? Here are some expert tips to enhance both the process and the final product:
1. Use Fresh Ingredients
Always use fresh Rice Krispies cereal and mini marshmallows. Stale cereal will result in a disappointing texture, and old marshmallows may not melt properly.
2. Customize Your Flavors
If you want to add a little something special, consider mixing in a bit of vanilla extract, almond extract, or even cocoa powder to the marshmallow mixture.
3. Experiment with Mix-Ins
For added texture and flavor, try mixing in fun ingredients like mini chocolate chips, crushed cookies, or colorful sprinkles directly into the cereal mixture before molding.
4. Use Gloves for Molding
To make the shaping process even easier, lightly spray your hands with nonstick spray or wear food-safe gloves. This helps prevent the sticky mixture from clinging to your fingers.
5. Make Them Extra Pretty
If you’re serving these at a party, consider adding a finishing touch by drizzling your treats with colored white chocolate or decorating them with edible glitter. Presentation goes a long way!
Following these tips will make sure your treats not only taste amazing but also look stunning and professional.
Frequently Asked Questions (FAQs)
Q1: Can I use regular marshmallows instead of mini marshmallows?
Yes, you can use regular marshmallows! Just make sure to use about 40 regular marshmallows (equivalent to a 10-ounce bag of mini marshmallows). You may need to increase the melting time slightly.
Q2: Can I make these treats dairy-free?
Absolutely! Simply replace the butter with a dairy-free alternative like coconut oil or a vegan butter substitute. Also, double-check that the marshmallows you’re using are dairy-free.
Q3: What if I don’t have plastic Easter eggs?
No worries! You can shape the treats by hand, use silicone molds, or even make traditional Rice Krispies squares and use cookie cutters to create fun shapes.
Q4: Can I make these treats ahead of time?
Yes, you can prepare them up to 3 days in advance and store them in an airtight container at room temperature. For longer storage, follow the freezing instructions above.
Q5: Why are my Rice Krispies Easter Eggs too hard?
This usually happens when the marshmallow mixture is overheated or when you press the mixture too firmly into the molds. Always heat gently and handle the mixture with care.
Conclusion & Call to Action
Congratulations! You’ve just made the most adorable and delicious Rice Krispies Easter Eggs, and hopefully, had a blast doing it. This recipe is all about fun, creativity, and a touch of nostalgia. Whether you’re making these treats with kids, preparing them for a party, or just indulging in a sweet little project for yourself, it’s hard not to smile when you see the colorful, crispy results.
What’s really amazing about this recipe is its simplicity and versatility. You can make them bright and festive for Easter, or adapt them for any occasion by switching up the colors, decorations, and even the shapes. And since these treats are so easy to prepare and store, they’re perfect for making ahead of time or gifting to friends and family.
Before you wrap up your Rice Krispies Easter Eggs experience, here are a few final words of encouragement:
- Have Fun and Experiment: The beauty of this recipe is that it’s super forgiving. If one egg doesn’t come out perfect, just reshape and try again.
- Get Creative: Add chocolate drizzle, sprinkles, or even crushed candies to make each egg unique.
- Share the Joy: These treats make perfect gifts, especially when wrapped in cute packaging. You’re sure to put a smile on someone’s face with these charming little snacks.
I would absolutely love to see how your Rice Krispies Easter Eggs turned out! Did you go for classic pastel shades, vibrant neons, or a creative mix of both? Share your creations in the comments below or tag me on social media. It’s always a joy to see your amazing work and hear about your kitchen adventures.
If you enjoyed this recipe and want to see more creative, easy-to-make treats, don’t forget to bookmark this page and share it with your friends. There’s nothing better than spreading a little joy through homemade treats!
Now, it’s your turn. Go ahead, grab your ingredients, and start making some magical Rice Krispies Easter Eggs. I promise, once you take that first crunchy, gooey bite, you’ll be hooked. Happy cooking!
Print
Rice Krispies Easter Eggs Recipe – Fun & Easy No-Bake Treats
- Total Time: 50 minutes (Including Cooling)
- Yield: About 18 Eggs 1x
- Diet: Vegetarian
Description
These Rice Krispies Easter Eggs are a delightful, no-bake treat made with just three simple ingredients! Perfect for Easter celebrations, kids’ parties, or gifting, this easy recipe brings fun and creativity to your kitchen. Customize with your favorite colors and decorations for a playful twist on classic Rice Krispies treats.
Ingredients
-
6 cups Rice Krispies Cereal
-
1 (10 oz) bag Mini Marshmallows
-
6 tbsp Butter
-
Plastic Easter Eggs (for molding)
-
Nonstick Spray (e.g., Pam)
-
Food Coloring (optional for fun colors)
Instructions
-
Prepare Workspace: Spray plastic eggs with nonstick spray and set up a parchment-lined tray for cooling.
-
Melt Butter & Marshmallows: Microwave butter and marshmallows in a large bowl for 1 minute. Stir and continue microwaving in 15-second intervals until smooth.
-
Add Food Coloring (Optional): If desired, divide the mixture into separate bowls and add food coloring. Mix until fully combined.
-
Add Rice Krispies Cereal: Gradually stir in Rice Krispies cereal until fully coated with the marshmallow mixture.
-
Shape the Eggs: Press the mixture firmly into greased plastic eggs, then gently remove and place them on parchment paper to cool.
-
Let Cool: Allow the eggs to cool and set for 15-20 minutes before serving.
-
Decorate (Optional): Drizzle with melted chocolate or add sprinkles if desired.
-
Serve & Enjoy: Enjoy your colorful, crispy treats or package them as gifts!
Notes
-
Use gloves or lightly greased hands for easier handling of the sticky mixture.
-
Store in an airtight container for up to 3 days at room temperature or freeze for up to 6 weeks.
- Prep Time: 30 minutes
- Cook Time: 0 minutes (No-Bake)
- Category: Dessert, Snacks
- Method: No-Bake
- Cuisine: American