
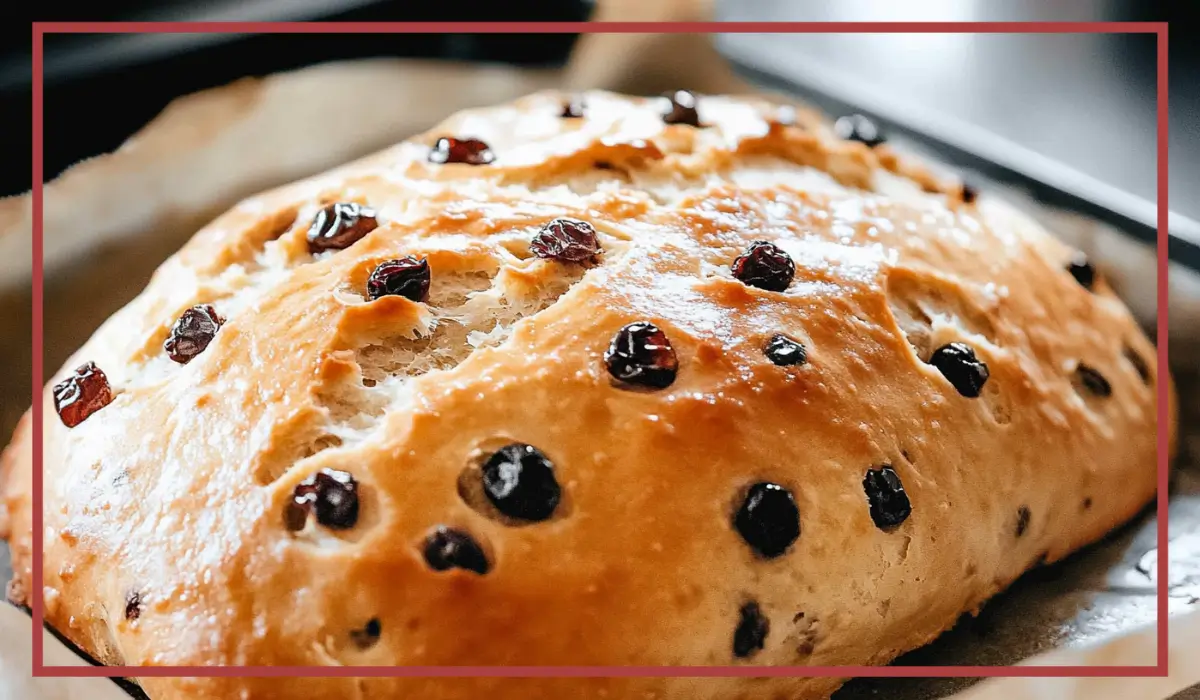
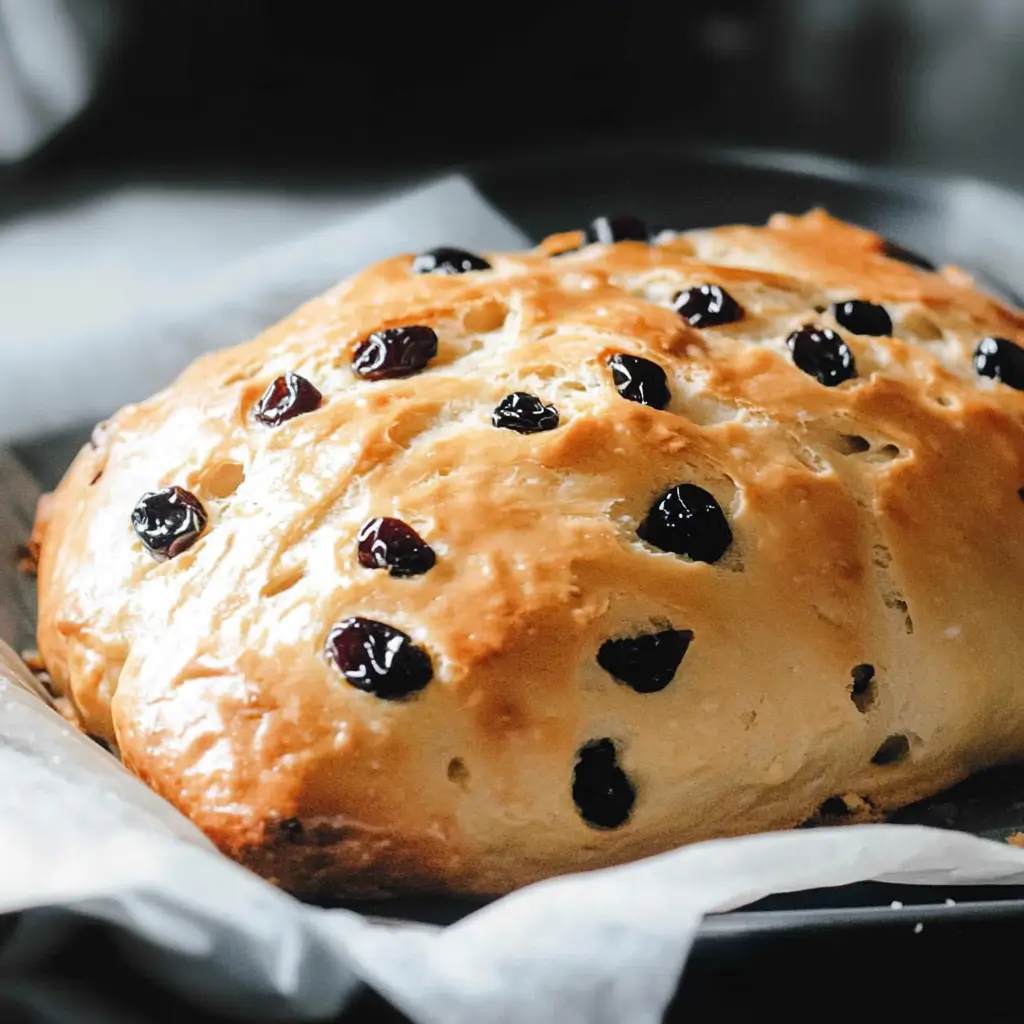
Raisin Bread Recipe at home is one of those simple pleasures that never gets old. The aroma of freshly baked bread wafting through your kitchen, the warmth of a soft slice slathered with butter—it’s pure comfort. But when you add plump, sweet raisins and cozy spices like cinnamon and nutmeg, you’ve just elevated bread-making to a whole new level.
This raisin bread recipe is everything you want in a classic sweet bread: it’s tender, slightly chewy, and filled with delightful bursts of raisin sweetness. Plus, the option to add a luscious almond paste filling takes it from amazing to absolutely irresistible. Whether you’re planning to serve it as part of a hearty breakfast, as a sweet snack with tea, or as a comforting dessert, this bread will leave everyone craving more.
I’ve always loved baking bread, but this raisin bread recipe holds a special place in my heart. The first time I made it, the entire house was filled with the most heavenly aroma of cinnamon and warm bread. It instantly became a family favorite, with slices vanishing from the cutting board faster than I could set them down. And the best part? It’s so much easier to make than you’d expect.
If you’re new to bread-making, don’t worry. This recipe walks you through every step, with plenty of helpful tips and guidance along the way. And if you’re a seasoned baker, you’ll love how effortlessly this bread comes together. So, grab your mixing bowl and let’s get baking!
Why You’ll Love This Recipe
This raisin bread recipe is a keeper for so many reasons, but here are a few that make it truly special:
Easy to Make: Don’t let the thought of homemade bread intimidate you. This recipe uses instant yeast, which makes the process much simpler and quicker. You’ll have delicious bread on your table in just a few hours.
Rich in Flavor: The combination of cinnamon, nutmeg, and raisins gives this bread a comforting, slightly sweet flavor that’s perfect for breakfast or an afternoon treat.
Versatile Recipe: You can easily customize this bread to suit your taste. Want it extra sweet? Add a bit more sugar. Prefer a different dried fruit? Go for it. And if you’re feeling fancy, the almond paste filling takes it to a whole new level of deliciousness.
Perfect for Any Occasion: Whether you’re baking it for a cozy family breakfast or preparing something special for guests, this raisin bread always impresses. Plus, it makes the most amazing French toast the next day!
Kid-Friendly: Kids love this bread. The sweetness of the raisins combined with the soft, pillowy bread makes it a hit with little ones.
Beautifully Golden Crust: If you like your bread with a slightly softer crust, just brush it with melted butter right after it comes out of the oven. It gives it a beautiful sheen and enhances the flavor.
Freezer-Friendly: This bread stores well, so you can make extra and freeze a loaf for later. Perfect for meal prepping or just having a tasty treat ready whenever you need it.
Health Benefits
While this Raisin Bread Recipe may be a sweet treat, it still offers some surprising health benefits when enjoyed in moderation. Here’s why you can feel good about indulging in a slice (or two):
Natural Sweetness from Raisins: Raisins are naturally sweet and provide a good source of natural sugars, which can offer a quick energy boost. Plus, they’re rich in fiber, vitamins, and minerals like potassium, iron, and calcium.
Source of Protein: With three eggs and a bit of almond paste (if you choose to add it), this bread has a decent protein content that helps keep you feeling fuller for longer.
Rich in Antioxidants: Spices like cinnamon and nutmeg aren’t just there for flavor. They’re packed with antioxidants that help protect your body from inflammation and oxidative stress.
Bone Health: The milk used in this recipe contributes to calcium intake, which is essential for strong bones and teeth.
Heart-Friendly Ingredients: Almond paste, if used, contains healthy fats that can benefit heart health when consumed in moderation.
Controlled Ingredients: By making bread at home, you control the ingredients, avoiding preservatives and artificial additives commonly found in store-bought bread.
Boosts Digestion: The fiber content from raisins can aid in healthy digestion and keep your digestive system running smoothly.
Low in Saturated Fat: Unlike some bread recipes that use heavy amounts of butter or oil, this raisin bread uses a modest amount of melted butter, keeping the fat content lower while still providing excellent flavor.
Mood-Boosting Qualities: The warmth of cinnamon and nutmeg is not only comforting but also known to have mood-enhancing properties, promoting relaxation and reducing stress.
Preparation Time, Servings, and Nutritional Information
Making this Raisin Bread Recipe is a breeze, but it does take a little time to allow the dough to rise. Here’s a breakdown of what you can expect:
Preparation Time: 30 minutes
Kneading Time: 10 minutes
First Rise: 1 hour
Second Rise: 30 minutes
Baking Time: 30 minutes
Total Time: Approximately 2 hours 40 minutes
Servings: Makes 2 loaves (approximately 24 slices total)
Nutritional Information (Per Slice Without Almond Paste Filling):
Calories: 160
Protein: 4g
Carbohydrates: 32g
Fats: 3g
Fiber: 1.5g
Sugars: 10g
Sodium: 120mg
Nutritional Information (Per Slice With Almond Paste Filling):
Calories: 220
Protein: 5g
Carbohydrates: 36g
Fats: 7g
Fiber: 1.5g
Sugars: 12g
Sodium: 130mg
Ingredients List
This Raisin Bread Recipe requires simple ingredients, most of which you probably already have in your pantry.
Dry Ingredients:
- 4 cups flour (All-purpose works well, but bread flour will yield a slightly chewier texture)
- 1.5 cups raisins (Plump and sweet, these add a delightful texture to each slice)
- ½ tsp salt (To enhance flavor)
- ½ tsp nutmeg (For a warm, slightly earthy undertone)
- 1 tsp cinnamon (The star spice for that comforting aroma and flavor)
- ¼ cup sugar (To sweeten the bread and activate the yeast)
Wet Ingredients:
- 3 eggs (For richness, structure, and flavor)
- 1 package instant yeast (About 2 ¼ tsp. The instant yeast helps the dough rise quickly and evenly)
- 2 tbsp melted butter (Adds a rich, buttery flavor to the bread)
- 7 tbsp lukewarm milk (The perfect temperature to activate the yeast without killing it)
Optional Almond Paste Filling:
- 200g almond paste (A sweet, nutty addition that makes this bread extra special)
- 1 egg yolk (Mixed with almond paste to create a smooth, spreadable filling)
Now that we have all our ingredients ready, let’s dive into the step-by-step cooking instructions that will make this bread come out perfectly every time.
Step-By-Step Cooking Instructions
Making this Raisin Bread Recipe is a rewarding process. Follow these detailed steps to achieve the best results.
Prepare the Yeast (5 minutes)
- Dissolve Sugar and Yeast:
- In a small bowl, combine 7 tablespoons of lukewarm milk and ¼ cup sugar. Stir until the sugar is dissolved.
- Sprinkle in 1 package of instant yeast (about 2 ¼ teaspoons) and give it a gentle stir.
- Let it sit for about 5 minutes until it becomes foamy. This step ensures the yeast is alive and ready to work its magic.
Mix the Dry Ingredients (5 minutes)
- Combine Dry Ingredients:
- In a large mixing bowl, add 4 cups of flour, 1.5 cups of raisins, ½ teaspoon salt, ½ teaspoon nutmeg, and 1 teaspoon cinnamon.
- Mix well to distribute the spices and raisins evenly throughout the flour.
- Tip: Tossing the raisins with flour prevents them from sinking to the bottom of the bread during baking.
Mix the Wet Ingredients (5 minutes)
- Prepare the Wet Ingredients:
- In a separate bowl, lightly beat 3 eggs.
- Add 2 tablespoons of melted butter and the yeast mixture (once it’s foamy) to the eggs. Mix until well combined.
- Tip: Make sure the melted butter is not too hot when adding it to the eggs, as high heat can cook the eggs.
Combine Wet and Dry Ingredients (10 minutes)
- Form the Dough:
- Make a well in the center of the flour mixture.
- Pour the wet ingredients into the well.
- Using a spatula or your hands, gradually mix the flour into the wet ingredients until a shaggy dough forms.
- Tip: It might look messy at first, but keep mixing until all the flour is incorporated.
Knead the Dough (10 minutes)
- Kneading the Dough:
- Transfer the dough to a lightly floured surface.
- Knead the dough for about 10 minutes until it becomes smooth, soft, and slightly elastic.
- If the dough is too sticky, add a bit more flour (about 1 tablespoon at a time), but be careful not to overdo it. The dough should remain soft and slightly tacky.
- Tip: To test if your dough is ready, gently press it with your finger. It should slowly bounce back.
First Rise (1 hour)
- Let the Dough Rise:
- Place the kneaded dough in a lightly greased bowl and cover it with a clean kitchen towel.
- Let it rise in a warm, draft-free spot for about 1 hour or until it has doubled in size.
- Tip: If your kitchen is chilly, place the bowl in a slightly warm oven (turned off) to help the dough rise.
Shape the Dough and Prepare Filling (If Using) (10 minutes)
- Shape the Dough:
- Once the dough has doubled in size, punch it down gently to release the air.
- Divide the dough into two equal portions if you are making two loaves.
- Add Almond Paste Filling (Optional):
- If you’re using the almond paste filling, mix 200g of almond paste with 1 egg yolk until smooth.
- Roll the almond paste mixture into a long “snake” shape.
- Flatten each dough portion into a rectangle, about 9×12 inches.
- Place the almond paste “snake” lengthwise in the center of each rectangle.
- Roll the dough over the almond paste and seal the edges well.
Second Rise (30 minutes)
- Let the Dough Rise Again:
- Place the shaped dough (with or without almond paste) on a greased or parchment-lined baking sheet.
- Cover loosely with a towel and let it rise for another 30 minutes. The dough should puff up but not quite double in size.
Bake the Bread (30 minutes)
- Preheat the Oven:
- While the dough is rising for the second time, preheat your oven to 180°C (350°F).
- Bake:
- Bake the loaves for about 30 minutes, or until they are golden brown and sound hollow when tapped on the bottom.
- Tip: If the bread is browning too quickly, cover it loosely with aluminum foil during the last 10 minutes of baking.
- Cool the Bread:
- Remove the loaves from the oven and allow them to cool on a wire rack.
- If you prefer a softer crust, brush the tops with melted butter as soon as they come out of the oven.
- Let the bread cool completely before slicing to maintain its structure and avoid a gummy texture.
How to Serve
This Raisin Bread Recipe is versatile and can be enjoyed in many ways. Here are some serving suggestions to get you started:
- Breakfast Delight: Slice and toast the bread, then spread it with butter, honey, or cream cheese. It pairs wonderfully with a hot cup of coffee or tea.
- Afternoon Snack: Serve with a pat of butter or a dollop of almond or peanut butter for a satisfying and slightly indulgent snack.
- Dessert: Drizzle slices with a glaze made from powdered sugar and milk or serve with a scoop of vanilla ice cream for a sweet treat.
- French Toast: Turn this bread into an extraordinary breakfast by dipping slices in a cinnamon-egg mixture and frying until golden brown.
- Gift Idea: Wrap the loaves in parchment paper and tie with a rustic string for a charming homemade gift.
Pairing Suggestions
This sweet, spiced bread pairs wonderfully with various beverages and dishes.
- Hot Drinks:
- A steaming cup of chai or spiced tea complements the cinnamon and nutmeg in the bread.
- Coffee, especially rich, dark roasts, offers a bold contrast to the sweetness of the raisins.
- Warm apple cider also makes for a comforting pairing.
- Cold Drinks:
- Serve with a chilled glass of almond milk for a creamy, nutty complement.
- A simple glass of cold milk is also a classic choice.
- Spreads and Toppings:
- Cinnamon butter, honey butter, or fruit preserves (like apricot or blackberry) take the flavor to the next level.
- Cream cheese spreads with a touch of vanilla or orange zest can enhance the richness of the bread.
- Side Dishes:
- If you’re serving this bread as part of a brunch spread, pair it with scrambled eggs, turkey bacon, or fresh fruit.
Storage, Freezing & Reheating Instructions
Making two loaves of this delicious raisin bread is fantastic because you can enjoy one now and save the other for later. Here’s how to properly store, freeze, and reheat your bread to keep it as fresh and tasty as possible.
Storing Your Bread (Short-Term):
- Room Temperature: Once completely cooled, store your raisin bread in an airtight container or a resealable plastic bag. It will stay fresh for up to 3 days at room temperature.
- Refrigeration: If you prefer to keep it longer, you can store it in the refrigerator for up to 1 week. However, refrigeration may cause the bread to dry out a bit, so reheating slices in the microwave or toaster before eating is recommended.
Freezing Your Bread (Long-Term):
- Whole Loaf: Allow the bread to cool completely. Wrap it tightly in plastic wrap, then place it in a freezer-safe zip-top bag or wrap it in aluminum foil. Store in the freezer for up to 3 months.
- Pre-Sliced Bread: To make serving even easier, slice the bread before freezing. Place parchment paper between each slice before stacking them together and sealing them in a freezer bag. This way, you can grab a single slice whenever you want.
Reheating Instructions:
- Microwave: For individual slices, microwave on high for 10–15 seconds. This method works especially well if the bread has been refrigerated and needs a little moisture revival.
- Toaster: Toast slices to your preferred crispiness. This works beautifully for breakfast or a quick snack.
- Oven (For Whole Loaves): Preheat the oven to 350°F (180°C). Place the loaf (unwrapped) on a baking sheet and heat for about 10–15 minutes until warmed through.
- Tip: If reheating bread that was frozen, let it thaw at room temperature for about 1 hour before warming it up for the best texture.
Common Mistakes to Avoid
Even the most experienced bakers can run into hiccups when making bread. Here are some common mistakes to avoid when making this delicious raisin bread:
1. Using Water Instead of Milk:
The milk in this recipe provides richness and tenderness to the bread. Substituting it with water will result in a drier, less flavorful bread.
2. Adding Hot Butter or Milk to the Yeast:
It’s crucial to let your melted butter cool slightly before mixing it with the eggs and yeast mixture. Hot liquids can kill the yeast, preventing your bread from rising properly.
3. Not Proofing the Yeast:
Even though instant yeast is reliable, giving it a few minutes to proof (become foamy) ensures that it’s active. Skipping this step could result in flat, dense bread.
4. Overworking the Dough:
Kneading the dough for too long can make the bread tough and overly chewy. Knead until the dough is smooth and elastic but don’t go overboard.
5. Using Old Yeast:
If your yeast has been sitting in the pantry for a while, it may have lost its potency. Always check the expiration date and test it by proofing in warm milk with sugar before proceeding.
6. Skipping the Second Rise:
The second rise is what gives your bread its fluffy, airy texture. Don’t rush it. Make sure to let the dough rise until it’s properly puffed up before baking.
7. Baking at the Wrong Temperature:
Make sure your oven is fully preheated to 180°C (350°F) before placing the bread inside. An inaccurate temperature can result in bread that’s underbaked or overbrowned.
8. Slicing Too Soon:
I know it’s tempting, but slicing the bread before it’s completely cooled will result in a gummy, uneven texture. Patience is key here!
9. Not Wrapping the Bread Properly for Freezing:
Exposure to air is the enemy of frozen bread. Always wrap your bread tightly before freezing to preserve freshness.
10. Forgetting to Grease the Baking Sheet:
Even with parchment paper, a light greasing of the baking sheet ensures the bread doesn’t stick and makes for easier cleanup.
Pro Tips
If you want your raisin bread to come out perfect every single time, these pro tips will definitely help:
1. Plump Your Raisins:
For extra juicy raisins, soak them in warm water for about 10 minutes before adding them to the dough. Drain and pat them dry to prevent excess moisture.
2. Use Bread Flour for Extra Chewiness:
Although all-purpose flour works perfectly fine, substituting with bread flour will give your bread a slightly chewier, more structured texture.
3. Make It Sweeter (If You Like):
If you prefer your bread a bit sweeter, increase the sugar to ½ cup. You can also try adding a tablespoon of honey or maple syrup for added flavor.
4. Experiment with Spices:
Want a more complex flavor? Add a pinch of ground cloves or cardamom to the flour mixture. These spices pair beautifully with cinnamon and nutmeg.
5. Ensure a Soft Crust:
Brushing melted butter over the Raisin Bread Recipe right after it comes out of the oven is the key to a soft, tender crust. This simple step also adds a beautiful shine and richer flavor.
6. Make Ahead and Refrigerate:
If you want to prepare the dough ahead of time, you can refrigerate it after the first rise. Simply cover it well and let it chill for up to 24 hours before shaping, allowing it to come to room temperature before the second rise.
7. Add Nuts for Extra Texture:
If you enjoy a little crunch, fold in ½ cup of chopped nuts like walnuts or pecans when mixing the dough. This adds a delightful contrast to the soft, sweet bread.
8. Test for Doneness:
If you’re unsure if the bread is fully baked, use a kitchen thermometer. The internal temperature should reach 190°F (88°C) when properly baked.
9. Almond Paste Creativity:
If you love almond flavor, try adding a bit of almond extract (about ¼ teaspoon) to the almond paste mixture for an extra kick.
10. Storing for Maximum Freshness:
If you plan to eat the bread within a couple of days, avoid slicing it all at once. Slice only what you need to keep the rest of the loaf fresher for longer.
Frequently Asked Questions (FAQs)
Making homemade raisin bread might seem straightforward, but there are always a few questions that pop up along the way. Here are the most common ones to help you achieve perfect results every time.
1. Can I use active dry yeast instead of instant yeast?
Yes, absolutely! If you only have active dry yeast, you can still make this delicious bread. However, keep in mind that active dry yeast needs to be activated before use. To do this, dissolve the yeast in the lukewarm milk and sugar mixture and let it sit for about 10 minutes until it becomes foamy. Then proceed with the recipe as written.
2. Can I use whole wheat flour instead of all-purpose flour?
Yes, but with some adjustments. Whole wheat flour is denser and absorbs more liquid, so you may need to add a bit more milk to achieve the right dough consistency. Also, the bread will have a slightly heartier, nuttier flavor and a denser texture. For the best results, consider using a mix of half whole wheat flour and half all-purpose flour.
3. How do I know if my dough has risen enough?
During the first rise, your dough should double in size. To check, gently press two fingers into the dough. If the indentation remains, your dough has risen sufficiently. If it bounces back, give it more time to rise.
4. Can I add other dried fruits or nuts to this recipe?
Absolutely! Feel free to customize your bread by adding chopped nuts (like walnuts or pecans) or other dried fruits (such as cranberries, currants, or chopped dried apricots). Aim for a total of about 1.5 to 2 cups of add-ins to avoid overwhelming the dough.
5. Why is my bread dense and heavy?
Several factors can cause dense bread, including:
- Not kneading the dough enough. Make sure to knead until the dough is smooth and elastic.
- Using old or inactive yeast. Always check the expiration date and proof the yeast before use.
- Skipping the second rise. This step is essential for light and airy bread.
- Adding too much flour. The dough should be slightly sticky but manageable. Adding too much flour can result in a dry, dense bread.
6. Can I make this bread gluten-free?
Yes, but it requires some modifications. Using a gluten-free all-purpose flour blend that’s specifically designed for bread-making is crucial. Adding a binder like xanthan gum or psyllium husk powder can help improve the texture. However, gluten-free bread will have a different texture than the original version.
7. Can I make the dough in advance and bake it later?
Yes! After the first rise, you can refrigerate the dough for up to 24 hours. Just be sure to let it come to room temperature before shaping and allowing it to rise a second time.
8. How do I prevent the bread from drying out while baking?
If your Raisin Bread Recipe is coming out too dry, it could be overbaked. Make sure to check it at the 25-minute mark and cover it loosely with aluminum foil if it’s browning too quickly. Also, brushing melted butter over the top right after baking helps retain moisture.
9. What’s the best way to slice this bread without crushing it?
Allow the Raisin Bread Recipe to cool completely before slicing. Use a serrated bread knife and apply gentle, even pressure while slicing. Slicing the bread while it’s still warm can cause it to become squished and gummy.
10. Can I double this recipe to make more loaves?
Absolutely! This Raisin Bread Recipe already makes two loaves, but you can easily double it to make four. Just be sure you have enough oven space to accommodate all the loaves without overcrowding them.
Conclusion & Call to Action
Congratulations! You’ve just mastered a beautiful, sweet, and perfectly spiced raisin bread recipe that’s sure to impress everyone at your table. Whether you’re enjoying it fresh out of the oven, toasted with a pat of butter, or transformed into decadent French toast, this bread is a true winner.
I hope you loved making this bread as much as I enjoyed guiding you through the process. Remember, baking is an art and a science, but most of all, it’s about having fun and sharing something special with the people you love. So go ahead, make another batch, experiment with new flavors, and don’t forget to try the almond paste filling if you haven’t already. It’s worth it!
I’d love to hear how your raisin bread turned out. Did you make any creative additions? Did your family rave about it as much as mine did? Drop a comment below and share your experience. And if you snap a photo of your gorgeous loaves, tag me on Instagram—I can’t wait to see your creations!
Ready to bake another batch? Why not challenge yourself to make a sweet cinnamon glaze to drizzle over the top, or try swapping raisins for dried cherries or figs for a fun twist? The possibilities are endless, and the joy of baking is all about experimenting and enjoying the journey.
Happy baking, and may your kitchen always be filled with the warm, comforting aroma of homemade bread!
Print
Raisin Bread Recipe – Soft, Sweet, and Perfectly Spiced Bread
- Total Time: 2 hours 40 minutes
- Yield: 2 loaves (about 24 slices) 1x
- Diet: Vegetarian
Description
This homemade raisin bread is irresistibly soft, sweet, and perfectly spiced with cinnamon and nutmeg. With juicy raisins scattered throughout and the option to add a luscious almond paste filling, this bread makes a delightful breakfast, snack, or dessert. Ideal for beginners and seasoned bakers alike, it’s comfort food at its finest.
Ingredients
Dry Ingredients:
-
4 cups flour
-
1.5 cups raisins
-
½ tsp salt
-
½ tsp nutmeg
-
1 tsp cinnamon
-
¼ cup sugar
Wet Ingredients:
-
3 eggs
-
1 package instant yeast (about 2 ¼ tsp)
-
2 tbsp melted butter
-
7 tbsp lukewarm milk
Optional Almond Paste Filling:
-
200g almond paste
-
1 egg yolk
Instructions
-
Prepare Yeast: Dissolve sugar and yeast in lukewarm milk. Let sit for 5 minutes until foamy.
-
Mix Dry Ingredients: Combine flour, raisins, salt, nutmeg, and cinnamon.
-
Combine Wet Ingredients: Beat eggs, add melted butter and yeast mixture. Mix well.
-
Form Dough: Add wet ingredients to dry ingredients. Mix until a shaggy dough forms.
-
Knead: Knead for 10 minutes until smooth and elastic.
-
First Rise: Let dough rise in a greased bowl for 1 hour, until doubled.
-
Shape Dough: Punch down, divide into two portions.
-
Add Almond Paste (Optional): Mix almond paste with egg yolk, form into a “snake”, and place in dough.
-
Second Rise: Let shaped dough rise for 30 minutes.
-
Bake: Preheat oven to 180°C (350°F) and bake for 30 minutes until golden brown.
-
Cool & Serve: Let cool on a wire rack before slicing.
Notes
-
For a softer crust, brush with melted butter after baking.
-
Store at room temperature for up to 3 days or freeze for up to 3 months.
- Prep Time: 30 minutes
- Cook Time: 30 minutes
- Category: Bread
- Method: Baking
- Cuisine: American, European