

Pioneer Woman Lemon Bars are a delightful dessert that packs a punch of flavor and sunshine. These bars, known for their zesty filling and buttery crust, have gained immense popularity, bringing joy to many dessert tables. With their perfect balance of sweetness and tartness, they’re an excellent choice for any occasion, whether it’s a holiday gathering, a summer picnic, or just a cozy afternoon snack. Even if you’re not an expert baker, you’ll find this recipe straightforward and rewarding.
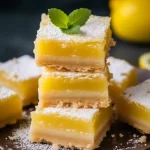
Imagine biting into a slice of these lemon bars, the creamy lemon layer melting in your mouth with just the right amount of tang. Not only are they delicious, but they also have a wonderful, vibrant appearance. When made correctly, they stand out with their sunny yellow filling and delicate, powdered sugar topping, making them a feast for the eyes as well!
In this article, you will discover why Pioneer Woman Lemon Bars should become a staple in your baking repertoire. You’ll learn about the preparation and cooking times, the complete ingredient list, and easy step-by-step instructions to guide you through the process. Get ready to impress your family and friends with this amazing recipe that will leave them craving more!
Why You’ll Love This Recipe
Pioneer Woman Lemon Bars are cherished for many reasons, and it’s no wonder they’ve become a favorite among both novice and seasoned bakers. Here are some compelling reasons to fall in love with this recipe:
1. Bright and Fresh Flavor: The tartness of fresh lemons shines through, delivering a refreshing taste that’s perfect for any palate.
2. Simple Ingredients: Most of the ingredients are common pantry staples, making it easy for anyone to whip up a batch.
3. Perfect for Any Occasion: Whether it’s a birthday, dessert buffet, or just a weekend treat, lemon bars fit right in.
4. Easy to Make: The step-by-step instructions are straightforward, ensuring even the most inexperienced bakers can succeed.
5. Versatile Recipe: You can easily adjust the sweetness or tartness to suit your preference, making it adaptable for everyone’s taste.
6. Beautiful Presentation: With a light dusting of powdered sugar, these bars are not only delicious but also visually appealing.
These factors make Pioneer Woman Lemon Bars a must-try recipe that disappoints no one.
Preparation and Cooking Time
Time management is crucial when baking, and Pioneer Woman Lemon Bars are no exception. Here’s a breakdown of how long it takes to create these delightful treats:
– Preparation Time: 15 minutes
– Cooking Time: 25 minutes
– Cooling Time: 30 minutes (or more if desired)
In total, you can expect the process to take about an hour and 10 minutes from start to finish. This time includes preparation and cooling, allowing for a smooth workflow in your kitchen.
Ingredients
– 1 cup unsalted butter, softened
– 2 cups granulated sugar
– 1 cup all-purpose flour
– 2 large eggs
– 1 cup fresh lemon juice
– Zest of 2 lemons
– 1 teaspoon baking powder
– A pinch of salt
– Powdered sugar, for dusting
Step-by-Step Instructions
Creating Pioneer Woman Lemon Bars is a simple yet rewarding process. Follow these steps for the best results:
1. Preheat the Oven: Begin by preheating your oven to 350°F (175°C). This ensures that the bars bake evenly.
2. Prepare the Baking Dish: Grease a 9×13-inch baking dish with butter or line it with parchment paper for easy removal later.
3. Make the Crust: In a mixing bowl, cream together the softened butter and granulated sugar until light and fluffy. This usually takes about 3-5 minutes.
4. Add Flour: Gradually add in the all-purpose flour and mix until well combined. The mixture should resemble a crumbly dough.
5. Press into the Dish: Take the crust mixture and press it evenly into the bottom of the prepared baking dish.
6. Bake the Crust: Place the crust in the preheated oven and bake for about 20 minutes or until lightly golden.
7. Prepare the Filling: In a separate bowl, whisk together the eggs, fresh lemon juice, lemon zest, baking powder, and a pinch of salt until fully combined.
8. Combine with Crust: Once the crust is done baking, pour the lemon filling over the hot crust and spread it evenly.
9. Bake Again: Return the baking dish to the oven and bake for an additional 20-25 minutes or until the filling is set and slightly firm to the touch.
10. Cool Completely: Once baked, remove the dish from the oven and let it cool at room temperature for at least 30 minutes. For optimal results, refrigerate for an hour before cutting.
11. Dust with Powdered Sugar: Just before serving, dust the top of the cooled bars with powdered sugar for that classic finishing touch.
These simple steps will lead you to a batch of incredible lemon bars that everyone will adore.
How to Serve
Serving Pioneer Woman Lemon Bars can elevate the entire experience and make your dessert table shine. Consider these suggestions for a delightful presentation:
1. Slice Neatly: Use a sharp knife to cut even squares or rectangles for serving. Clean the knife between cuts to maintain neat edges.
2. Presentation: Arrange the lemon bars on a beautiful serving platter or a cake stand. A touch of creativity can enhance their visual appeal.
3. Optional Accompaniments: Serve alongside fresh berries, whipped cream, or a scoop of vanilla ice cream to complement the lemon flavor.
4. Serving Size: Offer smaller slices for a lighter snack option, encouraging guests to enjoy more than one piece.
5. Beverage Pairing: These bars pair excellently with tea or lemonade for a refreshing touch, making them perfect for a summer afternoon tea.
By taking the time to present and serve your Pioneer Woman Lemon Bars beautifully, you ensure a memorable experience for every guest!
Additional Tips
– Use Fresh Lemons: For the best flavor, opt for fresh lemons rather than bottled lemon juice. The natural oils from the lemon zest enhance the taste.
– Chill Before Cutting: Allow the lemon bars to cool completely before cutting them. This helps achieve clean and neat slices.
– Experiment with Sweetness: If you prefer a sweeter bar, consider increasing the sugar in the filling slightly to suit your taste.
– Garnish Creatively: Add fresh mint leaves or thin lemon slices on top for an appealing garnish that enhances the presentation.
Recipe Variation
Feel free to customize your Pioneer Woman Lemon Bars! Here are some exciting variations to try:
1. Berry Bliss: Add a layer of fresh berries, such as blueberries or raspberries, between the crust and lemon filling for an added burst of flavor.
2. Ginger Zest: Mix in finely grated fresh ginger into the filling for a spicy twist that complements the lemon beautifully.
3. Meringue Topping: Top the lemon bars with a whipped meringue layer before returning them to the oven for a classic lemon meringue pie flavor.
4. Coconut Twist: Incorporate shredded coconut into the crust for a tropical flare that pairs wonderfully with the citrus.
Freezing and Storage
– Storage: Keep your lemon bars covered in the refrigerator. They should remain fresh for 5-7 days, making them a fantastic make-ahead dessert.
– Freezing: If you want to store them longer, freeze the cut bars in an airtight container. They can last for up to 3 months. Be sure to separate layers with parchment paper to avoid sticking.
Special Equipment
To ensure your baking experience goes smoothly, gather the following tools:
– Mixing bowls for combining ingredients
– A whisk for mixing the filling thoroughly
– Sharp knife or pizza cutter for cutting the bars
– 9×13 inch baking dish
– Measuring cups and spoons for accuracy
Frequently Asked Questions
Can I use bottled lemon juice?
While bottled lemon juice can work in a pinch, fresh lemon juice yields the best flavor and is highly recommended.
How thick should the lemon filling be?
The filling should be set and slightly firm to the touch but still soft. It’s ready when it doesn’t jiggle excessively.
Can I double the recipe?
Yes! For a larger gathering, simply double the ingredients and use a larger pan.
How do I know when the crust is done?
The crust should be lightly golden. Keep an eye on it to avoid over-baking.
Can I substitute gluten-free flour?
Absolutely! You can replace all-purpose flour with a gluten-free blend and still enjoy these delightful bars.
Conclusion
Pioneer Woman Lemon Bars are a scrumptious treat that beautifully combines tangy and sweet flavors. Their fresh taste, vibrant appearance, and ease of preparation make them perfect for any dessert occasion. Whether you serve them at a party, family gathering, or enjoy a quiet afternoon with friends, these lemon bars will undoubtedly impress. Try the recipe today, and add this delightful dessert to your baking collection!
Pioneer Woman Lemon Bars: An Incredible Ultimate Recipe
- Total Time: 40 minutes
Ingredients
– 1 cup unsalted butter, softened
– 2 cups granulated sugar
– 1 cup all-purpose flour
– 2 large eggs
– 1 cup fresh lemon juice
– Zest of 2 lemons
– 1 teaspoon baking powder
– A pinch of salt
– Powdered sugar, for dusting
Instructions
Creating Pioneer Woman Lemon Bars is a simple yet rewarding process. Follow these steps for the best results:
1. Preheat the Oven: Begin by preheating your oven to 350°F (175°C). This ensures that the bars bake evenly.
2. Prepare the Baking Dish: Grease a 9×13-inch baking dish with butter or line it with parchment paper for easy removal later.
3. Make the Crust: In a mixing bowl, cream together the softened butter and granulated sugar until light and fluffy. This usually takes about 3-5 minutes.
4. Add Flour: Gradually add in the all-purpose flour and mix until well combined. The mixture should resemble a crumbly dough.
5. Press into the Dish: Take the crust mixture and press it evenly into the bottom of the prepared baking dish.
6. Bake the Crust: Place the crust in the preheated oven and bake for about 20 minutes or until lightly golden.
7. Prepare the Filling: In a separate bowl, whisk together the eggs, fresh lemon juice, lemon zest, baking powder, and a pinch of salt until fully combined.
8. Combine with Crust: Once the crust is done baking, pour the lemon filling over the hot crust and spread it evenly.
9. Bake Again: Return the baking dish to the oven and bake for an additional 20-25 minutes or until the filling is set and slightly firm to the touch.
10. Cool Completely: Once baked, remove the dish from the oven and let it cool at room temperature for at least 30 minutes. For optimal results, refrigerate for an hour before cutting.
11. Dust with Powdered Sugar: Just before serving, dust the top of the cooled bars with powdered sugar for that classic finishing touch.
These simple steps will lead you to a batch of incredible lemon bars that everyone will adore.
- Prep Time: 15 minutes
- Cook Time: 25 minutes
Nutrition
- Serving Size: 12 bars
- Calories: 250 kcal
- Fat: 12g
- Protein: 2g