
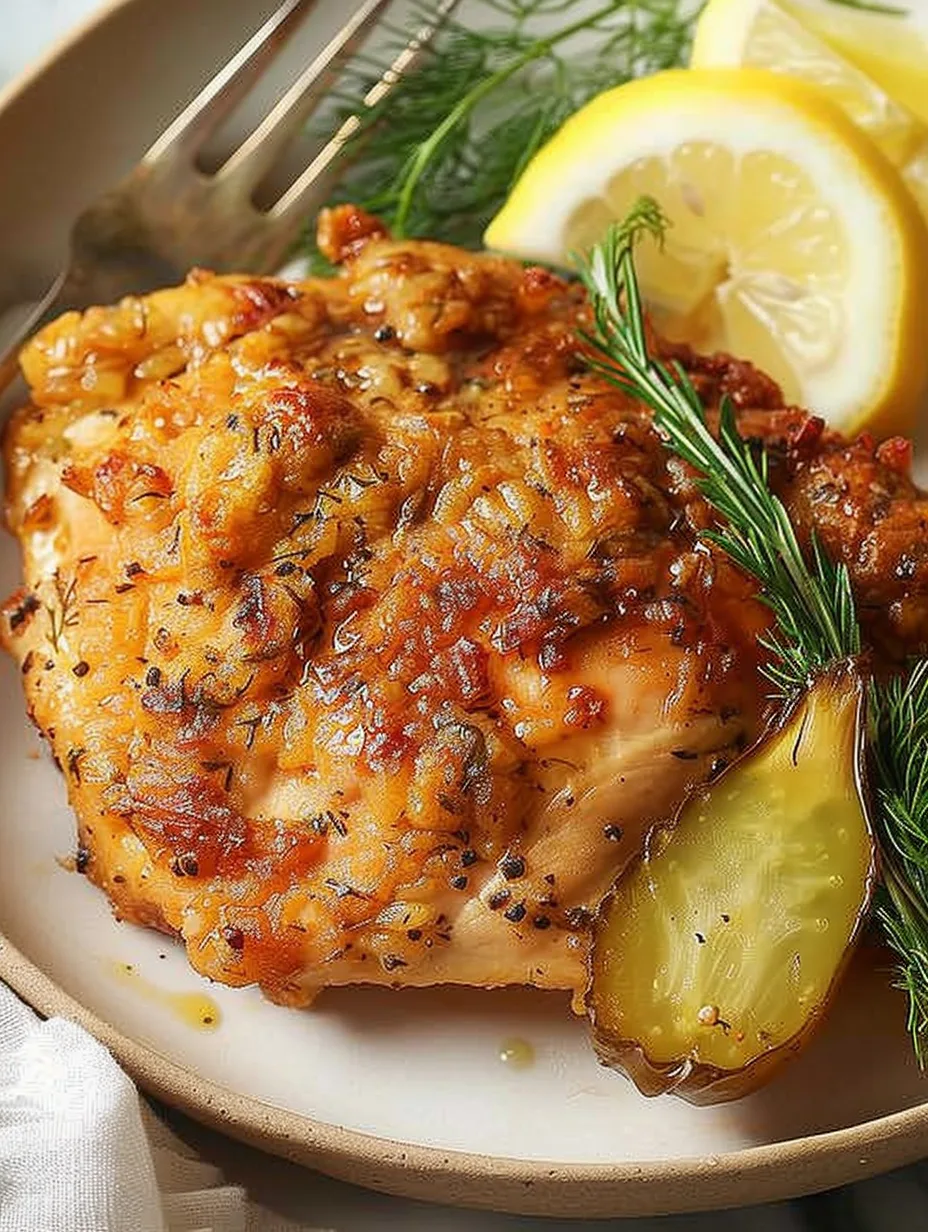
Pickle-brined chicken is a culinary sensation that has taken the food world by storm. The combination of juicy chicken and the tangy, flavorful brine makes for an amazing dish that will leave your taste buds craving more. This unique cooking method infuses the chicken with moisture and flavor, resulting in a succulent meal that’s perfect for any occasion. If you’ve never tried pickle-brined chicken, you’re in for a delightful experience that will change the way you think about preparing chicken forever.
The allure of pickle-brined chicken lies in its simplicity and flavor profile. The brine, typically made from dill pickles, vinegar, and a variety of spices, penetrates the chicken, ensuring every bite is packed with deliciousness. This recipe can easily become a staple in your cooking repertoire, whether you’re hosting a barbecue, preparing a weeknight dinner, or looking to impress your guests.
In this guide, you’ll discover why this recipe is so beloved, how to prepare it step by step, and tips on serving pickle-brined chicken to enhance your dining experience. Join me as we explore the incredible world of pickle-brined chicken, and get ready to elevate your cooking game to new heights!
Why You’ll Love This Recipe
There are countless reasons to love pickle-brined chicken, and here are just a few:
1. Ultimate Flavor: The brine infuses the chicken with a rich, tangy flavor that’s hard to beat.
2. Moist and Juicy: The brining process ensures that the chicken remains moist and tender, even after cooking.
3. Simple Ingredients: Most of the ingredients are pantry staples, making it easy to whip up at a moment’s notice.
4. Versatile Cooking Methods: Whether you prefer grilling, baking, or frying, this recipe works well with various cooking methods.
5. Quick Preparation: The brining process is straightforward, and you can prepare the chicken ahead of time, saving you stress on the day of your meal.
6. Crowd-Pleaser: This dish is sure to impress family and friends, making it perfect for gatherings and celebrations.
With these enticing factors in mind, it’s easy to see why pickle-brined chicken is taking the culinary world by storm!
Preparation and Cooking Time
Creating pickle-brined chicken is a straightforward process. Here’s a breakdown of the time you’ll need:
– Preparation Time: 15 minutes (plus brining time)
– Brining Time: 4 hours (or overnight for best results)
– Cooking Time: 30-40 minutes, depending on the cooking method
In total, you can expect to spend about 4 hours and 45 minutes from start to finish, including brining. However, most of this time is hands-off, allowing you to go about your day while the chicken absorbs all the tasty goodness of the brine.
Ingredients
– 4 boneless, skinless chicken breasts
– 2 cups dill pickle juice
– 1 tablespoon honey (optional)
– 1 teaspoon garlic powder
– 1 teaspoon onion powder
– ½ teaspoon black pepper
– ½ teaspoon smoked paprika (optional)
– Oil for cooking (olive oil or vegetable oil)
Step-by-Step Instructions
Follow these simple steps to create your delicious pickle-brined chicken:
1. Prepare the Brine: In a large bowl, combine the dill pickle juice, honey, garlic powder, onion powder, black pepper, and smoked paprika (if using). Mix well.
2. Brine the Chicken: Place the chicken breasts in the brine, ensuring they are fully submerged. Cover the bowl and refrigerate for at least 4 hours, or overnight for maximum flavor.
3. Remove and Pat Dry: After brining, remove the chicken from the brine and pat it dry with paper towels. This helps achieve a nice sear during cooking.
4. Preheat Your Cooking Surface: If grilling, preheat the grill to medium-high heat. If baking, preheat your oven to 400°F (200°C).
5. Cook the Chicken: For grilling, brush the grill grates with oil and place the chicken on the grill. Cook for 6-7 minutes on each side or until the internal temperature reaches 165°F (74°C). For baking, place the chicken in a greased baking dish and bake for 25-30 minutes.
6. Rest the Chicken: Once cooked, remove the chicken from the heat and let it rest for 5 minutes. This allows the juices to redistribute within the meat.
7. Slice and Serve: Slice the chicken breasts and serve them as desired.
By following these steps, you’ll create an incredible pickle-brined chicken that is sure to impress!
How to Serve
Serving pickle-brined chicken can elevate the dining experience. Here are some ideas to make your meal stand out:
1. Plating: Arrange slices of chicken on a large platter and garnish with fresh herbs like parsley or dill for a pop of color.
2. Accompaniments: Pair the chicken with classic sides such as coleslaw, potato salad, or grilled vegetables for a well-rounded meal.
3. Sauces: Serve with a side of ranch dressing or a creamy dill sauce to complement the flavors of the chicken.
4. Buns: For a fun twist, serve the chicken on toasted buns to create delicious sandwiches. Add lettuce, tomato, and pickles for texture and flavor.
5. Salads: Slice the chicken over a fresh green salad with cucumbers, tomatoes, and a light vinaigrette for a healthy option.
6. Leftovers: If you have any leftovers, consider using the chicken in wraps or stir-fries for a quick and tasty meal the next day.
By putting thought into how you serve pickle-brined chicken, you’ll create an unforgettable meal that will leave a lasting impression on your guests!
Additional Tips
– Use Quality Pickles: For the best flavor, opt for high-quality dill pickles when preparing the brine.
– Experiment with Spices: Feel free to adjust the spices in the brine to suit your taste. Adding a pinch of cayenne pepper can give it a nice kick.
– Let It Rest: Allowing the chicken to rest after cooking is crucial. This helps the juices redistribute and ensures each bite is juicy.
Recipe Variation
You can easily customize this pickle-brined chicken recipe to suit your preferences. Here are a few variations:
1. Spicy Pickle-Brined Chicken: Add sliced jalapeños or a splash of hot sauce to the brine for a spicy twist.
2. Herb-Infused Brine: Incorporate fresh herbs like thyme or rosemary into the brine for added depth of flavor.
3. Pickle-Brined Chicken Tenders: Cut the chicken breasts into tenders for a fun, finger-friendly option that cooks faster.
Freezing and Storage
– Storage: Store leftover pickle-brined chicken in an airtight container in the refrigerator for up to 3 days. Reheat gently to maintain moisture.
– Freezing: You can freeze cooked chicken for up to 3 months. Ensure it’s well-wrapped to prevent freezer burn. Thaw in the refrigerator before reheating.
Special Equipment
While this recipe is simple, having the right equipment can make the process smoother:
– Large bowl for brining
– Plastic wrap or lid to cover the bowl
– Grill or oven for cooking
– Meat thermometer to check for doneness
Frequently Asked Questions
Can I use bone-in chicken?
Yes, you can use bone-in chicken pieces. Just adjust the cooking time accordingly, as they may take longer to cook through.
What type of pickles should I use?
Dill pickles are traditional, but you can experiment with bread and butter pickles for a sweeter flavor.
Is this recipe suitable for meal prep?
Absolutely! Pickle-brined chicken is great for meal prep. It can be cooked in batches and stored for easy lunches or dinners throughout the week.
Can I grill the chicken indoors?
Yes, you can use a grill pan on the stovetop if outdoor grilling isn’t an option. Just ensure proper ventilation.
What should I serve with pickle-brined chicken?
This chicken pairs well with a variety of sides, including salads, roasted vegetables, or classic picnic dishes like coleslaw.
Conclusion
Pickle-brined chicken is a game-changer that brings a burst of flavor and moisture to your meals. This versatile dish can be grilled, baked, or fried and is sure to be a hit with family and friends. With its simple preparation and delicious results, pickle-brined chicken deserves a spot in your recipe collection. Elevate your cooking and enjoy this delightful dish!

Pickle-Brined Chicken: An Incredible Ultimate Recipe for 2023
- Total Time: 10 minute
Ingredients
– 4 boneless, skinless chicken breasts
– 2 cups dill pickle juice
– 1 tablespoon honey (optional)
– 1 teaspoon garlic powder
– 1 teaspoon onion powder
– ½ teaspoon black pepper
– ½ teaspoon smoked paprika (optional)
– Oil for cooking (olive oil or vegetable oil)
Instructions
Follow these simple steps to create your delicious pickle-brined chicken:
1. Prepare the Brine: In a large bowl, combine the dill pickle juice, honey, garlic powder, onion powder, black pepper, and smoked paprika (if using). Mix well.
2. Brine the Chicken: Place the chicken breasts in the brine, ensuring they are fully submerged. Cover the bowl and refrigerate for at least 4 hours, or overnight for maximum flavor.
3. Remove and Pat Dry: After brining, remove the chicken from the brine and pat it dry with paper towels. This helps achieve a nice sear during cooking.
4. Preheat Your Cooking Surface: If grilling, preheat the grill to medium-high heat. If baking, preheat your oven to 400°F (200°C).
5. Cook the Chicken: For grilling, brush the grill grates with oil and place the chicken on the grill. Cook for 6-7 minutes on each side or until the internal temperature reaches 165°F (74°C). For baking, place the chicken in a greased baking dish and bake for 25-30 minutes.
6. Rest the Chicken: Once cooked, remove the chicken from the heat and let it rest for 5 minutes. This allows the juices to redistribute within the meat.
7. Slice and Serve: Slice the chicken breasts and serve them as desired.
By following these steps, you’ll create an incredible pickle-brined chicken that is sure to impress!
- Prep Time: 15 minutes
- Cook Time: 30-40 minutes
Nutrition
- Serving Size: 4
- Calories: 250 kcal
- Fat: 12g
- Protein: 30g