
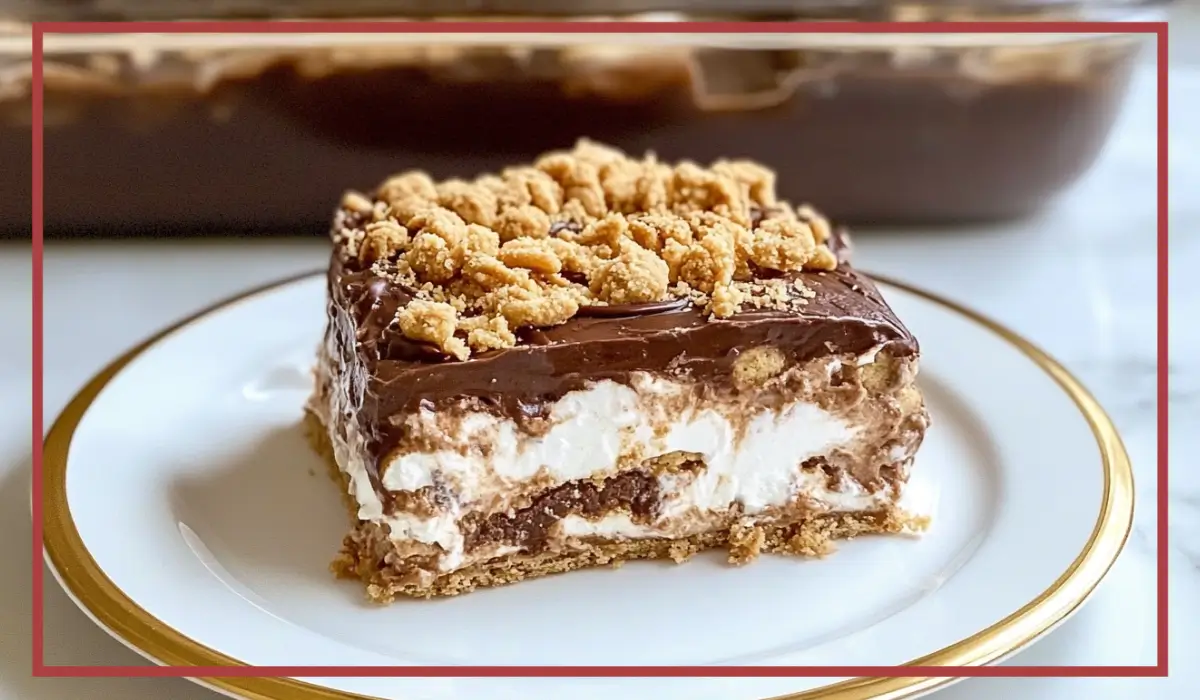
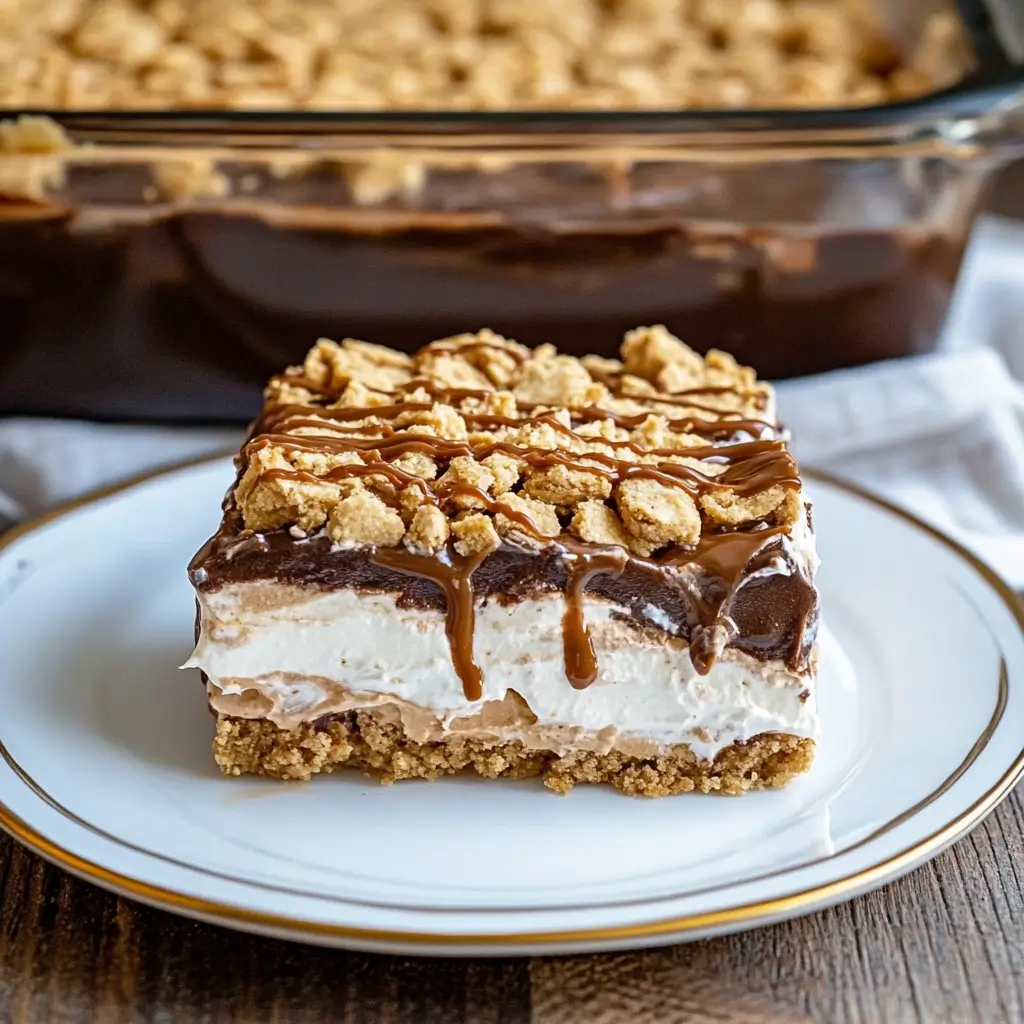
There’s something undeniably comforting about layered desserts. Maybe it’s the way each spoonful gives you a little bit of everything—cool creaminess, rich flavor, and a hint of crunch. Or maybe it’s because they’re often made ahead of time, giving them that perfectly set texture that only gets better as it chills. Whatever the reason, this Nutter Butter dessert Layered Delight is one of those no-bake desserts that checks all the boxes.
This recipe is pure magic in a casserole dish. You start with a layer of Nutter Butter cookies—already rich and peanut buttery on their own—then you build up layers of tangy cream cheese, smooth chocolate pudding, fluffy whipped topping, and a crunchy cookie crumble with a peanut butter drizzle to finish it all off. It’s the kind of dessert that feels like it should be complicated, but it’s actually incredibly easy to throw together.
I first made this dessert for a casual family gathering, and it instantly became the star of the table. Everyone from the kids to the grandparents went back for seconds, and I had multiple requests for the recipe before the evening ended. Since then, it’s become my go-to for potlucks, picnics, and birthday parties—basically any event where dessert is needed and oven space is limited.
This no-bake beauty is all about layers of texture and flavor, and the best part is, it only takes a few simple ingredients you probably already have in your pantry. Whether you’re a baking pro or a total beginner, this recipe is truly foolproof—and absolutely delicious.
Why You’ll Love This Nutter Butter dessert Recipe
It’s Completely No-Bake
One of the biggest reasons people love this dessert? You never need to turn on your oven. That’s a huge win during summer months, or anytime you’re short on time or kitchen space. You can prep it quickly and let it chill while you focus on the rest of your meal—or just sit back and relax.
Quick and Easy to Assemble
With only a few steps and ingredients, this dessert comes together effortlessly. You’ll be surprised at how fast you can build those layers, and you don’t need any special baking skills. It’s all about mixing, layering, and letting time do the rest.
Rich and Creamy Layers
Every bite delivers a creamy, dreamy texture with a burst of flavor. The cream cheese adds just enough tang to balance the sweetness, while the chocolate pudding brings depth. And let’s not forget the whipped topping, which keeps everything light and fluffy.
That Crunchy, Peanut-Buttery Finish
The crushed Nutter Butter topping is what takes this dessert over the top. It adds just the right amount of crunch and pairs perfectly with the melted peanut butter drizzle. This final touch ties all the layers together beautifully.
Crowd-Pleasing and Kid-Friendly
From birthday parties to school functions, this dessert is a guaranteed hit. Kids love the cookie base and chocolate flavor, while adults appreciate the nostalgic peanut butter notes and silky texture. It’s the kind of dish that disappears fast—so don’t be surprised if there are no leftovers.
Health Benefits of this Nutter Butter dessert
Now let’s be honest—this dessert isn’t trying to win any awards for being ultra-health-conscious. But that doesn’t mean it can’t offer some satisfying perks, especially when enjoyed in moderation.
A Source of Energy
Thanks to the peanut butter and Nutter Butter cookies, this dessert offers a solid dose of protein and healthy fats, which can help keep you full and satisfied. That makes it a fun and indulgent choice for an occasional energy boost during the day.
Dairy for Calcium and Protein
The cream cheese and milk used in the pudding both contribute calcium and protein, essential nutrients for maintaining healthy bones and muscles. While it’s still a dessert, it contains elements that provide real nutritional value when compared to purely sugary treats.
Peanut Butter Benefits
Peanut butter contains monounsaturated fats, which are known for supporting heart health when consumed in small amounts. It also adds fiber and vitamins like vitamin E and magnesium. So while this dessert is certainly rich, its peanut butter base gives it more than just flavor—it gives it function, too.
Portion Control Made Easy
Because it’s so rich and satisfying, even a small square of this dessert feels like a full treat. That means you’re less likely to overindulge, and it becomes easier to enjoy responsibly while still satisfying your sweet tooth.
Mood-Boosting Treat
Desserts like this are meant to be joyful. Food is about more than just nutrition—it’s also about pleasure, sharing, and creating memories. The comfort and nostalgia of this creamy, cookie-filled dessert can lift spirits and bring people together in a way that’s just as important as fiber and vitamins.
Preparation Time, Servings, and Nutritional Information
Total Preparation Time
This dessert is wonderfully quick to assemble. Here’s a breakdown of the time you’ll need:
- Prep time: 25 minutes
- Chill time: Minimum of 6 hours (preferably overnight)
Total time from start to serving is just over 6 hours, but the majority of that is chilling. Active hands-on time is under 30 minutes.
Serving Size
This recipe fills a standard 9×13 inch pan, which makes:
- 12 to 15 generous servings, depending on how you slice it.
It’s ideal for sharing with a crowd, making it perfect for parties, holidays, and gatherings.
Nutrition Facts (Per Serving – based on 15 servings)
- Calories: 390
- Total Fat: 22g
- Saturated Fat: 10g
- Cholesterol: 30mg
- Sodium: 340mg
- Carbohydrates: 42g
- Sugars: 29g
- Protein: 6g
Keep in mind that values may vary slightly based on the brands of ingredients you use. To reduce sugar or fat content, consider using light cream cheese, sugar-free pudding, or reduced-fat peanut butter.
Ingredients List of this Nutter Butter dessert
Before diving into the step-by-step process, here’s everything you’ll need to make this dessert:
- 1 family-size package Nutter Butter cookies
This will serve both as your base and the crushed topping. These cookies are essential—they bring that iconic peanut butter flavor and a crisp texture that softens beautifully as the dessert chills. - 1 (8 oz) package cream cheese, softened to room temperature
The cream cheese forms the base of the rich, tangy middle layer. It balances the sweetness and adds that luscious, smooth texture. - 1⅓ cups powdered sugar
This sweetens the cream cheese layer and helps it whip into a light, fluffy texture. - 3 cups frozen whipped topping, thawed
You’ll use this in both the cream cheese layer and as the top layer. It’s light, airy, and makes the whole dessert feel like a cloud. - 1 (5.9 oz) box chocolate instant pudding mix
The chocolate layer brings richness and depth. Make sure to use instant pudding so it sets properly without additional cooking. - 3 cups milk
Used to mix with the pudding. Whole milk will give the richest flavor, but any milk will work here. - ½ cup peanut butter
For drizzling on top. You can use smooth or chunky depending on your preference, but smooth peanut butter makes for a cleaner drizzle.
These ingredients are easy to find, budget-friendly, and shelf-stable enough to keep on hand for last-minute dessert needs.
Step-By-Step Cooking Instructions of this Nutter Butter dessert
Making this Nutter Butter Layered Delight is a simple process, especially since there’s no baking involved. Just follow these easy steps:
Step 1: Prepare Your Pan and Base Layer
- Start by grabbing a 9×13 inch casserole dish.
- Line the bottom of the dish with a single, flat layer of Nutter Butter cookies.
- Don’t worry if there are small gaps—once the dessert chills, the cookies will soften and expand slightly.
Tip: You can break cookies in half if needed to fill in corners or gaps. The goal is to create a fairly even base that will support the creamy layers above.
Step 2: Make the Cream Cheese Layer
- In a large mixing bowl, beat the softened cream cheese and powdered sugar together until completely smooth.
- This step is important—beating until smooth prevents lumps and ensures a silky texture.
- Fold in 1½ cups of the whipped topping using a spatula or wooden spoon.
- Mix gently to keep the layer light and airy.
Tip: Make sure the cream cheese is at room temperature before mixing—it will blend much more easily and create a fluffier final texture.
Step 3: Spread the Cream Cheese Layer Over the Cookies
- Spoon the cream cheese mixture over the cookie base.
- Use a spatula to spread it evenly across the entire surface.
- Try to get it all the way to the edges so every bite includes some of this delicious layer.
Tip: For a cleaner spread, use an offset spatula or the back of a spoon dipped in warm water.
Step 4: Prepare the Pudding Layer
- In a separate mixing bowl, combine the chocolate instant pudding mix with the milk.
- Whisk vigorously for about 5 minutes until the pudding thickens and no lumps remain.
- Let the pudding sit for a couple of minutes to finish thickening.
Tip: Use cold milk to help the pudding set properly. Avoid plant-based milks unless the box specifies they’re compatible with instant pudding.
Step 5: Add the Pudding Layer
- Pour the pudding mixture over the cream cheese layer.
- Spread it gently into an even layer using your spatula.
Tip: For perfectly smooth layers, let the pudding cool slightly in the bowl before adding it. This prevents it from sinking into the cream cheese layer.
Step 6: Top with Whipped Topping
- Spread the remaining whipped topping over the pudding layer.
- Make sure to cover the entire surface, smoothing it out for a clean finish.
Tip: If you want a fancy look, use a piping bag to add decorative dollops of whipped topping instead of spreading it flat.
Step 7: Create the Crunch Topping
- Place the remaining Nutter Butter cookies in a zip-top bag.
- Use a rolling pin or the bottom of a cup to crush them into small pieces.
- Sprinkle the crushed cookies evenly over the top whipped layer.
Tip: For added crunch, reserve a few whole cookies to break over the top right before serving.
Step 8: Drizzle with Melted Peanut Butter
- In a microwave-safe bowl, melt the peanut butter for about 30 seconds until it’s pourable but not too hot.
- Let it cool for a minute, then transfer to a piping bag or a zip-top bag with the corner snipped.
- Drizzle the peanut butter across the top of the dessert.
Tip: For a thicker drizzle, let the peanut butter cool for a minute or two. For a thinner, runnier drizzle, use it right away while still warm.
Step 9: Chill the Dessert
- Cover the dish with plastic wrap or foil.
- Place in the refrigerator for at least 6 hours, or overnight for best results.
- This chilling time allows the cookies to soften and the layers to firm up.
Tip: If you’re in a hurry, 4 hours in the fridge will still work, but overnight is ideal for the perfect texture.
How to Serve this Nutter Butter dessert
Serving this Nutter Butter Layered Delight is almost as fun as making it. Once the dessert has had plenty of time to chill and the layers have fully set, you’re ready to slice and impress.
Slice Neatly for Presentation
Using a sharp knife, cut the dessert into squares or rectangles directly in the casserole dish. A small metal spatula works well for lifting the pieces out cleanly. If you want to keep the layers looking picture-perfect, wipe the knife clean between each cut. This small step makes a big difference in keeping the edges neat and the layers defined.
Garnish for a Special Touch
Although the peanut butter drizzle and crushed cookies already make this dessert look beautiful, you can take it a step further with a few finishing touches. Try adding a dollop of whipped topping to each slice or a small sprinkle of mini chocolate chips or chopped peanuts. These little extras add texture and visual appeal that guests always notice.
Serve Cold
This dessert is best enjoyed straight from the fridge. The cool temperature helps the layers stay firm, and the flavors are most balanced when chilled. If it’s been sitting out for a while during a party, simply pop it back in the fridge for a bit before serving again.
Ideal for Gatherings
Since this dessert makes 12 to 15 servings, it’s perfect for family dinners, birthday parties, or casual get-togethers. You can even pre-slice and serve it in cupcake liners or small plates to make it easier for guests to grab and enjoy.
Pairing Suggestions
While this dessert is definitely the star of the show, pairing it with the right side dishes or drinks can elevate the entire experience. Whether you’re serving it as part of a party spread or a casual family meal, here are a few pairing ideas to make your dessert moment even more satisfying.
Beverages That Complement the Dessert
Cold Milk
A tall glass of milk—whether dairy or plant-based—is a natural companion to anything peanut buttery and chocolatey. The creaminess of the milk complements the dessert’s texture and cleanses your palate between bites.
Iced Coffee or Cold Brew
The slight bitterness of coffee offers a perfect contrast to the sweetness of the dessert. Try it with a splash of almond milk or a hint of vanilla syrup for an extra indulgent touch.
Herbal Tea
If you prefer something caffeine-free, go with a chilled herbal tea like peppermint or chamomile. Their gentle flavors won’t compete with the richness of the dessert.
Serve with Light Side Dishes
Fresh Fruit Platter
A colorful bowl of sliced strawberries, bananas, or grapes adds a refreshing touch. The brightness of fresh fruit helps balance the richness of the dessert and adds a nice visual contrast on the table.
Simple Green Salad
If you’re serving this after a meal, a light salad with lemon vinaigrette can help reset the palate and prepare guests for something sweet.
Savory Snacks
Balance the sweetness of dessert with something salty, like pretzels, popcorn, or mixed nuts. The combination of sweet and salty is always a hit, and it offers a nice break between bites.
For Special Occasions
Dress up the dessert by serving it in small parfait cups with extra crushed cookies and peanut butter drizzle layered throughout. This turns the dish into individual servings, perfect for parties or buffets. You could even add a mini spoon and a personalized label for a polished presentation.
Storage, Freezing & Reheating Instructions
One of the best things about this no-bake Nutter Butter dessert is how well it stores. You can make it ahead, store the leftovers with ease, and even freeze it if needed. Here’s how to keep it fresh and delicious.
How to Store in the Refrigerator
After assembling and chilling the dessert, cover the dish tightly with plastic wrap or foil. You can also transfer individual slices into airtight containers if you prefer grab-and-go servings.
Storage time in fridge:
- Up to 4 days for best texture and flavor.
After a few days, the cookie layers will become very soft. It’ll still taste good, but the contrast between creamy and crunchy won’t be as sharp.
How to Freeze the Dessert
This dessert freezes surprisingly well, especially if you want to save some for later or prepare it well in advance.
To freeze:
- Cut the dessert into individual servings.
- Wrap each piece tightly in plastic wrap, then place in a freezer-safe container or zip-top bag.
- Label and date the container.
Freezing time:
- Store for up to 2 months in the freezer.
How to Thaw and Serve
When you’re ready to enjoy a frozen slice, remove it from the freezer and unwrap it. Place it on a plate and let it thaw in the refrigerator for a few hours or overnight. Avoid thawing at room temperature, as it may become too soft and lose its structure.
Note: Do not try to reheat this dessert. It is meant to be served cold, and any form of heat will ruin the texture of the whipped topping and pudding.
Common Mistakes to Avoid
Even though this recipe is super simple, there are a few common pitfalls that can affect the final result. Here’s what to watch out for to ensure your Nutter Butter dessert turns out perfectly every time.
Not Softening the Cream Cheese
Trying to mix cold cream cheese can lead to a lumpy, uneven texture in the cream cheese layer. Always let it soften at room temperature for at least 30 minutes before beating. This ensures a smooth and fluffy mixture.
Overmixing the Whipped Topping
When folding whipped topping into the cream cheese, be gentle. Overmixing can deflate the airiness of the topping and make the layer dense instead of light and creamy.
Using the Wrong Pudding Type
Make sure to use instant chocolate pudding, not the cook-and-serve version. The cook-and-serve pudding won’t set properly without heat and can lead to a runny, unstable layer.
Not Letting It Chill Long Enough
Chilling the dessert is essential. Don’t cut corners on chill time—those hours in the fridge allow the cookies to soften and the layers to set. Aim for at least 6 hours, but overnight is even better.
Pouring Hot Peanut Butter Over Whipped Topping
If the peanut butter is too hot when you drizzle it, it can melt the whipped topping and cause it to lose structure. Let it cool slightly after microwaving to avoid this issue.
Pro Tips
Want to take your dessert-making skills to the next level? These pro tips will help you create the most delicious, beautiful Nutter Butter Layered Delight every time.
Use a Cold Mixing Bowl for Whipped Layers
Chilling your mixing bowl before folding in whipped topping can help keep everything light and stable, especially if your kitchen is warm.
Try a Layer of Bananas or Sliced Strawberries
For a fruity twist, add a thin layer of sliced bananas or strawberries between the pudding and whipped topping layers. It adds a pop of flavor and a little extra freshness.
Use a Decorative Drizzle
If you want a clean, bakery-style look, use a piping bag for your peanut butter drizzle. You can also combine peanut butter with a bit of melted chocolate for a marbled drizzle effect.
Add Crushed Peanuts for Texture
For a bit of extra crunch, sprinkle a handful of chopped roasted peanuts over the crushed cookies before adding the drizzle. This adds variety in texture and a nice salty note to balance the sweetness.
Prep Ahead for Parties
Make this dessert the day before your event and store it in the fridge overnight. Not only does this save time, but it also gives the dessert time to set up perfectly and allows the flavors to meld together even more.
Frequently Asked Questions (FAQs)
Can I use off-brand cookies instead of Nutter Butters?
Yes, but keep in mind that Nutter Butters have a specific flavor and texture that contribute to the overall taste. Off-brand peanut butter cookies may work, but the results could vary slightly.
Is it okay to use light cream cheese or reduced-fat whipped topping?
Absolutely. Light versions will slightly reduce the richness, but they still work beautifully. Just make sure your cream cheese is softened and your whipped topping is fully thawed.
Can I make this dessert gluten-free?
Yes, if you can find a gluten-free peanut butter cookie that has a similar texture to Nutter Butters. Be sure to also use gluten-free pudding mix and confirm all ingredients are certified gluten-free.
How far in advance can I make this dessert?
This dessert can be made up to 2 days in advance. Just keep it tightly covered in the fridge and add the crushed cookie topping and peanut butter drizzle just before serving for maximum crunch.
Can I use homemade whipped cream instead of whipped topping?
Yes, you can substitute homemade whipped cream, but keep in mind that it may deflate faster than stabilized whipped topping. If using fresh whipped cream, serve the dessert within 24 hours for best results.
What if I don’t have a 9×13 inch pan?
You can use two smaller pans or even a large trifle dish for a more decorative presentation. Just layer the ingredients in the same order and adjust proportions if needed.
Can I double the recipe for a larger crowd?
Yes, simply double all ingredients and use two pans, or a deeper baking dish. Just ensure each layer remains even and balanced.
Can I skip the peanut butter drizzle?
Technically, yes—but it’s one of the best parts. If you’re allergic or not a fan of peanut butter, consider drizzling chocolate syrup or caramel instead.
Is this dessert safe for kids?
Definitely. It’s kid-approved and easy to eat, with soft textures and familiar flavors. Just be mindful of peanut allergies if serving to a group.
Can I turn this into a parfait or individual serving cups?
Yes! Layer the ingredients in small clear cups or mason jars for a cute, portable version. Great for parties, BBQs, or school events.
Conclusion & Call to Action
This Nutter Butter Layered Delight is more than just a dessert—it’s a guaranteed crowd-pleaser, a conversation starter, and a little piece of nostalgia wrapped in creamy, crunchy, chocolatey bliss. It’s the kind of recipe that brings people together, whether you’re serving it up at a holiday party, making it as a fun weekend treat with your kids, or surprising your coworkers with something sweet at the office potluck.
What makes this dessert truly special is how simple it is to make, yet how impressive it looks and tastes once it’s finished. You don’t need any fancy equipment or culinary skills—just a few bowls, a little mixing, some layering, and a good amount of chill time. And the result? A stunning dessert that people won’t stop talking about.
The layers of flavor and texture—the softened Nutter Butter cookie base, the tangy-sweet cream cheese, the smooth chocolate pudding, the light whipped topping, and the rich peanut butter drizzle—work together to create a dessert that’s equal parts indulgent and comforting. It’s a little bit retro, a little bit modern, and 100% delicious.
If you’ve never tried making a no-bake layered dessert before, this is the perfect place to start. It’s forgiving, flexible, and totally addictive in the best way. You can even make it your own by adding fresh fruit, swapping in different pudding flavors, or changing up the toppings.
So here’s your next move: gather your ingredients, clear a little space in your fridge, and get ready to create a dessert that’ll steal the spotlight at your next event. I promise, once you try it, you’ll want to make it again and again.
And when you do? I’d love to hear how it turned out for you. Share your experience in the comments, snap a photo of your creation, and tag me on social media so I can celebrate your delicious success with you. This Nutter Butter Layered Delight is too good not to share, and I can’t wait to see your version of it.
Happy layering—and even happier eating!
Print
Nutter Butter Dessert: Easy No-Bake Peanut Butter Layered Delight
- Total Time: 6 hours, 25 minutes (including chilling)
- Yield: 12–15 servings 1x
- Diet: Vegetarian
Description
This no-bake layered dessert features a Nutter Butter cookie base, creamy whipped cream cheese, rich chocolate pudding, and a peanut butter drizzle. It’s easy to make, full of nostalgic flavor, and perfect for any gathering.
Ingredients
-
1 family-size package Nutter Butter cookies
-
1 (8 oz) package cream cheese, softened
-
1⅓ cups powdered sugar
-
3 cups frozen whipped topping, thawed
-
1 (5.9 oz) box chocolate instant pudding mix
-
3 cups milk
-
½ cup peanut butter
Instructions
-
-
-
Line a 9×13 inch dish with a single layer of Nutter Butter cookies.
-
In a bowl, beat softened cream cheese and powdered sugar until smooth.
-
Fold in 1½ cups of whipped topping.
-
Spread over cookies evenly.
-
In a separate bowl, mix pudding with milk for 5 minutes until thickened.
-
Spread pudding over cream cheese layer.
-
Top with remaining whipped topping.
-
Crush remaining cookies and sprinkle over top.
-
Melt peanut butter and drizzle over dessert.
-
Cover and chill for at least 6 hours or overnight.
-
-
Notes
-
Use smooth peanut butter for a cleaner drizzle.
-
For extra crunch, add chopped roasted peanuts.
-
Best served chilled.
-
Let cream cheese soften before mixing for smooth texture.
- Prep Time: 25 minutes
- Cook Time: 0 minutes
- Category: Dessert
- Method: No-Bake
- Cuisine: American