
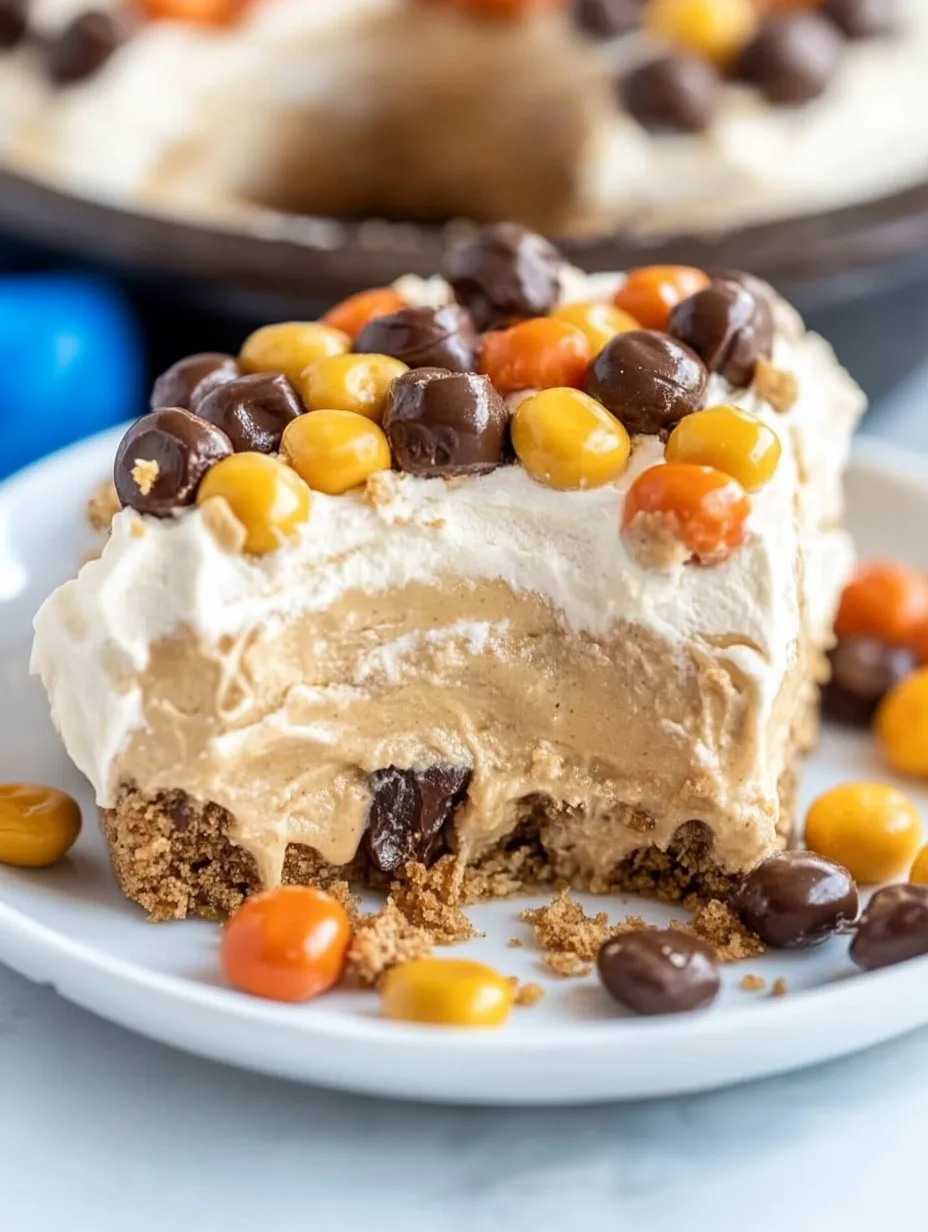
No Bake Peanut Butter Icebox Cake is a delightful dessert that takes indulgence to a whole new level. This amazing recipe combines creamy peanut butter, crunchy cookies, and whipped cream to create a treat that will please anyone—especially peanut butter lovers! It’s perfect for hot summer days when you don’t want to turn on the oven but still crave something sweet and satisfying.
Imagine layers of creamy goodness paired with the delightful crunch of cookies. The contrasting textures create a dessert experience that is both refreshing and decadently rich. You won’t believe how easy it is to prepare this cake, as it requires minimal ingredients and no baking. This makes it an ideal choice for gatherings, picnics, or just a cozy evening at home, where you can enjoy a slice (or two) of this incredible cake without any fuss.
If you’re looking to impress your family or friends with a stunning yet easy dessert, no need to look further! In this guide, you’ll discover why you’ll love making the No Bake Peanut Butter Icebox Cake, how to prepare it in no time, delicious ingredient options, step-by-step instructions, and delightful serving suggestions.
Why You’ll Love This Recipe
No Bake Peanut Butter Icebox Cake is truly a dessert that stands out for various reasons. Here’s why you’ll absolutely adore this recipe:
1. Effortless Preparation: With no baking involved, you can whip this cake together in no time. This means more focus on enjoying it and less on kitchen chaos!
2. Few Ingredients: The ingredient list is straightforward, making it easy to make with pantry staples. Peanut butter, whipped cream, and cookies are the stars here!
3. Versatile Dessert: This recipe can be easily modified to suit dietary preferences. You can make it gluten-free or even dairy-free by swapping in alternatives.
4. Perfect for Any Occasion: Whether it’s a backyard BBQ, birthday party, or casual family dinner, this icebox cake fits any gathering perfectly.
5. Delightfully Decadent: It strikes a beautiful balance between creamy and crunchy, making each bite a delightful experience.
6. No Waiting Time: You can enjoy the cake as soon as it sets, usually a couple of hours in the refrigerator.
These factors contribute to its popularity and why many people keep coming back for more. Each layer of the cake can evoke feelings of nostalgia, and it promises to impress anyone lucky enough to try it!
Preparation and Cooking Time
Preparing the No Bake Peanut Butter Icebox Cake is refreshingly easy. Here’s a breakdown of the time required:
– Preparation Time: 20 minutes
– Chill Time: 4 hours (or overnight for best results)
This means you can have a dessert ready without the long wait. The chill time ensures that the cake sets well, allowing the flavors to meld beautifully. Whether you’re making it for a special occasion or just because you want a sweet treat, this time frame will work smoothly for most schedules.
Ingredients
– 1 cup peanut butter (creamy or crunchy)
– 1 cup powdered sugar
– 8 ounces cream cheese (softened)
– 2 cups heavy whipping cream
– 1 teaspoon vanilla extract
– 24-30 chocolate wafer cookies (or graham crackers)
– Chopped nuts or chocolate chips (for garnish, optional)
Step-by-Step Instructions
Creating the No Bake Peanut Butter Icebox Cake is straightforward. Just follow these simple steps:
1. Prepare the Cream Cheese Mixture: In a large mixing bowl, beat the softened cream cheese until smooth. Add peanut butter and powdered sugar. Beat until fully combined and creamy.
2. Whip the Cream: In another bowl, whip the heavy cream with vanilla extract until stiff peaks form.
3. Fold in Cream: Gently fold the whipped cream into the peanut butter mixture. Be careful not to deflate the whipped cream too much; this will keep the cake light and airy.
4. Layer the Cake: In a 9×9 inch or a similar-sized dish, start layering. Spread a layer of the peanut butter mixture on the bottom.
5. Add Cookies: Place a layer of chocolate wafer cookies over the peanut butter mixture. You may need to break the cookies to fit them nicely.
6. Repeat Layers: Add another layer of the peanut butter mixture, followed by another layer of cookies. Continue this until the dish is full, ending with the peanut butter mixture on top.
7. Chill: Cover the dish with plastic wrap and refrigerate for at least 4 hours, preferably overnight. This allows the flavors to meld and the cake to set.
8. Serve: Before serving, garnish with chopped nuts or chocolate chips if desired.
These steps are designed to help you effortlessly create a stunning dessert that tastes as good as it looks!
How to Serve
Presenting the No Bake Peanut Butter Icebox Cake can be a fun and creative process. Here are some tips to make your serving stand out:
1. Slice with Care: Use a sharp knife to cut neat slices. Cleaning the knife between each cut ensures clean edges.
2. Garnish: Add a dollop of whipped cream or a drizzle of chocolate sauce on each slice for an extra touch. Chopped peanuts can offer a nice crunch too.
3. Pair with Snacks: Serve alongside fresh fruit, like sliced strawberries or bananas, to add freshness to this rich dessert.
4. Beverage Pairings: A glass of cold milk or iced coffee complements the dessert beautifully. Consider serving it with a scoop of vanilla ice cream for an exquisite indulgence.
5. Creative Containers: For a casual setting, consider serving smaller portions in individual dessert cups, allowing guests to easily enjoy their dessert.
These serving suggestions will not only enhance the presentation but also elevate the overall experience of indulging in this incredible No Bake Peanut Butter Icebox Cake!
With these detailed instructions and mouth-watering descriptions, you are ready to embark on a delightful journey of making this icebox cake that is sure to impress anyone!
Additional Tips
– Use Natural Peanut Butter: Opt for natural peanut butter without added sugar or hydrogenated oils for a more authentic flavor.
– Chill Well: Allow the cake to chill overnight for the best set and flavor. The longer it sits, the better the flavors meld.
– Experiment with Cookies: Try different types of cookies, such as vanilla wafers or Oreo cookies, to add unique flavors to the cake.
– Flavor Enhancements: Add a pinch of salt to the cream cheese mixture to balance the sweetness and enhance the peanut butter flavor.
– Keep Everything Cool: Be sure your cream cheese and heavy cream are well chilled before mixing for the best texture.
Recipe Variation
Feel free to customize the No Bake Peanut Butter Icebox Cake to suit your taste! Here are several variations to inspire you:
1. Chocolate Lovers: Incorporate chocolate peanut butter for an extra-rich flavor. Use chocolate crème cookies instead of chocolate wafers for more chocolatey goodness.
2. Nutty Alternative: Mix in crushed peanuts or almond butter for a different nutty twist in the filling.
3. Fruit Fusion: Add layers of sliced bananas or strawberries between the peanut butter mixture for a fruity surprise.
4. Dairy-Free Option: Substitute cream cheese with a dairy-free alternative and use coconut cream for the whipped topping.
Freezing and Storage
– Storage: Cover the cake tightly with plastic wrap or in an airtight container. It can last in the refrigerator for up to 5 days.
– Freezing: For longer preservation, freeze individual slices wrapped in plastic wrap and placed in a zippered bag. They can last for up to 2 months. Just ensure they are well-wrapped to prevent freezer burn.
– Thawing: To enjoy, simply remove from the freezer and let thaw in the refrigerator for a few hours before serving.
Special Equipment
To make the No Bake Peanut Butter Icebox Cake successfully, have the following equipment on hand:
– Mixing Bowls: For mixing both the peanut butter filling and whipped cream.
– Electric Mixer: Ideal for achieving smooth, creamy filling and stiff peaks in the whipped cream.
– Spatula: Useful for folding the whipped cream into the peanut butter mixture gently.
– 9×9 Inch Dish: An appropriate size for layering the cake. Alternatively, you can use a rectangular dish for larger servings.
Frequently Asked Questions
Can I use organic ingredients for a healthier option?
Yes, using organic versions of peanut butter, whipped cream, and sugar can enhance the cake’s nutritional profile.
How can I make this recipe gluten-free?
Simply substitute regular chocolate wafer cookies with gluten-free varieties.
What if I don’t have heavy cream?
You can use full-fat coconut milk as an alternative to heavy cream for a dairy-free version.
Can I add layers of frosting?
Absolutely! For added richness, feel free to spread whipped chocolate frosting between the layers.
Is this cake suitable for kids?
Definitely! Just ensure that none of the ingredients are allergens for the child consuming it.
Conclusion
The No Bake Peanut Butter Icebox Cake is a stellar dessert that blends effortless preparation with delightful flavors. Its creamy peanut butter mixture and crunchy cookie layers are guaranteed to satisfy your sweet cravings. This cake is not only versatile for various dietary needs but is sure to be a hit at any gathering. Give it a try, and you might find it becomes a staple dessert in your recipe repertoire!
No Bake Peanut Butter Icebox Cake: An Incredible Ultimate Recipe for 2023
- Total Time: 15 minutes
Ingredients
– 1 cup peanut butter (creamy or crunchy)
– 1 cup powdered sugar
– 8 ounces cream cheese (softened)
– 2 cups heavy whipping cream
– 1 teaspoon vanilla extract
– 24-30 chocolate wafer cookies (or graham crackers)
– Chopped nuts or chocolate chips (for garnish, optional)
Instructions
Creating the No Bake Peanut Butter Icebox Cake is straightforward. Just follow these simple steps:
1. Prepare the Cream Cheese Mixture: In a large mixing bowl, beat the softened cream cheese until smooth. Add peanut butter and powdered sugar. Beat until fully combined and creamy.
2. Whip the Cream: In another bowl, whip the heavy cream with vanilla extract until stiff peaks form.
3. Fold in Cream: Gently fold the whipped cream into the peanut butter mixture. Be careful not to deflate the whipped cream too much; this will keep the cake light and airy.
4. Layer the Cake: In a 9×9 inch or a similar-sized dish, start layering. Spread a layer of the peanut butter mixture on the bottom.
5. Add Cookies: Place a layer of chocolate wafer cookies over the peanut butter mixture. You may need to break the cookies to fit them nicely.
6. Repeat Layers: Add another layer of the peanut butter mixture, followed by another layer of cookies. Continue this until the dish is full, ending with the peanut butter mixture on top.
7. Chill: Cover the dish with plastic wrap and refrigerate for at least 4 hours, preferably overnight. This allows the flavors to meld and the cake to set.
8. Serve: Before serving, garnish with chopped nuts or chocolate chips if desired.
These steps are designed to help you effortlessly create a stunning dessert that tastes as good as it looks!
- Prep Time: 15 minutes
- Cook Time: 0 minutes
Nutrition
- Serving Size: 9 servings
- Calories: 400 kcal
- Fat: 28g
- Protein: 5g