
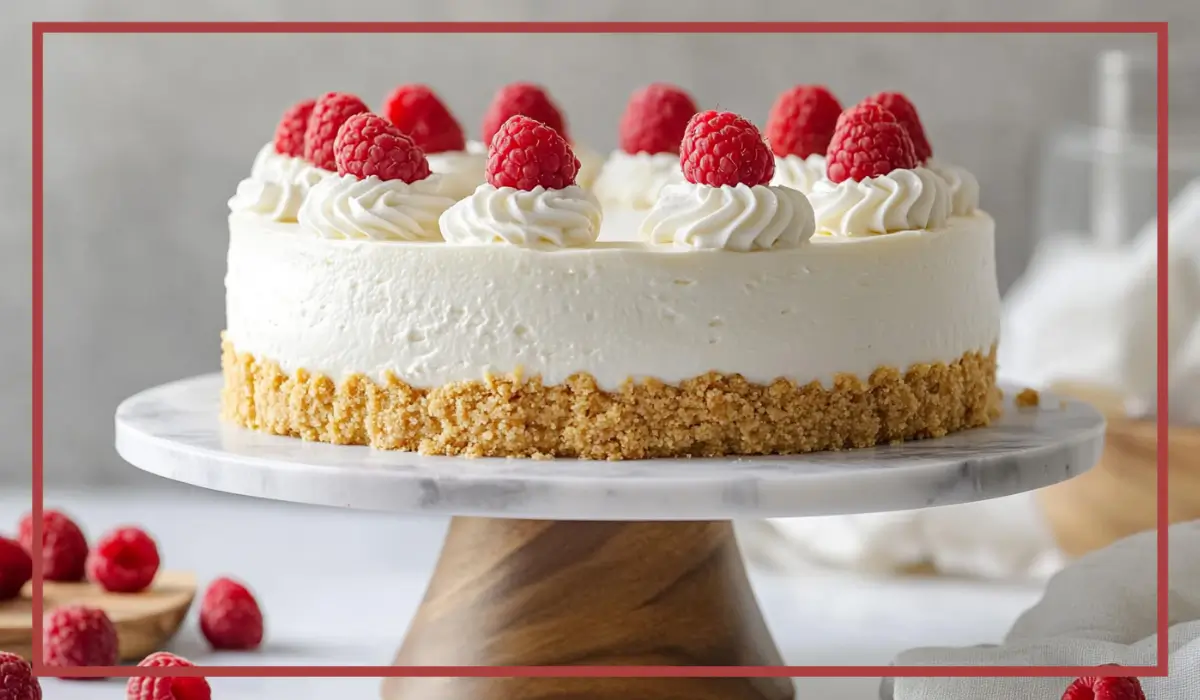
There’s something truly special about lemon desserts. They’re light, refreshing, and just the right amount of sweet. Now imagine all that, packed into a soft, creamy cheesecake with a buttery graham cracker crust—and absolutely no oven required. That’s exactly what you get with this no-bake lemon cheesecake.
Whether you’re making dessert for a family gathering, a summer dinner party, or just to treat yourself on a quiet weekend, this cheesecake is a total crowd-pleaser. It feels indulgent, but not heavy. It looks impressive, but it’s incredibly easy to make. And thanks to the no-bake method, there’s no worrying about cracked tops, overbaking, or water baths.
What makes this cheesecake even more lovable is how it blends simplicity with elegance. You only need a handful of basic ingredients—cream cheese, powdered sugar, heavy cream, lemon juice, and vanilla—to create a filling that’s fluffy, rich, and melt-in-your-mouth smooth. The graham cracker crust adds just the right crunch and balances the creamy texture perfectly.
I remember the first time I made this recipe. It was a hot summer day, and the thought of turning on the oven was enough to make me run the other way. I needed a dessert that felt fresh and bright but didn’t require any baking. After some experimenting and a bit of inspiration from my favorite café’s lemon tart, this cheesecake came together—and it’s been a staple in my dessert rotation ever since.
Over time, it’s become my go-to for everything from casual brunches to birthday parties. Everyone who tries it asks for the recipe, and I always love how surprised they are to hear how simple it is to make. It’s the kind of dessert that tastes like sunshine and comfort in one bite. Trust me—you’re going to want to make this more than once.
Why You’ll Love This No-bake lemon cheesecake Recipe
It’s Easy and No-Fuss
One of the biggest reasons people fall in love with this no-bake lemon cheesecake is how incredibly simple it is to make. There’s no oven involved, which means no need to worry about precise baking times, water baths, or cracking. All you need is a mixer and a bit of chill time in the fridge.
Even if you’re completely new to baking—or in this case, “no-baking”—you’ll find this recipe very approachable. Each step is clear, and the ingredients are easy to find at any grocery store. You don’t need any fancy equipment or advanced techniques, and yet, the result looks and tastes like a dessert from a high-end bakery.
It’s Light, Creamy, and Packed with Flavor
This cheesecake strikes the perfect balance between rich and refreshing. The cream cheese gives it a smooth, luscious texture, while the whipped cream lightens it up, giving it that airy, cloud-like quality that melts on your tongue. The lemon juice adds a fresh, zesty tang that cuts through the richness beautifully, making every bite feel balanced and satisfying.
The graham cracker crust is sweet, buttery, and perfectly crisp. It complements the soft filling with a lovely texture contrast, and it holds up beautifully—even after a few days in the fridge.
It’s Crowd-Pleasing and Customizable
This cheesecake is perfect for every occasion. Whether you’re serving it at a family gathering, a potluck, or just for a quiet night in, it always gets rave reviews. Kids love it, adults love it, and because it’s not too heavy, people always come back for seconds.
You can also easily customize it with your favorite toppings. Add a layer of lemon curd for extra citrus punch, drizzle it with berry sauce, or top it with fresh fruit for a burst of color and freshness. You can even add a chocolate ganache drizzle for a rich twist. The base is simple, which makes it the perfect canvas for creativity.
Health Benefits of this No-bake lemon cheesecake
A Lighter Dessert Option
While cheesecake isn’t typically seen as a “health food,” this no-bake lemon cheesecake is actually a lighter option compared to traditional baked cheesecakes. One reason is the absence of eggs and heavy baking ingredients. By folding in whipped cream, the texture becomes airy and light, which makes it feel less dense while still offering that creamy indulgence.
Another benefit is portion control. Because this cheesecake is rich in flavor, even a small slice feels satisfying. You can enjoy it without feeling weighed down, especially after a heavy meal.
Real Ingredients You Can Feel Good About
This recipe uses straightforward, recognizable ingredients—cream cheese, lemon juice, vanilla extract, powdered sugar, and heavy cream. There’s nothing overly processed or artificial here. Using fresh lemon juice not only adds a bright flavor but also delivers a small dose of vitamin C. The lemon’s natural acidity also helps balance the sweetness, giving the cheesecake a refreshing finish.
For the crust, graham crackers are a familiar favorite. They’re easy to find and lower in fat than more buttery crust options. You can also choose to use whole wheat graham crackers for a bit more fiber.
Easy to Modify for Dietary Needs
Another bonus? This cheesecake is very adaptable. If you’re looking to make it lower in sugar, you can easily reduce the amount of powdered sugar or use a sugar substitute like erythritol or stevia. Want a dairy-free version? There are several plant-based cream cheeses and whipped toppings that work well in this type of no-bake dessert.
The crust can also be made gluten-free by swapping regular graham crackers with a gluten-free alternative. With a few smart substitutions, this cheesecake becomes an inclusive treat everyone can enjoy, regardless of dietary restrictions.
Preparation Time, Servings, and Nutritional Information
Prep Time Breakdown
One of the most appealing aspects of this recipe is how quickly it comes together. Here’s how the timing breaks down:
- Crust Preparation: 10 minutes
- Filling Preparation: 15 minutes
- Assembly: 5 minutes
- Chilling Time: At least 6 hours (preferably overnight)
Total Active Time: Around 30 minutes
Total Inactive Time (chilling): Minimum 6 hours
You can prepare it in the morning and let it chill during the day, or assemble it the night before a special event. Either way, it’s mostly hands-off.
Servings
This recipe makes one 9-inch cheesecake, which comfortably serves 10 to 12 people. Each slice is generous without being overwhelming, making it ideal for parties or large family dinners.
Nutritional Information (Per Serving, Based on 12 Servings)
- Calories: 390
- Protein: 4g
- Fat: 28g
- Carbohydrates: 29g
- Sugar: 18g
- Fiber: 0.5g
These values are approximate and will vary based on your ingredient choices. For example, using a lower-fat cream cheese or less sugar can reduce the calorie count.
Ingredients List of this No-bake lemon cheesecake
For the Crust:
- 1½ cups graham cracker crumbs (about 11–12 full sheets or 180g)
The base of the crust, these give a sweet, toasty flavor and a crunchy texture. - ¼ cup granulated sugar (50g)
Adds sweetness and helps bind the crust. - 6 tablespoons unsalted butter, melted (85g)
This brings richness and binds the crumbs together to form a sturdy base.
For the Filling:
- 16 oz brick-style cream cheese, softened (452g)
This is the heart of the cheesecake—rich, tangy, and smooth. Be sure to use brick-style, not the spreadable kind. - 1 cup powdered sugar (120g)
Powdered sugar dissolves easily and blends smoothly into the filling. - 2 teaspoons fresh lemon juice
Adds brightness and a subtle tang that balances the sweetness. - 1 teaspoon pure vanilla extract
Adds warmth and depth of flavor. - 1½ cups cold heavy whipping cream (360 ml, 36% fat)
Whipped to stiff peaks and folded in, this lightens the filling and gives it a fluffy texture.
These ingredients come together to create a perfect balance of flavors and textures. You can also personalize the filling by adding a teaspoon of lemon zest for extra zing or a tablespoon of sour cream for added tanginess.
Step-By-Step Cooking Instructions of this No-bake lemon cheesecake
Step 1: Prepare Your Pan
Before doing anything else, set up your 9-inch springform pan. These pans are a must for cheesecakes because of how easily they release the finished product. But even with a springform pan, it’s helpful to line the bottom with parchment paper. This step ensures the crust doesn’t stick, and your slices lift out cleanly.
If you don’t have a springform pan, don’t worry—you can still make this recipe using a deep-dish pie plate or an 8×8 square pan. Just know that it may be a little trickier to slice and serve neatly.
Step 2: Make the Graham Cracker Crust
What You’ll Need:
- 1½ cups graham cracker crumbs (180g)
- ¼ cup granulated sugar (50g)
- 6 tablespoons melted unsalted butter (85g)
Instructions:
- Crush the graham crackers if you haven’t already. The easiest way is to pulse full graham cracker sheets in a food processor until they turn into fine crumbs. If you don’t have a processor, place the crackers in a zip-top bag and crush them using a rolling pin until they’re very fine.
- Combine the crumbs and sugar in a medium-sized mixing bowl. Stir until evenly mixed.
- Pour in the melted butter and mix with a fork until the mixture resembles wet sand. It should hold together when you press it between your fingers.
- Transfer the mixture into your prepared pan. Use the bottom of a measuring cup or the back of a spoon to press the crumbs firmly into an even layer along the bottom. You want it compact so it stays intact when sliced later.
- Refrigerate the crust for at least 15 minutes while you make the filling. Chilling the crust helps it firm up, making it a sturdy base for the creamy filling.
Step 3: Whip the Cream
Whipped cream is one of the secrets behind the luxurious texture of this cheesecake. It gives the filling that light, airy quality while still keeping it rich.
What You’ll Need:
- 1½ cups cold heavy whipping cream (36% fat)
Instructions:
- Pour the cold cream into a large mixing bowl. Make sure the cream is straight from the fridge—the colder it is, the faster and better it will whip.
- Using a hand mixer or stand mixer with a whisk attachment, begin whipping the cream on medium speed. After about a minute, you’ll see it start to thicken. Increase to high speed and continue whipping until stiff peaks form—this means when you lift the beaters, the peaks should stand straight up without drooping.
- Set the whipped cream aside in the fridge while you prepare the rest of the filling. Don’t overbeat the cream, or it could turn grainy or start to separate.
Step 4: Make the Cream Cheese Filling
Now it’s time to build the flavor-packed core of your cheesecake.
What You’ll Need:
- 16 oz cream cheese, softened
- 1 cup powdered sugar
- 2 teaspoons fresh lemon juice
- 1 teaspoon vanilla extract
Instructions:
- In a large bowl, add the softened cream cheese. Using a hand mixer or stand mixer, beat the cream cheese for 1–2 minutes until smooth and creamy. This step is important for getting a lump-free filling, so make sure the cream cheese is fully softened before you begin.
- Add the powdered sugar to the cream cheese, then mix on low speed to combine. Once the sugar is mostly incorporated, increase the speed to medium-high and beat until smooth.
- Add the lemon juice and vanilla extract, and continue to beat until everything is fully blended. Scrape down the sides of the bowl to ensure all ingredients are mixed evenly.
The filling should be silky, thick, and slightly tangy. The lemon adds just the right amount of brightness without overpowering the cheesecake flavor.
Step 5: Fold in the Whipped Cream
This step transforms your cream cheese mixture into a fluffy, mousse-like filling.
- Add one-third of the whipped cream to the cream cheese mixture. Using a spatula, gently fold it in by turning the mixture over itself. This loosens up the texture without deflating it.
- Fold in the remaining whipped cream in two additions. Be gentle and take your time—folding slowly helps keep the mixture light and airy. Try not to stir or mix too vigorously, or you’ll lose the fluffiness that makes this cheesecake so delightful.
Once fully combined, the filling should be thick, smooth, and beautifully light.
Step 6: Assemble the Cheesecake
Now comes the satisfying part—assembling your masterpiece.
- Pour the filling over the chilled crust. Use a spatula to spread it evenly from edge to edge, smoothing out the top.
- Tap the pan gently on the counter a couple of times to remove any air bubbles and help the filling settle.
- Cover the cheesecake with plastic wrap or foil and refrigerate for at least 6 hours, but preferably overnight. The longer it chills, the better it sets.
Don’t skip this chilling step—it’s what transforms your soft filling into a firm, sliceable cheesecake. It also allows the flavors to meld and deepen, making each bite even better.
Step 7: Serve and Enjoy
After all that patience, it’s finally time to dig in.
- Carefully release the springform pan, then lift the cheesecake out. Use a long, sharp knife to slice cleanly through the chilled filling.
- Wipe the knife between slices to keep the edges neat and beautiful.
- Top your slices with whatever you like—here are a few favorite ideas:
- A dollop of whipped cream and a sprinkle of lemon zest
- Fresh berries like raspberries, blueberries, or strawberries
- A spoonful of lemon curd for extra lemon punch
- A drizzle of berry sauce or chocolate ganache for a decadent touch
Each slice is creamy, bright, and just the right amount of indulgent.

How to Serve this No-bake lemon cheesecake
Serving this no-bake lemon cheesecake can be just as enjoyable as making it. Once it’s fully chilled and set, you’re only a few finishing touches away from a showstopping dessert. Because it’s already rich and flavorful on its own, it doesn’t take much to elevate each slice into something truly special.
Best Way to Slice
Start by removing the cheesecake from the springform pan. Run a thin knife along the inside edge before unclipping the latch. This ensures a clean release and helps preserve that gorgeous edge. If you lined the bottom with parchment paper, you’ll find it much easier to transfer the cheesecake to a serving plate without any sticking.
When slicing, use a long, sharp knife and wipe it clean between each cut. This might seem like a small detail, but it makes a big difference in presentation. Clean cuts make your cheesecake look bakery-worthy and prevent smudging, especially with that smooth, creamy filling.
Delicious Toppings to Try
You can serve the cheesecake exactly as is—its lemony flavor and creamy texture are more than enough to stand alone—but if you want to add a little something extra, there are plenty of ways to dress it up:
- Whipped Cream: A swirl of freshly whipped cream on top of each slice adds a light and elegant touch.
- Lemon Zest: Sprinkle a bit of freshly grated lemon zest across the top for added citrus aroma and color.
- Fresh Berries: Add raspberries, blueberries, or sliced strawberries for a pop of color and juicy contrast.
- Lemon Curd: Spoon a thin layer on top before slicing or serve on the side for a double-lemon experience.
- Berry Compote or Fruit Sauce: Drizzle with strawberry or blueberry sauce for a sweet and tart pairing that complements the cheesecake perfectly.
Plating Like a Pro
For more formal occasions, serve each slice on a small dessert plate with a fork and maybe even a sprig of mint for that fresh, elegant look. If you’re hosting a party, consider pre-slicing the cheesecake and adding toppings individually to each piece. It’s a simple step that makes serving seamless and polished.
And if you’re keeping it casual at home? Just grab a fork, serve it with love, and enjoy every bite.
Pairing Suggestions
Pairing your no-bake lemon cheesecake with the right accompaniments can take it from a simple dessert to a full-on experience. Whether you’re thinking about drinks, sides, or even entire meal pairings, there’s no shortage of ways to complement the bright, creamy flavors of this cheesecake.
Beverages to Serve With Lemon Cheesecake
Because lemon has such a refreshing, tangy profile, it pairs beautifully with both hot and cold beverages. Here are a few favorites:
- Hot Herbal Teas: Chamomile, mint, or lemon verbena teas all pair wonderfully. They’re soothing, and they help cleanse the palate between bites.
- Iced Green Tea or Black Tea: The slight bitterness in tea balances out the richness of the cheesecake without overwhelming the citrus notes.
- Sparkling Water with Citrus Slices: This adds a bit of fizz and keeps things light, making it a great option for daytime events or outdoor meals.
- Fresh Lemonade or Fruit-Infused Water: Staying on theme, lemonade amplifies the lemony flavors, while cucumber or berry-infused water adds a cool, refreshing touch.
If you’re serving a halal-friendly meal, these non-alcoholic drinks keep things festive without needing wine or champagne.
Light Savory Dishes to Precede Dessert
Since the cheesecake is sweet and creamy, it’s a good idea to precede it with a lighter main course to balance the meal. Here are a few dinner ideas that pair well with lemon cheesecake:
- Grilled Chicken with Herbs and Olive Oil: Light and flavorful, this pairs well with lemony desserts.
- Mediterranean-Style Grain Bowls: Think quinoa, roasted veggies, and a lemony tahini dressing. The lemon from the main meal will connect beautifully with the cheesecake at the end.
- Pan-Seared Fish with Garlic and Lemon: This ties into the citrus notes and keeps the meal feeling fresh and light from start to finish.
- Stuffed Bell Peppers with Rice and Fresh Herbs: A veggie-forward option that satisfies without being heavy.
Snack Pairings for Casual Occasions
If you’re not serving a full meal and just want a spread of light treats and desserts, consider pairing this cheesecake with:
- Shortbread Cookies or Biscotti: These dry, buttery cookies contrast well with the creamy texture of the cheesecake.
- Mini Fruit Tarts: Keep the citrus theme going and add color to your dessert table.
- Lemon Bars or Macarons: A lemon-on-lemon moment never hurts, especially if you love citrus.
When paired thoughtfully, this cheesecake can elevate any table, from a cozy brunch with family to a more elegant dinner party spread. The key is to keep things light and complementary—nothing too rich or overpowering, just delicate flavors that let the cheesecake shine.
Storage, Freezing & Reheating Instructions
One of the best parts about a no-bake cheesecake—besides how easy it is to make—is how well it holds up in the fridge and freezer. That makes it a perfect make-ahead dessert for dinner parties, holidays, or just to have something sweet on hand for the week. Let’s talk about how to store it properly, how to freeze it for longer-term keeping, and even a few tips on bringing it back to life after freezing.
If you plan to eat your cheesecake within a few days, you can simply store it in the refrigerator. After it’s fully set, cover the cheesecake with plastic wrap or aluminum foil and keep it chilled. It will stay fresh for up to five days in the fridge. Make sure it’s covered tightly to prevent it from drying out or absorbing odors from other foods. If you’ve already sliced the cheesecake, store the slices in an airtight container with a piece of parchment paper between layers to keep them from sticking together.
Freezing is another great option if you want to prepare the cheesecake well in advance. Once it’s set, you can either freeze the entire cheesecake or individual slices. To freeze the whole cheesecake, place it in the freezer uncovered for about 1–2 hours until the top is firm. Then wrap it in two layers of plastic wrap followed by a layer of aluminum foil. This prevents freezer burn and keeps the texture intact. For individual slices, place them on a baking sheet lined with parchment paper and freeze until solid. Then wrap each slice and store them together in a freezer-safe container or zip-top bag. The cheesecake will keep well for up to two months in the freezer.
When you’re ready to serve frozen cheesecake, transfer it to the fridge and let it thaw overnight. You can also let it sit at room temperature for 30–60 minutes if you need it a bit quicker, but don’t microwave it—that can change the texture. Once thawed, you’ll find that the flavor and texture are still wonderfully creamy and satisfying.
If you’ve added toppings like whipped cream or fruit, it’s best to freeze the cheesecake without them and add fresh toppings just before serving. That way, you keep the texture and presentation at their very best.
Common Mistakes to Avoid
Even though this recipe is super beginner-friendly, there are a few little missteps that can trip people up if they’re not careful. But don’t worry—I’ve made these mistakes so you don’t have to. Let’s walk through the most common ones and how to avoid them for a perfect cheesecake every time.
First up, using the wrong kind of cream cheese. It’s crucial to use brick-style full-fat cream cheese, not the whipped or spreadable kind that comes in tubs. The brick-style variety has the structure you need to help the cheesecake set properly. If you use a softer, airier version, your filling might not firm up, even after hours in the fridge.
Next, not softening your cream cheese completely before mixing. Cold cream cheese can lead to a lumpy filling that’s tough to smooth out. To avoid this, let the cream cheese sit at room temperature for at least 30–45 minutes. You want it soft and easy to blend so it creates that silky, lump-free base.
Another mistake is over- or under-whipping the cream. For the best texture, you want stiff peaks—where the cream holds its shape but isn’t grainy or separated. If you under-whip, the filling won’t hold up well. If you over-whip, the cream can become clumpy and difficult to fold into the filling.
Be careful not to stir too aggressively when folding the whipped cream into the cream cheese mixture. This step is all about preserving the airy structure, so fold gently with a spatula until everything is just combined.
And finally, not giving the cheesecake enough time to chill. It might be tempting to dive in early, but chilling for at least six hours, preferably overnight, is essential. This helps the cheesecake firm up properly and develop its full flavor. If you try to cut it too soon, it might be too soft to slice cleanly.
Avoid these common pitfalls, and you’re already well on your way to making a flawless no-bake lemon cheesecake that will wow your guests and satisfy your sweet tooth.
Pro Tips
Even though this cheesecake is simple, there are a few insider tricks that can take it from good to utterly unforgettable. These pro tips come from lots of trial and error, as well as plenty of cheesecake experiments in my own kitchen. If you want a dessert that looks as good as it tastes, these little details make all the difference.
First, let’s talk about draining moisture. If your cream cheese or whipped cream have extra liquid (which can sometimes happen), it can affect how well your cheesecake sets. Make sure your cream cheese isn’t watery, and always use cold heavy cream straight from the fridge so it whips up properly.
If you want a flavor boost, consider adding a teaspoon of finely grated lemon zest to the filling. It’s a small step, but the natural oils in the zest give the cheesecake a deeper citrus flavor without extra acidity. Just make sure to zest only the yellow part of the peel—avoid the bitter white pith underneath.
Another great tip? Use a chilled bowl and beaters when whipping the cream. This helps it firm up faster and hold its shape longer, which leads to a better texture in your final filling.
When pressing the crust into the pan, use a flat-bottomed measuring cup to really compact it evenly. This not only gives you a solid base but also keeps it from crumbling when sliced. Be sure to go all the way to the edges and don’t forget the corners.
If presentation matters, you can smooth the top of your cheesecake with an offset spatula dipped in warm water. This melts the top layer slightly and gives you that sleek, professional finish you see in bakeries.
Lastly, always give your cheesecake a few minutes at room temperature before slicing. This makes the filling easier to cut and helps release it cleanly from the pan. You’ll get neater slices and a much more enjoyable serving experience.
These tips might sound small, but together they help you create a cheesecake that’s not just good—but restaurant-quality impressive.
Frequently Asked Questions (FAQs)
Whenever I share this No-bake lemon cheesecake recipe, I get a lot of questions from friends, family, and readers who want to make sure they’re doing it right. Below are some of the most common questions, along with clear, helpful answers to keep your baking stress-free and your results delicious.
Can I use store-bought whipped topping instead of whipping the cream?
Yes, you can substitute store-bought whipped topping (like Cool Whip) if you’re in a pinch. Use about 3 cups of whipped topping in place of the homemade whipped cream. However, whipping the cream yourself gives the cheesecake a fresher flavor and lighter texture.
Can I make this No-bake lemon cheesecake ahead of time?
Absolutely. In fact, it’s better when made ahead because it needs several hours to chill and set properly. You can prepare it up to two days in advance and keep it refrigerated until ready to serve.
What can I use instead of graham crackers for the crust?
If you don’t have graham crackers or want to switch things up, you can use digestive biscuits, crushed vanilla wafers, or even gingersnaps. Just keep the crumb and butter ratios the same and adjust for sweetness as needed.
Can I freeze leftovers?
Yes! This cheesecake freezes beautifully. Freeze individual slices or the whole cake, tightly wrapped. Thaw in the fridge overnight before serving.
What if I don’t have a springform pan?
You can use a deep pie dish or an 8×8-inch square baking dish instead. The presentation won’t be quite as classic, but the taste and texture will still be excellent. Just be sure to grease the pan or line it with parchment for easier removal.
Why didn’t my cheesecake set properly?
Usually, this is due to not chilling it long enough, under-whipping the cream, or using the wrong type of cream cheese. Make sure your ingredients are at the right temperature and give the cheesecake enough time in the fridge to firm up.
Can I add fruit directly into the filling?
It’s best to keep the filling smooth and creamy, but you can gently fold in a handful of chopped berries or swirl in a bit of fruit puree for a marbled effect. Just avoid anything too juicy, which might affect the texture.
Is this No-bake lemon cheesecake recipe gluten-free?
The filling itself is gluten-free, but traditional graham crackers contain gluten. To make this cheesecake fully gluten-free, simply use gluten-free graham crackers or another gluten-free cookie for the crust.
Can I use low-fat cream cheese?
While you can technically use low-fat cream cheese, I recommend sticking with full-fat for the best flavor and texture. The richness helps the cheesecake set properly and gives it that classic creamy mouthfeel.
What’s the best way to transport this cheesecake?
Chill it fully, then keep it in the springform pan for transport. Wrap it tightly in plastic wrap and place it in a cooler if needed. Add toppings just before serving to keep them fresh.
Conclusion & Call to Action
If you’ve made it this far, you’re more than ready to take on this no-bake lemon cheesecake. Whether you’re a beginner or a seasoned home baker, this recipe is as approachable as it is delicious. With its creamy, tangy filling, buttery graham cracker crust, and endless topping possibilities, it’s truly one of those desserts that never fails to impress.
What I love most about this cheesecake is how adaptable it is. You can dress it up for a fancy dinner party or keep it simple for a cozy night in. You can make it a few hours ahead or prepare it days in advance. It’s the perfect go-to dessert for when you want something that feels special without spending hours in the kitchen.
I really hope you give this one a try. Don’t worry if it’s your first cheesecake—this recipe is super forgiving, and the steps are easy to follow. You’ll be amazed at how quickly it all comes together, and once you take that first bite, you’ll understand why this one’s such a winner.
And when you do make it, I’d love to hear how it turns out! Share your experience, snap a photo of your finished cheesecake, and tell me what toppings you tried. If you’re sharing it on social media, feel free to tag me—I love seeing your creations come to life.
So go ahead, gather your ingredients, clear a little space in the fridge, and whip up a cheesecake that’s equal parts creamy, dreamy, and refreshingly lemony. Your taste buds—and your guests—will thank you.
Print
No-Bake Lemon Cheesecake: Light, Creamy, and Easy to Make
- Total Time: 6 hours 30 minutes (including chill time)
- Yield: 10–12 servings 1x
- Diet: Halal
Description
This no-bake lemon cheesecake is smooth, creamy, and refreshingly citrusy with a buttery graham cracker crust. A perfect make-ahead dessert for any occasion.
Ingredients
For the Crust
-
1½ cups graham cracker crumbs (180g)
-
¼ cup granulated sugar (50g)
-
6 tbsp unsalted butter, melted (85g)
For the Filling
-
16 oz cream cheese, softened (452g)
-
1 cup powdered sugar (120g)
-
2 tsp fresh lemon juice
-
1 tsp vanilla extract
-
1½ cups cold heavy whipping cream (360ml)
Instructions
-
Line a 9-inch springform pan with parchment paper.
-
Mix graham cracker crumbs, sugar, and melted butter. Press into pan; chill.
-
Whip heavy cream to stiff peaks; set aside.
-
Beat cream cheese until smooth. Add powdered sugar, lemon juice, and vanilla.
-
Fold in whipped cream gently.
-
Spread filling over crust. Smooth top.
-
Cover and chill at least 6 hours or overnight.
-
Serve with whipped cream, berries, or lemon curd.
Notes
-
Use full-fat brick cream cheese for best texture.
-
Chill at least 6 hours for a firm set.
-
Add lemon zest to enhance flavor.
-
Don’t overmix when folding in whipped cream.
- Prep Time: 30 minutes
- Cook Time: 0 minutes
- Category: Dessert
- Method: No-Bake
- Cuisine: American