
There’s something about coconut desserts that instantly makes you feel like you’re on vacation. The sweet, nutty aroma, the creamy texture, and that lightly toasted crunch on top—it’s tropical comfort in dessert form. This no-bake coconut cheesecake delight brings together all of those amazing flavors in one easy-to-make, absolutely irresistible layered treat.
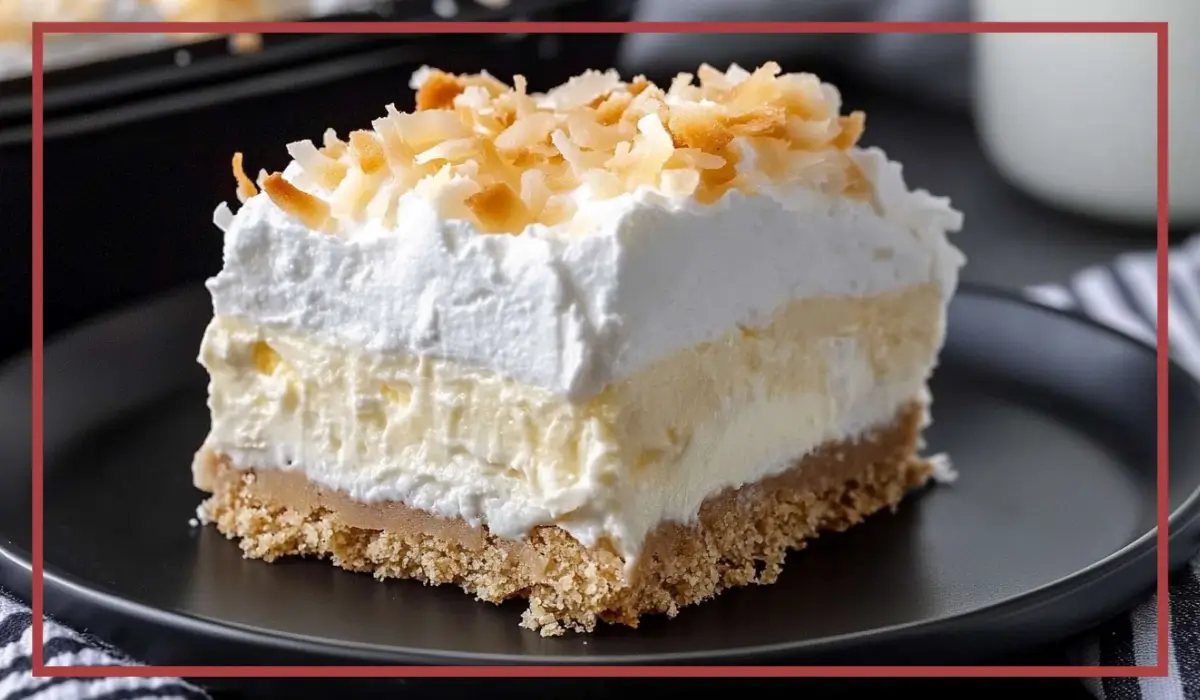
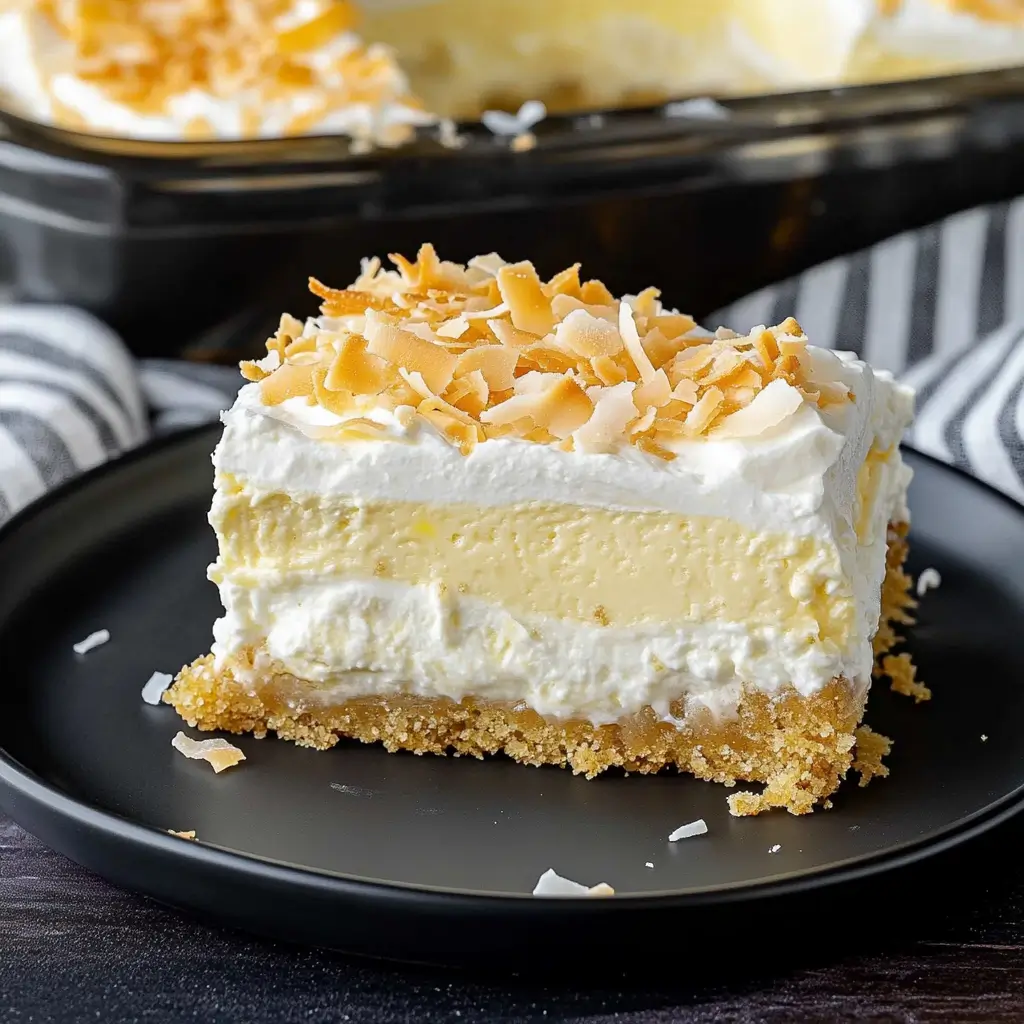
If you’re the kind of person who loves rich, creamy desserts but dreads turning on the oven—especially during the warmer months—then this is your new go-to. It starts with a buttery graham cracker crust, followed by a luscious coconut cheesecake layer, then a smooth and creamy coconut pudding layer. And of course, the whole thing is topped with whipped topping and golden toasted coconut for the perfect finish.
I first made this dessert for a family barbecue one summer when I needed something quick, crowd-pleasing, and cool. The moment I set it down on the table, everyone was asking for the recipe before they even tried it—just based on the smell and how pretty it looked. Once they tasted it, it was all over. This quickly became one of those recipes that gets requested again and again.
Another thing I love about this recipe is how easy it is to make ahead of time. You can throw it together the night before a party, let it chill overnight, and forget about it until it’s time to serve. That kind of low-effort, high-impact dessert is a rare gem. It also keeps really well in the fridge, so you can enjoy it over a few days—if it lasts that long!
This no-bake coconut cheesecake delight is truly one of those desserts that feels fancy, tastes luxurious, and yet comes together with simple pantry and fridge staples. Whether you’re serving it at a birthday party, bringing it to a potluck, or just making it because you love coconut as much as I do, this recipe is sure to be a hit.
Why You’ll Love This No-bake coconut cheesecake Recipe
There are countless reasons to fall in love with this coconut cheesecake dessert, but let’s start with the most important one: it’s incredibly easy to make. Even if you’re not super confident in the kitchen, this recipe will make you feel like a pro. There’s no baking, no complicated steps, and you don’t even need fancy tools—just a mixing bowl, a whisk, and a 9×13-inch pan.
The texture is a dream. The graham cracker crust adds a touch of crunch and buttery richness at the base. The cheesecake layer is creamy, tangy, and sweet with just the right hint of coconut. Then you’ve got that silky pudding layer, which brings even more coconut flavor and a luxurious mouthfeel. Finally, the whipped topping and toasted coconut give it lightness and a beautiful golden finish.
Another reason to love this recipe is how versatile it is. You can serve it straight from the fridge, which makes it perfect for hot weather. It’s also totally portable, so you can make it for picnics, potlucks, family reunions, or any gathering where you need a reliable dessert that feeds a crowd.
Kids love it. Adults love it. Coconut lovers are obsessed with it. And even folks who don’t normally go for coconut desserts often find themselves going back for seconds. There’s just something about the balance of flavors and textures that makes it so satisfying.
Because it’s chilled, this dessert feels refreshing even though it’s rich. The cool layers practically melt in your mouth, while the toasted coconut gives just enough crunch to keep every bite interesting. It’s not overly sweet, and the combination of cream cheese and coconut makes it feel indulgent without being too heavy.
So whether you’re new to cooking or an experienced baker looking for a no-fuss treat, this recipe checks all the boxes. It’s a make-ahead, crowd-pleasing, creamy coconut dessert that always steals the show.
Health Benefits of this No-bake coconut cheesecake
Now, you might not think of dessert as something that has health benefits—but let’s be honest, food isn’t just about nutrition. It’s also about joy, connection, and comfort. That said, this no-bake coconut cheesecake delight does offer a few nutritional perks worth celebrating, especially when enjoyed in moderation.
First, let’s talk about coconut. While it’s often considered an indulgent ingredient, coconut is actually rich in medium-chain triglycerides (MCTs), a type of fat that may support metabolism and energy levels. Shredded coconut and coconut extract both contribute to that unmistakable flavor while bringing along trace minerals like manganese, which helps with bone health and enzyme function.
The cream cheese in this dessert provides a good source of calcium and protein. Calcium is essential for maintaining strong bones and teeth, and the protein can help balance the sugar content slightly by slowing digestion and providing longer-lasting energy.
Half-and-half, if used instead of whole milk, adds creaminess with a little more fat content—but that fat helps make the dessert more satisfying. That means you’re likely to enjoy a smaller portion and feel content, rather than needing to overindulge to feel full.
Also, since this dessert doesn’t require baking, it retains the texture and nutrients of its ingredients without the effects of high-heat cooking. And let’s not forget: mental health matters too. Sharing a delicious dessert with people you love, or even treating yourself to a creamy slice after a long day, can do wonders for your mood.
Of course, moderation is key. This dessert is rich and meant to be a treat. But it can easily be part of a balanced lifestyle, especially if paired with lighter meals or enjoyed after a nourishing dinner.
In short, while this dessert isn’t a superfood-packed smoothie, it does offer a few healthful elements—and a lot of happiness. And honestly, that’s just as important.
Preparation Time, Servings, and Nutritional Information
One of the best parts of this recipe is how quick it is to pull together. From start to finish, it takes about 30 to 40 minutes of active prep time. After that, it just needs to chill in the fridge for at least 6 hours, or ideally overnight.
Total Time:
Prep Time: 40 minutes
Chill Time: 6 hours or overnight
Total Time: Approximately 6 hours and 40 minutes
Servings:
This recipe makes approximately 12–15 servings, depending on how generous your slices are. It’s perfect for family gatherings, holiday celebrations, or taking to a potluck where you need to serve a crowd.
Nutritional Information (Per Serving, based on 15 servings):
Calories: ~420
Total Fat: 30g
Saturated Fat: 20g
Cholesterol: 60mg
Carbohydrates: 35g
Sugars: 24g
Protein: 4g
Fiber: 1g
Please note that nutritional values may vary slightly based on the brands of ingredients used and portion sizes. You can easily lighten this dessert by using reduced-fat cream cheese or a light whipped topping, though the texture and flavor will vary a bit.
Despite its richness, this no-bake coconut cheesecake delight is a dessert that satisfies with just a small square. It’s cool, creamy, and layered with flavors that hit all the right notes. Because of its chilled nature and the portion-friendly setup in a large pan, it’s a wonderful choice for making ahead and serving up with ease.
Ingredients List of this No-bake coconut cheesecake
Let’s break down the ingredients by layer, so it’s super easy to organize your shopping list and prep process. Every layer has a specific role to play, and together they build that perfect tropical cheesecake bite.
Graham Cracker Crust:
-
1½ cups graham cracker crumbs (about 12–14 sheets)
Graham crackers provide that classic, slightly sweet crunch. You can crush them in a food processor or place them in a sealed plastic bag and smash them with a rolling pin. -
2 tablespoons granulated sugar
A little sugar enhances the natural sweetness of the crust without making it overwhelming. -
½ cup unsalted butter, melted
Butter binds everything together and adds rich flavor. Use unsalted so you can control the seasoning.
Coconut Cheesecake Layer:
-
16 oz cream cheese, softened (2 blocks)
This is the base of your cheesecake layer. Let it soften at room temperature so it whips up smooth and creamy. -
1 cup powdered sugar
Powdered sugar blends beautifully into the cream cheese, keeping the texture smooth without any grittiness. -
1 teaspoon coconut extract
This is key for boosting the coconut flavor. It’s strong, so a little goes a long way. -
8 oz Cool Whip, thawed
Cool Whip adds lightness and volume. It makes the cheesecake layer feel mousse-like and airy.
Coconut Pudding Layer:
-
2 (3.4 oz) boxes instant coconut cream pudding mix (or one 6.8 oz box)
This layer adds rich coconut flavor and creamy texture. Make sure to use instant pudding, not the cook-and-serve kind. -
3 cups half-and-half (or whole milk)
Half-and-half makes the pudding layer extra thick and creamy, but you can use whole milk for a slightly lighter texture.
Whipped Topping & Garnish:
-
8 oz Cool Whip
This final layer adds lightness and visual appeal. It also balances the richness of the lower layers. -
1 cup sweetened shredded coconut, toasted
Toasted coconut not only adds a wonderful nutty crunch but also brings out the natural oils and sweetness in the coconut. It’s the perfect finishing touch.
With these ingredients on hand, you’re ready to build a no-bake dessert that’s as stunning as it is simple to create. Each layer builds on the last, creating a beautiful, crowd-pleasing treat that tastes like sunshine in every bite.
Step-By-Step Cooking Instructions of this No-bake coconut cheesecake
Now that you have all your ingredients prepped and ready, it’s time to assemble your no-bake coconut cheesecake delight. Don’t worry—this part is super straightforward, and I’ll walk you through each layer step by step. Whether you’re brand new to the kitchen or just in need of a quick refresher, these instructions will guide you with ease.
Step 1: Prepare the Pan and Crust
Start by grabbing a 9×13-inch baking dish. Spray it lightly with non-stick spray. This ensures easy serving later on and prevents any sticking.
Now, let’s move on to making that buttery, sweet graham cracker crust.
In a mixing bowl, combine 1½ cups of graham cracker crumbs with 2 tablespoons of granulated sugar. Stir to mix. Next, pour in ½ cup of melted unsalted butter. Mix everything together until the crumbs are fully coated and resemble wet sand. This mixture should hold together when pressed between your fingers.
Pour the crumb mixture into the prepared pan. Using your hands or the back of a measuring cup, press the mixture evenly into the bottom of the pan. Make sure to get into the corners and keep it as level as possible for an even base.
Once it’s firmly packed, place the crust in the freezer to firm up while you work on the next layer. Freezing the crust helps it set quickly and gives you a solid foundation for the soft cheesecake layer.
Step 2: Toast the Coconut for Garnish
Toasting the shredded coconut adds an extra layer of flavor and crunch to the dessert. It’s a small step that makes a big difference in both taste and presentation.
Preheat your oven to 350°F.
Spread 1 cup of sweetened shredded coconut evenly on a baking sheet lined with parchment paper or a silicone mat. Make sure it’s in a single layer for even toasting.
Place the tray in the oven and toast for 8–10 minutes, stirring once or twice during baking to ensure even color. Keep a close eye on it—coconut can go from golden brown to burnt very quickly.
Once it’s lightly golden and fragrant, remove it from the oven and set it aside to cool. You’ll use this as the finishing touch on your dessert.
Step 3: Make the Coconut Cheesecake Layer
In a large mixing bowl, add two blocks (16 oz total) of softened cream cheese. If your cream cheese is still a bit cold, you can microwave it for 10–15 seconds to soften it further, but be careful not to melt it.
Using a hand mixer or stand mixer, beat the cream cheese on medium speed until smooth and creamy, about 2 minutes. There should be no lumps—take your time here to ensure a silky texture.
Add 1 cup of powdered sugar and 1 teaspoon of coconut extract. Continue beating for another 1–2 minutes until the mixture is fully combined and fluffy.
Now it’s time to fold in the Cool Whip. Add 8 oz of thawed Cool Whip to the bowl. Using a spatula, gently fold it into the cream cheese mixture. Folding, rather than stirring or beating, keeps the mixture airy and prevents it from deflating.
Once it’s well incorporated and fluffy, remove the crust from the freezer and carefully spread the coconut cheesecake layer over the crust. Use an offset spatula or the back of a spoon to get an even layer.
Return the pan to the freezer briefly while you move on to the next step. This will help the layers stay distinct and beautiful.
Step 4: Make the Coconut Pudding Layer
In another large mixing bowl, combine two (3.4 oz) boxes of instant coconut cream pudding mix (or one 6.8 oz box) with 3 cups of cold half-and-half or whole milk.
Using a whisk or hand mixer, beat the mixture for about 2 minutes until it thickens. It should be smooth, creamy, and pourable but thick enough to hold its shape. Let it sit for a minute or two to fully set.
Take the pan from the freezer and gently spread the pudding mixture over the cheesecake layer. Again, use a spatula to smooth it into an even layer, working slowly to avoid mixing it into the layer below.
At this point, the dessert is really starting to take shape.
Step 5: Add the Final Whipped Topping Layer
Grab your remaining 8 oz of Cool Whip and spread it evenly over the top of the pudding layer. This final layer adds a creamy, cloud-like finish to the dessert and balances the rich layers beneath it.
Smooth it out gently with a spatula, going right up to the edges so that every bite gets a bit of that fluffy topping.
Step 6: Garnish with Toasted Coconut and Chill
Now it’s time for the crowning touch—your beautifully toasted coconut.
Sprinkle the cooled, golden shredded coconut evenly over the top of the dessert. It not only looks stunning, but it adds a crunchy contrast that brings the whole dessert together.
Once garnished, cover the dish with plastic wrap or foil and place it in the refrigerator to chill. It’s important to let it sit for at least 6 hours to allow the layers to firm up and the flavors to meld. Overnight chilling is even better if you have the time.
When it’s fully set, slice into squares and serve chilled. Each slice should reveal beautiful, distinct layers with creamy textures and toasted coconut on top.
How to Serve this No-bake coconut cheesecake
When it comes to serving this no-bake coconut cheesecake delight, there are a few different approaches you can take depending on the occasion.
For casual family dinners, simply slice into 12 or 15 squares right in the pan and serve them as-is. A spatula or pie server makes it easy to lift out the slices cleanly, especially if the dessert has chilled long enough.
If you’re serving guests or want to elevate the presentation, you can top each slice with an extra dollop of whipped topping and a sprinkle of extra toasted coconut just before serving. You could even add a tiny sprig of fresh mint or a sliver of fresh pineapple on the side for a tropical touch.
Another fun idea is to serve this dessert in individual cups or jars. Simply layer each component into small clear cups for a portable, party-friendly version of the dish. This is especially great for outdoor gatherings or events where people might be walking around.
This dessert pairs wonderfully with light meals, so consider serving it after grilled chicken skewers, a summer salad, or even a seafood dish. It adds the perfect sweet finish without feeling too heavy.
And if you’re looking for a dessert to impress at a potluck or holiday meal, this one always stands out. The layers are visually appealing, the flavors are rich but balanced, and it’s easy to transport and serve with minimal fuss.
Pairing Suggestions
Pairing a dessert like this no-bake coconut cheesecake with the right sides and drinks can really make the entire meal feel cohesive and special.
For beverages, a light and refreshing drink works best. Since the dessert is rich and creamy, a cold glass of sparkling water with lemon or lime makes a nice palate cleanser. If you’re serving this dessert at a gathering, a chilled pitcher of mint iced tea or coconut water infused with fresh fruit makes for a beautifully balanced pairing.
If you’re in the mood for something a little more indulgent, you can serve this alongside a creamy iced coffee or a coconut latte. The subtle bitterness of coffee complements the sweetness of the cheesecake and highlights the coconut flavor even more.
For a completely tropical experience, consider serving this dessert after a dinner that includes grilled shrimp with lime rice, jerk chicken with mango salsa, or even a pineapple-glazed turkey. The tropical notes in the main course will echo beautifully in the dessert and create a harmonious flavor profile from start to finish.
Looking for a family-friendly combo? This dessert pairs beautifully with fresh fruit on the side—think pineapple chunks, mango slices, or a simple fruit salad with lime and mint. The brightness of the fruit contrasts the richness of the dessert and brings everything together in a satisfying way.
You can even pair this with a scoop of coconut or vanilla bean ice cream if you’re feeling extra decadent. The cool, creamy flavors all play together perfectly, and it’s a crowd-pleasing combo for both kids and adults alike.
Whether you’re serving this dessert after a light lunch or as the grand finale of a festive dinner, these pairing ideas will elevate the experience and highlight the tropical, creamy joy that this no-bake coconut cheesecake brings.
Storage, Freezing & Reheating Instructions
This no-bake coconut cheesecake delight is not only easy to make but also incredibly convenient to store. Because it’s a chilled dessert, it actually improves in texture and flavor the longer it sits—up to a point, of course. Let’s break down how to store, freeze, and even reheat (though reheating isn’t typically necessary for this one).
Refrigeration:
Once your dessert is fully assembled and topped with toasted coconut, it should be stored in the refrigerator. Make sure it’s well-covered with plastic wrap or foil to prevent it from absorbing any odors from the fridge.
It’s best to refrigerate the dessert for at least 6 hours before serving, but overnight is even better. This allows the layers to set up properly and makes slicing much easier.
You can safely keep this cheesecake delight in the fridge for up to 4–5 days. The texture will remain creamy and fresh, and the toasted coconut will hold its crispness for the first few days. After that, it may start to soften slightly but will still taste amazing.
If you’re storing individual slices, transfer them to airtight containers. This makes it easy to grab a serving whenever you like and keeps the dessert protected from fridge humidity.
Freezing:
Yes, you can freeze this dessert! In fact, freezing is a great way to make it ahead of time for a special occasion. Here’s how to do it:
If you want to freeze the entire pan, cover it tightly with several layers of plastic wrap followed by a layer of aluminum foil. Label it with the date and place it in the freezer.
For individual servings, slice the chilled dessert and wrap each piece in plastic wrap, then place them in a freezer-safe container or zip-top bag.
It can be frozen for up to 2 months. When you’re ready to serve, move the dessert from the freezer to the fridge and let it thaw overnight.
Note that the texture may become slightly softer after freezing, but the flavor will still be spot on. The toasted coconut may lose a bit of its crispness, so you can always add a fresh sprinkle on top after thawing for extra texture.
Reheating:
This dessert is best served cold or at room temperature, so there’s no need for reheating in the traditional sense. However, if the dessert has been in the freezer and you’re short on time, you can let it sit at room temperature for about 30–45 minutes to soften before serving.
Avoid microwaving, as it will melt the whipped topping and compromise the structure of the layers.
Common Mistakes to Avoid
Even though this is a no-bake recipe and relatively foolproof, a few common mistakes can still sneak up on you. To make sure your coconut cheesecake turns out perfectly every single time, here are some common pitfalls to look out for—and how to avoid them.
1. Not Softening the Cream Cheese
One of the biggest mistakes is using cream cheese that’s too cold. If it’s not softened, it won’t blend smoothly with the sugar and Cool Whip, and you’ll end up with lumps in your cheesecake layer. Always let your cream cheese sit out at room temperature for 30 minutes before using, or microwave it gently for 10–15 seconds.
2. Using Cook-and-Serve Pudding Instead of Instant
It’s crucial to use instant coconut cream pudding mix for this recipe. Cook-and-serve pudding requires heating and won’t set properly in this no-bake dessert. Always double-check the box before adding it to your cart.
3. Not Letting It Chill Long Enough
It’s tempting to want to dig in right away, but this dessert really needs at least 6 hours in the fridge to firm up. If you try to slice it too soon, the layers won’t hold their shape and the whole dessert may turn into a gooey mess. Patience is key.
4. Skipping the Toasted Coconut
This might seem like an optional garnish, but toasted coconut adds so much texture and flavor. Skipping this step means missing out on that irresistible nutty crunch that makes this dessert really shine.
5. Not Leveling Each Layer
It’s important to spread each layer evenly, especially when you’re working with soft textures like pudding and whipped topping. Take your time with an offset spatula or spoon to smooth everything out before moving on to the next layer. This ensures a beautiful, professional-looking presentation.
Pro Tips
Once you’ve made this dessert once or twice, you’ll find your groove—but to help you get it just right from the start, here are a few of my best tried-and-true pro tips.
1. Use a Measuring Cup to Press the Crust
When you’re forming the graham cracker crust, the back of a measuring cup works wonders for pressing the crumbs evenly into the bottom of the pan. It helps get into the corners and keeps the layer nice and compact.
2. Chill Between Layers
If you have a little extra time, chill the pan in the freezer between adding each layer. Just 10–15 minutes makes a big difference in helping the layers set slightly before adding the next. This prevents colors and textures from blending together and keeps your dessert looking clean and distinct.
3. Use Coconut Milk in the Pudding (Optional)
If you want to go all in on coconut flavor, try swapping part of the half-and-half for canned coconut milk in the pudding layer. Just be sure to shake the can well before measuring. This adds even more depth and a lovely richness.
4. Add a Pinch of Salt to the Crust
A tiny pinch of salt (just ⅛ teaspoon) in the graham cracker crust enhances the flavor and balances the sweetness. It’s a small touch that can really elevate the whole dessert.
5. Make It the Day Before
This dessert is ideal for making ahead of time. The flavors meld beautifully overnight, and the structure holds up perfectly in the fridge. Making it the day before a party or gathering also frees you up to focus on other dishes.
With these pro tips in your back pocket, you’ll be creating this coconut cheesecake delight like a seasoned dessert expert—no oven required.
Frequently Asked Questions (FAQs)
Even with a no-bake dessert as approachable as this one, it’s completely normal to have a few questions. Below are the most common ones I’ve come across when sharing this recipe with family, friends, and readers. Hopefully, these answers will clear up any uncertainties you might have as you prep your own no-bake coconut cheesecake delight.
Can I make this recipe ahead of time?
Absolutely! In fact, it’s best made ahead of time. The dessert needs at least 6 hours to chill and firm up, and overnight is even better. You can make it the day before a party or event and keep it refrigerated until you’re ready to serve. This not only saves you time but also ensures perfect texture and flavor.
What if I can’t find coconut cream pudding mix?
If your grocery store doesn’t carry coconut cream pudding, you can substitute with vanilla or white chocolate pudding and add extra coconut extract (about ½ to 1 teaspoon) to the pudding mixture to replicate the flavor. It’s not exactly the same, but it still tastes amazing and maintains the creamy texture.
Can I use homemade whipped cream instead of Cool Whip?
Yes, you can definitely substitute homemade whipped cream for Cool Whip in both the cheesecake and topping layers. Whip about 2 cups of heavy cream with 3–4 tablespoons of powdered sugar and ½ teaspoon vanilla extract until stiff peaks form. Keep in mind that real whipped cream is a bit less stable than Cool Whip, so the dessert may soften slightly faster over time.
Is it possible to make this dessert gluten-free?
It is! Just swap out the graham cracker crumbs for gluten-free graham crackers or gluten-free digestive biscuits. Make sure your pudding mix is also labeled gluten-free, as some brands contain thickeners derived from wheat.
How do I keep the crust from crumbling?
The key to a sturdy crust is making sure you use the full ½ cup of melted butter and pressing the crumbs firmly into the pan. Chilling or freezing the crust for at least 10–15 minutes before adding the next layer also helps it set up properly.
Can I freeze individual portions?
Definitely. Slice the fully chilled dessert into squares, wrap each in plastic wrap, and store them in a freezer-safe container. This makes it easy to enjoy a piece whenever you want without needing to thaw the entire pan. Just move a portion to the fridge or let it sit at room temperature for about 30–45 minutes before serving.
What if I don’t have coconut extract?
If you’re in a pinch and don’t have coconut extract, you can still make the dessert without it. The pudding mix and shredded coconut provide a lot of flavor on their own. However, the extract does give that extra boost of coconut richness, so it’s worth keeping in your pantry if you love coconut desserts.
How do I get clean slices?
For neat, professional-looking slices, use a sharp knife dipped in hot water and wiped clean between cuts. This helps you slice through the creamy layers without smudging or dragging the topping.
Will this dessert hold up at room temperature?
Because of the whipped topping and dairy-based layers, it’s best served chilled. If you’re bringing it to an event, try to keep it in a cooler or insulated bag until ready to serve. It will be fine at room temperature for about 30–60 minutes, but any longer and it might start to soften or melt.
Can I add other toppings?
Sure! This dessert is super versatile. In addition to the toasted coconut, you could sprinkle chopped toasted almonds, drizzle a bit of melted chocolate, or add some crushed pineapple or tropical fruit on top. Just be careful not to add anything too wet, as it can affect the texture of the topping.
Conclusion & Call to Action
There you have it—your complete guide to making the dreamiest, creamiest no-bake coconut cheesecake delight. From the buttery graham cracker crust to the fluffy whipped topping and golden toasted coconut, every layer is packed with flavor and texture that’s sure to impress. Whether you’re looking for the perfect summer dessert, a crowd-pleasing party treat, or just a little something special to end the week on a sweet note, this recipe has got you covered.
I truly love this dessert because it checks all the right boxes. It’s easy, it’s make-ahead friendly, and it’s practically foolproof. Even if you’re new to making no-bake desserts or just not in the mood to fuss with the oven, you can create a layered masterpiece that looks beautiful and tastes even better. Plus, there’s something so satisfying about the contrast between the creamy cheesecake, silky pudding, and that crisp, toasted coconut on top. It’s comfort food with a tropical twist.
So here’s your invitation to give it a try. Set aside 30–40 minutes for prep, pop it in the fridge, and let the magic happen while you kick back and relax. When it’s time to serve, I promise you’ll be glad you did. Whether it becomes your go-to for family birthdays or a special treat just for you, this dessert has a way of making people smile.
And when you make it? I’d absolutely love to hear how it turns out. Share your experience, let me know if you tried any fun twists or add-ins, and feel free to tag your creations on social media if you’re sharing photos. It’s always so rewarding to see how these recipes come to life in your kitchens.
Happy no-baking, and enjoy every bite of your coconut cheesecake delight!
Print
No-Bake Coconut Cheesecake Delight – Easy Creamy Dessert
- Total Time: 6 hours 40 minutes (includes chilling)
- Yield: 12–15 servings 1x
- Diet: Vegetarian
Description
A rich and creamy no-bake dessert with layers of coconut cheesecake, coconut pudding, whipped topping, and a buttery graham cracker crust—topped with golden toasted coconut for the perfect tropical treat.
Ingredients
Graham Cracker Crust:
-
1½ cups graham cracker crumbs (12–14 sheets)
-
2 tbsp granulated sugar
-
½ cup unsalted butter, melted
Coconut Cheesecake Layer:
-
16 oz cream cheese, softened
-
1 cup powdered sugar
-
1 tsp coconut extract
-
8 oz Cool Whip, thawed
Coconut Pudding Layer:
-
2 (3.4 oz) boxes instant coconut cream pudding mix (or one 6.8 oz box)
-
3 cups half-and-half (or whole milk)
Topping & Garnish:
-
8 oz Cool Whip
-
1 cup sweetened shredded coconut, toasted
Instructions
-
Spray a 9×13” pan with non-stick spray. Mix graham cracker crumbs, sugar, and melted butter. Press into pan and freeze.
-
Toast shredded coconut at 350°F for 8–10 minutes until golden, stirring halfway. Let cool.
-
Beat cream cheese, powdered sugar, and coconut extract until smooth. Fold in 8 oz Cool Whip. Spread over crust and briefly freeze.
-
Whisk pudding mix with half-and-half until thickened. Spread over cheesecake layer.
-
Top with remaining Cool Whip and sprinkle with toasted coconut. Chill for 6 hours or overnight.
Notes
-
Use instant pudding only.
-
For deeper coconut flavor, swap half-and-half with canned coconut milk.
-
Chill between layers for cleaner slicing.
- Prep Time: 40 minutes
- Cook Time: 0 minutes
- Category: Dessert
- Method: No-Bake
- Cuisine: American, Tropical