
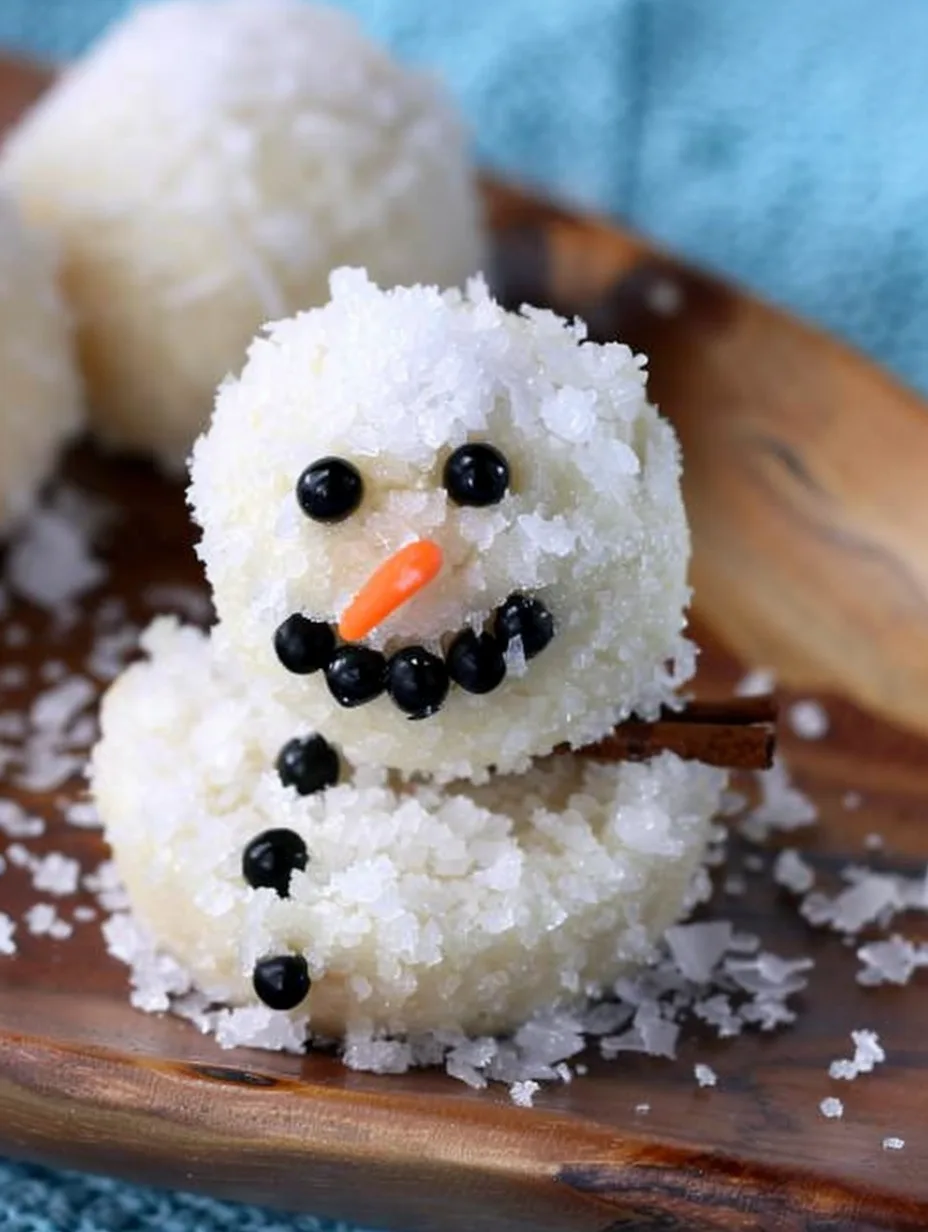
Mini Melting Snowman Cheese Balls are a delightful and whimsical addition to any holiday gathering. These charming little treats not only bring a festive spirit to your table but also offer a burst of flavor that your guests will love. The creamy cheese, paired with playful decorations, creates a memorable appetizer that is both fun and delicious. Perfect for holiday parties, family gatherings, or as a creative snack, these snowman cheese balls are guaranteed to be a hit.
Imagine setting out a platter of these adorable snowmen, each one unique and inviting. They are sure to spark joy and laughter among your friends and family as they dive into this festive treat. Plus, they are incredibly easy to make, requiring simple ingredients and minimal preparation. In this guide, you will discover why this recipe is so special, how to prepare it step-by-step, and tips for serving these delightful cheese balls. Get ready to impress your guests with these Mini Melting Snowman Cheese Balls!
Why You’ll Love This Recipe
There are several reasons why Mini Melting Snowman Cheese Balls will become a favorite recipe during the holiday season. Here are some standout features:
1. Creative Presentation: These cheese balls are visually appealing and add a festive touch to any spread.
2. Delicious Flavor: The combination of cream cheese and seasonings creates a wonderful flavor that pairs well with various dippers.
3. Easy to Make: With straightforward instructions, even novice cooks can whip these up in no time.
4. Customizable: Feel free to get creative with toppings and decorations to suit your taste or holiday theme.
5. Perfect for Sharing: These bite-sized treats are great for parties, making them ideal for sharing with family and friends.
6. Kid-Friendly: Children will love the playful design, making this a fun activity for the whole family.
With these features in mind, it’s easy to see why Mini Melting Snowman Cheese Balls are sure to impress and delight all who try them!
Preparation and Cooking Time
Creating Mini Melting Snowman Cheese Balls is quick and easy. Here’s a breakdown of the time you’ll need:
– Preparation Time: 20 minutes
– Chilling Time: 30 minutes
– Total Time: 50 minutes
These times may vary slightly depending on your kitchen setup and preparation speed, but this estimate should help you plan your holiday festivities effectively.
Ingredients
– 8 oz cream cheese, softened
– 1 cup shredded cheddar cheese
– 1/2 cup grated Parmesan cheese
– 1/2 teaspoon garlic powder
– 1/2 teaspoon onion powder
– 1/4 teaspoon salt
– 1/4 teaspoon black pepper
– 1/4 cup chopped fresh herbs (like parsley or chives)
– Mini pretzel sticks
– Black olives (sliced)
– Carrot sticks (for noses)
– Mini marshmallows (for melting snow)
– Toothpicks (for assembly)
Step-by-Step Instructions
Making Mini Melting Snowman Cheese Balls is simple, and following these steps will ensure your success:
1. Mix the Cheese: In a mixing bowl, combine the softened cream cheese, shredded cheddar, grated Parmesan, garlic powder, onion powder, salt, and pepper. Mix until smooth and well blended.
2. Add Herbs: Fold in the chopped fresh herbs to add flavor and a pop of color to your cheese mixture.
3. Shape Cheese Balls: Using your hands, scoop out a portion of the cheese mixture and roll it into a ball about the size of a golf ball. Repeat until all the mixture is shaped into balls.
4. Chill the Cheese Balls: Place the cheese balls on a plate and cover with plastic wrap. Refrigerate for at least 30 minutes to firm up.
5. Decorate: Once chilled, take a cheese ball and insert a mini pretzel stick into the top for the snowman’s hat. Then, use a toothpick to attach sliced olives for eyes and a carrot stick for the nose.
6. Create the Melting Effect: To give the appearance of melting snow, place a few mini marshmallows around the base of each snowman cheese ball.
7. Serve: Arrange the finished snowman cheese balls on a festive platter, and they are ready to be enjoyed!
How to Serve
Serving your Mini Melting Snowman Cheese Balls can enhance the overall experience. Here are some tips to make your presentation stand out:
1. Platter Presentation: Use a decorative platter to showcase the cheese balls. Arrange them in a circle or in a playful pattern to draw attention.
2. Dippers: Accompany the cheese balls with an assortment of dippers like crackers, sliced vegetables, or breadsticks for added variety.
3. Garnish: Consider adding fresh herbs or edible flowers around the cheese balls for a pop of color.
4. Themed Decor: Use holiday-themed decorations, such as snowflakes or festive napkins, to create a cohesive look.
5. Interactive Element: Encourage guests to build their own mini snowmen by providing extra ingredients on the side for customization.
By paying attention to how you serve these cheese balls, you can create an inviting and festive atmosphere that will delight your guests and make your gathering memorable!
Additional Tips
– Use Fresh Ingredients: For the best flavor, ensure all ingredients, especially the herbs and cheeses, are fresh. This enhances the overall taste of the Mini Melting Snowman Cheese Balls.
– Experiment with Seasonings: Feel free to adjust the garlic and onion powder to suit your palate. Adding different spices can give a unique twist to the cheese mixture.
– Create a Cheese Ball Bar: Set up a DIY station where guests can create their own mini snowmen. This interactive element adds a fun touch to your gathering.
– Pair with Wine: If your guests enjoy wine, consider serving different varieties that pair well with cheese. A light white wine or sparkling wine can complement the flavors beautifully.
– Keep it Cool: If serving outdoors, ensure the cheese balls are kept cool to maintain their shape and flavor. A chilled platter or ice pack underneath can help.
Recipe Variation
Feel free to get creative with these Mini Melting Snowman Cheese Balls! Here are a few variations to consider:
1. Spicy Twist: Add a pinch of cayenne pepper or some finely chopped jalapeños to the cheese mixture for a bit of heat.
2. Herbed Delight: Use different herbs, such as dill or basil, in place of parsley or chives for a different flavor profile.
3. Sweet Snowmen: For a dessert twist, mix cream cheese with powdered sugar and vanilla extract. Shape into snowmen and decorate with chocolate chips and mini candy canes.
4. Nutty Addition: Incorporate finely chopped nuts, such as walnuts or almonds, into the cheese mixture for added texture and flavor.
Freezing and Storage
– Storage: Keep the Mini Melting Snowman Cheese Balls in an airtight container in the refrigerator. They will stay fresh for about 3-5 days.
– Freezing: You can freeze the cheese balls before decorating them. Wrap them tightly in plastic wrap and place them in a freezer-safe bag. They can be frozen for up to 3 months. When ready to serve, thaw in the refrigerator and decorate as desired.
Special Equipment
To make your Mini Melting Snowman Cheese Balls, you will need a few essential tools:
– Mixing bowl for combining ingredients
– A sturdy spatula or electric mixer for mixing
– Measuring cups and spoons for precise measurements
– Baking sheet or platter for chilling the cheese balls
– Toothpicks for assembly and decoration
– Plastic wrap for covering during chilling
Frequently Asked Questions
Can I make these cheese balls ahead of time?
Yes, you can prepare the cheese balls a day in advance. Store them in the refrigerator, and decorate them just before serving.
What if I don’t have mini pretzel sticks?
You can use other items like sliced cucumbers or carrot sticks for the snowman’s hat. Get creative with whatever you have on hand!
Can I use different cheeses?
Absolutely! Feel free to experiment with other cheese varieties such as goat cheese, feta, or even flavored cream cheese.
How can I make these snowmen more festive?
Consider adding edible glitter or colored sprinkles to the snowmen for a more festive appearance.
Are these cheese balls suitable for a gluten-free diet?
Yes! The ingredients used in Mini Melting Snowman Cheese Balls are naturally gluten-free, making them suitable for gluten-sensitive guests.
Conclusion
Mini Melting Snowman Cheese Balls are a delightful and fun addition to any holiday table. Their playful design and delicious flavor make them a crowd favorite. By following the simple steps and tips provided, you can create an appetizer that not only tastes great but also brings a smile to everyone’s faces. Whether you’re hosting a large party or a cozy family gathering, these charming cheese balls are sure to impress. Enjoy the holiday spirit and delicious flavors with this creative recipe!
Mini Melting Snowman Cheese Balls: An Amazing Ultimate Recipe
- Total Time: 15 minutes
Ingredients
– 8 oz cream cheese, softened
– 1 cup shredded cheddar cheese
– 1/2 cup grated Parmesan cheese
– 1/2 teaspoon garlic powder
– 1/2 teaspoon onion powder
– 1/4 teaspoon salt
– 1/4 teaspoon black pepper
– 1/4 cup chopped fresh herbs (like parsley or chives)
– Mini pretzel sticks
– Black olives (sliced)
– Carrot sticks (for noses)
– Mini marshmallows (for melting snow)
– Toothpicks (for assembly)
Instructions
Making Mini Melting Snowman Cheese Balls is simple, and following these steps will ensure your success:
1. Mix the Cheese: In a mixing bowl, combine the softened cream cheese, shredded cheddar, grated Parmesan, garlic powder, onion powder, salt, and pepper. Mix until smooth and well blended.
2. Add Herbs: Fold in the chopped fresh herbs to add flavor and a pop of color to your cheese mixture.
3. Shape Cheese Balls: Using your hands, scoop out a portion of the cheese mixture and roll it into a ball about the size of a golf ball. Repeat until all the mixture is shaped into balls.
4. Chill the Cheese Balls: Place the cheese balls on a plate and cover with plastic wrap. Refrigerate for at least 30 minutes to firm up.
5. Decorate: Once chilled, take a cheese ball and insert a mini pretzel stick into the top for the snowman’s hat. Then, use a toothpick to attach sliced olives for eyes and a carrot stick for the nose.
6. Create the Melting Effect: To give the appearance of melting snow, place a few mini marshmallows around the base of each snowman cheese ball.
7. Serve: Arrange the finished snowman cheese balls on a festive platter, and they are ready to be enjoyed!
- Prep Time: 15 minutes
- Cook Time: 0 minutes
Nutrition
- Serving Size: 12 cheese balls
- Calories: 90 kcal
- Fat: 8g
- Protein: 3g