
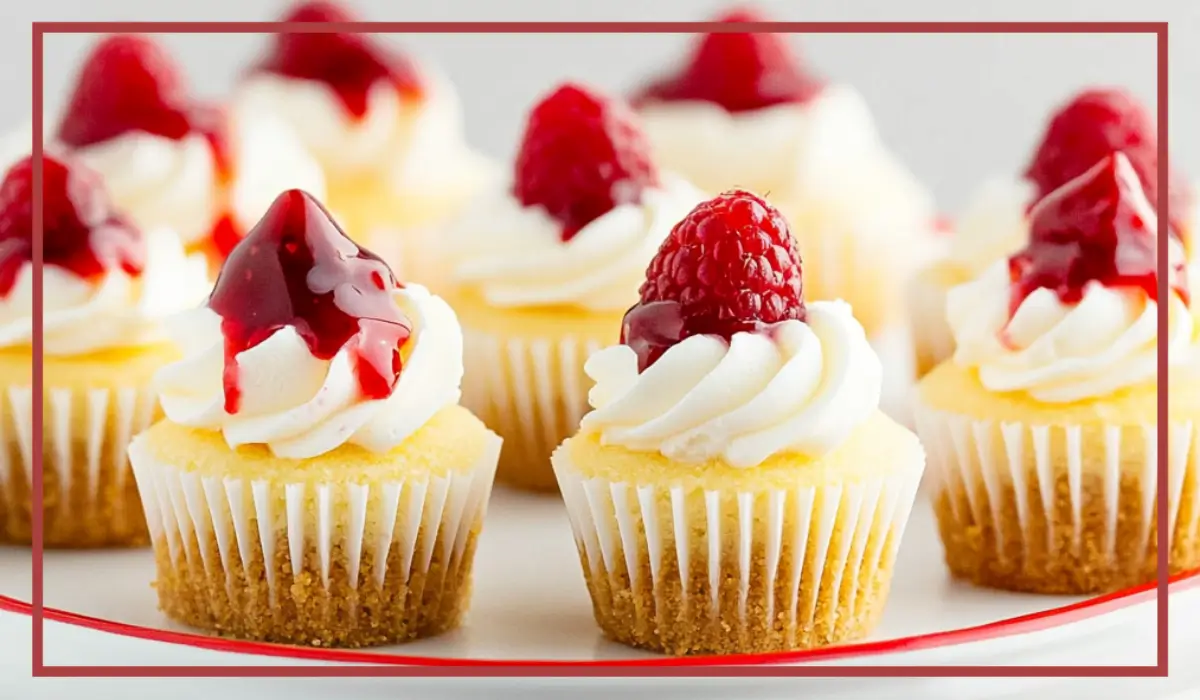
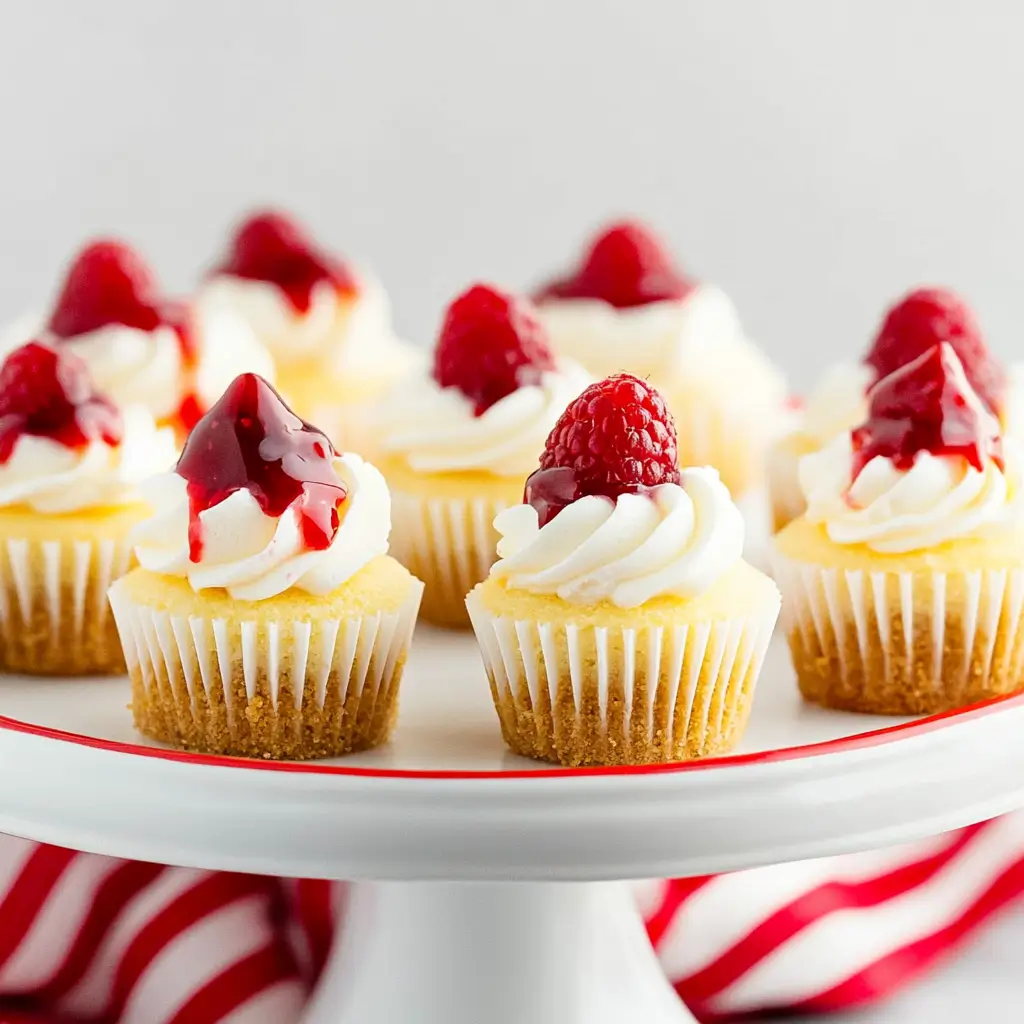
There’s something universally comforting about cheesecake. It’s rich, creamy, and just the right amount of sweet with that perfect tangy bite. Now, imagine taking all that velvety goodness and transforming it into a perfectly portioned, bite-sized treat. That’s exactly what these Mini Cheesecake Bites are. They’re essentially everything you love about classic cheesecake—but in a cute, handheld form that’s perfect for parties, holiday platters, or even just a cozy night in with a cup of tea.
I first made these mini cheesecakes for a family gathering, thinking they’d just be a fun little addition to the dessert table. What I didn’t expect was for them to completely steal the show. People were going back for seconds, thirds—even sneaking some into their purses “for later.” That’s when I knew this recipe was a keeper.
What really makes this recipe stand out is its simplicity. You don’t need any fancy equipment or complicated steps. In fact, with just a few pantry staples and a muffin tin, you can whip up a batch of these beauties in no time. The buttery graham cracker crust pairs beautifully with the creamy, vanilla-scented filling. Plus, because they’re so small, they chill faster than a full-sized cheesecake, meaning less waiting and more snacking.
Whether you’re a seasoned baker or just starting out, this recipe is one of those no-fail desserts you’ll turn to again and again. It’s especially great for making ahead, freezing, or customizing with different toppings like fruit, chocolate, or a drizzle of caramel. And because they’re already portioned out, serving them is as easy as it gets.
So, if you’re looking for a dessert that’s guaranteed to impress without causing any stress, these mini cheesecake bites are your new best friend. Let’s dive into why this recipe is such a winner.
Why You’ll Love This Recipe
Easy to Make with Everyday Ingredients
One of the best things about this recipe is how easy it is to pull together. You don’t need to be a pro baker or invest in any specialty tools. The ingredients are simple, likely already in your kitchen, and the steps are straightforward. From start to finish, you’ll be amazed at how effortlessly everything comes together.
Perfectly Portioned for Sharing
Because they’re baked in a mini muffin tin, these cheesecake bites are naturally portion-controlled. They’re just the right size for popping into your mouth, making them a perfect treat for parties, potlucks, or even lunchbox desserts. No knives, no plates, no mess—just delicious little bites ready to be devoured.
Customizable and Versatile
While the classic vanilla cheesecake filling is already amazing on its own, this recipe acts as a blank canvas for your creativity. You can top these bites with fresh fruit, chocolate ganache, crushed cookies, or flavored syrups. You could even swirl a bit of fruit jam into the batter before baking for a fun twist.
Make-Ahead Friendly
Since cheesecake tastes best when it’s chilled, this dessert is ideal for prepping in advance. You can make a batch the night before your event or freeze them weeks in advance. That way, you’re not scrambling at the last minute.
Light, Creamy Texture with a Buttery Crunch
The texture combination is what makes these bites irresistible. The crust is slightly crunchy, buttery, and just sweet enough to complement the smooth, creamy cheesecake filling. Every bite is a satisfying mix of soft and crisp that keeps you coming back for more.
Whether you’re baking for a crowd or simply treating yourself, these mini cheesecake bites deliver maximum flavor with minimal effort.
Health Benefits
Portion Control Without Sacrificing Flavor
One of the biggest advantages of mini desserts like these cheesecake bites is the built-in portion control. Each bite-sized piece allows you to indulge your sweet tooth without overdoing it. Unlike full-sized slices that might tempt you into second helpings, these little guys help you enjoy dessert more mindfully.
Calcium and Protein from Dairy
Thanks to the cream cheese, sour cream, and eggs in the recipe, each mini cheesecake bite provides a small but meaningful boost of calcium and protein. These nutrients are essential for maintaining strong bones and muscles. While this is definitely a dessert, it’s nice to know you’re getting a few nutritional perks along the way.
Lower in Sugar Than Traditional Cheesecake
Because the portions are smaller, you end up consuming significantly less sugar than you would with a traditional slice. Plus, the balance of tart cream cheese and just the right amount of sweetness keeps things flavorful without being overly sugary. You can also modify the recipe to use a sugar substitute if needed.
Fewer Calories Per Serving
A typical slice of cheesecake can pack in over 500 calories. These mini versions come in at less than 150 calories each, making them a lighter alternative when you still want to enjoy something rich and satisfying. It’s a guilt-free way to satisfy your cravings.
Customizable for Dietary Needs
This recipe can easily be modified to fit various dietary preferences. Use gluten-free graham crackers for the crust, swap in dairy-free cream cheese if you’re avoiding lactose, or choose a sugar substitute to reduce carbs. Because each bite is individually portioned, it’s easy to make a few different versions in the same batch.
All in all, while cheesecake may not be considered a “health food,” these mini versions are a smarter way to indulge—especially when you’re trying to enjoy balance without deprivation.
Preparation Time, Servings, and Nutritional Information
Total Time Required
From prep to chill time, here’s how your kitchen timeline will look:
- Prep Time: 15 minutes
- Cook Time: 15–18 minutes
- Cooling + Chilling Time: 2 hours minimum
- Total Time: Approximately 2 hours and 30 minutes
Serving Size
This recipe makes 24 mini cheesecake bites, which is perfect for a medium-sized gathering. You can easily double the recipe if you’re serving a crowd or halve it for a smaller group.
Nutritional Information (Per Mini Cheesecake Bite)
- Calories: 130
- Protein: 2g
- Fat: 9g
- Carbohydrates: 10g
- Sugar: 6g
- Calcium: 4% of the recommended daily intake
These numbers are approximate and can vary based on the ingredients you use. If you make any modifications—like using low-fat cream cheese or sugar substitutes—you’ll want to recalculate accordingly.
Ingredients List
For the Crust:
- 1 cup graham cracker crumbs – This forms the base and gives each bite that classic buttery crunch.
- 3 tablespoons granulated sugar – Adds a touch of sweetness to balance the tangy filling.
- 4 tablespoons unsalted butter, melted – Helps bind the crust and adds rich flavor.
For the Cheesecake Filling:
- 2 blocks (8 oz each) cream cheese, softened – The star of the show; make sure it’s room temperature for easy blending.
- ½ cup granulated sugar – Sweetens the filling without overpowering the cream cheese.
- 2 large eggs – These bind the filling and give it structure.
- 1 teaspoon vanilla extract – Adds warm, aromatic depth.
- ⅓ cup sour cream – For a touch of tang and to keep the filling silky smooth.
Optional Toppings (Choose Your Favorites):
- Fresh berries
- Fruit preserves or jam
- Melted chocolate or ganache
- Whipped cream
- Crushed cookies or chocolate chips
Feel free to mix and match toppings or keep them plain for a classic look.
Step-By-Step Cooking Instructions
Step 1: Preheat and Prepare Your Pan
Begin by preheating your oven to 325°F (163°C). While the oven heats, grab a mini muffin tin and line each cavity with mini cupcake liners. This not only helps with easy removal but also makes for a prettier presentation.
Step 2: Make the Graham Cracker Crust
In a medium mixing bowl, combine 1 cup graham cracker crumbs, 3 tablespoons of sugar, and 4 tablespoons of melted butter. Stir with a fork or spoon until the mixture resembles wet sand and the crumbs are evenly coated.
Using a small spoon or your fingers, press about 1 teaspoon of the crust mixture into the bottom of each mini cupcake liner. Press firmly to pack it down. This step is important so the crust holds together after baking.
Place the crusts in the oven and bake for 5 minutes. Remove and let them cool slightly while you make the filling.
Step 3: Make the Cheesecake Filling
In a large mixing bowl, add the softened cream cheese and ½ cup sugar. Beat with a hand mixer or stand mixer on medium speed until smooth and fluffy—this should take about 2–3 minutes. Scrape down the sides of the bowl as needed.
Next, add the eggs one at a time, beating just until combined after each addition. Be careful not to overmix once the eggs are in.
Now, stir in the vanilla extract and sour cream. Beat on low speed until smooth and creamy. Again, avoid overmixing, which can lead to air bubbles and a cracked surface.
Step 4: Fill the Cups
Using a small spoon or piping bag, fill each mini cupcake liner about ¾ full with the cheesecake batter. Be careful not to overfill, as the batter will puff up slightly while baking.
Tap the muffin tin gently on the counter to release any air bubbles.
Step 5: Bake the Cheesecake Bites
Place the filled tin in the oven and bake for 15 to 18 minutes, or until the centers are just set. The tops may look slightly puffed, and the centers should jiggle just a little when you gently shake the pan.
Avoid opening the oven door too often, as that can cause the cheesecakes to sink or crack.
Step 6: Cool Gradually
Remove the pan from the oven and let the cheesecakes cool completely in the tin. Once cooled to room temperature, transfer the pan to the refrigerator and let them chill for at least 2 hours or, ideally, overnight. This step is crucial for the best texture and flavor.
Step 7: Add Optional Toppings
Once fully chilled, feel free to decorate your mini cheesecakes with your choice of toppings. A small dollop of fruit jam, a single raspberry, or a swirl of melted chocolate are all great options.
At this point, they’re ready to serve—or freeze for later.
How to Serve
Serve Them Chilled and Fresh
The best way to enjoy mini cheesecake bites is cold, straight from the fridge. Once they’ve had time to fully chill and set, the texture becomes perfectly creamy and smooth. You can serve them directly in their cupcake liners for a casual presentation, or peel the liners off for a more polished look on a serving platter.
Dress Them Up for Special Occasions
These little cheesecakes are incredibly versatile when it comes to presentation. For a birthday party or celebration, consider adding piped whipped cream and a sprinkle of colorful sprinkles. If you’re serving them at a wedding or elegant dinner, try topping each one with a delicate fruit glaze or a fresh berry and mint leaf.
Even a simple dusting of powdered sugar can take them from casual to classy in seconds. Use a fine mesh sieve to lightly sprinkle the tops right before serving.
Create a Cheesecake Bar
If you’re hosting a larger group, set up a “mini cheesecake bar.” Bake the cheesecake bites plain and offer a variety of toppings on the side—think chocolate sauce, fruit preserves, chopped nuts, caramel drizzle, and fresh berries. Let guests customize their own desserts for a fun, interactive experience.
Include Them in a Dessert Platter
These bites make a beautiful addition to a mixed dessert tray. Pair them with cookies, mini brownies, or fruit skewers for a variety of flavors and textures. Because they’re so compact, they balance well with other small treats and don’t overwhelm the palate.
Whether you’re going for casual or classy, these mini cheesecake bites are easy to serve and a guaranteed crowd favorite every time.
Pairing Suggestions
Beverage Pairings
Since these mini cheesecake bites are rich and creamy, they pair beautifully with both warm and cold beverages. If you’re serving them during the day, a hot cup of coffee or tea is a perfect match. The bold bitterness of coffee cuts through the sweetness, while herbal or black tea offers a more subtle contrast.
For a more indulgent pairing, serve them with a flavored latte like vanilla, cinnamon, or caramel. If you’re going the caffeine-free route, a glass of cold milk or a lightly sweetened almond milk works wonderfully, especially for kids.
During warmer months, iced tea, lemonade, or even sparkling water with a splash of citrus offers a refreshing balance to the creamy dessert.
Snack and Side Pairings
Mini cheesecake bites are sweet, so they’re best served with lighter, complementary snacks if you’re building a full dessert spread. Consider pairing them with:
-
Fresh fruit (especially berries, grapes, or melon slices)
-
Light shortbread or sugar cookies
-
Chocolate-dipped pretzels for a salty-sweet balance
-
Mini fruit tarts for a colorful contrast
If you’re serving these bites at a brunch or shower, they also go well with savory finger foods like mini quiches, cucumber sandwiches, or deviled eggs. A mix of savory and sweet options keeps your guests satisfied and engaged.
Meal Pairing Ideas
As a dessert, these mini cheesecake bites are an ideal end to a wide range of meals. They work especially well after lighter entrees such as:
-
Grilled chicken with roasted vegetables
-
Baked fish and a crisp salad
-
Pasta with a lemon or tomato-based sauce
-
Vegetarian flatbreads or wraps
Their small size means guests won’t feel overly full after a big meal, but they’ll still get to enjoy something sweet and satisfying.
Storage, Freezing & Reheating Instructions
How to Store in the Fridge
Once your mini cheesecake bites are fully cooled and topped (if desired), place them in an airtight container. Store them in the refrigerator for up to 5 days. If you’re stacking them in layers, be sure to separate layers with parchment paper to prevent them from sticking together.
To maintain the best flavor and texture, allow them to chill for at least 2 hours before serving. This not only helps them firm up but also enhances the tangy-sweet flavor of the cheesecake filling.
How to Freeze for Later
These cheesecake bites freeze beautifully, making them a fantastic make-ahead dessert for busy weeks or upcoming events.
Here’s how to freeze them properly:
-
Once the cheesecake bites have cooled completely, remove the cupcake liners (optional).
-
Arrange them on a baking sheet in a single layer and place in the freezer for 1–2 hours until they’re frozen solid.
-
Transfer the frozen cheesecake bites into a freezer-safe bag or airtight container, separating layers with parchment paper.
-
Label the container with the date. They’ll stay fresh in the freezer for up to 3 months.
How to Thaw and Serve
To enjoy frozen cheesecake bites, simply remove the desired amount from the freezer and place them in the refrigerator for 3–4 hours or overnight to thaw gradually. Avoid microwaving them, as it can alter the texture and cause uneven thawing.
Once thawed, they’ll be just as creamy and flavorful as when freshly made.
Common Mistakes to Avoid
1. Overmixing the Batter
When it comes to cheesecake, less is more. Overmixing the batter, especially after adding the eggs, can introduce too much air, leading to puffed-up tops that collapse or crack as they cool. Mix just until smooth for the best texture.
2. Skipping the Room Temperature Ingredients
Using cold cream cheese or eggs can lead to a lumpy batter. Make sure all your dairy and eggs are at room temperature before mixing. This ensures a smooth, creamy consistency that’s easier to blend.
3. Overbaking
It’s easy to assume that a fully set cheesecake should look firm all the way through, but that’s actually a sign it’s overbaked. The centers should still jiggle slightly when you remove them from the oven. They’ll continue to set as they cool and chill.
4. Not Letting Them Cool Before Chilling
Placing hot cheesecake bites directly into the fridge can cause condensation to form, which can make the tops wet or even lead to cracking. Always let them cool to room temperature before refrigerating.
5. Using the Wrong Pan Size
Make sure you’re using a mini muffin tin and not a standard-sized one. Regular muffin tins will result in undercooked centers or overly browned tops because the proportions are off. Stick to the mini size for best results.
Avoiding these common pitfalls will help you achieve consistently smooth, creamy, and delicious cheesecake bites every time.
Pro Tips
Use a Cookie Scoop for Even Portions
To ensure all your mini cheesecake bites are uniform in size (which helps them bake evenly), use a small cookie scoop to portion out both the crust and the filling. It saves time and makes your presentation look more polished.
Line the Muffin Tin with Cupcake Liners
Using liners not only makes cleanup easier but also helps keep the crust intact when removing each cheesecake bite from the pan. If you prefer a liner-free look, lightly grease each cavity, but be sure to chill thoroughly before removing.
Tap the Pan to Release Air Bubbles
After filling your liners with cheesecake batter, gently tap the pan on the counter a few times. This helps release any trapped air bubbles, resulting in a smoother top after baking.
Let Them Chill Overnight for the Best Flavor
While a two-hour chill time is the minimum, letting your mini cheesecakes chill overnight really allows the flavors to develop and the texture to become ultra-smooth and rich.
Keep Toppings Simple and Add Just Before Serving
If you’re adding toppings like fresh fruit or whipped cream, do so right before serving. This prevents the toppings from softening or bleeding onto the cheesecake, especially if storing them overnight.
Frequently Asked Questions (FAQs)
Can I Use Low-Fat Cream Cheese?
Yes, you can use low-fat cream cheese, but keep in mind that it may slightly alter the texture. The filling might be less creamy and a bit more crumbly. For the best flavor and texture, full-fat cream cheese is recommended.
Can I Make These Cheesecake Bites Without a Mixer?
Absolutely. While a mixer makes the job faster, you can use a sturdy whisk and a bit of elbow grease to combine the ingredients. Just make sure the cream cheese is fully softened to avoid lumps.
How Do I Know When They’re Done Baking?
The edges will look set, and the centers should still jiggle slightly when gently shaken. Avoid overbaking, as they will continue to cook and firm up as they cool.
Can I Use a Different Crust?
Yes! While graham crackers are the classic choice, you can experiment with crushed cookies like Oreos, digestive biscuits, or even gingersnaps for a unique flavor twist.
Are These Gluten-Free?
The recipe as written is not gluten-free because of the graham cracker crust. However, you can easily make it gluten-free by using gluten-free graham crackers or cookies for the crust.
Can I Add Flavors to the Filling?
Definitely. Feel free to swirl in fruit jam, melted chocolate, or lemon zest for added flavor. Just be careful not to add too much liquid, which could affect the texture.
Do I Need a Water Bath?
Nope! One of the beauties of mini cheesecakes is that you don’t need a water bath to get that classic smooth, crack-free top. The small size means they bake quickly and evenly without extra steps.
Can I Make These Ahead of Time?
Yes, these mini cheesecake bites are ideal for making ahead. They can be made up to 3 days in advance and stored in the fridge, or frozen for up to 3 months.
How Do I Remove Them from the Pan?
If you’ve used liners, simply lift them out once cooled. If you didn’t use liners, run a thin knife or offset spatula around the edges and gently lift them out after they’ve chilled.
Can Kids Help Make These?
Yes, this is a fun and safe recipe for kids to help with. They can press the crust into the liners, mix the batter (with supervision), and decorate the finished cheesecakes with toppings.
Conclusion & Call to Action
Mini cheesecake bites are the ultimate go-to dessert for when you want something impressive, delicious, and incredibly easy to make. From the rich and creamy filling to the crisp graham cracker crust, every bite is packed with flavor and texture that’s sure to leave everyone asking for the recipe.
They’re ideal for nearly any occasion—holidays, family gatherings, bridal showers, birthdays, or just because. With simple ingredients, easy steps, and lots of room for customization, this recipe is beginner-friendly but never boring. Whether you go with classic vanilla or experiment with different crusts and toppings, there’s no wrong way to make them your own.
I hope you’ll give this recipe a try and see just how magical a bite-sized dessert can be. If you do, I’d absolutely love to hear how it turns out for you. Snap a photo, share it with your friends, or tag your creation online. Seeing your delicious results is the best part of sharing these recipes.
Now, go grab your muffin tin and get baking—your next favorite dessert is waiting.
Print
Mini Cheesecake Bites Recipe: Easy Creamy Dessert for Parties
- Total Time: 2 hours 30 minutes (including chilling)
- Yield: 24 mini cheesecake bites 1x
- Diet: Vegetarian
Description
Creamy, tangy, and perfectly sweet mini cheesecake bites baked in a mini muffin tin with a buttery graham cracker crust. A no-fuss, crowd-pleasing dessert ideal for parties, holidays, and make-ahead treats.
Ingredients
For the Crust:
-
1 cup graham cracker crumbs
-
3 tbsp granulated sugar
-
4 tbsp unsalted butter, melted
For the Cheesecake Filling:
-
2 blocks (8 oz each) cream cheese, softened
-
½ cup granulated sugar
-
2 large eggs
-
1 tsp vanilla extract
-
⅓ cup sour cream
Instructions
-
Preheat oven to 325°F (163°C) and line a mini muffin tin with mini cupcake liners.
-
Combine graham cracker crumbs, sugar, and melted butter. Press 1 tsp into each liner. Bake for 5 mins and cool.
-
Beat cream cheese and sugar until fluffy. Add eggs one at a time, then vanilla and sour cream. Mix until smooth.
-
Fill each liner ¾ full with cheesecake batter. Bake 15–18 mins until centers are just set.
-
Cool in the pan, then refrigerate for at least 2 hours before serving. Add desired toppings before serving.
Notes
-
Make sure cream cheese is at room temperature to avoid lumps.
-
Avoid overmixing to prevent cracking.
-
Toppings like berries or chocolate should be added after chilling.
-
Can be made 2–3 days in advance or frozen for up to 3 months.
- Prep Time: 15 minutes
- Cook Time: 15–18 minutes
- Category: Dessert
- Method: Baking
- Cuisine: American