
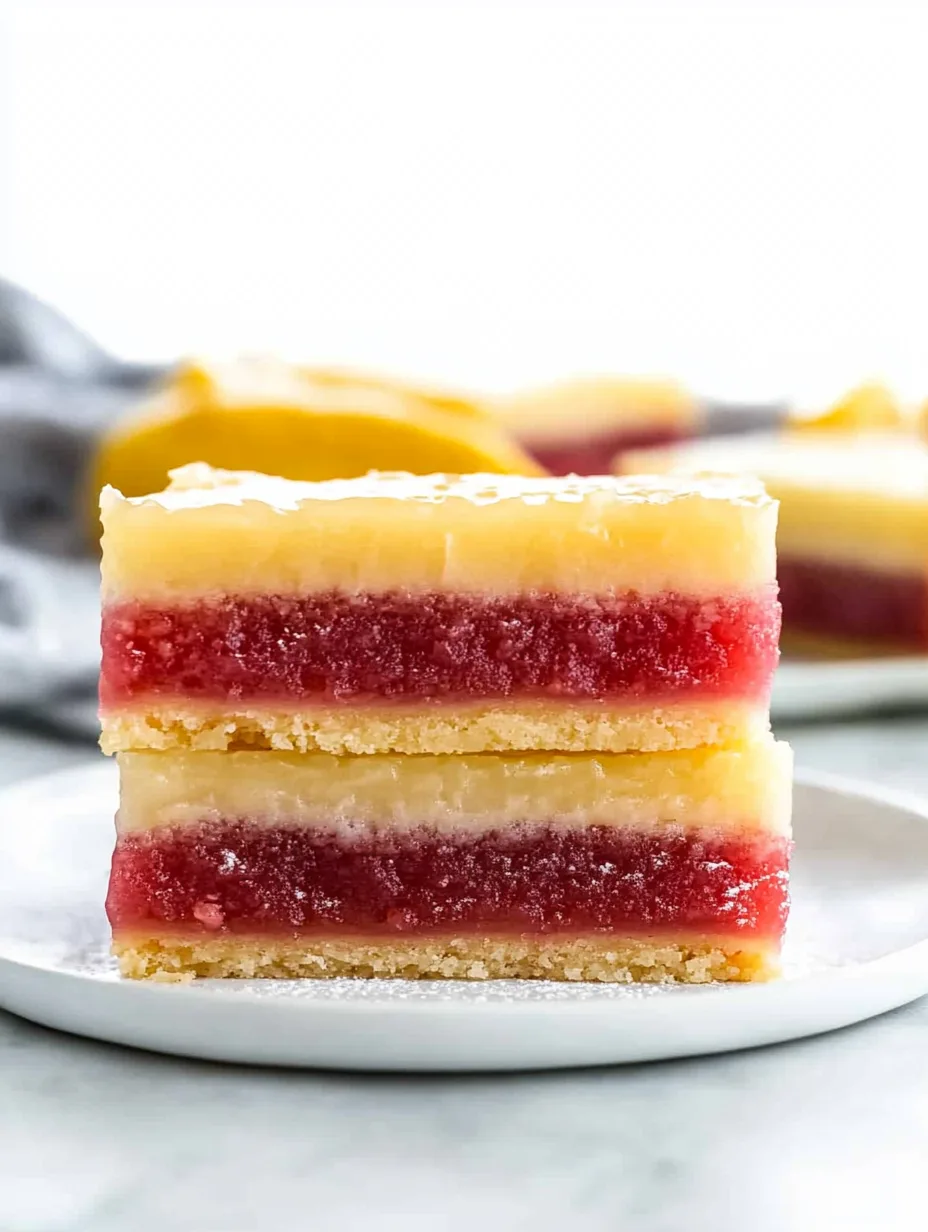
Lemon Raspberry Bars are a delightful treat that perfectly balances tartness and sweetness. The bright flavors of lemons combined with the juiciness of fresh raspberries create a heavenly dessert that excites the taste buds. These bars are not just another dessert; they are a celebration of summer in every bite, bringing a sense of joy and refreshment to your table. Whether for a picnic, a family gathering, or a simple weeknight indulgence, Lemon Raspberry Bars offer an amazing twist that’s just too good to resist.
Imagine biting into a soft, zesty lemon bar layered with the tangy sweetness of raspberries. Each bar is a delightful burst of flavor, perfect for those who crave something a little different. With their buttery crust and creamy filling, they are as pleasing to the eye as they are to the palate. In this guide, you will discover why this recipe is a must-try, how to make it step by step, and tips for serving these delicious treats that everyone will love.
Preparing these Lemon Raspberry Bars is not just about baking; it’s about creating an experience. They will be a hit at any gathering and are easy enough to whip up for an unexpected visitor. With just a handful of ingredients and straightforward steps, you’ll soon become the star of dessert night, earning compliments from family and friends.
Let’s dive into the delicious world of Lemon Raspberry Bars and uncover why they should be your next baking project!
Why You’ll Love This Recipe
Lemon Raspberry Bars stand out for several reasons that make them irresistible. Here’s why you’ll fall head over heels for this recipe:
1. Bright and Flavorful: The combination of lemons and raspberries creates a burst of fresh flavor that is invigorating and delicious.
2. Simple Ingredients: Most of the ingredients are pantry staples, making it easy for anyone to whip up these bars.
3. Perfect for Any Occasion: Whether it’s a birthday party, picnic, or summer BBQ, these bars are ideal for any event.
4. Easy to Make: The step-by-step instructions ensure even novice bakers can create these delightful treats without a hitch.
5. Visually Stunning: The vibrant colors of yellow and pink make these bars not only tasty but also beautiful to present.
6. Great for Sharing: Cut them into portions for sharing, and they become the perfect addition to any dessert table.
With these fantastic elements, it’s no wonder that Lemon Raspberry Bars are so popular. Their invigorating flavors and simple preparation make them a coveted recipe in homes everywhere.
Preparation and Cooking Time
Lemon Raspberry Bars can be made in under 2 hours, including preparation and baking time. Here’s a breakdown of the time required:
– Preparation Time: 20 minutes
– Cooking Time: 30-35 minutes
– Cooling Time: 45 minutes
These timeframes may vary slightly based on your kitchen experience, but this guide will help you have a clear idea of your schedule.
Ingredients
– 1 ½ cups all-purpose flour
– ½ cup powdered sugar
– ½ cup unsalted butter, softened
– 3 large eggs
– 1 cup granulated sugar
– 1 teaspoon grated lemon zest
– ½ cup fresh lemon juice
– 1 cup fresh raspberries
– ½ teaspoon baking powder
– ¼ teaspoon salt
– Additional powdered sugar for dusting (optional)
Step-by-Step Instructions
Follow these simple steps to create delicious Lemon Raspberry Bars:
1. Preheat the Oven: Start by preheating your oven to 350°F (175°C). Prepare a 9×9-inch baking dish by greasing it or lining it with parchment paper for easy removal.
2. Make the Crust: In a mixing bowl, combine the softened butter, flour, and powdered sugar. Mix until the mixture resembles coarse crumbs. Press this mixture firmly into the bottom of your prepared baking dish to form the crust.
3. Bake the Crust: Place the crust in the oven and bake for about 15–20 minutes or until lightly golden. Once done, remove it from the oven and allow it to cool slightly.
4. Prepare the Filling: In another bowl, whisk together the eggs, granulated sugar, lemon zest, lemon juice, baking powder, and salt until well combined.
5. Add Raspberries: Gently fold in the fresh raspberries, being careful not to crush them too much.
6. Pour Filling: Pour the lemon filling over the pre-baked crust, spreading it evenly.
7. Bake Again: Return the dish to the oven and bake for an additional 30–35 minutes. The filling should be set and slightly golden around the edges.
8. Cool: Allow the bars to cool in the pan at room temperature for about 45 minutes. Then, place them in the refrigerator to chill completely.
9. Cut into Bars: Once chilled, lift the bars out using the parchment paper (if used). Cut them into squares or rectangles, dust with additional powdered sugar if desired.
With these straightforward steps, your Lemon Raspberry Bars will be ready to dazzle your taste buds.
How to Serve
To create a memorable serving experience for your Lemon Raspberry Bars, consider the following tips:
1. Presentation: Arrange the bars on a beautiful serving platter. A sprinkle of powdered sugar on top adds a charming touch.
2. Accompaniments: Serve alongside whipped cream or a scoop of vanilla ice cream for an extra indulgent experience.
3. Garnishing: Consider garnishing with fresh raspberries or lemon slices for added visual appeal.
4. Portion Sizes: Cut the bars into smaller pieces for easier sharing; this encourages guests to enjoy more than one!
5. Drink Pairing: Serve with iced tea, lemonade, or flavored sparkling water, complementing the tangy flavors beautifully.
These serving suggestions will enhance not only the taste experience but also the visual allure of your beautiful Lemon Raspberry Bars, making them a hit on any table!
Additional Tips
– Use Fresh Berries: For the best flavor, opt for fresh raspberries instead of frozen ones. Fresh berries elevate the taste and texture.
– Zest Smartly: When zesting lemons, avoid the white pith as it can add bitterness. Use only the bright yellow part for the freshest flavor.
– Customize Sweetness: Adjust the granulated sugar in the filling based on your taste preference. A little more sugar can balance the tartness of the lemon.
– Experiment with Citrus: Try adding orange or lime zest to the filling for a unique citrus twist.
– Allow to Chill: Chilling the bars for longer than 45 minutes will enhance their texture and flavor, making them even more delightful.
Recipe Variation
Feel free to experiment with these variations for your Lemon Raspberry Bars:
1. Gluten-Free Option: Substitute all-purpose flour with a gluten-free all-purpose blend to cater to gluten-sensitive friends.
2. Berry Blend: Mix in other berries like blueberries or blackberries along with raspberries for a mixed berry flavor explosion.
3. Add Nuts: Incorporate crushed almonds or pecans into the crust for added texture and flavor.
4. Cream Cheese Layer: Spread a layer of cream cheese frosting on top of the cooled bars for a rich contrast to the lemon and raspberry.
5. Lemon Cream Bars: Replace raspberries with a lemon cream filling for a more intense lemon flavor.
Freezing and Storage
– Storage: Keep your Lemon Raspberry Bars in an airtight container in the refrigerator for up to a week to maintain freshness.
– Freezing: You can freeze the bars for up to 3 months. Wrap them individually in plastic wrap and place them in a freezer-safe container for best results.
Special Equipment
To successfully make Lemon Raspberry Bars, you will need the following tools:
– Mixing bowls
– Whisk
– 9×9-inch baking dish
– Parchment paper (optional for easy removal)
– Rubber spatula or wooden spoon
– Measuring cups and spoons
– Cooling rack for chilling
Frequently Asked Questions
Can I use bottled lemon juice instead of fresh lemon juice?
While fresh lemon juice is ideal for flavor, bottled lemon juice can work in a pinch, but it may not be as vibrant.
How can I tell when the bars are done baking?
The filling should be set and slightly golden around the edges. You can also do the toothpick test; it should come out clean or with a few moist crumbs.
Can I make these bars ahead of time?
Absolutely! These bars can be made a day in advance. Just ensure to refrigerate them until you’re ready to serve.
What is the best way to cut the bars?
Use a sharp knife and wipe it clean after each cut for smooth edges. For best results, let them chill fully before cutting.
Can I add more raspberries?
Yes, feel free to increase the raspberry amount to enhance the berry flavor, but be sure not to overmix them in the filling.
Conclusion
Lemon Raspberry Bars are not just a dessert; they are an experience bursting with fresh flavors and vibrant colors. The perfect blend of zesty lemon and sweet raspberries, atop a buttery crust, makes these bars a standout treat for any occasion. Whether you’re serving them at a summer picnic or enjoying a slice during a cozy evening at home, these bars are guaranteed to impress. With simple ingredients and easy-to-follow instructions, you’ll find yourself returning to this recipe again and again. Happy baking!

Lemon Raspberry Bars: An Amazing Ultimate Recipe
- Total Time: 20 minute
Ingredients
– 1 ½ cups all-purpose flour
– ½ cup powdered sugar
– ½ cup unsalted butter, softened
– 3 large eggs
– 1 cup granulated sugar
– 1 teaspoon grated lemon zest
– ½ cup fresh lemon juice
– 1 cup fresh raspberries
– ½ teaspoon baking powder
– ¼ teaspoon salt
– Additional powdered sugar for dusting (optional)
Instructions
Follow these simple steps to create delicious Lemon Raspberry Bars:
1. Preheat the Oven: Start by preheating your oven to 350°F (175°C). Prepare a 9×9-inch baking dish by greasing it or lining it with parchment paper for easy removal.
2. Make the Crust: In a mixing bowl, combine the softened butter, flour, and powdered sugar. Mix until the mixture resembles coarse crumbs. Press this mixture firmly into the bottom of your prepared baking dish to form the crust.
3. Bake the Crust: Place the crust in the oven and bake for about 15–20 minutes or until lightly golden. Once done, remove it from the oven and allow it to cool slightly.
4. Prepare the Filling: In another bowl, whisk together the eggs, granulated sugar, lemon zest, lemon juice, baking powder, and salt until well combined.
5. Add Raspberries: Gently fold in the fresh raspberries, being careful not to crush them too much.
6. Pour Filling: Pour the lemon filling over the pre-baked crust, spreading it evenly.
7. Bake Again: Return the dish to the oven and bake for an additional 30–35 minutes. The filling should be set and slightly golden around the edges.
8. Cool: Allow the bars to cool in the pan at room temperature for about 45 minutes. Then, place them in the refrigerator to chill completely.
9. Cut into Bars: Once chilled, lift the bars out using the parchment paper (if used). Cut them into squares or rectangles, dust with additional powdered sugar if desired.
With these straightforward steps, your Lemon Raspberry Bars will be ready to dazzle your taste buds.
- Prep Time: 15 minutes
- Cook Time: 30-35 minutes
Nutrition
- Serving Size: 12 bars
- Calories: 190 kcal
- Fat: 8g
- Protein: 3g