
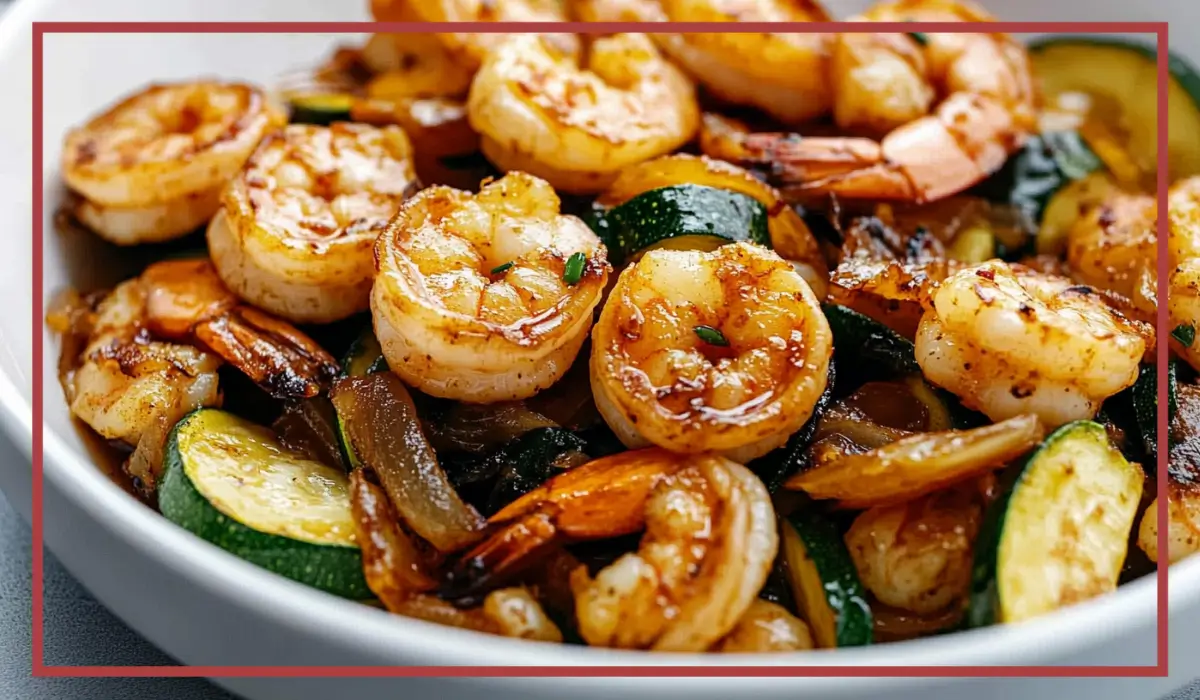
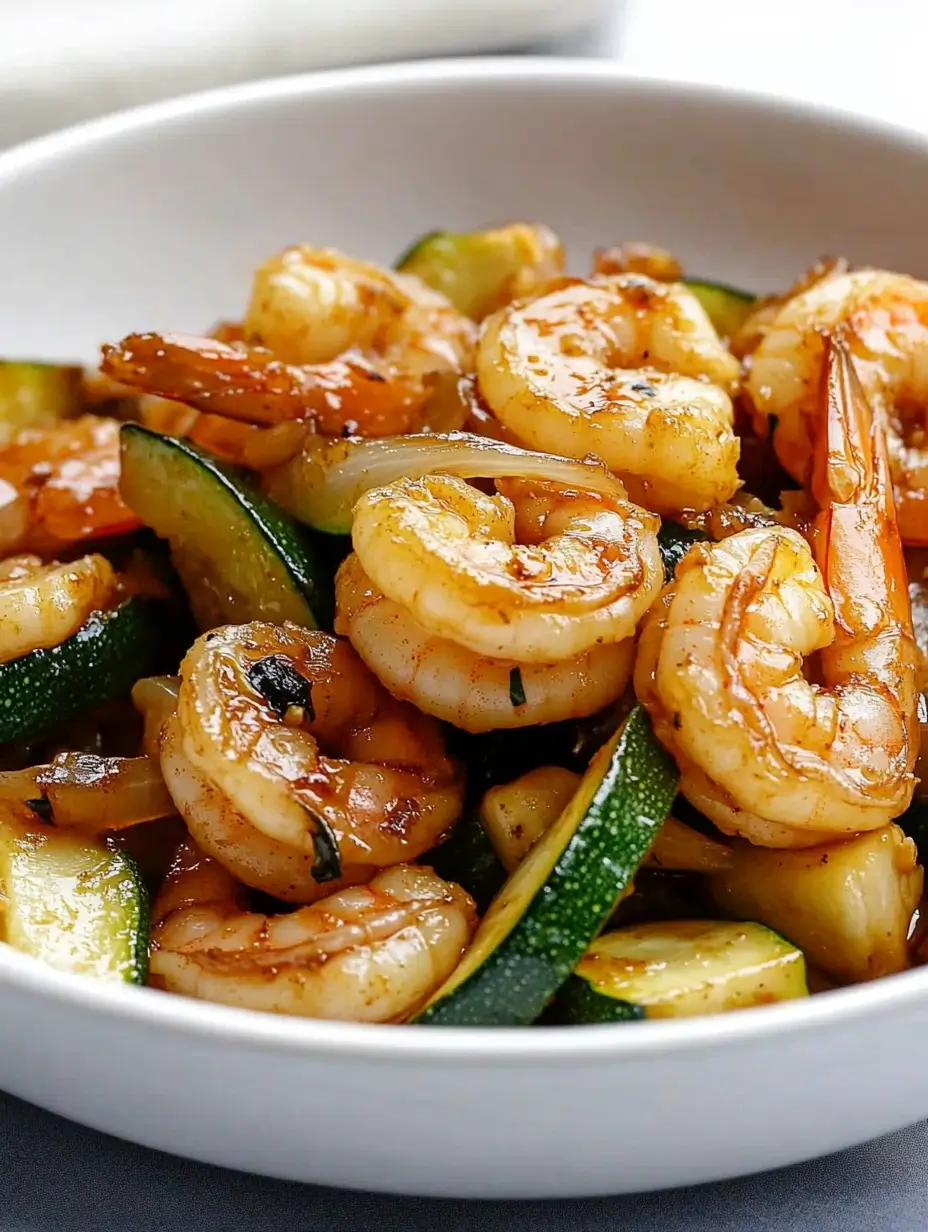
There’s something special about hibachi-style cooking. The sizzling sounds, the fragrant aroma of garlic butter wafting through the air, and the irresistible combination of juicy shrimp and perfectly seasoned fried rice make it an experience worth savoring. If you love Japanese hibachi but don’t want to wait for takeout, these Hibachi Shrimp Rice Bowls will bring all the magic of the restaurant straight to your kitchen.
What makes this recipe so special? First, it’s quick and easy, coming together in just 30 minutes. It delivers that signature buttery, garlicky, umami-packed flavor that makes hibachi meals unforgettable. The shrimp are cooked to tender perfection, the fried rice is loaded with crisp veggies, and the homemade Yum Yum Sauce ties it all together with its creamy, tangy, slightly sweet taste.
I still remember the first time I had hibachi shrimp at a Japanese steakhouse. The chef’s expert knife skills, the fire show, and the interactive cooking style made it feel like more than just a meal—it was a full-blown experience. Ever since then, I’ve been hooked on recreating that magic at home. After plenty of trial and error, I’ve mastered the perfect hibachi shrimp rice bowl that’s simple enough for a weeknight dinner yet special enough to serve to guests.
If you’re looking for a flavorful, fuss-free meal that satisfies your takeout cravings without the wait (or the price tag), you’ve come to the right place. Let’s dive into why you’ll love this dish and how you can easily whip it up at home.
Why You’ll Love This Recipe
This Hibachi Shrimp Rice Bowl is packed with flavor, texture, and satisfying goodness. Here are a few reasons why it’s a must-try:
- Quick and easy: You can have this meal ready in under 30 minutes, making it a perfect option for busy weeknights.
- Restaurant-quality flavors: The garlic butter shrimp, the smoky soy sauce-infused fried rice, and the creamy Yum Yum Sauce taste just like what you’d get at a Japanese steakhouse.
- One-pan convenience: Aside from cooking the rice separately, this dish requires only one pan, making cleanup a breeze.
- Customizable: You can swap out the shrimp for chicken, steak, or tofu and even mix up the veggies to suit your taste.
- Budget-friendly: Making hibachi at home costs a fraction of what you’d spend at a restaurant while delivering the same high-quality flavors.
- Family-friendly: Even picky eaters love this dish! The shrimp is buttery and mild, the rice is packed with familiar flavors, and the Yum Yum Sauce adds a fun, creamy element.
This recipe is a game-changer for anyone who loves Japanese flavors but wants a simplified, homemade version that’s just as satisfying.
Health Benefits
While hibachi meals are often associated with indulgence, this homemade version is much healthier than restaurant takeout. Here’s why:
- Lean protein: Shrimp is an excellent source of lean protein, containing low calories and virtually no fat while being packed with essential amino acids. Protein helps with muscle repair, keeps you full longer, and supports overall body function.
- Healthy fats: The butter and sesame oil used in this recipe provide healthy fats that enhance flavor while keeping the dish balanced. You can also opt for olive oil to make it even healthier.
- Nutrient-rich vegetables: Carrots, onions, and peas provide vitamins, minerals, and antioxidants that boost immunity and support overall well-being. Feel free to add zucchini, bell peppers, or mushrooms for extra nutrients.
- Lower sodium: Many restaurant versions of hibachi shrimp and fried rice are high in sodium due to excessive soy sauce use. By making it at home, you can control the amount of sodium by using low-sodium soy sauce or coconut aminos.
- Balanced meal: With protein, fiber-rich vegetables, and complex carbs from the rice, this meal is a well-rounded dish that provides sustained energy.
Enjoying hibachi-style food doesn’t have to mean compromising on nutrition. This homemade version allows you to enjoy your favorite flavors in a healthier way.
Preparation Time, Servings, and Nutritional Information
- Prep Time: 10 minutes
- Cook Time: 20 minutes
- Total Time: 30 minutes
- Servings: 4
Nutritional Information (Per Serving)
- Calories: 450
- Protein: 35g
- Carbohydrates: 50g
- Fats: 15g
- Fiber: 4g
- Sodium: 700mg (varies based on soy sauce type)
This meal provides a well-balanced combination of protein, carbs, and healthy fats, making it both satisfying and nourishing.
Ingredients List
For the Hibachi Shrimp:
- 1 lb shrimp (peeled and deveined)
- 1 tablespoon sesame oil or olive oil
- 2 tablespoons butter
- 2 cloves garlic (minced)
- 1 tablespoon soy sauce
- 1 tablespoon lemon juice
For the Fried Rice:
- 2 cups cooked white rice (day-old rice works best)
- ½ cup diced carrots
- ½ cup diced onions
- ½ cup peas (frozen or fresh)
- 1 clove garlic (minced)
- 2 eggs (beaten)
- 1 tablespoon sesame oil
- 2 tablespoons soy sauce
For the Yum Yum Sauce:
- ½ cup mayonnaise
- 1 tablespoon ketchup
- 1 teaspoon honey
- ½ teaspoon garlic powder
- ¼ teaspoon paprika
- 1 tablespoon water (to thin)
For Garnish:
- Chopped green onions
- Sesame seeds
Now that we have our ingredients ready, let’s dive into how to make these delicious Hibachi Shrimp Rice Bowls from scratch.
Step-By-Step Cooking Instructions
Step 1: Make the Yum Yum Sauce
- In a small bowl, whisk together mayonnaise, ketchup, honey, garlic powder, paprika, and water until smooth.
- Adjust consistency by adding more water if needed. The sauce should be creamy but pourable.
- Set aside in the fridge while you prepare the rest of the meal.
Step 2: Cook the Fried Rice
- Heat sesame oil in a large pan or wok over medium heat.
- Add onions, carrots, peas, and garlic, then sauté for 3-4 minutes until softened.
- Push the vegetables to one side of the pan, then pour in the beaten eggs. Scramble the eggs until fully cooked, then mix them with the vegetables.
- Add the day-old rice and soy sauce. Stir-fry for 4-5 minutes, letting the rice absorb all the flavors.
- Taste and adjust seasoning if needed. Remove from heat and set aside.
Step 3: Cook the Hibachi Shrimp
- In the same pan, heat butter and sesame oil over medium-high heat.
- Add the shrimp in a single layer and cook for 1-2 minutes per side until pink and opaque.
- Stir in minced garlic, soy sauce, and lemon juice, tossing to coat the shrimp evenly.
- Remove from heat once the shrimp are fully cooked.
Step 4: Assemble and Serve
- Divide the fried rice into bowls, then top with the hibachi shrimp.
- Drizzle with the Yum Yum Sauce and garnish with chopped green onions and sesame seeds.
- Serve immediately and enjoy!
How to Serve
These Hibachi Shrimp Rice Bowls are incredibly versatile and can be served in multiple ways depending on your preferences. While the classic combination of shrimp, fried rice, and Yum Yum Sauce is unbeatable, you can get creative with your presentation and sides.
Serving Suggestions:
- Traditional Hibachi-Style: Serve the shrimp and fried rice side by side on a large plate or in a shallow bowl, just like at a hibachi restaurant. Drizzle the Yum Yum Sauce generously over the shrimp and rice.
- Bento Box Style: If you’re meal-prepping or want a fun way to serve this dish, portion everything into separate compartments in a bento box. Add a side of steamed broccoli or cucumber salad for extra freshness.
- Over Steamed Rice: If you want to keep things simple, serve the shrimp over a bed of steamed jasmine or brown rice instead of fried rice. This is a great option if you’re looking for a lower-calorie meal.
- With a Side Salad: A light cucumber and seaweed salad or a crisp Asian slaw can add a refreshing contrast to the buttery, garlicky flavors of the dish.
- As a Wrap or Lettuce Cups: For a fun twist, serve the shrimp and rice in lettuce cups or tortillas for a hibachi-inspired wrap. Drizzle with Yum Yum Sauce for extra flavor.
This meal is hearty and satisfying on its own, but pairing it with the right sides and drinks can elevate the dining experience even more.
Pairing Suggestions
Pairing this dish with complementary flavors can turn a simple meal into a complete feast. Here are some great sides and drinks to serve alongside your Hibachi Shrimp Rice Bowls:
Side Dishes:
- Miso Soup: A warm, umami-rich miso soup makes a perfect light starter before diving into your hibachi meal.
- Steamed or Roasted Vegetables: Broccoli, zucchini, mushrooms, and bell peppers all pair wonderfully with hibachi shrimp. You can steam or roast them with a bit of soy sauce and sesame oil.
- Edamame with Sea Salt: These lightly salted soybeans are a great high-protein side dish that keeps things light and nutritious.
- Spring Rolls: A fresh or crispy spring roll with a light dipping sauce adds an extra layer of texture to the meal.
- Cucumber Salad: A quick cucumber salad with rice vinegar, sesame seeds, and a touch of sugar brings a refreshing contrast to the rich flavors of the dish.
Beverage Pairings:
- Green Tea: A hot or iced green tea pairs beautifully with hibachi flavors and helps balance the richness of the shrimp and butter.
- Sparkling Water with Lemon: A light, bubbly drink like sparkling water with a squeeze of lemon or lime adds freshness to the meal.
- Homemade Iced Tea: A lightly sweetened iced tea with a hint of citrus is a great way to wash down the flavors of hibachi shrimp and rice.
- Fresh Mango or Pineapple Juice: The slight acidity and natural sweetness of tropical fruit juices complement the buttery shrimp and fried rice perfectly.
With the right pairings, you can create a restaurant-worthy meal that feels like an elevated dining experience at home.
Storage, Freezing & Reheating Instructions
One of the best things about this dish is that it stores and reheats well, making it a fantastic option for meal prep or leftovers.
Storing Leftovers:
- Allow the shrimp and rice to cool before storing them.
- Store the shrimp and rice separately in airtight containers in the refrigerator.
- The shrimp will stay fresh for up to 2 days, while the fried rice can last up to 4 days.
- Keep the Yum Yum Sauce in a small, sealed container in the fridge for up to a week.
Freezing Instructions:
- If you want to freeze the shrimp, spread them on a baking sheet in a single layer and freeze until solid. Then transfer them to a freezer-safe bag or container. They will keep for up to 3 months.
- Fried rice can also be frozen. Portion it into freezer-safe bags or containers and store for up to 2 months.
- Tip: Freezing the rice in a thin, flat layer helps it thaw and reheat evenly.
Reheating Instructions:
- For the Shrimp: Reheat in a pan over low-medium heat for 2-3 minutes, adding a splash of water or butter to keep them from drying out. Avoid microwaving as it can make the shrimp rubbery.
- For the Fried Rice: Heat in a pan over medium heat, stirring frequently. You can add a little bit of sesame oil or soy sauce to freshen up the flavors. Alternatively, microwave it for 1-2 minutes, stirring halfway through.
- For the Yum Yum Sauce: Let it sit at room temperature for a few minutes before serving, as it thickens in the fridge. Stir well before using.
By following these tips, you can enjoy your hibachi shrimp rice bowls even after a few days without losing any of their deliciousness.
Common Mistakes to Avoid
Even though this recipe is straightforward, a few common mistakes can affect the final result. Here’s what to watch out for:
- Overcooking the Shrimp – Shrimp cook very quickly and can become tough and rubbery if left on the heat too long. Cook them just until they turn pink and opaque, about 1-2 minutes per side.
- Using Freshly Cooked Rice for Fried Rice – Day-old rice is best because it’s slightly dried out, which helps it absorb the flavors better and achieve the right texture. Freshly cooked rice tends to be too soft and sticky.
- Skipping the Butter – Butter is essential for achieving the rich, hibachi-style flavor. While you can use less for a lighter dish, don’t omit it completely.
- Not Prepping Ingredients Ahead of Time – Hibachi-style cooking is quick, so make sure to have everything chopped, measured, and ready to go before you start cooking.
- Overcrowding the Pan – If you crowd the shrimp or rice in the pan, they won’t cook evenly. Cook in batches if necessary.
Avoiding these mistakes will help you achieve that authentic hibachi flavor and texture every time.
Pro Tips
- Use High Heat for the Best Results – Cooking the shrimp and fried rice over high heat helps them develop that slight smoky, grilled flavor you get at hibachi restaurants.
- Let the Rice Sit Before Stirring – If you want extra crispy fried rice, let it sit undisturbed for 1-2 minutes before stirring. This allows the rice to brown slightly, adding more texture and flavor.
- Toast the Sesame Seeds for Extra Flavor – Lightly toasting the sesame seeds before sprinkling them on the dish enhances their nutty flavor.
- Double the Yum Yum Sauce – If you love dipping sauces, make extra Yum Yum Sauce because it’s addictively good. It also pairs well with grilled chicken, roasted vegetables, and even sandwiches.
- Customize the Veggies – Feel free to add or swap out vegetables based on what you have. Zucchini, mushrooms, bell peppers, or snap peas all work beautifully in this dish.
By following these pro tips, you’ll make the most delicious hibachi shrimp rice bowls every time.
Frequently Asked Questions (FAQs)
1. Can I use frozen shrimp?
Yes! Just make sure to thaw them completely and pat them dry before cooking. This prevents excess moisture from making them soggy.
2. What’s the best rice for fried rice?
Jasmine or long-grain rice works best, and day-old rice gives the best texture.
3. Can I make this dish ahead of time?
Yes! Cook everything and store it separately in the fridge. Reheat before serving.
4. How do I make this recipe gluten-free?
Use gluten-free soy sauce or tamari instead of regular soy sauce.
5. Can I use chicken instead of shrimp?
Absolutely! Just cut chicken into bite-sized pieces and cook until fully cooked through.
Conclusion & Call to Action
I hope you love these Hibachi Shrimp Rice Bowls as much as I do! They’re quick, easy, packed with flavor, and perfect for a homemade Japanese-inspired meal. If you try this recipe, let me know how it turns out—leave a comment or tag me on social media. Happy cooking!
Print
Hibachi Shrimp Rice Bowls – Easy Japanese-Inspired Dinner in 30 Minutes
- Total Time: 30 minutes
- Yield: 4 servings
- Diet: Halal
Description
Enjoy the flavors of Japanese hibachi at home with these Hibachi Shrimp Rice Bowls! Juicy, buttery shrimp, flavorful fried rice, and a creamy Yum Yum Sauce come together in just 30 minutes. This easy, one-pan meal is perfect for busy weeknights and delivers restaurant-quality taste without the wait.
Ingredients
- For the Hibachi Shrimp: 1 lb shrimp (peeled & deveined), 1 tbsp sesame oil, 2 tbsp butter, 2 cloves garlic (minced), 1 tbsp soy sauce, 1 tbsp lemon juice
- For the Fried Rice: 2 cups cooked white rice (day-old), ½ cup diced carrots, ½ cup diced onions, ½ cup peas, 1 clove garlic (minced), 2 eggs (beaten), 1 tbsp sesame oil, 2 tbsp soy sauce
- For the Yum Yum Sauce: ½ cup mayonnaise, 1 tbsp ketchup, 1 tsp honey, ½ tsp garlic powder, ¼ tsp paprika, 1 tbsp water
- Garnish: Chopped green onions, sesame seeds
Instructions
- Make the Yum Yum Sauce: Whisk together mayonnaise, ketchup, honey, garlic powder, paprika, and water. Set aside.
- Cook the Fried Rice: Heat sesame oil, sauté onions, carrots, peas, and garlic until soft. Push veggies to one side, scramble eggs, then mix. Stir in rice and soy sauce; cook for 3-4 minutes.
- Cook the Shrimp: Heat oil and butter in a skillet, cook shrimp for 1-2 minutes per side until pink. Stir in garlic, soy sauce, and lemon juice.
- Assemble & Serve: Spoon fried rice into bowls, top with shrimp, drizzle with Yum Yum Sauce, and garnish with green onions and sesame seeds.
Notes
- Use day-old rice for the best fried rice texture.
- Adjust soy sauce and butter to taste.
- Swap shrimp for chicken, steak, or tofu if desired.
- Prep Time: 10 minutes
- Cook Time: 20 minutes
- Category: Main Course
- Method: Stir-Fry
- Cuisine: Japanese-Inspired