
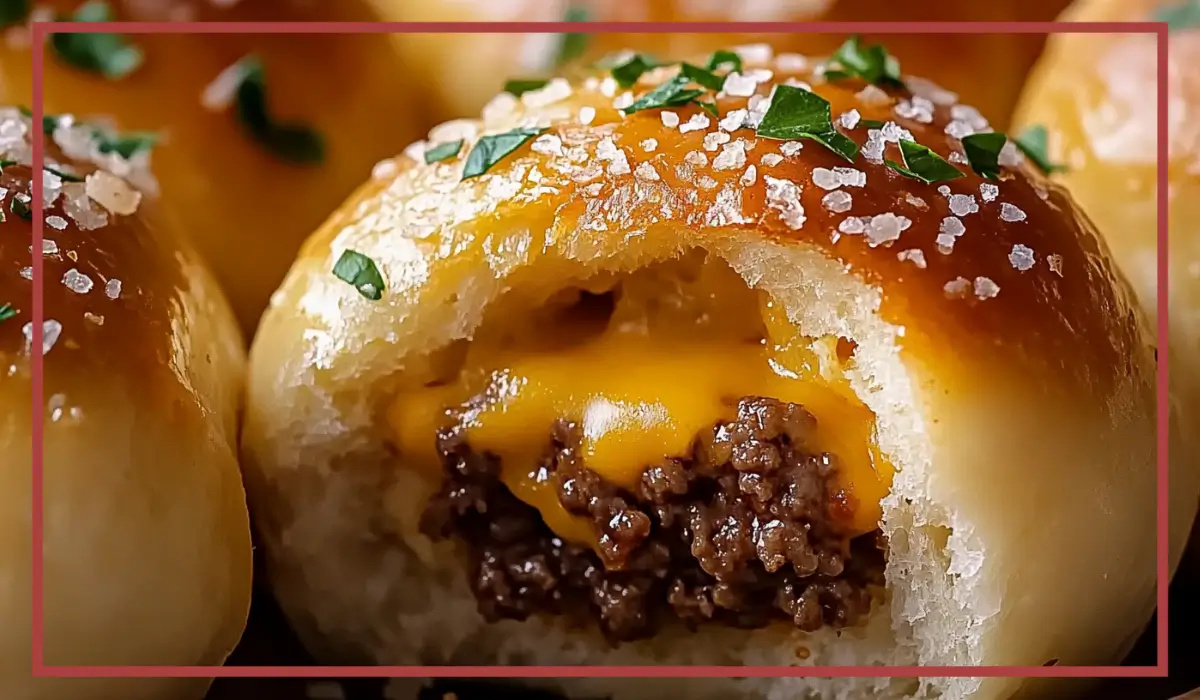
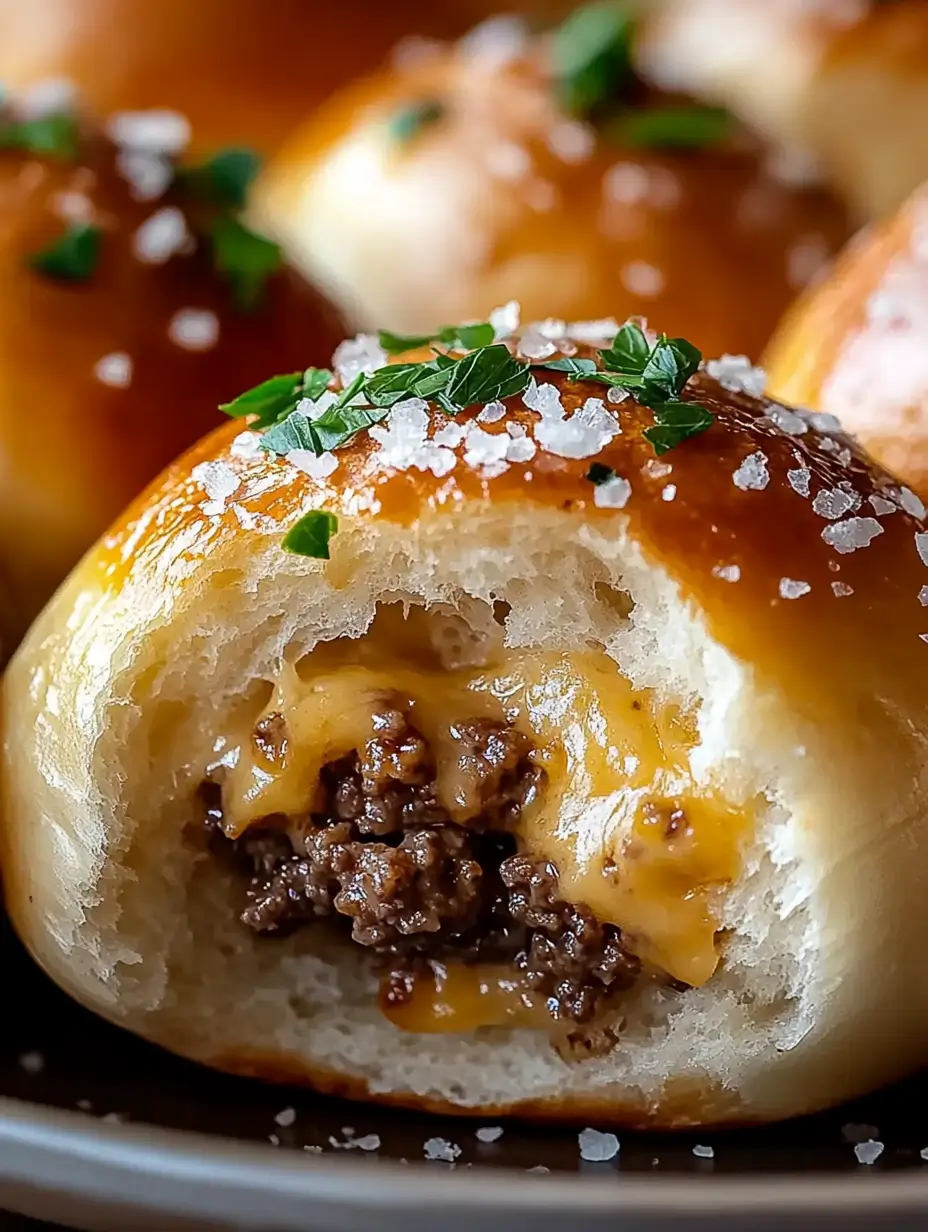
There is something undeniably satisfying about biting into a warm, cheesy, buttery creation that combines all the best flavors of a classic cheeseburger in one perfectly handheld bite. That is exactly what these Garlic Parmesan Cheeseburger Bombs deliver—juicy, flavorful beef wrapped in golden biscuit dough, brushed with a garlic-Parmesan butter glaze, and baked to perfection. They are crispy on the outside, gooey and cheesy on the inside, and bursting with rich, savory flavors.
Whether you are making these for a game night, party appetizer, or a fun weeknight dinner, they are guaranteed to be a hit. Unlike traditional cheeseburgers that require assembling toppings and buns, these burger bombs pack all the deliciousness into a neat, sealed ball, making them less messy and more fun to eat. Plus, they bake in under 15 minutes, making them an easy, hassle-free dish that still tastes indulgent.
I first discovered a version of these while looking for creative ways to serve cheeseburgers for a family movie night. The idea of rolling the filling into dough and baking it into a buttery, golden bite was too tempting to resist. The first batch disappeared in minutes, and ever since, these cheeseburger bombs have been a regular request in my household. They are kid-friendly, easy to customize with different fillings, and require minimal prep time—what’s not to love?
If you are looking for a fun twist on a classic burger, this recipe is exactly what you need. The combination of juicy beef, melty cheese, and crispy, garlicky biscuit dough is pure magic. Let’s get into why you are going to absolutely love this recipe.
Why You’ll Love This Recipe
These Garlic Parmesan Cheeseburger Bombs check all the boxes for a perfect crowd-pleasing dish. Here are a few reasons why you are going to fall in love with them:
1. Super Easy to Make
This recipe requires minimal prep work, and everything comes together in under 30 minutes. Since we use refrigerated biscuit dough, there is no need to make dough from scratch, which saves tons of time.
2. Bursting with Flavor
From the juicy, seasoned beef filling to the garlic-Parmesan butter glaze, every bite is packed with flavor. The crispy outer layer of the biscuit pairs beautifully with the melty, cheesy interior, making each bite completely irresistible.
3. Perfect for Any Occasion
These cheeseburger bombs are versatile and work for a variety of occasions. Serve them as a fun dinner option, an appetizer for parties, or even a snack for game day. They are handheld and mess-free, which makes them ideal for gatherings.
4. Kid-Friendly and Customizable
If you have picky eaters, this recipe is a lifesaver. You can easily adjust the filling based on what your family likes. Add bacon, pickles, caramelized onions, or even jalapeños for a spicy kick. The options are endless!
5. Freezer-Friendly and Great for Meal Prep
These cheeseburger bombs can be made ahead of time, frozen, and reheated later, making them an excellent meal prep option. They retain their crispy texture and cheesy goodness even after reheating.
Health Benefits
While these cheeseburger bombs are undeniably indulgent, they can be part of a balanced diet when enjoyed in moderation. Here are a few ways this recipe offers some nutritional benefits:
1. High in Protein
Since the filling is made with lean ground beef and cheese, each serving provides a good amount of protein, which helps keep you full and satisfied. You can also substitute ground turkey or chicken for a leaner option.
2. Rich in Calcium
Cheese is a great source of calcium, which is essential for strong bones and teeth. If you want an even healthier version, opt for reduced-fat cheddar cheese.
3. Can Be Made Healthier
For a lower-carb version, you can swap the biscuit dough for fathead dough (made with almond flour and mozzarella cheese). If you are looking for a higher fiber option, consider using whole wheat biscuit dough.
4. Good Source of Healthy Fats
The butter and cheese in this recipe provide healthy fats, which help with brain function and energy levels. Using grass-fed butter and high-quality cheese can improve the nutritional profile.
5. Customizable to Fit Dietary Needs
If you are gluten-free, use gluten-free biscuit dough. If you are watching sodium, opt for low-sodium cheese and seasonings. Small adjustments can make this dish work for different dietary needs while still tasting delicious.
Preparation Time, Servings, and Nutritional Information
This recipe is incredibly quick to make, making it perfect for weeknight meals or last-minute party snacks.
Preparation Time: 10 minutes
Cooking Time: 15 minutes
Total Time: 25 minutes
Servings: Makes 8-10 cheeseburger bombs
Estimated Nutritional Information (per serving):
- Calories: 290
- Protein: 12g
- Carbohydrates: 26g
- Fat: 15g
- Saturated Fat: 7g
- Cholesterol: 40mg
- Sodium: 450mg
Ingredients List
The Filling:
- 1 lb ground beef (or ground turkey for a lighter option)
- ½ cup onion, finely diced
- 2 cloves garlic, minced
- ½ teaspoon salt
- ¼ teaspoon black pepper
- 1 teaspoon Worcestershire sauce (optional, for added depth of flavor)
- 1 cup shredded cheddar cheese
The Dough:
- 1 can refrigerated biscuit dough (or pizza dough)
The Garlic Parmesan Butter:
- 3 tablespoons butter, melted
- 1 teaspoon garlic powder
- ½ teaspoon Italian seasoning
- 2 tablespoons grated Parmesan cheese
Optional Toppings & Dipping Sauces:
- Chopped parsley (for garnish)
- Ketchup, ranch, or burger sauce (for dipping)
Step-By-Step Cooking Instructions
Step 1: Preheat and Prepare
Preheat your oven to 375°F (190°C). Line a baking sheet with parchment paper or lightly grease it to prevent sticking.
Step 2: Cook the Beef Filling
In a large skillet over medium heat, cook the ground beef until it begins to brown. Add the diced onions and garlic, then season with salt, pepper, and Worcestershire sauce. Continue cooking until the onions are soft and the beef is fully cooked, about 5-7 minutes. Remove from heat and stir in the shredded cheddar cheese. Set aside to cool slightly.
Step 3: Assemble the Cheeseburger Bombs
Take the biscuit dough and flatten each round into a small disc. Place a spoonful of the beef mixture in the center of each dough circle. Fold the dough over the filling, pinching the edges to seal, and gently roll into a ball shape.
Step 4: Bake to Perfection
Place the dough balls seam-side down on the prepared baking sheet. Bake for 12-15 minutes, or until they are golden brown and fully cooked.
Step 5: Make the Garlic Parmesan Butter
While the cheeseburger bombs are baking, mix melted butter, garlic powder, Italian seasoning, and grated Parmesan cheese in a small bowl.
Step 6: Brush and Serve
Once the cheeseburger bombs are done, remove them from the oven and immediately brush with the garlic Parmesan butter. Garnish with chopped parsley, if desired.
Step 7: Serve and Enjoy
Serve warm with ketchup, burger sauce, or your favorite dip. Enjoy!
How to Serve
One of the best things about these Garlic Parmesan Cheeseburger Bombs is their versatility. They can be served as a main dish, appetizer, or snack, making them perfect for any occasion. Here are some of the best ways to serve them:
1. As a Fun Dinner Option
Serve these cheeseburger bombs as a main course alongside a fresh side dish. Since they are packed with cheesy, meaty goodness, they pair well with lighter sides like:
- Crisp green salad with a light vinaigrette
- Roasted vegetables such as zucchini, bell peppers, or asparagus
- Coleslaw for a refreshing crunch
2. As a Game Day Snack
These bite-sized burger bombs are perfect for game nights, Super Bowl parties, or casual get-togethers. Arrange them on a platter and serve with an assortment of dipping sauces. Some of the best dips to offer include:
- Ketchup for a classic burger taste
- Spicy mayo for a creamy kick
- Honey mustard for a sweet and tangy flavor
- Barbecue sauce for a smoky twist
3. As a Party Appetizer
Since these are handheld and easy to eat, they make a great party appetizer. If you are serving them at a gathering, place toothpicks nearby so guests can easily grab them. Pair them with other fun finger foods like:
- Mozzarella sticks
- Loaded potato skins
- Buffalo chicken wings
4. For Kids’ Lunches or Snacks
Kids love cheeseburgers, and these cheeseburger bombs make a perfect lunchbox addition. Pack them in a lunch container with a side of fresh fruit and some carrot sticks for a balanced meal. Since they are not messy, they are also great for on-the-go snacking.
5. As a Breakfast Option
Want to give them a morning twist? Try stuffing them with scrambled eggs, turkey bacon, and cheese for a breakfast bomb version. Serve them with a side of fresh fruit and coffee for a satisfying morning meal.
Pairing Suggestions
These Garlic Parmesan Cheeseburger Bombs are already delicious on their own, but pairing them with the right sides and beverages can elevate the experience even further. Here are some great pairings:
Side Dish Pairings
1. French Fries or Sweet Potato Fries
Since these cheeseburger bombs are inspired by classic burgers, they go perfectly with crispy French fries or sweet potato fries. Try serving them with a side of garlic aioli or spicy ketchup for extra flavor.
2. Fresh Side Salad
To balance out the richness of the cheeseburger bombs, serve them with a light, refreshing salad. Some great options include:
- Caesar salad with crisp romaine and Parmesan
- Greek salad with cucumbers, tomatoes, and feta
- Arugula salad with a lemon vinaigrette
3. Onion Rings
For a fun, indulgent pairing, serve these with crispy beer-battered onion rings. The crunch of the onion rings contrasts beautifully with the soft, cheesy interior of the burger bombs.
4. Mac and Cheese
If you want to go all out, pair these cheeseburger bombs with creamy mac and cheese. The combination of cheesy pasta and juicy burger filling is pure comfort food bliss.
Beverage Pairings
1. Classic Milkshakes
Burgers and milkshakes are a match made in heaven. Try serving these cheeseburger bombs with a thick vanilla, chocolate, or strawberry milkshake for a fun diner-style meal.
2. Sparkling Lemonade
A glass of cold, sparkling lemonade provides a refreshing contrast to the rich flavors of the cheeseburger bombs.
3. Iced Tea
For a more subtle pairing, iced tea (sweet or unsweetened) is a great choice. The mild bitterness of tea complements the savory cheeseburger filling.
4. Soda or Sparkling Water
If you love the classic burger and soda combination, go for a cola, root beer, or ginger ale. If you want a healthier alternative, flavored sparkling water is a great choice.
Storage, Freezing & Reheating Instructions
These Garlic Parmesan Cheeseburger Bombs store and reheat beautifully, making them great for meal prep. Here is how to store and reheat them properly to keep them tasting fresh:
Store Leftovers
- Place any leftover cheeseburger bombs in an airtight container.
- Store them in the refrigerator for up to 3 days.
- If stacking them, place a sheet of parchment paper between layers to prevent sticking.
Freeze for Later
- Allow the cheeseburger bombs to cool completely.
- Place them on a baking sheet and freeze for 1-2 hours until solid.
- Transfer them to a freezer-safe bag or container and store for up to 3 months.
Reheat
- Oven Method: Preheat the oven to 350°F (175°C) and bake for 10 minutes, or until heated through. This method keeps them crispy.
- Air Fryer Method: Reheat at 350°F for 4-5 minutes. This is the best method for maintaining a crispy texture.
- Microwave Method: Heat on medium power for 30-45 seconds, but note that this method may make the dough slightly soft.
Common Mistakes to Avoid
Here are some common mistakes people make when preparing cheeseburger bombs and how to avoid them:
1. Overstuffing the Dough
Adding too much filling can cause the dough to tear and leak. Use about a tablespoon of filling per dough round to ensure a proper seal.
2. Not Sealing the Dough Properly
If the dough is not sealed tightly, the cheese may ooze out during baking. Pinch the edges together firmly and roll them into a smooth ball.
3. Using Too Much Butter
Brushing on too much garlic butter can make the cheeseburger bombs soggy. Use just enough to coat them evenly without drenching them.
4. Skipping the Cooling Step
Let the cheeseburger bombs rest for 2-3 minutes after baking. This prevents them from falling apart when bitten into.
5. Using Too Much Flour on the Dough
If rolling out the dough, avoid using excess flour, as it can make the texture too dry.
Pro Tips for the Best Cheeseburger Bombs
- Use cold dough: This makes it easier to handle and shape into balls.
- Toast the garlic butter: Lightly browning the butter before adding the garlic powder enhances the flavor.
- Add a cheese cube: Instead of shredded cheese, place a small cube of cheddar inside each bomb for an extra gooey center.
- Make them spicy: Add chopped jalapeños or a dash of hot sauce for a little heat.
- Try different fillings: Experiment with ground turkey, chicken, or even plant-based meat substitutes for variations.
Frequently Asked Questions (FAQs)
1. Can I use homemade dough instead of biscuit dough?
Yes! If you prefer, you can use homemade pizza dough or crescent roll dough.
2. Can I make these in an air fryer?
Absolutely! Cook them in an air fryer at 350°F for 8-10 minutes, flipping halfway through.
3. How do I prevent them from being too dry?
Make sure not to overcook the beef filling and avoid baking them for too long.
4. Can I make them ahead of time?
Yes! You can prepare the cheeseburger bombs ahead of time, refrigerate them, and bake them just before serving.
5. What is the best cheese to use?
Cheddar is a classic choice, but mozzarella, gouda, or pepper jack work well too.
Conclusion & Call to Action
These Garlic Parmesan Cheeseburger Bombs are a game-changer. They are crispy, cheesy, buttery, and absolutely delicious. Whether you are making them for a party, a weeknight meal, or just a fun snack, they are sure to be a hit. Try making a batch today, and let me know how they turn out! If you loved this recipe, share it with friends or tag me in your photos. Happy cooking!
Print
Garlic Parmesan Cheeseburger Bombs – Easy, Cheesy & Irresistible
- Total Time: 35 minutes
- Yield: 8-10 cheeseburger bombs 1x
- Diet: Gluten Free
Description
These Garlic Parmesan Cheeseburger Bombs are crispy on the outside, gooey on the inside, and bursting with rich flavors. Made with juicy beef, melty cheddar cheese, and wrapped in golden biscuit dough, they are brushed with a buttery garlic-Parmesan glaze for extra flavor. Perfect for appetizers, game day snacks, or a quick dinner option!
Ingredients
For the Filling:
- 1 lb ground beef
- ½ cup onion, finely diced
- 2 cloves garlic, minced
- ½ tsp salt
- ¼ tsp black pepper
- 1 tsp Worcestershire sauce (optional)
- 1 cup shredded cheddar cheese
For the Dough:
- 1 can refrigerated biscuit dough (or pizza dough)
For the Garlic Parmesan Butter:
- 3 tbsp butter, melted
- 1 tsp garlic powder
- ½ tsp Italian seasoning
- 2 tbsp grated Parmesan cheese
Optional Garnishes & Dips:
- Chopped parsley
- Ketchup, ranch, or burger sauce
Instructions
- Preheat oven to 375°F (190°C). Line a baking sheet with parchment paper.
- Cook the beef: In a pan over medium heat, cook ground beef, onion, garlic, salt, and pepper until browned. Drain excess grease, then mix in shredded cheddar cheese. Let cool slightly.
- Assemble the bombs: Flatten each biscuit dough round and place a spoonful of the cheeseburger mixture in the center. Fold the dough over the filling and pinch the edges to seal.
- Bake to perfection: Place the cheeseburger bombs seam-side down on the baking sheet. Bake for 12-15 minutes until golden brown.
- Make the garlic Parmesan butter: While baking, mix melted butter, garlic powder, Italian seasoning, and Parmesan cheese.
- Brush & serve: Once baked, brush with garlic Parmesan butter, sprinkle with parsley, and serve with your favorite dip.
Notes
- Avoid overstuffing the dough to prevent leaks.
- For extra crispiness, broil for the last 2 minutes of baking.
- Can be made ahead and frozen for meal prep.
- Prep Time: 10 minutes
- Cook Time: 25 minutes
- Category: Appetizer, Snack, Main Course
- Method: Baking
- Cuisine: American