
Fruit Tray Platter is a delightful way to bring freshness and vibrancy to any gathering. The vibrant colors and natural sweetness of various fruits create an inviting presentation that is not only visually stunning but also incredibly healthy. Whether you are hosting a party, a picnic, or simply want a nutritious snack, a well-prepared fruit tray platter can be the highlight of your event. It’s an amazing option that appeals to everyone, from children to adults, making it a versatile choice for any occasion.
Imagine a spread of juicy watermelon, succulent strawberries, and crisp apples arranged artfully on a platter. Each bite is a burst of flavor, and the natural sweetness of the fruits can satisfy cravings without the guilt associated with sugary desserts. Moreover, creating a fruit tray platter allows for endless creativity. You can choose seasonal fruits, mix and match colors, and even add a touch of elegance with garnishes like mint leaves or edible flowers.
In this guide, you will learn why a fruit tray platter is an excellent choice for any gathering, how to prepare it, what ingredients to include, and tips for serving it beautifully. With a few simple steps, you can create a stunning centerpiece that will impress your guests while offering a healthy snack option.
Why You’ll Love This Recipe
Creating a Fruit Tray Platter offers numerous benefits that make it a favorite among hosts and guests alike. Here are some compelling reasons why you will love this recipe:
1. Healthy and Nutritious: Fruits are packed with vitamins, minerals, and antioxidants that are essential for maintaining good health. They provide a refreshing and wholesome option for your guests.
2. Visually Appealing: The colorful array of fruits creates a beautiful display that is sure to catch everyone’s attention. A well-arranged platter can be the centerpiece of your table.
3. Easy to Prepare: Preparing a fruit tray platter requires minimal effort. You only need to wash, cut, and arrange the fruits, making it a quick and stress-free option.
4. Customizable: You can tailor your fruit tray platter to suit different tastes and dietary preferences. Add tropical fruits for a summer vibe or winter fruits for a cozy feel.
5. Perfect for Any Occasion: Whether it’s a birthday party, wedding, or casual get-together, a fruit tray platter fits seamlessly into any event.
6. Kid-Friendly: Fruits are naturally sweet and appealing to children. A fruit platter can encourage kids to enjoy healthy snacks without fuss.
7. Great for Leftovers: Any leftover fruits can be blended into smoothies or used in salads, minimizing food waste.
These aspects make the Fruit Tray Platter not just a dish but an experience that brings joy and health to any occasion.
Preparation and Cooking Time
Preparing a Fruit Tray Platter is quick and straightforward. Here’s a breakdown of the time required:
– Preparation Time: 15-20 minutes
– Total Time: 15-20 minutes
The beauty of this platter is that it requires no cooking, allowing you to focus on selecting and arranging your fruits.
Ingredients
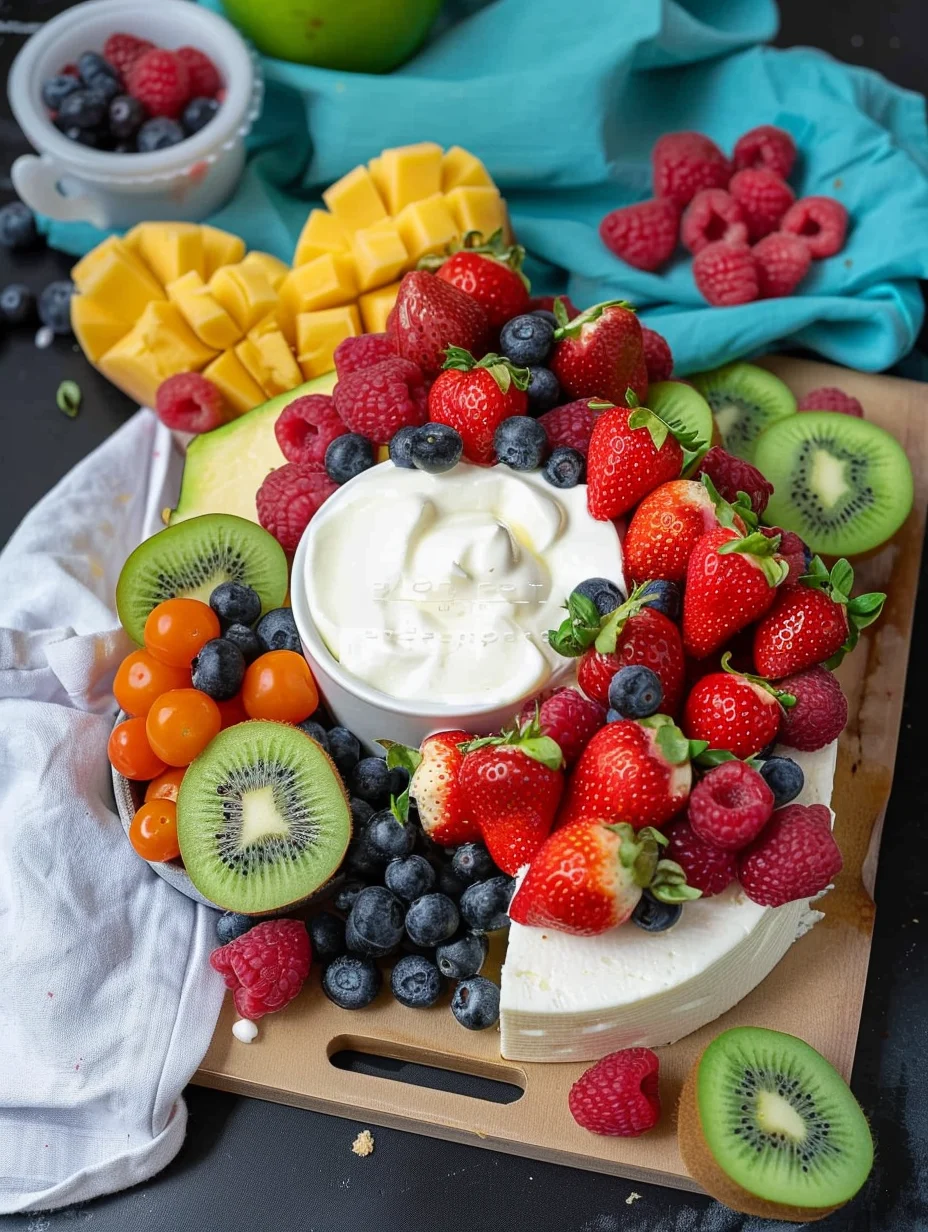
– A variety of fresh fruits (e.g., strawberries, blueberries, grapes, apple slices, kiwi, pineapple, watermelon)
– Fresh mint leaves (for garnish)
– Optional: yogurt dip or honey (for serving)
Step-by-Step Instructions
Creating a stunning Fruit Tray Platter is simple when you follow these easy steps:
1. Select Your Fruits: Choose a mix of seasonal fruits to ensure freshness. Consider using both sweet and tart fruits for a balanced flavor profile.
2. Wash the Fruits: Rinse all fruits thoroughly under cold water to remove any dirt or pesticides.
3. Prepare the Fruits:
– Slice larger fruits like watermelon and pineapple into bite-sized pieces.
– Halve grapes or strawberries if desired.
– Leave smaller fruits, such as blueberries and raspberries, whole.
4. Choose a Platter: Select a large serving platter or wooden board that will accommodate all your fruits beautifully.
5. Arrange the Fruits: Start by placing the larger fruit pieces on the platter first. Then fill in the gaps with smaller fruits, creating a visually appealing arrangement.
6. Add Garnishes: Place fresh mint leaves around the platter to add a pop of color and freshness.
7. Serve with Dips: If desired, include a small bowl of yogurt or honey on the side for dipping.
How to Serve
Serving your Fruit Tray Platter effectively can enhance the overall experience for your guests. Here are some tips to consider:
1. Presentation: Use a large, attractive platter or a tiered stand to elevate the presentation. A beautiful arrangement will draw guests in.
2. Temperature: Keep the platter chilled before serving, especially if you’re using fruits that are prone to spoiling quickly, like bananas or cut apples.
3. Portion Control: Provide small skewers or toothpicks for easy serving, allowing guests to take just the right amount without mess.
4. Pairing Options: Offer a yogurt dip, chocolate sauce, or honey for guests who may prefer a little extra sweetness or flavor.
5. Seasonal Themes: Adapt the fruit selection based on the season or holiday. For example, use red and green fruits for Christmas or tropical fruits for a summer barbecue.
6. Accompaniments: Consider serving nuts or cheese alongside the platter for added texture and flavor. This can also cater to a broader range of tastes.
7. Leftover Ideas: If there are any leftovers, suggest blending the fruits into smoothies or adding them to salads for a refreshing twist.
With these serving tips, your Fruit Tray Platter will be a hit, leaving your guests happy and satisfied!
Additional Tips
– Use Seasonal Fruits: Selecting fruits that are in season will enhance the flavor and freshness of your platter. Seasonal fruits are often more affordable and tastier.
– Experiment with Shapes: Consider using cookie cutters to create fun shapes with fruits like watermelon or pineapple. This can make your platter more appealing, especially for kids.
– Keep It Simple: Don’t feel pressured to include every fruit available. A well-thought-out selection of a few different types can be more effective than an overwhelming variety.
– Add Dips: Offering a selection of dips can enhance the experience. Yogurt, chocolate sauce, or a light citrus dressing can complement the fruits beautifully.
– Use Fresh Herbs: In addition to mint, consider garnishing with basil or rosemary for a unique flavor twist.
– Consider Allergies: Be mindful of any allergies your guests may have. Avoid including common allergens like nuts if you’re unsure.
– Create Themes: Tailor your fruit platter based on the theme of your event, such as tropical fruits for a Luau or autumn fruits for a fall gathering.
Recipe Variation
Feel free to customize your Fruit Tray Platter to suit different tastes! Here are some variations to try:
1. Tropical Twist: Use a mix of mango, papaya, and star fruit for a tropical flair. Add shredded coconut for an extra touch.
2. Berry Medley: Focus on an assortment of berries, such as strawberries, blueberries, raspberries, and blackberries. This can create a vibrant and colorful platter.
3. Cheese and Fruit Combination: Pair fruits with a selection of cheeses, such as brie, gouda, or goat cheese, for a savory-sweet experience.
4. Chocolate-Dipped Fruits: Offer a few chocolate-dipped fruits like strawberries or bananas for a decadent addition to your platter.
5. Nutty Addition: Sprinkle some chopped nuts or seeds over the fruits for added crunch and nutrition.
Freezing and Storage
– Storage: If you have leftover fruits, store them in an airtight container in the refrigerator. They should remain fresh for 2-3 days.
– Freezing: Most fruits can be frozen; however, keep in mind that their texture might change. Freeze fruits like berries, bananas, and mango in a single layer before transferring them to a freezer bag.
Special Equipment
You don’t need much in terms of equipment to prepare a Fruit Tray Platter, but here are some handy tools:
– Large serving platter or wooden board
– Sharp knife for cutting fruits
– Cutting board
– Small bowls for dips
– Skewers or toothpicks for serving
Frequently Asked Questions
How do I choose the best fruits for my platter?
Select a variety of fresh, ripe fruits that complement each other in flavor and color. Seasonal fruits are usually the best choice.
Can I prepare the fruit tray in advance?
Yes, you can prepare the fruits ahead of time. Just remember to keep them refrigerated and assemble the platter shortly before serving to maintain freshness.
What if I have leftover fruit?
Leftover fruit can be blended into smoothies, added to salads, or used in baking. Get creative to minimize waste!
How can I make my platter more visually appealing?
Arrange fruits in a rainbow order or create patterns. Adding garnishes like mint leaves or edible flowers can also enhance the visual appeal.
Can I use canned or frozen fruits?
While fresh fruits are preferred for their texture and flavor, you can use canned or frozen fruits in a pinch. Just ensure they are well-drained and thawed before serving.
Conclusion
A Fruit Tray Platter is not just a dish; it’s an experience that brings people together. With its vibrant colors, refreshing flavors, and health benefits, it makes for an ideal centerpiece at any gathering. By following the tips and variations provided, you can create a stunning and delicious platter that caters to diverse tastes and preferences. Whether you’re celebrating a special occasion or simply enjoying a casual get-together, a well-prepared fruit platter will surely impress your guests and leave them wanting more.

Fruit Tray Platter: An Incredible Ultimate Guide with 7 Tips
- Total Time: 15 minutes
Ingredients
– A variety of fresh fruits (e.g., strawberries, blueberries, grapes, apple slices, kiwi, pineapple, watermelon)
– Fresh mint leaves (for garnish)
– Optional: yogurt dip or honey (for serving)
Instructions
Creating a stunning Fruit Tray Platter is simple when you follow these easy steps:
1. Select Your Fruits: Choose a mix of seasonal fruits to ensure freshness. Consider using both sweet and tart fruits for a balanced flavor profile.
2. Wash the Fruits: Rinse all fruits thoroughly under cold water to remove any dirt or pesticides.
3. Prepare the Fruits:
– Slice larger fruits like watermelon and pineapple into bite-sized pieces.
– Halve grapes or strawberries if desired.
– Leave smaller fruits, such as blueberries and raspberries, whole.
4. Choose a Platter: Select a large serving platter or wooden board that will accommodate all your fruits beautifully.
5. Arrange the Fruits: Start by placing the larger fruit pieces on the platter first. Then fill in the gaps with smaller fruits, creating a visually appealing arrangement.
6. Add Garnishes: Place fresh mint leaves around the platter to add a pop of color and freshness.
7. Serve with Dips: If desired, include a small bowl of yogurt or honey on the side for dipping.
- Prep Time: 15 minutes
- Cook Time: 0 minutes
Nutrition
- Serving Size: 8-10 servings
- Calories: 150 kcal (per serving)
- Fat: 0g
- Protein: 1g