
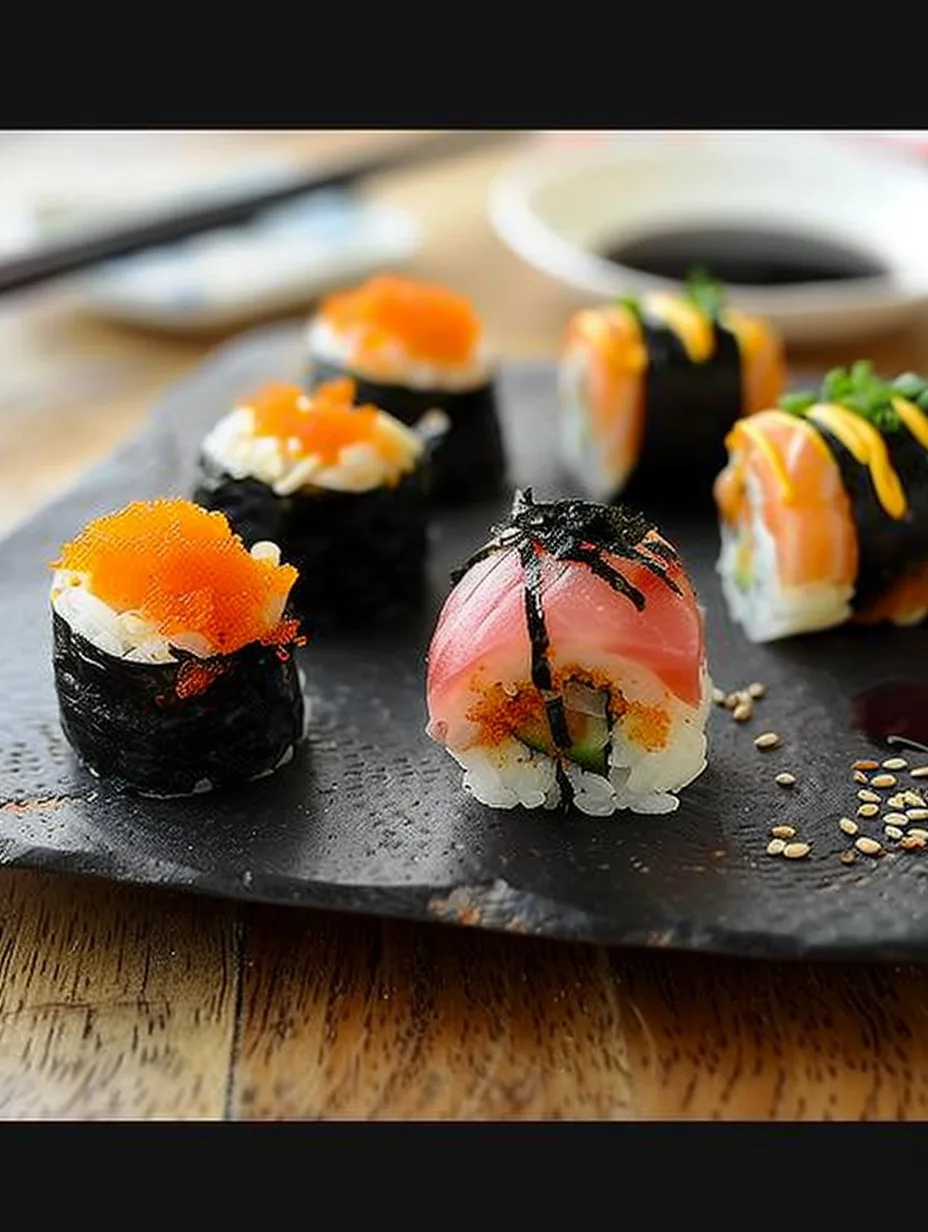
Easy Sushi Balls are a wonderful way to enjoy sushi in a fun and accessible form. These delightful bites capture the essence of traditional sushi while offering a playful twist that makes them perfect for gatherings, parties, or just a cozy night in. With their vibrant colors and delicious flavors, Easy Sushi Balls are an impressive yet simple option that will surely please sushi lovers and newcomers alike.
If you’ve ever craved sushi but felt overwhelmed by the intricacies of rolling it up, Easy Sushi Balls are your answer. They combine all of the classic sushi components into manageable, bite-sized portions. This recipe is not just about the taste; it’s about creating an experience that you can share with friends and family. In this guide, you’ll discover why this recipe stands out, how to make it, and tips for serving it beautifully.
With a variety of fillings, toppings, and flavors, Easy Sushi Balls allow you to customize based on your preferences. Whether you prefer classic flavors like tuna and avocado or want to get adventurous with spicy crab and mango, this recipe is designed to inspire your creativity. Let’s dive into the amazing world of Easy Sushi Balls!
Why You’ll Love This Recipe
There are countless reasons why Easy Sushi Balls will become a favorite in your home. Here are just a few compelling factors that make this recipe a must-try:
1. Simple and Fun: The process of making sushi balls is entertaining and engaging for all ages. It’s a great activity to do with kids or friends.
2. Customizable: You can easily modify the ingredients based on dietary preferences or what you have on hand, making it versatile for any occasion.
3. Quick to Prepare: Unlike traditional sushi rolls that require precise techniques, these sushi balls are straightforward and can be made in under an hour.
4. Beautiful Presentation: The colorful ingredients create a stunning visual appeal, making them perfect for parties or special gatherings.
5. Healthy Options: Made with fresh ingredients, Easy Sushi Balls can be a nutritious and balanced meal option.
6. Perfect for Leftovers: If you have leftover rice or fish, this recipe provides an excellent way to use them up without compromising on flavor.
These attributes make Easy Sushi Balls not just a meal but a delightful experience that will bring joy to your table!
Preparation and Cooking Time
Making Easy Sushi Balls is not only fun but also relatively quick. Here’s a breakdown of the time you can expect to spend:
– Preparation Time: 30 minutes
– Cooking Time: 15 minutes
– Cooling Time: 10 minutes
– Total Time: Approximately 55 minutes
This timeframe may vary slightly depending on your cooking speed and kitchen setup, but it should give you a good estimate to plan your sushi-making adventure.
Ingredients
– 2 cups sushi rice
– 2 ½ cups water
– ¼ cup rice vinegar
– 2 tablespoons sugar
– 1 teaspoon salt
– 1 cup cooked and seasoned seafood (like crab, shrimp, or cooked tuna)
– 1 avocado, diced
– 1 cucumber, diced
– ¼ cup pickled ginger
– 2 tablespoons sesame seeds
– Soy sauce, for drizzling
– Nori sheets, cut into strips (optional for garnish)
Step-by-Step Instructions
Creating Easy Sushi Balls is a straightforward process if you follow these steps:
1. Rinse the Rice: Begin by rinsing the sushi rice under cold water until the water runs clear. This removes excess starch.
2. Cook the Rice: In a medium saucepan, combine the rinsed rice and water. Bring to a boil, then reduce to low heat, cover, and simmer for about 18 minutes or until the water is absorbed. Remove from heat and let it sit for 10 minutes.
3. Prepare Sushi Vinegar: In a small bowl, mix the rice vinegar, sugar, and salt until dissolved.
4. Combine Rice and Vinegar: Transfer the cooked rice to a large bowl. Drizzle the vinegar mixture over the rice and gently fold it in using a wooden spoon or spatula. Allow it to cool to room temperature.
5. Shape the Sushi Balls: Once the rice is cool enough to handle, wet your hands with water to prevent sticking. Take a small handful of rice and flatten it slightly in your palm.
6. Add Fillings: Place a small portion of your chosen seafood, avocado, or cucumber in the center of the rice. Mold the rice around the filling and roll it into a ball shape.
7. Sprinkle with Sesame Seeds: Roll the formed sushi ball in sesame seeds for added flavor and texture.
8. Repeat: Continue this process until all the rice and fillings are used up.
9. Garnish: If desired, serve the sushi balls with strips of nori for garnish and drizzle with soy sauce.
By following these steps, you’ll create beautiful and delicious Easy Sushi Balls that everyone will love!
How to Serve
Serving Easy Sushi Balls can enhance the overall experience. Here are some tips to make your presentation memorable:
1. Plating: Use a large platter to arrange the sushi balls in an attractive manner. You can create patterns or clusters for visual appeal.
2. Dipping Sauces: Offer a variety of dipping sauces, such as soy sauce, spicy mayo, or wasabi, to cater to different tastes.
3. Garnishes: Add fresh herbs like cilantro or green onions for a pop of color and flavor. Pickled ginger can also be served on the side.
4. Accompaniments: Pair the sushi balls with sides like seaweed salad, edamame, or miso soup for a complete meal.
5. Interactive Serving: Allow guests to build their own sushi balls by providing assorted fillings and toppings, making it a fun and interactive experience.
With these serving suggestions, you can elevate the presentation and enjoyment of your Easy Sushi Balls, making them a highlight of any meal!
Additional Tips
– Use Fresh Ingredients: For the best flavor, ensure that your seafood and vegetables are fresh. This will enhance the overall taste and texture of your Easy Sushi Balls.
– Experiment with Seasonings: Feel free to adjust the seasoning in the sushi vinegar to suit your palate. You can add a touch of sesame oil or even a splash of citrus juice for an extra zing.
– Keep Ingredients Ready: Prepare all your fillings and toppings in advance. This will make the assembly process smoother and quicker.
– Moisture Control: If your rice feels dry, lightly mist it with water while shaping the sushi balls. This will help them hold together better.
– Create a Sushi Bar: Set up a sushi-making station with all the ingredients laid out. This allows everyone to customize their sushi balls to their liking, making it interactive and fun.
Recipe Variation
Feel free to switch things up! Here are a few variations to try:
1. Vegetarian Version: Substitute seafood with tofu or tempeh. Add more fresh vegetables like bell peppers or radishes for a colorful and nutritious option.
2. Spicy Option: Mix a little sriracha or spicy mayo into the seafood filling for those who enjoy a kick.
3. Tropical Twist: Incorporate tropical fruits like mango or pineapple into your fillings for a refreshing contrast to the savory components.
4. Sushi Ball Salad: Instead of shaping into balls, layer the ingredients in a bowl to create a sushi ball-inspired salad, perfect for a lighter meal option.
Freezing and Storage
– Storage: Keep the sushi balls in an airtight container in the refrigerator. They should be consumed within 2-3 days for optimal freshness.
– Freezing: You can freeze the cooked rice and seafood separately. However, it’s best to assemble the sushi balls fresh, as freezing may alter the texture of the rice.
Special Equipment
You will need a few essential tools to prepare Easy Sushi Balls successfully:
– Medium saucepan for cooking the rice
– Large mixing bowl for combining the rice and vinegar
– Wooden spoon or spatula for mixing
– A small bowl of water for wetting your hands while shaping the sushi balls
– A sharp knife for chopping ingredients
Frequently Asked Questions
Can I use regular rice instead of sushi rice?
Sushi rice is preferred due to its sticky texture, which helps the balls hold together better. Regular rice won’t provide the same results.
How can I make this recipe gluten-free?
Simply use gluten-free soy sauce or tamari as a dip instead of regular soy sauce.
What can I do if I have leftover sushi balls?
If you have leftovers, store them in the refrigerator. You can also repurpose them by adding them to salads or grain bowls.
Is it necessary to use rice vinegar?
Rice vinegar adds a mild flavor and helps season the sushi rice. If unavailable, you can substitute it with apple cider vinegar or white vinegar, but the taste will vary slightly.
Can I make these sushi balls ahead of time?
While you can prepare the rice and fillings in advance, it’s best to shape the sushi balls shortly before serving to maintain their texture.
Conclusion
Easy Sushi Balls offer a creative and enjoyable way to experience the flavors of sushi without the complexity of traditional rolling. With their versatility, quick preparation, and beautiful presentation, they are perfect for any occasion. Whether you’re hosting a party or enjoying a cozy meal at home, these delightful bites will surely impress your guests and satisfy your cravings. So gather your ingredients, unleash your creativity, and let your sushi-making adventure begin!
Easy Sushi Balls: An Incredible Ultimate Recipe for Everyone
- Total Time: 30 minutes
Ingredients
– 2 cups sushi rice
– 2 ½ cups water
– ¼ cup rice vinegar
– 2 tablespoons sugar
– 1 teaspoon salt
– 1 cup cooked and seasoned seafood (like crab, shrimp, or cooked tuna)
– 1 avocado, diced
– 1 cucumber, diced
– ¼ cup pickled ginger
– 2 tablespoons sesame seeds
– Soy sauce, for drizzling
– Nori sheets, cut into strips (optional for garnish)
Instructions
Creating Easy Sushi Balls is a straightforward process if you follow these steps:
1. Rinse the Rice: Begin by rinsing the sushi rice under cold water until the water runs clear. This removes excess starch.
2. Cook the Rice: In a medium saucepan, combine the rinsed rice and water. Bring to a boil, then reduce to low heat, cover, and simmer for about 18 minutes or until the water is absorbed. Remove from heat and let it sit for 10 minutes.
3. Prepare Sushi Vinegar: In a small bowl, mix the rice vinegar, sugar, and salt until dissolved.
4. Combine Rice and Vinegar: Transfer the cooked rice to a large bowl. Drizzle the vinegar mixture over the rice and gently fold it in using a wooden spoon or spatula. Allow it to cool to room temperature.
5. Shape the Sushi Balls: Once the rice is cool enough to handle, wet your hands with water to prevent sticking. Take a small handful of rice and flatten it slightly in your palm.
6. Add Fillings: Place a small portion of your chosen seafood, avocado, or cucumber in the center of the rice. Mold the rice around the filling and roll it into a ball shape.
7. Sprinkle with Sesame Seeds: Roll the formed sushi ball in sesame seeds for added flavor and texture.
8. Repeat: Continue this process until all the rice and fillings are used up.
9. Garnish: If desired, serve the sushi balls with strips of nori for garnish and drizzle with soy sauce.
By following these steps, you’ll create beautiful and delicious Easy Sushi Balls that everyone will love!
- Prep Time: 15 minutes
- Cook Time: 15 minutes
Nutrition
- Serving Size: 4
- Calories: 320 kcal
- Fat: 7g
- Protein: 10g