
Easter is a time of celebration, family gatherings, and of course, delicious treats. If you are looking for a dessert that is both visually stunning and incredibly tasty, Easter Egg Cheesecake is the perfect choice. This no-bake cheesecake is creamy, smooth, and packed with festive colors, making it a wonderful centerpiece for your holiday table. Unlike traditional baked cheesecakes, this recipe is easy to make and requires minimal effort.
One of the best things about this cheesecake is its versatility. You can customize it with different colors, flavors, and decorations to match your Easter theme. Whether you prefer pastel hues or vibrant swirls, this dessert allows you to get creative while ensuring a delicious outcome. The combination of a buttery graham cracker crust, a velvety cream cheese filling, and fun Easter decorations makes this recipe a must-try.
Another advantage of this no-bake cheesecake is that it saves time. Instead of waiting for the cheesecake to bake and cool down, you simply mix, assemble, and let it chill in the refrigerator. This makes it an ideal dessert for busy families or anyone who wants a hassle-free recipe without compromising on taste. Additionally, the creamy filling has a melt-in-your-mouth texture that pairs beautifully with the crunchy crust, creating a balance of flavors and textures in every bite.
Whether you are making this cheesecake for an Easter party, a family brunch, or simply as a special treat for yourself, it is sure to impress. Even those who are not experienced bakers can achieve stunning results with this easy-to-follow recipe. Now, let’s dive into why this recipe is so amazing and why you will love making it.
Why You’ll Love This Easter Egg Cheesecake Recipe
This Easter Egg Cheesecake is not only beautiful but also incredibly delicious. There are several reasons why this dessert will become a favorite in your household. First, it is a no-bake recipe, which means there is no need to worry about oven temperatures, cracks in the cheesecake, or complicated baking techniques. All you need to do is mix the ingredients, assemble them in a pan, and let the refrigerator do the rest.
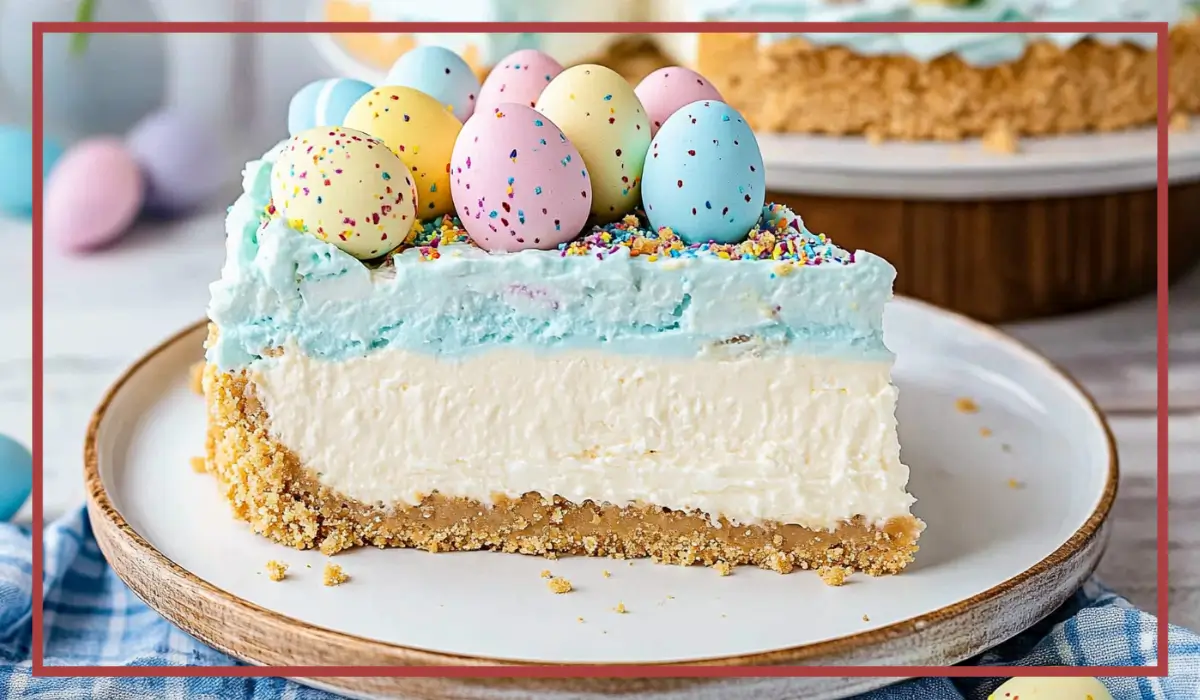
Another reason to love this recipe is its festive appearance. The pastel colors give it a cheerful, spring-inspired look that is perfect for Easter celebrations. The marbled or layered effect created by the food coloring adds an artistic touch, making each slice unique. Plus, decorating the cheesecake with chocolate eggs, sprinkles, or whipped cream enhances the festive charm and makes it even more appealing.
This cheesecake is also a great choice for entertaining. Since it needs to chill before serving, you can prepare it a day in advance, freeing up time for other Easter preparations. When it is time to serve, simply take it out of the fridge and enjoy. It is a stress-free dessert that allows you to focus on spending time with loved ones.
For those who love creamy desserts, this cheesecake delivers the perfect texture. The rich cream cheese filling is smooth and luscious, while the buttery graham cracker crust adds a satisfying crunch. The combination of flavors is well-balanced, with just the right amount of sweetness. You can also experiment with different extracts, such as vanilla, almond, or lemon, to customize the flavor to your liking.
Lastly, this recipe is fun to make. Whether you are preparing it with kids or trying your hand at creative designs, the process is enjoyable. Swirling the colors together is a great way to get artistic, and adding decorative touches allows you to make the cheesecake truly your own. If you are looking for a dessert that is as fun to create as it is to eat, this Easter Egg Cheesecake is the perfect choice.
Health Benefits
While cheesecake is often considered an indulgent treat, there are some nutritional benefits to this dessert. One of the main ingredients, cream cheese, is a good source of calcium and protein. Calcium is essential for strong bones and teeth, while protein supports muscle growth and overall health. Additionally, this recipe includes heavy cream, which provides healthy fats that help keep you full and satisfied.
Another benefit of this Easter Egg Cheesecake is that it can be made with healthier ingredient substitutions. For instance, you can use low-fat cream cheese or Greek yogurt instead of full-fat cream cheese to reduce the calorie content. Additionally, using a sugar substitute or natural sweeteners like honey or maple syrup can make this dessert lower in refined sugar.
Graham crackers, which form the base of the crust, contain fiber that aids in digestion. If you want to boost the nutritional value even further, you can opt for whole-grain graham crackers or almond flour crusts. Adding fresh fruit as a topping also increases the vitamin and antioxidant content of the dessert.
Unlike heavily processed store-bought desserts, homemade cheesecake allows you to control the ingredients, ensuring that you use high-quality and fresh components. This means you can avoid artificial preservatives and unnecessary additives, making your dessert a healthier choice overall.
Preparation Time, Servings, and Nutritional Information
One of the best things about this recipe is that it requires minimal preparation time. From start to finish, the process takes about 30 minutes, followed by a few hours of chilling in the refrigerator. This makes it a convenient dessert for those who do not want to spend hours in the kitchen.
This recipe yields approximately 8 to 10 servings, depending on how large you slice the cheesecake. It is perfect for sharing with family and friends during Easter gatherings. Since it is rich and creamy, a small slice is often enough to satisfy your sweet tooth.
On average, each serving contains around 350 to 450 calories, depending on the ingredients used. The main contributors to the calorie count are cream cheese, heavy cream, and the crust. If you want to make a lighter version, you can use reduced-fat ingredients and adjust the sugar levels.
The cheesecake is also relatively high in fat due to the dairy ingredients, but these fats contribute to its smooth texture and indulgent taste. As with any dessert, moderation is key. Enjoying a slice of this delicious Easter treat as part of a balanced diet is a great way to celebrate without overindulging.
Ingredients List
To make this Easter Egg Cheesecake, you will need the following ingredients:
- For the crust:
- 2 cups graham cracker crumbs
- ½ cup melted butter
- ¼ cup sugar
- For the filling:
- 16 oz cream cheese, softened
- ½ cup heavy cream
- 1 cup powdered sugar
- ½ cup melted white chocolate (optional for extra creaminess)
- 1 teaspoon vanilla extract
- Food coloring (pastel shades such as pink, blue, yellow, and purple)
- For decoration:
- Chocolate eggs
- Sprinkles
- Whipped cream
These ingredients are easy to find and can be customized based on your preferences. You can use different food coloring shades or add unique toppings to personalize the cheesecake.
Step-By-Step Cooking Instructions
Step 1: Prepare the Crust
Start by crushing the graham crackers into fine crumbs. You can do this using a food processor or by placing them in a ziplock bag and crushing them with a rolling pin. Transfer the crumbs to a mixing bowl and add the melted butter and sugar. Stir until the mixture is well combined and resembles wet sand.
Press the mixture into the bottom of a springform pan, making sure to create an even layer. Use the back of a spoon or a flat-bottomed glass to press the crumbs firmly into place. Refrigerate the crust for at least 30 minutes to allow it to set.
Step 2: Prepare the Filling
In a large mixing bowl, beat the softened cream cheese until smooth. Add the powdered sugar and melted white chocolate, then mix until fully combined. Pour in the heavy cream and continue beating until the mixture is fluffy and well incorporated. Finally, add the vanilla extract for extra flavor.
Step 3: Add Color and Swirl
Divide the filling into four separate bowls. Add a few drops of food coloring to each bowl and mix until you achieve the desired pastel shades. Once the colors are ready, drop spoonfuls of each colored mixture onto the crust in a random pattern.
Using a skewer or a butter knife, gently swirl the colors together to create a marbled effect. Be careful not to overmix, as you want to maintain distinct colors while blending them slightly for a decorative look.
Step-By-Step Cooking Instructions (Continued)
Step 4: Chill the Cheesecake
Once the filling is beautifully swirled, smooth the top with a spatula to create an even surface. Cover the cheesecake with plastic wrap or aluminum foil and place it in the refrigerator. Let it chill for at least 4 hours, but for best results, allow it to set overnight. This ensures that the cheesecake firms up properly, making it easier to slice and serve.
If you are in a hurry, you can place the cheesecake in the freezer for about 1 to 2 hours to speed up the setting process. However, avoid freezing it for too long, as it may become too firm and lose its creamy texture.
Step 5: Decorate the Cheesecake
Once the cheesecake has fully set, it is time to decorate it for the perfect Easter presentation. Remove it from the refrigerator and carefully release it from the springform pan. Place it on a serving plate or cake stand.
Now comes the fun part—decorating! You can arrange chocolate eggs on top of the cheesecake, placing them in the center or around the edges for a festive touch. If you want to make it even more colorful, sprinkle some pastel-colored sprinkles on top. A drizzle of melted white chocolate or whipped cream swirls can also add elegance and extra flavor.
If you want to take the Easter theme even further, consider placing small edible flowers or mini marshmallows around the edges. Some people even add a light dusting of powdered sugar for a soft, snow-like effect. Get creative with the decorations to make your cheesecake as festive as possible.
Step 6: Slice and Serve
When ready to serve, use a sharp knife to cut clean slices. To get the best results, run the knife under warm water, wipe it dry, and then slice through the cheesecake. This helps create smooth, even slices without dragging the filling.
Serve each slice with a dollop of whipped cream and an extra chocolate egg on the side for added indulgence. Enjoy this creamy, colorful Easter Egg Cheesecake with your loved ones.

How to Serve
Easter Egg Cheesecake is a showstopper dessert that deserves to be served beautifully. Since it is already visually stunning, you do not need much to enhance its presentation. However, there are a few ways to make the serving experience even more special.
One great idea is to serve each slice on a pastel-colored plate to match the Easter theme. Adding a few fresh berries, such as strawberries, raspberries, or blueberries, can provide a refreshing contrast to the rich and creamy cheesecake. A drizzle of berry sauce or chocolate syrup can also complement the flavors and add an extra layer of sweetness.
For a more elegant touch, garnish each plate with a sprig of mint leaves or a few edible flowers. These small additions can make a big difference in the overall presentation. If you are serving the cheesecake at a party, consider placing the entire cheesecake on a cake stand to elevate it and make it the centerpiece of your dessert table.
To make the serving process easier, provide small dessert forks or spoons so that guests can enjoy their slices comfortably. If you are serving the cheesecake at an Easter brunch, you can pair it with hot coffee, tea, or a glass of milk for a delightful combination.
Pairing Suggestions
Pairing this cheesecake with the right beverages and accompaniments can enhance its flavors. Since it is a rich and creamy dessert, pairing it with something light and refreshing can create a balanced experience.
For a simple and classic pairing, serve this cheesecake with freshly brewed coffee. The slight bitterness of coffee complements the sweetness of the cheesecake, making each bite even more enjoyable. If you prefer tea, a cup of Earl Grey or chamomile tea can work beautifully, adding floral and citrusy notes that enhance the flavors.
If you want a cold beverage, consider serving the cheesecake with a fruit-infused sparkling water or homemade lemonade. The tartness of citrus drinks helps cut through the richness of the cheesecake, making it a refreshing choice. You can also serve it with a lightly sweetened iced tea, such as peach or raspberry tea.
For a more indulgent experience, pair the cheesecake with a dessert wine like Moscato or Riesling. These wines have a natural sweetness that complements the creamy texture of the cheesecake. Alternatively, a chilled glass of milk can be a comforting and simple pairing, especially for children.
If you are serving this cheesecake at a brunch, consider pairing it with fresh fruit salad, yogurt parfaits, or almond croissants. These lighter options create a well-rounded meal that balances sweetness with freshness.
Storage, Freezing & Reheating Instructions
Proper storage is key to maintaining the freshness and texture of your cheesecake. If you have leftovers, cover the cheesecake tightly with plastic wrap or aluminum foil and store it in the refrigerator. It will stay fresh for up to 4 to 5 days.
If you want to freeze the cheesecake for later, first let it chill completely in the refrigerator. Then, wrap it securely in plastic wrap and place it in a freezer-safe container or ziplock bag. This helps prevent freezer burn and keeps the cheesecake fresh. Frozen cheesecake can last up to 2 months.
When ready to serve, remove the cheesecake from the freezer and let it thaw in the refrigerator for 4 to 6 hours before slicing. Avoid thawing it at room temperature, as this can cause condensation and affect the texture.
Since this is a no-bake cheesecake, reheating is not necessary. However, if you find that the cheesecake is too firm straight out of the fridge, let it sit at room temperature for 10 to 15 minutes before serving. This helps soften it slightly and brings out the creamy texture.
Common Mistakes to Avoid
- Not chilling the cheesecake long enough: The filling needs time to set properly, so do not rush the chilling process. Overnight chilling is ideal.
- Overmixing the filling: While it is important to mix the ingredients thoroughly, overmixing can incorporate too much air and affect the texture.
- Using too much food coloring: A little goes a long way. Adding too much food coloring can alter the taste and make the cheesecake look artificial.
- Not pressing the crust firmly: If the crust is too loose, it may crumble when slicing. Press it down well to create a firm base.
- Skipping the melted white chocolate: While optional, it enhances the creaminess and adds a subtle sweetness.
Pro Tips
- Use full-fat cream cheese for the best texture. Low-fat versions may not set as well.
- Chill the mixing bowl before whipping the heavy cream to get a fluffier consistency.
- If you want a firmer cheesecake, add 1 teaspoon of gelatin dissolved in warm water to the filling.
- For an extra crunch, mix in crushed cookies or nuts into the crust.
- Always use a springform pan for easy removal and perfect slices.
Frequently Asked Questions (FAQs)
1. Can I make this cheesecake ahead of time?
Yes! This cheesecake can be made 1 to 2 days in advance and stored in the refrigerator.
2. Can I use a different type of crust?
Absolutely! You can use Oreo crumbs, digestive biscuits, or even a nut-based crust for a unique twist.
3. Is there a way to make this cheesecake dairy-free?
Yes! Use dairy-free cream cheese, coconut cream instead of heavy cream, and vegan butter for the crust.
4. Can I make this cheesecake without food coloring?
Yes! You can keep it natural or use fruit puree, such as blueberry or raspberry juice, for a natural tint.
Conclusion & Call to Action
Easter Egg Cheesecake is a delightful and festive dessert that is easy to make and absolutely delicious. With its creamy texture, buttery crust, and vibrant colors, it is the perfect way to celebrate the holiday. Whether you make it for an Easter party, a brunch, or just to satisfy your sweet tooth, this cheesecake is sure to be a hit.
Now it’s your turn to try this recipe! Gather your ingredients, follow the steps, and enjoy this colorful, creamy treat. If you make this cheesecake, share your experience and any creative variations you tried. Happy Easter and happy baking!
Print
Easter Egg Cheesecake – A No-Bake, Colorful & Creamy Dessert
- Total Time: 4 hours 30 minutes (includes chilling time)
- Yield: 8–10 servings
- Diet: Vegetarian
Description
This no-bake Easter Egg Cheesecake is a creamy, colorful dessert with a buttery graham cracker crust and pastel swirls. Perfect for Easter celebrations!
Ingredients
- Crust: 2 cups graham cracker crumbs, ½ cup melted butter, ¼ cup sugar
- Filling: 16 oz cream cheese, ½ cup heavy cream, 1 cup powdered sugar, ½ cup melted white chocolate, 1 tsp vanilla extract, pastel food coloring
- Decoration: Chocolate eggs, sprinkles, whipped cream
Instructions
- Prepare the crust: Mix graham cracker crumbs, sugar, and melted butter. Press into a springform pan and refrigerate for 30 minutes.
- Make the filling: Beat softened cream cheese, powdered sugar, and melted white chocolate until smooth. Add heavy cream and vanilla extract, then mix until fluffy.
- Color the filling: Divide into bowls, add pastel food coloring, and mix.
- Assemble: Drop spoonfuls of colored filling onto the crust, swirl with a knife, and smooth the top.
- Chill: Refrigerate for at least 4 hours or overnight.
- Decorate: Top with chocolate eggs, sprinkles, and whipped cream before serving.
Notes
- For extra creaminess, let the cheesecake sit at room temperature for 10 minutes before serving.
- Swap graham crackers for Oreos for a chocolatey crust.
- Prep Time: 30 minutes
- Cook Time: No baking required
- Category: Dessert
- Method: No-Bake
- Cuisine: American