
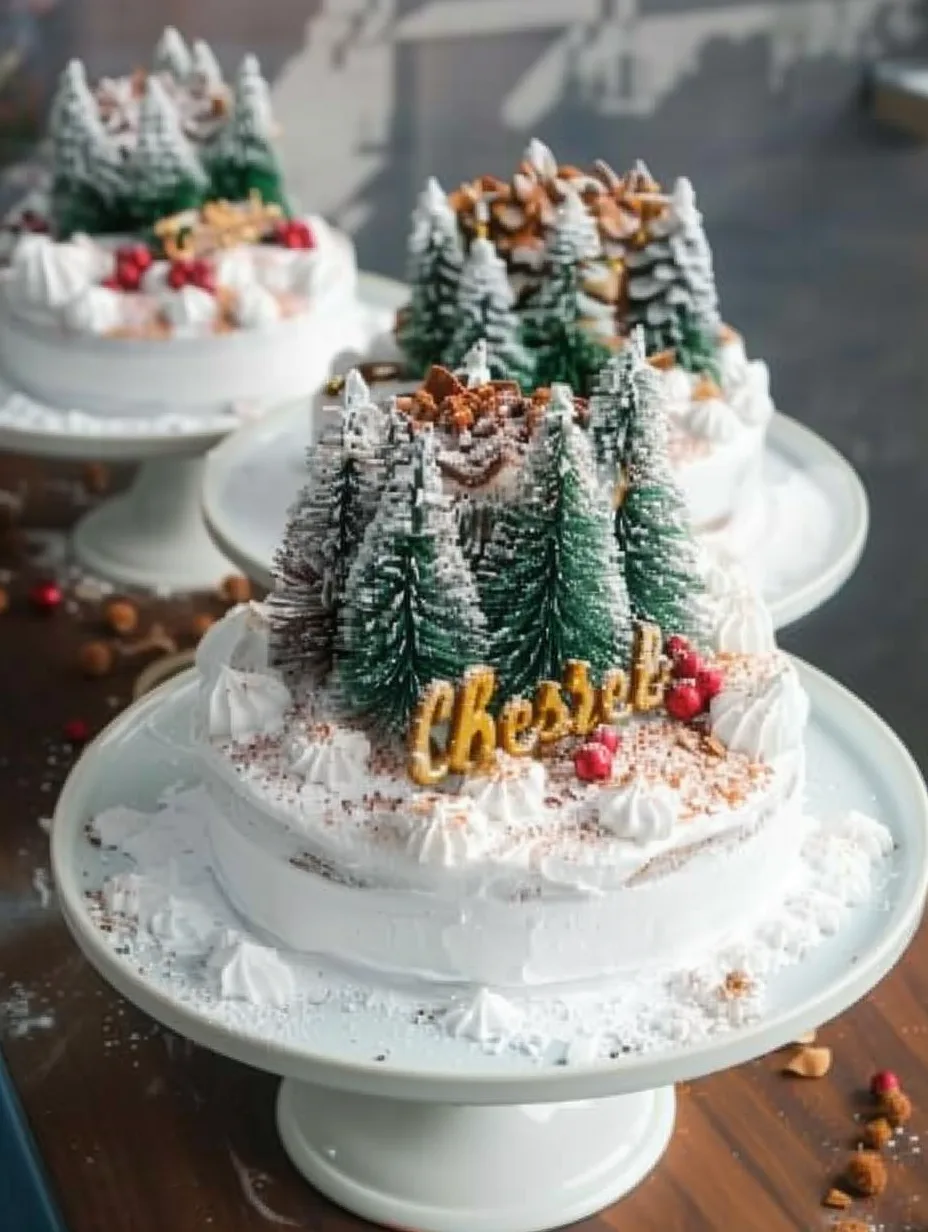
Christmas Cake Decorating is a delightful way to add a festive touch to your holiday celebrations. Every year, people around the world create beautiful and unique cakes to bring joy to their festivities. The process of decorating a Christmas cake can be as enjoyable as baking it. With the right techniques and a bit of creativity, you can transform a simple cake into a stunning centerpiece for your holiday table.
In this guide, you will discover amazing tips and tricks to elevate your Christmas cake decorating skills. Whether you’re a novice or an experienced baker, these strategies will help you create a cake that not only looks incredible but also tastes divine. From choosing the right colors to mastering various decoration techniques, this article covers everything you need to know for an unforgettable Christmas cake.
Imagine the joy on your loved ones’ faces as they admire your beautifully decorated Christmas cake. The vibrant colors, intricate designs, and festive themes will surely impress everyone at your gathering. So, let’s dive into the world of Christmas cake decorating and explore the essential elements that will help you shine this holiday season!
Why You’ll Love This Recipe
Christmas cake decorating is an art that combines creativity and skill. Here are several reasons why you’ll absolutely love exploring this festive endeavor:
1. Endless Creativity: The possibilities for decoration are limitless. You can choose themes ranging from traditional to modern.
2. Family Involvement: Decorating a cake can be a fun activity for the whole family, creating cherished memories together.
3. Personal Touch: You can customize the design to reflect your personal style or the preferences of your loved ones.
4. Showcase Skills: Impress your friends and family with your decorating skills, showing off your hard work and creativity.
5. Satisfying Experience: There’s immense satisfaction in seeing your vision come to life as you decorate your cake.
6. Perfect for Gifting: A beautifully decorated cake makes for a thoughtful and personal gift during the holiday season.
With these reasons in mind, it’s clear that Christmas cake decorating is not just about aesthetics; it’s about enjoyment, togetherness, and creating lasting memories!
Preparation and Cooking Time
Before diving into the decorating process, it’s essential to know the time required for baking and preparing your cake. Here’s a breakdown:
– Preparation Time: 30 minutes
– Baking Time: 1 hour
– Cooling Time: 1-2 hours (depending on the cake size)
– Decoration Time: 1-2 hours (this can vary based on the complexity of your design)
Overall, you should plan for about 3 to 5 hours from start to finish. This will give you ample time to enjoy the process and ensure your cake is perfectly decorated for the holiday festivities.
Ingredients
– 2 cups all-purpose flour
– 1 ½ cups granulated sugar
– ½ cup unsweetened cocoa powder (optional for chocolate cake)
– 1 cup whole milk
– ½ cup vegetable oil
– 3 large eggs
– 1 tablespoon baking powder
– ¼ teaspoon salt
– 1 tablespoon vanilla extract
– ½ teaspoon almond extract
– 2 cups buttercream frosting (or fondant for a smooth finish)
– Food coloring (various colors for decoration)
– Edible glitter (optional)
– Sugar decorations (like snowflakes, stars, etc.)
– Fresh fruits, nuts, or chocolate shavings for topping
Step-by-Step Instructions
Creating a beautifully decorated Christmas cake involves several steps. Here’s a guide to help you through the process:
1. Bake the Cake: Preheat your oven to 350°F (175°C). Grease and flour your cake pans. Combine the dry ingredients in one bowl and the wet ingredients in another. Mix them together until smooth. Pour the batter into the prepared pans and bake for 1 hour or until a toothpick comes out clean.
2. Cool the Cake: Once baked, remove the cakes from the oven. Allow them to cool in their pans for about 15 minutes before transferring them to wire racks to cool completely.
3. Prepare the Frosting: While the cake cools, prepare your frosting. You can use store-bought buttercream or make your own. If you want to use fondant, roll it out to a smooth sheet after your frosting is ready.
4. Level the Cakes: Once the cakes are completely cooled, use a serrated knife to level the tops if they have domed. This will ensure a stable cake structure.
5. Assemble the Cake: Place one layer of the cake on a serving plate. Spread a layer of frosting on top, then add the second cake layer. Apply a thin layer of frosting around the sides and top of the cake for a crumb coat. Chill the cake for about 30 minutes to set this layer.
6. Decorate: Once the crumb coat is set, apply a final layer of frosting. Use a spatula or a cake comb for a textured finish. Get creative with your decorations using piping bags, edible glitter, and sugar decorations.
7. Add Final Touches: Consider adding fresh fruits, nuts, or chocolate shavings to enhance the decorative aspect. Use food coloring to create festive designs and patterns.
8. Display: Once decorated, place your cake in a prominent location to showcase your hard work!
By following these steps, you’ll create a Christmas cake that will not only taste delicious but also look stunning!
How to Serve
Serving your beautifully decorated Christmas cake is just as important as the decoration itself. Here are some tips to ensure a memorable presentation:
1. Presentation: Use a decorative cake stand to elevate your cake’s appearance. A beautiful stand can enhance the overall look and make it the centerpiece of your holiday table.
2. Slice Size: Cut the cake into even slices, making sure they’re generous but not overly large. This encourages guests to come back for seconds!
3. Accompaniments: Consider serving your cake with sides like whipped cream, vanilla ice cream, or a warm fruit compote. These additions can enhance the flavors and provide a delightful contrast.
4. Garnish: Use fresh fruits or edible flowers to garnish each slice. This adds a pop of color and freshness to the presentation.
5. Beverage Pairing: Pair the cake with festive beverages like spiced apple cider, eggnog, or a rich hot chocolate to complement the flavors.
6. Sharing: Encourage guests to take pictures of the cake before cutting into it. This will help capture the beauty of your creation and create lasting memories.
With these serving tips, your Christmas cake will be the highlight of the holiday gathering, leaving everyone in awe of your baking and decorating skills!
Additional Tips
– Plan Your Design: Before starting, sketch out your cake design. This helps you visualize the final product and organize your decorating process.
– Practice Piping: If you’re new to piping, practice on parchment paper first. This can help you gain confidence and refine your skills before working on the cake.
– Use a Cake Turntable: A turntable makes it easier to decorate evenly. It allows you to rotate the cake while keeping your hands steady.
– Color Coordination: Stick to a color palette that complements your holiday theme. This creates a cohesive look that is visually appealing.
– Edible Decorations: Consider using edible decorations like fruits, nuts, or chocolate to enhance the look and taste of your cake.
– Temperature Matters: Ensure your frosting is at room temperature for easy spreading. Cold frosting can be hard to work with and may not give you the smooth finish you want.
Recipe Variation
Explore these variations to create unique Christmas cakes that suit your taste:
1. Spiced Fruit Cake: Incorporate spices like cinnamon, nutmeg, and dried fruits for a traditional fruitcake twist.
2. Chocolate Peppermint Cake: Add crushed peppermint candies to chocolate frosting for a festive flavor.
3. Carrot Cake Base: Use a moist carrot cake as the base and decorate with cream cheese frosting and festive decorations.
4. Vegan Option: Substitute eggs with applesauce or flaxseed meal and use plant-based milk and butter for a vegan-friendly cake.
5. Gluten-Free Cake: Replace all-purpose flour with a gluten-free blend to cater to gluten-sensitive guests.
Freezing and Storage
– Storage: Keep your decorated cake in a cool area, covered with a cake dome or plastic wrap. It will stay fresh for about 4-5 days.
– Freezing: For longer storage, freeze the cake before decorating. Wrap it tightly in plastic wrap and aluminum foil. It can last up to 3 months in the freezer.
– Thawing: To thaw, place the cake in the fridge overnight. This helps retain moisture and maintain texture.
Special Equipment
To achieve the best results in your Christmas cake decorating, consider using the following tools:
– Offset Spatula: Ideal for spreading frosting smoothly and creating an even layer.
– Piping Bags and Tips: Essential for intricate designs and adding details to your cake.
– Cake Leveler: Ensures even layers by trimming domed tops for stability.
– Fondant Smoother: For smoothing out fondant and achieving a polished finish.
– Decorative Cake Stand: Elevates your cake for a beautiful presentation.
Frequently Asked Questions
How long can I keep a decorated Christmas cake?
You can keep a decorated cake at room temperature for up to 5 days. If stored in the fridge, it can last longer but may dry out.
Can I use store-bought frosting?
Yes, store-bought frosting is a great time-saver and can be customized with food coloring or flavorings.
What if my frosting is too runny?
If your frosting is too runny, add powdered sugar gradually until you achieve the desired thickness.
Can I decorate a cake the day before?
Absolutely! Decorating a day in advance allows the flavors to meld and makes serving on the day easier.
Is fondant difficult to work with?
Fondant can be tricky, but with practice, it becomes easier. Ensure it’s at room temperature for best results.
Conclusion
Christmas cake decorating is a joyful and creative expression of the holiday spirit. With the right tips and techniques, you can create a stunning centerpiece that will impress your family and friends. Embrace your creativity and enjoy the process of bringing your cake to life. Remember, the joy of baking and decorating is just as important as the final product. So gather your loved ones, unleash your imagination, and make this Christmas cake a delightful part of your holiday celebrations!
Christmas Cake Decorating: The Ultimate 7 Amazing Tips
- Total Time: 1 hour 15 minutes
Ingredients
– 2 cups all-purpose flour
– 1 ½ cups granulated sugar
– ½ cup unsweetened cocoa powder (optional for chocolate cake)
– 1 cup whole milk
– ½ cup vegetable oil
– 3 large eggs
– 1 tablespoon baking powder
– ¼ teaspoon salt
– 1 tablespoon vanilla extract
– ½ teaspoon almond extract
– 2 cups buttercream frosting (or fondant for a smooth finish)
– Food coloring (various colors for decoration)
– Edible glitter (optional)
– Sugar decorations (like snowflakes, stars, etc.)
– Fresh fruits, nuts, or chocolate shavings for topping
Instructions
Creating a beautifully decorated Christmas cake involves several steps. Here’s a guide to help you through the process:
1. Bake the Cake: Preheat your oven to 350°F (175°C). Grease and flour your cake pans. Combine the dry ingredients in one bowl and the wet ingredients in another. Mix them together until smooth. Pour the batter into the prepared pans and bake for 1 hour or until a toothpick comes out clean.
2. Cool the Cake: Once baked, remove the cakes from the oven. Allow them to cool in their pans for about 15 minutes before transferring them to wire racks to cool completely.
3. Prepare the Frosting: While the cake cools, prepare your frosting. You can use store-bought buttercream or make your own. If you want to use fondant, roll it out to a smooth sheet after your frosting is ready.
4. Level the Cakes: Once the cakes are completely cooled, use a serrated knife to level the tops if they have domed. This will ensure a stable cake structure.
5. Assemble the Cake: Place one layer of the cake on a serving plate. Spread a layer of frosting on top, then add the second cake layer. Apply a thin layer of frosting around the sides and top of the cake for a crumb coat. Chill the cake for about 30 minutes to set this layer.
6. Decorate: Once the crumb coat is set, apply a final layer of frosting. Use a spatula or a cake comb for a textured finish. Get creative with your decorations using piping bags, edible glitter, and sugar decorations.
7. Add Final Touches: Consider adding fresh fruits, nuts, or chocolate shavings to enhance the decorative aspect. Use food coloring to create festive designs and patterns.
8. Display: Once decorated, place your cake in a prominent location to showcase your hard work!
By following these steps, you’ll create a Christmas cake that will not only taste delicious but also look stunning!
- Prep Time: 15 minutes
- Cook Time: 1 hour
Nutrition
- Serving Size: 10
- Calories: 350 kcal
- Fat: 15g
- Protein: 5g