
There’s just something about chocolate and peanut butter that speaks directly to the soul. It’s a flavor duo that’s warm, familiar, and utterly comforting. Whether you’re a fan of classic peanut butter cups or someone who sneaks spoonfuls of peanut butter straight from the jar, this recipe is for you. These homemade chocolate peanut butter balls are a no-bake, make-ahead dream that takes less than 30 minutes of active prep time—and they deliver a gourmet taste with minimal effort.
I first stumbled upon this recipe while prepping holiday treats for my family. I wanted something that looked impressive on a dessert platter but didn’t require turning on the oven. Enter: these little chocolate peanut butter gems. They’ve since become a yearly tradition, and not just during the holidays. I’ve made them for potlucks, birthday parties, lunchbox surprises, and even as a sweet “thinking of you” gift wrapped in parchment and ribbon.
What I love most about this recipe is how approachable it is. You don’t need to be a seasoned baker. You don’t even need fancy kitchen tools. Just a bowl, a spoon, a baking sheet, and a little patience while the dough chills. That’s it. From there, you’re rolling, dipping, and waiting for the magic to happen.
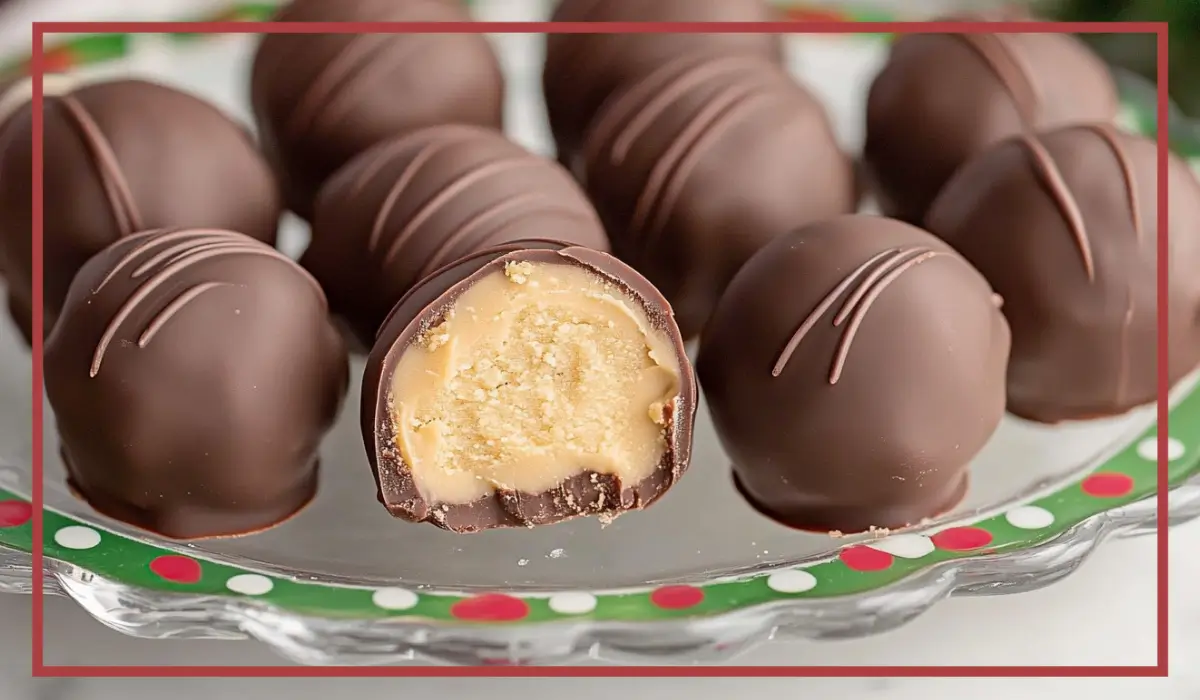
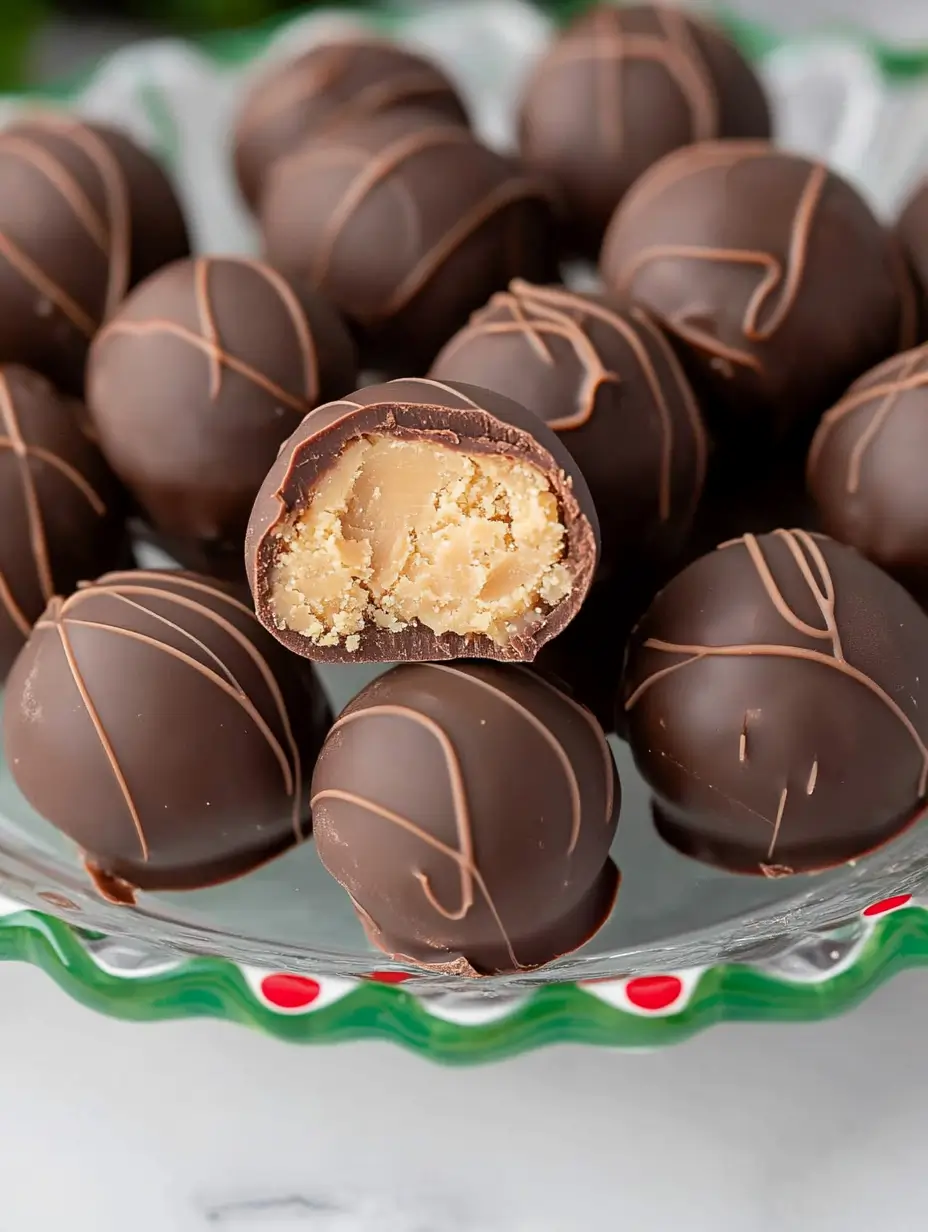
The result? A smooth, creamy peanut butter filling encased in a glossy chocolate shell that snaps ever so slightly with the first bite. They’re perfectly sized for snacking, endlessly customizable, and frankly addictive in the best way. This is the kind of recipe you’ll come back to again and again, whether you’re making treats for loved ones or just craving a bite of something rich and satisfying.
So if you’re looking for a foolproof dessert that’s easy to make, beautiful to serve, and completely delicious, this is the one.
Why You’ll Love This Recipe
There are so many reasons why these chocolate peanut butter balls should go straight to the top of your must-make list. Whether you’re a chocolate lover, a peanut butter enthusiast, or just someone looking for a quick dessert that feels extra special, this recipe checks every box.
First and foremost, it’s incredibly easy. You only need a handful of ingredients—most of which you probably already have in your pantry. The mixing process is simple, and there’s no baking involved. That means no preheating the oven, no keeping an eye on baking times, and definitely no stress. If you’re a beginner in the kitchen, this is a great recipe to start with. It’s nearly impossible to mess up.
Second, let’s talk flavor. The peanut butter filling is soft and creamy with just the right balance of sweetness. It’s the kind of filling that melts in your mouth but holds its shape beautifully once chilled. The outer chocolate coating adds a smooth, velvety finish and a bit of contrast to the richness inside. That combination of creamy and crisp, sweet and just slightly salty, is what makes these treats so crave-worthy.
Next, they’re extremely versatile. You can easily adapt the recipe to your taste. Want a crunchier texture? Add crushed pretzels or rice crisps to the filling. Prefer a darker chocolate flavor? Go for bittersweet or semi-sweet chocolate instead of milk. You can even experiment with toppings like sea salt flakes, crushed nuts, or drizzle a bit of white chocolate over the top for a decorative touch.
Finally, these are the ultimate crowd-pleasers. Whether you’re serving kids or adults, these chocolate peanut butter balls are guaranteed to disappear fast. They’re perfect for gifting, for holidays, for parties—or just for you, tucked away in the fridge for those little moments when only chocolate will do.
Health Benefits
While we often think of desserts as indulgences, these homemade chocolate peanut butter balls come with a few surprising benefits, especially when made with quality ingredients. They’re still a treat, of course, but it’s nice to know there are some nutritional perks along the way.
Let’s start with peanut butter, the star of the filling. Peanut butter is rich in healthy fats, specifically monounsaturated fats, which support heart health and help keep you full longer. It also contains a decent amount of plant-based protein, making these treats more satisfying than your average cookie or candy. In addition to protein and healthy fats, peanut butter offers key nutrients like magnesium, vitamin E, and B vitamins.
When you use a good-quality, low-sugar peanut butter without unnecessary additives or hydrogenated oils, you’re boosting the health factor without compromising on flavor. While we recommend avoiding “natural” peanut butter with oil separation for this recipe (since it can affect texture), many smooth, no-stir peanut butters on the market offer a great balance of taste and nutritional value.
Now let’s talk about the chocolate. If you opt for dark or semi-sweet chocolate bark or melting wafers, you’ll get a dose of antioxidants known as flavonoids. These compounds are linked to improved blood flow and heart health, and they may even help reduce inflammation. Just like with the peanut butter, choosing a high-quality chocolate with minimal additives can make a big difference in the overall nutritional profile.
And finally, because these treats are portion-controlled, it’s easy to enjoy just one or two as a satisfying sweet bite. The protein and fat from the peanut butter help curb cravings and keep you feeling more satiated compared to sugary snacks that spike and crash your energy levels.
So while they’re definitely a dessert, these chocolate peanut butter balls have some hidden benefits that make them a smarter option when that sweet tooth strikes.
Preparation Time, Servings, and Nutritional Information
One of the biggest advantages of this recipe is how quick and easy it is to prepare. You won’t need to spend hours in the kitchen, and you certainly don’t need to be a professional baker. With a few simple steps, you’ll have a batch of delicious chocolate peanut butter balls ready to go in no time.
Total preparation time for this recipe is approximately 25 minutes of active prep, plus a few hours for chilling and setting. You can even split the steps across a couple of days if you’re planning ahead—make the filling one day and dip in chocolate the next. It’s extremely flexible.
Here’s how it breaks down:
Prep Time: 20–25 minutes
Chilling Time: 2 hours (minimum, for firming the dough)
Dipping & Setting Time: 20 minutes
Total Time: About 2.5 to 3 hours (including passive chilling time)
Servings: This recipe makes about 30 balls, depending on the size you roll them. Each one is about 1 inch in diameter, which is the perfect poppable treat size.
Now for the nutritional details. Keep in mind that exact numbers will vary depending on the brand of ingredients used, but here’s an approximate breakdown per peanut butter ball:
Calories per serving: 130
Protein: 2.5g
Carbohydrates: 9g
Sugar: 7g
Fat: 9g
Fiber: 1g
These numbers make this dessert a lighter option when compared to baked cookies or layered cakes. And because the fat and protein content is higher thanks to the peanut butter, they tend to be more filling, which means you’re less likely to overindulge.
Ingredients List
What makes this recipe especially appealing is its simplicity. You only need a short list of ingredients, and chances are, you already have most of them in your kitchen. Each component plays a key role in creating that perfect balance of texture and flavor.
Here’s what you’ll need:
1 cup creamy peanut butter
It’s important to use a smooth, no-stir peanut butter here. Natural peanut butters with oil separation can make the mixture too soft or oily, which will affect how well the dough holds together. The creamy variety ensures a smooth, rich filling that’s easy to work with and delicious in every bite.
6 tablespoons unsalted butter, softened
Butter helps to bind the peanut butter and sugar together while adding a richness that enhances the flavor. Make sure your butter is soft but not melted so it blends easily into the peanut butter.
2 cups powdered sugar
Powdered sugar sweetens the mixture and helps create a dough-like consistency. It also prevents the filling from becoming too sticky, making it easier to roll into balls. Start by adding it gradually—you want the mixture to be firm but pliable.
16 oz chocolate bark or chocolate melting wafers
Chocolate bark or melting wafers are perfect for this recipe because they melt smoothly and set up beautifully. You can use semi-sweet, dark, or milk chocolate depending on your personal preference. If you’re feeling adventurous, you could even use white chocolate for a fun twist.
Optional add-ins and toppings:
- Sea salt flakes (for a sweet-salty contrast)
- Crushed nuts (for texture)
- White chocolate drizzle (for a decorative finish)
- Crushed pretzels or cookie crumbs (folded into the filling for crunch)
With just these few ingredients, you’ll be amazed at the big flavor these little treats pack. And because they’re so customizable, you can easily make them your own based on what you like or have on hand.
Step-By-Step Cooking Instructions
Even though this recipe is incredibly simple, walking through each step in detail helps ensure perfect results every single time. Below, you’ll find clear, easy-to-follow instructions along with helpful tips and variations to make this dessert totally foolproof—even if it’s your first time making chocolate peanut butter balls.
Step 1: Prepare the peanut butter filling
Start by gathering your ingredients and making sure your butter is properly softened. This means it should be soft to the touch but not melted or oily.
In a medium-sized mixing bowl, add 1 cup of creamy peanut butter and 6 tablespoons of softened unsalted butter. Using a hand mixer or a sturdy spatula, mix them together until the texture is completely smooth and fluffy. The mixture should be creamy but not runny.
Next, gradually add 2 cups of powdered sugar to the bowl. It’s best to do this in stages—start with about 1 cup and mix it in thoroughly before adding the rest. This will prevent clumping and make it easier to control the consistency. At first, the dough may look dry or crumbly, but keep mixing. The warmth from your hands or the mixer will bring it together into a soft, pliable dough.
If the mixture seems too sticky, you can add a small amount of extra powdered sugar, one tablespoon at a time. If it seems too dry, you can mix in an additional teaspoon or two of peanut butter until it reaches the right consistency. You’re aiming for a dough that holds together easily when pressed but isn’t too soft or greasy.
Step 2: Chill the peanut butter mixture
Once the filling is well mixed, cover the bowl with plastic wrap or a clean towel and place it in the refrigerator for at least 2 hours. This chilling step is crucial because it firms up the dough, making it easier to roll into balls and helping them maintain their shape when dipped in chocolate later on.
If you’re short on time, you can speed up the chilling process by placing the bowl in the freezer for about 30 to 40 minutes. Just be sure not to let it freeze completely—you want the dough to be cold and firm, but still workable.
Step 3: Roll the peanut butter balls
After the filling has had time to chill and set, take it out of the refrigerator. Using a small cookie scoop or tablespoon, portion out small amounts of dough—about 1 inch in diameter. Roll each portion between your palms to form smooth, round balls.
As you go, place each ball onto a baking sheet lined with parchment or wax paper. Continue rolling until all the dough is used up. You should end up with approximately 30 balls, give or take, depending on how large or small you make them.
Once all the balls are formed, place the baking sheet into the freezer for at least 30 minutes. This extra chilling time helps them stay firm during the chocolate dipping process. If the balls are too soft when dipped, they may melt or lose their shape.
Step 4: Melt the chocolate
While the peanut butter balls are chilling, it’s time to melt your chocolate. You can use chocolate bark, chocolate melting wafers, or high-quality chocolate chips. Choose a flavor you love—milk, dark, or semi-sweet all work well.
To melt the chocolate, use a double boiler method for best results. Place a heat-safe bowl over a saucepan filled with a few inches of simmering water (make sure the bottom of the bowl doesn’t touch the water). Add the chocolate bark or wafers to the bowl and stir gently as it melts. Continue stirring until the chocolate is smooth and fully melted with no lumps.
If you don’t have a double boiler, you can also melt the chocolate in the microwave. Place the chocolate in a microwave-safe bowl and heat in 20 to 30-second intervals, stirring between each one, until fully melted. Be careful not to overheat it, as chocolate can seize or burn easily.
Step 5: Dip the peanut butter balls in chocolate
Now for the fun part—dipping! Take the chilled peanut butter balls out of the freezer. Using a toothpick or fork, pick up one ball at a time and gently lower it into the melted chocolate. Swirl it around to fully coat it, then lift it out and gently tap your wrist to let the excess chocolate drip off.
Place the dipped ball back on the parchment-lined baking sheet. If you’re using a toothpick, you can smooth over the small hole on top with the back of a spoon or your finger once the chocolate begins to set.
Repeat the dipping process with the remaining peanut butter balls. If the chocolate starts to thicken or cool down too much while you’re working, return it to the heat briefly or microwave it for a few seconds to keep it smooth.
Optional: Before the chocolate sets completely, you can add toppings like a sprinkle of sea salt, crushed nuts, or drizzle additional white or dark chocolate for a fancy finish.
Step 6: Let the chocolate set
Once all the balls are dipped and decorated (if desired), let them sit at room temperature for about 30 minutes to allow the chocolate to harden completely. If you’re in a hurry, you can place them in the refrigerator for faster setting—about 10 to 15 minutes should do the trick.
Once the chocolate is firm, your peanut butter balls are ready to serve or store.
How to Serve
These chocolate peanut butter balls are incredibly versatile when it comes to serving. Whether you’re presenting them as part of a dessert spread, packaging them as a thoughtful gift, or sneaking one with your afternoon tea, they always feel just a little bit special.
For casual gatherings or family treats, serve them straight from the fridge on a pretty plate or tiered dessert stand. They pair beautifully with other small bites like truffles, cookies, or fruit slices. Because they’re small and rich, just a few go a long way—so they’re ideal for snacking or finishing a meal on a sweet note.
If you’re making these for a party or event, you can dress them up a bit. Place each ball in a small paper candy cup for an elegant presentation. This not only makes them look polished but also makes them easy for guests to pick up without getting chocolate on their fingers.
For gifting, arrange them in a decorative box or tin, separating layers with parchment paper to prevent sticking. Add a ribbon and a handwritten note, and you’ve got a heartfelt homemade gift that’s always well received.
When serving at home, you can also pair them with other sweet treats for a dessert board. Include strawberries, dried fruit, almonds, and mini cookies to create a beautiful, balanced selection that works for any celebration.
And don’t forget, they’re also perfect for just keeping in the fridge for a little everyday indulgence. Pop one after dinner or when you need a mid-afternoon pick-me-up. They’re rich enough to satisfy a craving, but small enough that you don’t feel like you’ve overdone it.
Pairing Suggestions
Pairing desserts might not be the first thing you think about, but when done right, it can elevate your entire experience. These chocolate peanut butter balls have a distinct flavor profile—sweet, creamy, slightly salty, and indulgently chocolaty—which makes them perfect for pairing with both drinks and other foods.
For a cozy night in, nothing beats pairing them with a warm beverage. Try them alongside a mug of hot cocoa or spiced chai tea. The warm spices in chai contrast beautifully with the sweetness of the peanut butter filling. Coffee, especially something bold like a dark roast or espresso, also complements the richness of the chocolate, creating a decadent after-dinner pairing.
If you’re serving them as part of a dessert table, pair them with lighter fare like fruit skewers, lemon bars, or mini cheesecakes. This variety gives guests different flavor options without overwhelming the palate. The sweetness and creaminess of the peanut butter balls balance well with tangy or fruity desserts.
For something unexpected, try serving them with a side of crunchy pretzels or popcorn. That salty, crunchy texture creates a contrast that highlights the smooth creaminess of the peanut butter filling and the snap of the chocolate coating.
If you’re setting up a kids’ table or planning a family movie night, pair these with milk—regular, oat, or almond. Kids will love the classic flavor combo, and the milk helps mellow the sweetness for a well-rounded treat.
When it comes to non-alcoholic drinks, cold brew coffee, vanilla milkshakes, or flavored seltzers with berry notes all work wonderfully. Each adds its own character without competing for attention.
Because these peanut butter balls are so adaptable, you really can’t go wrong. Keep the pairings simple or experiment with new combos—you’ll be surprised at how even a little planning can turn dessert into a full sensory experience.
Storage, Freezing & Reheating Instructions
One of the best parts about these chocolate peanut butter balls—aside from how delicious they are—is how incredibly well they store. Whether you’re planning ahead for a big event or just want to have a stash of sweets on hand for whenever a craving strikes, this recipe is perfect for make-ahead preparation.
Let’s start with storing them short-term. Once the chocolate coating has completely hardened, transfer the peanut butter balls to an airtight container. If you’re stacking them in layers, be sure to place a piece of parchment or wax paper between each layer to prevent sticking. You can store them at room temperature for up to 3 days, but they’ll last even longer and stay fresher in the refrigerator—up to 2 weeks. Just take them out a few minutes before serving so the chocolate softens slightly and the peanut butter inside reaches its ideal creamy consistency.
Now, if you’re looking to store them long-term, freezing is your best friend. These treats freeze beautifully and maintain their taste and texture. To freeze, place the peanut butter balls in a single layer on a parchment-lined baking sheet and put them in the freezer for about 1–2 hours, or until they’re solid. Once frozen, transfer them to a freezer-safe container or zip-top bag, again using parchment paper to separate layers. Label the container with the date and store for up to 3 months.
When you’re ready to enjoy them, simply take out however many you need and let them thaw in the refrigerator for a few hours or at room temperature for about 30–60 minutes. There’s no need to reheat anything, of course—these are meant to be served cold or at room temp, making them the ultimate low-maintenance dessert.
Whether you’re making a big batch for the holidays or just keeping a few on hand for personal sweet-tooth emergencies, these peanut butter balls are one of the easiest desserts to keep on standby.
Common Mistakes to Avoid
Even though this recipe is beginner-friendly, there are a few common mistakes that can trip people up the first time. But don’t worry—once you know what to watch for, you’ll be able to avoid these issues completely and enjoy perfect peanut butter balls every time.
Mistake 1: Using natural peanut butter with oil separation
While natural peanut butter is great for spreading on toast, it doesn’t work well in this recipe. The oil tends to separate, which can make the dough too greasy and unstable. Stick with a creamy, no-stir variety like Skippy or Jif for the best texture.
Mistake 2: Not chilling the dough long enough
Chilling isn’t just a suggestion—it’s a critical step. If you try to roll or dip the peanut butter balls while the dough is still soft, they’ll fall apart or lose their shape. Make sure to chill the dough for at least 2 hours before rolling, and freeze the balls before dipping them in chocolate.
Mistake 3: Overheating the chocolate
Chocolate can be temperamental. If you melt it too quickly or let it get too hot, it can seize or develop a gritty texture. Use the double boiler method or short microwave bursts, and stir frequently. Low and slow is the way to go.
Mistake 4: Skipping parchment paper
Lining your baking sheet with parchment or wax paper prevents the peanut butter balls from sticking and makes cleanup a breeze. Don’t skip it—it makes the whole process smoother.
Mistake 5: Using cold peanut butter balls for dipping without rechecking firmness
Freezing the balls before dipping is important, but if they’re too frozen, the chocolate may harden too quickly and form a lumpy or uneven coating. Let them sit at room temperature for just a couple of minutes before dipping to ensure the coating goes on smoothly.
Avoiding these pitfalls will help you get that glossy, smooth chocolate shell and the creamy, melt-in-your-mouth center that makes these peanut butter balls so delightful.
Pro Tips
Want to take your peanut butter balls from good to utterly unforgettable? These pro tips will help you perfect your technique and impress everyone who gets a bite.
Use a cookie scoop for consistent sizing
Using a small cookie scoop not only makes the rolling process faster, but it ensures each ball is the same size. This helps them chill evenly and gives your finished treats a professional, uniform look.
Add a pinch of salt to the filling
Even if your peanut butter is already salted, a tiny pinch of fine sea salt can enhance the flavor of the filling and provide that irresistible sweet-salty contrast that makes desserts shine.
Choose high-quality chocolate
The quality of your chocolate matters here. Since the chocolate shell is a major flavor element, go for something you love to eat on its own. Avoid overly waxy melting chocolate or chips with lots of additives. Brands like Ghirardelli, Guittard, or Callebaut offer excellent options.
Melt chocolate slowly and gently
Whether you’re using the double boiler or microwave, go low and slow. Stir constantly and remove from heat just before the chocolate is completely melted—residual heat will finish the job and prevent overheating.
Use a toothpick and tap gently for smooth dipping
Stick a toothpick into each chilled ball for easy dipping. After dipping, hold the ball over the bowl and tap your wrist—not the ball—to gently shake off excess chocolate. This keeps the coating smooth and even without tearing the surface.
Let the dipped balls set at room temperature
Refrigerating dipped balls right away can cause condensation or bloom (those white spots that sometimes form on chocolate). Let them set at room temperature for the best finish.
Decorate immediately after dipping
If you’re planning to top your peanut butter balls with sprinkles, sea salt, or crushed nuts, add them right after dipping—before the chocolate sets. That way, they’ll stick perfectly.
With these pro tips in your back pocket, you’re well on your way to mastering this classic treat and making it truly your own.
Frequently Asked Questions (FAQs)
Can I use crunchy peanut butter instead of creamy?
Yes, you can use crunchy peanut butter if you want added texture in the filling. Just make sure it’s still a no-stir variety so the dough holds its shape well. Keep in mind that the pieces of peanut may make rolling the dough slightly trickier.
Can I make these peanut butter balls dairy-free?
Absolutely. You can use a plant-based butter alternative in place of regular butter and make sure the chocolate you’re using is dairy-free as well. Just check the ingredient labels for any hidden dairy content.
What if I don’t have chocolate bark or wafers?
You can substitute with regular chocolate chips, but add a teaspoon of neutral oil (like coconut or vegetable oil) to help thin the chocolate and give it a smoother texture for dipping.
Do I have to freeze the peanut butter balls before dipping?
Yes, freezing makes the balls easier to dip and helps the chocolate set faster. If you skip this step, the balls may fall apart in the melted chocolate or create a messy finish.
Can I double or triple this recipe?
Absolutely. This recipe scales up beautifully. Just make sure you have enough fridge or freezer space to chill everything in batches, and melt your chocolate in smaller portions to keep it smooth.
How long do the finished peanut butter balls last?
They’ll last up to 2 weeks in the fridge and up to 3 months in the freezer. Store them in an airtight container with parchment between layers for best results.
Can I add other ingredients to the filling?
Definitely. Try folding in crushed graham crackers, crispy rice cereal, or chopped nuts for added crunch. Just be mindful not to add too much, as it can affect how well the dough holds together.
Can I dip them in white chocolate?
Yes! White chocolate makes for a sweet twist and a beautiful presentation, especially if you drizzle dark chocolate over the top for contrast.
Do these need to be refrigerated?
If you plan to eat them within a couple of days, they’re fine at room temperature. However, refrigeration helps them stay fresh longer and prevents the chocolate from melting.
Can I use this recipe as a base for other treats?
Definitely. You can shape the filling into bars, press it into molds, or even use it as a layer in no-bake desserts. It’s incredibly versatile.
Conclusion & Call to Action
And there you have it—your complete guide to making the most indulgent, satisfying, and downright delicious homemade chocolate peanut butter balls. Whether you’re whipping up a quick treat for the family, preparing a thoughtful homemade gift, or just indulging in a little weekend baking therapy, this recipe delivers every single time.
What I love most is how accessible it is. You don’t need fancy ingredients or tools, just a bowl, a spoon, and a little bit of patience while everything chills and sets. The result is a bite-sized treat that feels luxurious but is so easy to make, you’ll wonder why you ever bought store-bought versions in the first place.
These chocolate peanut butter balls are not only crowd-pleasers, but they also keep incredibly well, making them perfect for preparing ahead and keeping stashed for whenever the craving strikes. Whether you dress them up with crushed nuts, drizzle them with more chocolate, or keep them classic, they’re bound to become a staple in your dessert lineup.
Now it’s your turn. Grab your mixing bowl, get those ingredients ready, and treat yourself to a batch of pure peanut butter-chocolate bliss. If you give this recipe a try, I’d love to hear how it turned out. Leave a comment with your favorite variation or snap a photo and share it online—tag me so I can see your beautiful creations.
You’ve got this. Go make something sweet and share it with the people you love. Or keep the whole batch for yourself. I won’t tell.
Happy no-baking!
Print
Chocolate Peanut Butter Balls Recipe – Easy No Bake Dessert
- Total Time: 2 hours 30 minutes (including chilling)
- Yield: 30 balls 1x
- Diet: Vegetarian
Description
This no-bake chocolate peanut butter balls recipe is a quick, easy, and crowd-pleasing dessert. Creamy peanut butter filling is coated in a smooth chocolate shell—perfect for holidays, parties, or anytime snacking.
Ingredients
-
1 cup creamy peanut butter (no oil separation)
-
6 tablespoons unsalted butter, softened
-
2 cups powdered sugar
-
16 oz chocolate bark or chocolate melting wafers
Instructions
-
Mix peanut butter and softened butter in a bowl until smooth.
-
Gradually mix in powdered sugar until a dough forms.
-
Cover and chill for 2 hours.
-
Roll into 1-inch balls and freeze for 30 minutes.
-
Melt chocolate using double boiler or microwave.
-
Dip frozen balls into chocolate using a toothpick.
-
Place on parchment paper and let set.
-
Store in an airtight container at room temp, fridge, or freezer.
Notes
-
Do not use natural peanut butter with oil separation.
-
Let chocolate-dipped balls set at room temperature for a smooth finish.
-
Optional toppings: sea salt, chopped nuts, chocolate drizzle.
-
Use a cookie scoop for consistent sizing.
- Prep Time: 25 minutes
- Cook Time: 0 minutes
- Category: Dessert
- Method: No-Bake
- Cuisine: American