
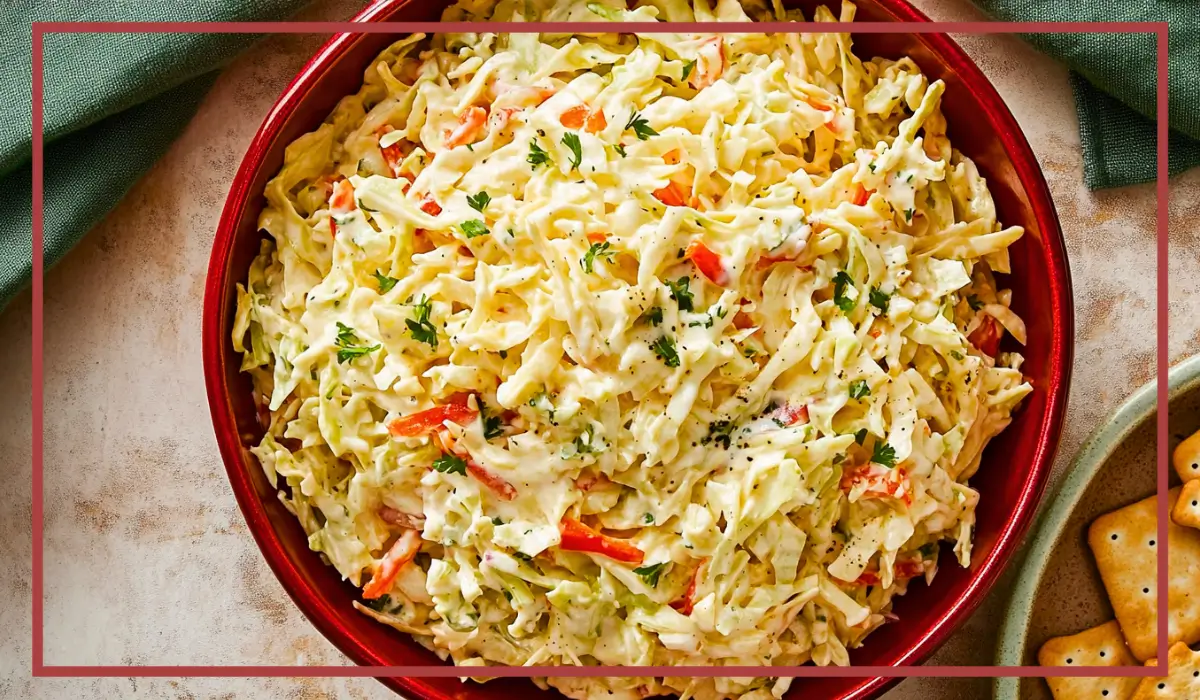
Let’s talk about Cheese slaw recipe—a dish that somehow manages to feel both comforting and bold, indulgent yet fresh. If you’ve never had cheese slaw before, you might be wondering what all the fuss is about. Imagine the creamy base of a classic slaw, then layer in the nutty smoothness of shredded Swiss cheese, the tang of banana peppers, the spicy kick of jalapeños, and the gentle crunch of scallions. It’s a flavor bomb, and it’s one you’ll want to keep in your back pocket for every potluck, barbecue, and family gathering.
What makes cheese slaw so special is how versatile it is. This isn’t just a side dish you serve with fried chicken or hot dogs (though it’s pretty epic in that setting too). It’s a crowd-pleasing dip, a punchy burger topping, and the star of your next wrap. In fact, once you try it, you’ll probably start inventing reasons to make it again. And again.
I first discovered cheese slaw at a Southern-style potluck years ago. It was nestled between a tray of deviled eggs and a mountain of fried chicken wings. Honestly, it didn’t look like much—just a creamy mound of shredded something with flecks of green and yellow. But after the first bite, I was hooked. The tang of the banana peppers paired so well with the creaminess of the cheese, and the jalapeños added just enough heat to keep it interesting without overpowering the whole dish.
Since then, I’ve made this cheese slaw more times than I can count, and it never fails to wow people. Whether you’re scooping it up with corn chips or piling it high on a sandwich, it’s the kind of recipe that leaves everyone asking for the secret. The best part? It’s incredibly easy to make, even if you’re new to cooking. So get ready—this one’s going to become a new favorite.
Why You’ll Love This Cheese slaw recipe Recipe
There are so many reasons to fall in love with this cheese slaw, and once you taste it, you’ll understand why it’s become a staple in Southern kitchens and beyond. Whether you’re hosting a party, heading to a potluck, or just need something easy and delicious to keep in the fridge for the week, this recipe checks all the boxes.
First and foremost, it’s incredibly easy to make. With just a few simple ingredients—most of which you probably already have in your pantry or fridge—you can whip this up in less than 15 minutes. There’s no cooking involved, and it’s mostly a matter of chopping, shredding, and stirring. That’s it. No stress, no complicated steps.
It’s also incredibly adaptable. While Swiss cheese provides a smooth, nutty backbone, you can easily swap it for Monterey Jack for a milder taste or even Pepper Jack if you’re looking for a spicier edge. Likewise, the level of heat is totally up to you. Want it fiery? Add extra jalapeños. Prefer a gentler flavor? Use mild banana peppers and cut back on the spice.
Another reason this slaw is so popular is that it’s family-friendly. The creamy texture makes it approachable for kids, while the peppers give it just enough personality for adults. It’s a dish that brings people together—perfect for summer cookouts, family dinners, or even as a fun addition to lunchboxes.
And let’s talk about flavor. Between the creamy mayo, the crunch of fresh scallions, and the zesty peppers, every bite is exciting. It’s tangy, a little spicy, and full of umami from the cheese. The texture is rich but not heavy, especially when served cold straight from the fridge. The result is a slaw that feels like comfort food, but with an exciting twist.
In short, this Cheese slaw recipe is the kind of recipe you make once and never forget. It becomes part of your regular rotation, that go-to side dish or snack you can count on to impress.
Health Benefits of this Cheese slaw recipe
At first glance, Cheese slaw recipe might seem like a purely indulgent dish. After all, it includes cheese and mayonnaise—two ingredients that don’t exactly scream “health food.” However, when eaten in moderation and made with quality ingredients, cheese slaw can offer some surprising nutritional perks.
To begin with, Swiss cheese is an excellent source of calcium and protein. Calcium is essential for maintaining strong bones and teeth, while protein helps support muscle repair and overall body function. Unlike some other cheeses, Swiss is relatively low in sodium and contains a good amount of vitamin B12, which supports brain and nerve function. If you opt for part-skim or reduced-fat versions, you can cut down on the saturated fat without compromising taste.
The peppers in this recipe—banana peppers and jalapeños—aren’t just there for flavor. They bring with them a dose of vitamin C and antioxidants. Banana peppers in particular are high in fiber and low in calories, making them a great addition to this creamy dish. Jalapeños contain capsaicin, which has been linked to pain relief and may even boost metabolism.
Scallions also add a health boost. These mild green onions are packed with flavonoids and sulfur compounds that may support immune health and reduce inflammation. They also provide a pop of fresh flavor that can help balance the richness of the cheese and mayo.
Now, let’s talk about the mayonnaise. While it often gets a bad rap, mayo is made from eggs and oil—both of which can be part of a healthy diet. Choosing a mayonnaise made with avocado oil or olive oil can offer heart-healthy fats. You can also opt for a lower-fat or plant-based mayo if you’re watching your cholesterol or following a specific diet.
Because this recipe doesn’t require cooking, all the nutrients in the peppers and scallions remain intact. You’re getting raw, unprocessed produce with every bite, which supports digestive health and delivers a nice mix of vitamins and minerals.
So while cheese slaw is definitely a comfort food, it’s not devoid of health benefits. In fact, with the right tweaks and a balanced plate, it can be a flavorful, satisfying way to enjoy vegetables, protein, and healthy fats in one bowl.
Preparation Time, Servings, and Nutritional Information
This Cheese slaw recipe is as quick and easy as recipes come, making it perfect for last-minute get-togethers or weekly meal prep. It requires minimal chopping, no cooking, and can be made ahead of time. Whether you’re prepping for a family dinner or a larger gathering, this recipe is designed to save time and effort.
Total Prep Time: 15 minutes
Cook Time: None
Chill Time (Optional): 30 minutes for best flavor integration
Total Time: 15–45 minutes depending on if you chill it
Servings: About 8 as a side dish or dip
Serving Size: Approximately ½ cup
Nutritional Information (Per Serving):
Calories: 210
Protein: 7g
Carbohydrates: 3g
Fat: 18g
Saturated Fat: 6g
Fiber: 1g
Sugar: 1g
Sodium: 350mg
Keep in mind that these values can vary depending on the specific ingredients you use, such as low-fat cheese or light mayonnaise. For those looking to reduce calories or fat, using part-skim cheese and a lighter mayo option can easily bring down the numbers while still maintaining that classic cheesy, tangy flavor.
This slaw is satisfying without being heavy, and because it’s rich in protein and healthy fats, it keeps you feeling full longer than your average side salad. You can also scale the recipe up or down depending on how many people you’re feeding. It doubles easily for parties, and leftovers keep well in the fridge for a few days, making it a smart choice for busy households.
Ingredients List of this Cheese slaw recipe
Here’s everything you’ll need to make this unforgettable cheese slaw. Each ingredient plays a specific role, so it’s worth using fresh, high-quality items to get the best flavor and texture.
Shredded Swiss Cheese (2 cups):
Swiss cheese is mild, creamy, and just nutty enough to give the slaw a rich, melt-in-your-mouth feel. If you prefer something with a bit more spice or stretch, Monterey Jack or Pepper Jack make great substitutes. Just make sure to shred it fresh for the best texture.
Mayonnaise (1 cup):
Mayonnaise is what binds all the ingredients together, giving the slaw its smooth, creamy consistency. Duke’s is the classic choice for Southern-style slaws thanks to its tangy, eggy richness. However, any high-quality mayo will do. For a slightly sweeter twist, you could try a version with Miracle Whip, which was part of the original recipe developed by Lib Wilhelm.
Chopped Banana Peppers (½ cup):
These bring a zesty, slightly sweet tang that cuts through the creaminess of the cheese and mayo. Be sure to drain them well before chopping to avoid excess moisture in your slaw.
Scallions (½ cup, thinly sliced):
Scallions—or green onions—add a fresh, peppery brightness that really wakes up the flavors. Use both the white and green parts for a well-rounded flavor. If you don’t have scallions, you can use a bit of finely chopped yellow or white onion instead.
Chopped Jalapeños (2 tablespoons):
These bring the heat! You’ll want to finely chop them to ensure the spice is evenly distributed throughout the slaw. Adjust the amount depending on your heat tolerance. For a milder version, remove the seeds before chopping.
Salt and Black Pepper (to taste):
A pinch of salt and a crack of pepper are usually enough, but don’t be afraid to taste and adjust as needed. The cheese and peppers already bring plenty of seasoning, so start light.
Optional Add-Ins:
- Celery seeds or dill pickles for an herbal or tangy twist
- Shredded carrots for added crunch and color
- A dash of vinegar for an extra acidic kick
Next, let’s walk through the entire cooking (or rather, assembling) process step-by-step, with all the little tips and tricks that’ll make your cheese slaw shine.
Step-By-Step Cooking Instructions of this Cheese slaw recipe
Now that you’ve got your ingredients ready, let’s put them together into something absolutely delicious. This cheese slaw is all about building layers of flavor and texture in a simple, foolproof way. There’s no stovetop, oven, or fancy equipment involved—just a bowl, a spoon, and a little love. Let’s walk through each step so you can feel confident making it, whether it’s your first time or your fiftieth.
Step 1: Shred the Cheese
Start with your Swiss cheese. If you’re using a block of cheese, grab a box grater or food processor and shred about 2 cups. Pre-shredded cheese can work in a pinch, but freshly shredded really melts into the mayo better and offers a smoother texture. Plus, it doesn’t have the anti-caking agents that can sometimes give slaws a gritty feel.
Tip: Chill your cheese block in the freezer for 5–10 minutes before grating for a cleaner shred.
Step 2: Prepare the Peppers
Drain your banana peppers well—especially if they’re packed in brine. You don’t want the slaw to get watery. Then chop them into small pieces. You want the tangy flavor in every bite, not big chunks that overwhelm the dish.
Next, finely chop your jalapeños. If you like a little fire, include the seeds. If you prefer milder heat, remove the seeds and membranes before chopping. It’s a good idea to taste a piece to gauge the spice level.
Safety tip: Wear gloves when chopping jalapeños or wash your hands thoroughly after—no one wants a surprise eye rub after handling hot peppers.
Step 3: Slice the Scallions
Rinse your scallions and trim off the root ends. Then, slice thinly on a diagonal for a nice presentation. Use both the white and green parts to get the full flavor. The white section offers a gentle onion bite, while the green tops add color and freshness.
If scallions aren’t available, you can substitute with a small amount of finely diced red or white onion. Red onion will add a bit of color, while white onion brings a sharper edge.
Step 4: Mix the Base
In a large mixing bowl, add your shredded Swiss cheese and the full cup of mayonnaise. Use a spatula or large spoon to fold them together gently. The cheese will begin to soften slightly in the mayo, helping it meld into a creamy base.
At this point, you can also add a dash of black pepper and a pinch of salt. Remember, cheese and banana peppers already add a good amount of seasoning, so go easy at first and adjust later.
Optional addition: If you like a little more acidity, you can mix in a teaspoon or two of white vinegar or pickle brine. This gives the slaw a sharper edge and brightens the overall flavor.
Step 5: Add the Veggies
Now, add your chopped banana peppers, scallions, and jalapeños into the mayo-cheese mixture. Fold everything together until all the ingredients are evenly coated. The key here is to stir gently—you want the texture to stay thick and chunky, not mashed.
As you stir, take a moment to admire how colorful the mixture is. The green scallions and jalapeños pop against the creamy backdrop, and the yellow peppers add little flecks of sunshine throughout.
Step 6: Taste and Adjust
This step is crucial. Grab a clean spoon and taste a little. What do you notice? Is it too mild? Add a bit more jalapeño. Want more zing? Stir in an extra spoonful of banana peppers or a splash of vinegar. Not creamy enough? Add a touch more mayo.
This is your chance to personalize the flavor to your taste preferences. Cheese slaw is very forgiving, and a little tweak here or there can make it feel just right.
Step 7: Chill (Optional but Recommended)
If you have the time, cover the bowl with plastic wrap and refrigerate for at least 30 minutes. This resting period lets all the flavors mingle and gives the cheese time to soften a bit more in the mayo. The result is a smoother, more cohesive slaw that tastes even better.
Tip: If you’re making it ahead for a party or picnic, you can prep this up to 24 hours in advance. Just give it a quick stir before serving.
Step 8: Serve and Enjoy
Spoon your cheese slaw into a serving bowl or hollowed-out cabbage for a fun presentation. It’s ready to go! Whether you’re using it as a dip, topping, or side dish, it brings big flavor with zero fuss.

How to Serve this Cheese slaw recipe
One of the best things about this cheese slaw is how versatile it is. It’s more than just a side dish—it’s a total flavor enhancer that can take your meals to the next level. Here are some of our favorite ways to enjoy it.
As a Dip with Corn Chips
This is the go-to serving style at parties. Thick, salty corn chips are the perfect vehicle for scooping up creamy slaw. It’s like a Southern queso meets veggie dip. Try serving it chilled in a big bowl surrounded by chips for easy snacking.
Topped on Burgers or Hot Dogs
Move over, traditional slaw—this cheesy, tangy version adds a whole new dimension to your grilled favorites. The creamy texture melts slightly into a hot burger patty or sausage, and the peppers add a punch of brightness. Try it on turkey burgers, chicken sausages, or even veggie dogs for a flavor boost.
Spread in Wraps and Sandwiches
Layer a spoonful of cheese slaw inside your favorite wrap or sandwich for instant upgrade status. It pairs beautifully with grilled chicken, roast beef, or even falafel. The rich texture works almost like a spread, making condiments optional.
Served with Yeast Rolls or Crackers
This is a great way to serve cheese slaw as part of an appetizer spread. Offer soft dinner rolls or buttery crackers for guests to pile high with slaw. It’s a little messy, but that’s part of the fun.
As a Salad Topper
Want to jazz up a basic green salad? A spoonful of cheese slaw on top adds creaminess, crunch, and loads of flavor. Try it with mixed greens, cucumbers, and a light vinaigrette for balance.
Party Presentation Idea
For a fun twist, serve your cheese slaw in a hollowed-out cabbage or bell pepper. It makes a festive, eye-catching centerpiece that’s both functional and creative.
No matter how you serve it, cheese slaw is guaranteed to make people ask for seconds—and the recipe.
Pairing Suggestions
Cheese slaw recipe is rich, creamy, and just a little spicy, which makes it a perfect partner for a wide variety of dishes and drinks. Whether you’re setting the table for a casual family dinner or a laid-back backyard BBQ, here are some pairing ideas to inspire you.
Main Dishes
- Grilled Chicken: The smoky char of grilled chicken pairs beautifully with the tang and creaminess of the slaw.
- BBQ Ribs or Pulled Beef: The richness of BBQ gets a bright contrast with the tangy peppers and cool mayo base.
- Fried Fish or Fish Tacos: Cheese slaw adds crunch and spice, making it an ideal topping or side.
- Stuffed Baked Potatoes: Add a spoonful of slaw to a baked potato along with turkey bacon and chives for a hearty, satisfying meal.
Side Dishes
- Cornbread or Jalapeño Muffins: The sweetness of cornbread contrasts nicely with the spicy jalapeños in the slaw.
- Baked Beans: The savory, slightly sweet flavor of baked beans complements the tang of the slaw.
- Roasted Vegetables: Serve a medley of roasted carrots, sweet potatoes, or Brussels sprouts for a veggie-packed plate.
Bread Pairings
- Yeast Rolls: Soft and slightly sweet, these rolls are the perfect vehicle for soaking up creamy slaw.
- Flatbreads or Pita: These make it easy to scoop up slaw or create DIY wraps on the fly.
- Garlic Toasts: Add a little crunch and extra flavor by serving the slaw with toasted garlic bread slices.
Beverages
Since this is a halal version, we’ll skip the wine and focus on family-friendly and refreshing drink pairings.
- Iced Tea with Lemon: The citrusy tang of lemon iced tea pairs perfectly with the creamy slaw.
- Sparkling Water with Lime or Mint: Light and bubbly, it helps cleanse the palate between bites.
- Fruit-Based Mocktails: Try a pineapple-ginger fizz or a mango-mint cooler for tropical contrast.
- Lassi (Yogurt Drink): A chilled salted or mint lassi makes a creamy yet refreshing match.
No matter what you pair it with, cheese slaw brings balance and brightness to your plate. Coming up next, we’ll cover exactly how to store, freeze, and reheat it so you can make the most of every batch.
Storage, Freezing & Reheating Instructions of this Cheese slaw recipe
One of the many things to love about cheese slaw is how well it stores. In fact, it often tastes even better after a few hours in the fridge, once all the flavors have had time to meld together. Whether you’re making it ahead for a gathering or planning to enjoy leftovers throughout the week, here’s everything you need to know about storing, freezing, and serving it later.
Refrigerator Storage
If you’re preparing cheese slaw in advance or storing leftovers, simply transfer it to an airtight container and keep it in the refrigerator. It will stay fresh for up to 3 to 4 days. The mayonnaise helps preserve the ingredients, and the cheese holds its structure nicely.
Before serving, give the slaw a good stir. Some separation may occur as it sits—this is completely normal. A quick mix will bring it back to its creamy, luscious texture. If it seems a little dry, you can stir in a spoonful of mayonnaise to freshen it up.
Freezing Cheese Slaw
Freezing cheese slaw is possible, but it does come with some caveats. Because it contains mayonnaise and fresh vegetables, the texture can change once thawed. The mayonnaise may separate, and the scallions and peppers might lose their crunch.
If you do want to freeze it, here’s how:
- Portion the slaw into freezer-safe containers or resealable freezer bags. Press out as much air as possible before sealing.
- Label with the date and contents, then place in the freezer for up to 1 month. Beyond that, the texture may degrade too much for a pleasant eating experience.
- To thaw, move the container from the freezer to the refrigerator and let it defrost slowly overnight.
- Once thawed, give it a good stir. You may need to drain off a bit of liquid and add a touch more mayonnaise to help bring it back to life.
Reheating Cheese Slaw
Since cheese slaw is meant to be served cold or at room temperature, there’s really no need to reheat it. In fact, heating it would break down the mayo and cheese, resulting in a greasy, unpleasant mixture. If you’ve stored it in the fridge, just take it out 10–15 minutes before serving to let it soften slightly. This helps the flavors shine and improves the texture.
If you’re using the slaw as a topping for a hot dish like burgers or baked potatoes, you can serve it directly from the fridge. The contrast between hot and cold makes for a delicious combination.
In short, cheese slaw is a make-ahead dream. It stores well, travels well, and even adapts fairly gracefully to the freezer if you’re in a pinch. Just remember—cold is gold when it comes to serving.
Common Mistakes to Avoid in this Cheese slaw recipe
Even though cheese slaw is a simple recipe, there are a few common mistakes that can get in the way of achieving that perfect balance of creamy, tangy, and spicy. Here are the top pitfalls and how to avoid them so your slaw turns out perfectly every time.
1. Using Pre-Shredded Cheese
It might be tempting to save time by buying pre-shredded cheese, but don’t do it unless you absolutely have to. Pre-shredded cheese is often coated with anti-caking agents that affect how it blends with the mayo. This can lead to a gritty or chalky texture. For the creamiest, most luscious slaw, shred your cheese fresh.
2. Not Draining the Peppers Properly
Banana peppers and pickled jalapeños are usually packed in brine, which is full of flavor—but also moisture. If you skip draining them, that extra liquid can water down your slaw and make it runny. Always drain your peppers well and even pat them dry with paper towels if needed.
3. Overmixing the Ingredients
Cheese slaw should be gently folded together, not whipped like a cake batter. Overmixing can break down the cheese and vegetables, leaving you with a mushy texture. Mix just until everything is evenly combined.
4. Forgetting to Taste and Adjust
Every batch of slaw is a little different depending on the ingredients, so it’s important to taste and adjust before serving. If it needs more tang, add banana peppers. Too bland? Try a pinch of salt or a squeeze of lemon juice. Let your taste buds guide you.
5. Serving It Immediately Without Resting
While you can technically serve cheese slaw right after mixing, it really benefits from a short rest in the fridge. Giving it 30 minutes to chill helps the flavors meld together and the texture settle into that creamy, cohesive state. It’s worth the wait.
Avoiding these common mistakes can make the difference between a good cheese slaw and a truly unforgettable one. With just a little extra care, your slaw will have that perfect balance of flavor, creaminess, and crunch.
Pro Tips
Want to take your cheese slaw to the next level? These tried-and-true pro tips will help you fine-tune the recipe to perfection and impress every guest at the table.
1. Use a Microplane for a Finer Shred
For a smoother, creamier slaw, try shredding your cheese with a microplane or the fine side of a box grater. This helps it melt more seamlessly into the mayo, giving the slaw a silkier texture.
2. Add Texture with Crunchy Mix-Ins
Want a little extra bite? Stir in some finely chopped celery, shredded carrots, or even chopped pickles. These add another dimension of crunch and color without overpowering the core flavors.
3. Use High-Quality Mayo
Since mayonnaise is one of the main components of this dish, the quality really matters. A rich, flavorful mayo like Duke’s will deliver better results than a generic brand. You can also experiment with avocado-based or egg-free versions for dietary needs.
4. Customize the Heat Level
Not everyone loves spice, and that’s okay. You can completely control the heat by adjusting the amount of jalapeños or removing the seeds. For more spice, toss in a dash of cayenne or hot sauce. You can even make two batches—one spicy, one mild—to please every palate.
5. Fresh Is Best—But It Gets Better with Time
While cheese slaw is best when made with fresh ingredients, letting it sit for 30 minutes to a few hours before serving enhances the flavor. If you’re making it ahead of time, just give it a good stir before bringing it to the table.
6. Try a Smoked Cheese Variation
Want to add a smoky dimension? Swap out half the Swiss cheese for smoked Gouda or smoked mozzarella. It’s an unexpected twist that pairs beautifully with the tang of banana peppers.
7. Use It as a Secret Sauce
Cheese slaw isn’t just a side—it’s a flavor powerhouse. Use it as a topping for baked potatoes, inside grilled cheese sandwiches, or as a creamy base for wraps. It instantly elevates simple meals.
With these pro tips, you’re not just making cheese slaw—you’re mastering it. Every tweak helps make it your own, and the more you play with the recipe, the more you’ll discover just how flexible and fun it really is.
Frequently Asked Questions (FAQs)
Can I use a different type of cheese instead of Swiss?
Yes, absolutely. While Swiss is traditional and offers a mild, nutty flavor, you can easily substitute it with Monterey Jack for a creamier result or Pepper Jack if you like a bit of heat. Just be sure to shred it fresh for the best texture.
What if I don’t like mayonnaise?
If you’re not a fan of mayo, you can try using a mix of Greek yogurt and sour cream as a lighter alternative. This will change the flavor slightly, but it still gives you that creamy consistency. Be sure to season well since mayo typically has salt and tang built-in.
How spicy is this recipe?
The heat level depends entirely on how many jalapeños you use and whether you include the seeds. For a mild version, use fewer jalapeños and remove all seeds. For a spicier version, keep the seeds in or add a pinch of crushed red pepper flakes.
Can I make this in advance?
Yes, cheese slaw is ideal for making ahead. In fact, it tastes even better after chilling for a few hours. Just keep it in an airtight container in the fridge and stir before serving.
Is this recipe kid-friendly?
Definitely! Just dial back the jalapeños or skip them entirely to make a milder version that’s great for younger eaters. The creamy cheese and tangy banana peppers are usually a hit with kids.
Can I make this recipe dairy-free?
You can try using a dairy-free cheese alternative, though results will vary depending on the brand. Choose one that melts well and has a flavor profile similar to Swiss or Monterey Jack. Use vegan mayo to complete the swap.
What if my slaw turns out watery?
That usually happens if the banana peppers or other add-ins weren’t properly drained. To fix it, you can stir in a bit more shredded cheese or a spoonful of mayo to thicken it back up.
Can I use fresh peppers instead of pickled ones?
Yes, but the flavor will be quite different. Pickled banana peppers add a tangy kick that’s part of the slaw’s signature taste. If using fresh, consider adding a splash of vinegar or lemon juice to balance the flavor.
How long does it last in the fridge?
Cheese slaw will keep in the fridge for 3 to 4 days when stored in a sealed container. It’s best enjoyed within the first 48 hours for optimal flavor and texture.
Can I use this as a sandwich spread?
Absolutely. This slaw works wonderfully as a sandwich or wrap spread. It adds creaminess, tang, and crunch—all in one spoonful.
Conclusion & Call to Action
Cheese slaw may not be the most common dish on the table, but once you’ve made it, it’s hard to imagine your spread without it. It’s creamy, a little spicy, full of flavor, and comes together in a matter of minutes. Whether you’re scooping it with corn chips, piling it onto a burger, or serving it alongside your favorite grilled dishes, this slaw always delivers.
It’s the kind of recipe that invites customization and creativity. You can make it mild or spicy, classic or smoky, chunky or silky smooth. And because it stores so well, it’s perfect for prepping ahead or enjoying throughout the week.
If you’re someone who loves bold flavors and easy recipes, cheese slaw is your new best friend. I hope this guide has given you all the tips, tricks, and inspiration you need to make it confidently in your own kitchen.
Now it’s your turn! Make a batch of this irresistible cheese slaw and tell me how you served it. Did you go classic with chips? Try it on a wrap? Add your own twist with smoked cheese or dill pickles? I want to hear about it.
Leave a comment, share your version, or tag me on social media with your cheesy creation. I can’t wait to see how you make it your own.
Print
Cheese Slaw Recipe: Creamy, Spicy, and Easy Southern Side
- Total Time: 15 minutes (plus 30 min optional chill)
- Yield: 8 servings 1x
- Diet: Halal
Description
A creamy, tangy, and slightly spicy Southern-style cheese slaw made with shredded Swiss cheese, banana peppers, jalapeños, and scallions. Perfect as a side dish, dip, or sandwich topping—easy to make and packed with bold flavor.
Ingredients
-
2 cups shredded Swiss cheese (or Monterey Jack/Pepper Jack)
-
1 cup mayonnaise
-
½ cup chopped banana peppers (drained)
-
½ cup thinly sliced scallions
-
2 tbsp chopped jalapeños (adjust to taste)
-
Salt and black pepper to taste
-
Optional: 1 tsp vinegar or pickle brine, shredded carrots, chopped pickles
Instructions
-
Shred the cheese and place in a large mixing bowl.
-
Add mayonnaise and stir to combine.
-
Mix in the drained banana peppers, scallions, and jalapeños.
-
Season with salt and pepper, and optional vinegar if desired.
-
Chill for 30 minutes to enhance flavors. Stir before serving.
Notes
-
For a milder version, remove jalapeño seeds.
-
Use freshly shredded cheese for best texture.
-
Serve as a dip, side, or sandwich spread.
-
Store in fridge up to 4 days.
- Prep Time: 15 minutes
- Cook Time: 0 minutes
- Category: Side Dish / Dip
- Method: No-Cook
- Cuisine: Southern American