
Easter is a time for celebration, family gatherings, and, of course, delicious food. When planning an Easter menu, it is always fun to include dishes that bring joy not just to the taste buds but also to the eyes. One such creative and adorable dish is the Bunny Butt Cheese Ball. This whimsical Easter-themed appetizer is not only visually delightful but also incredibly tasty.
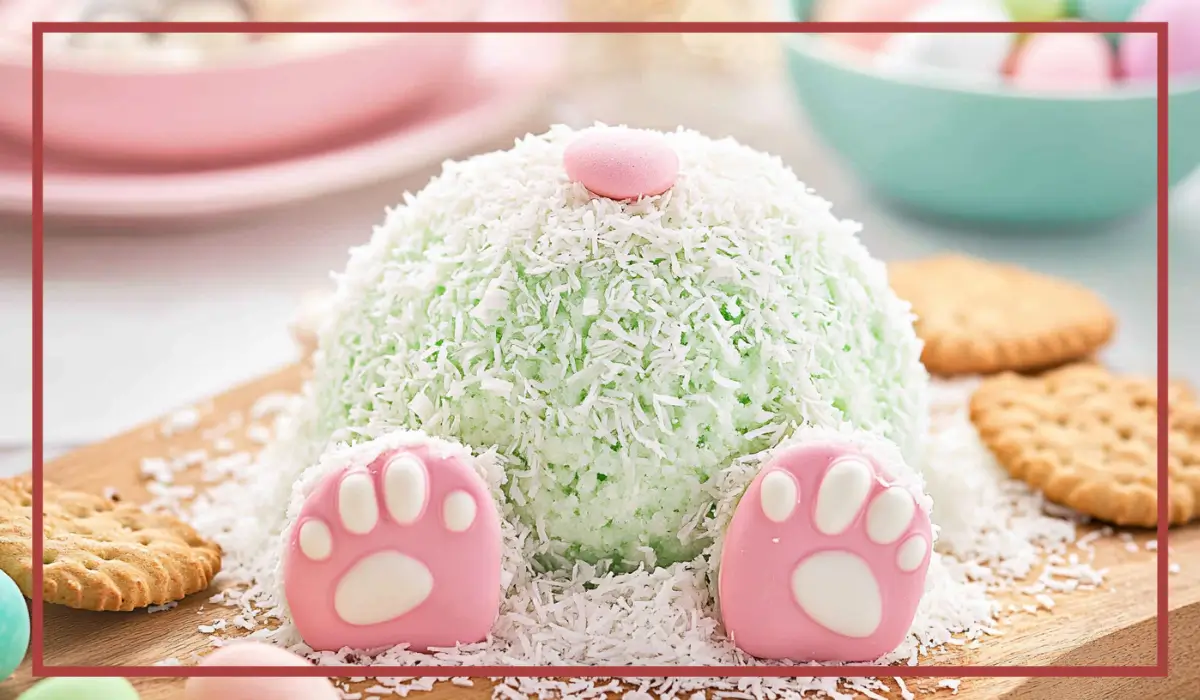
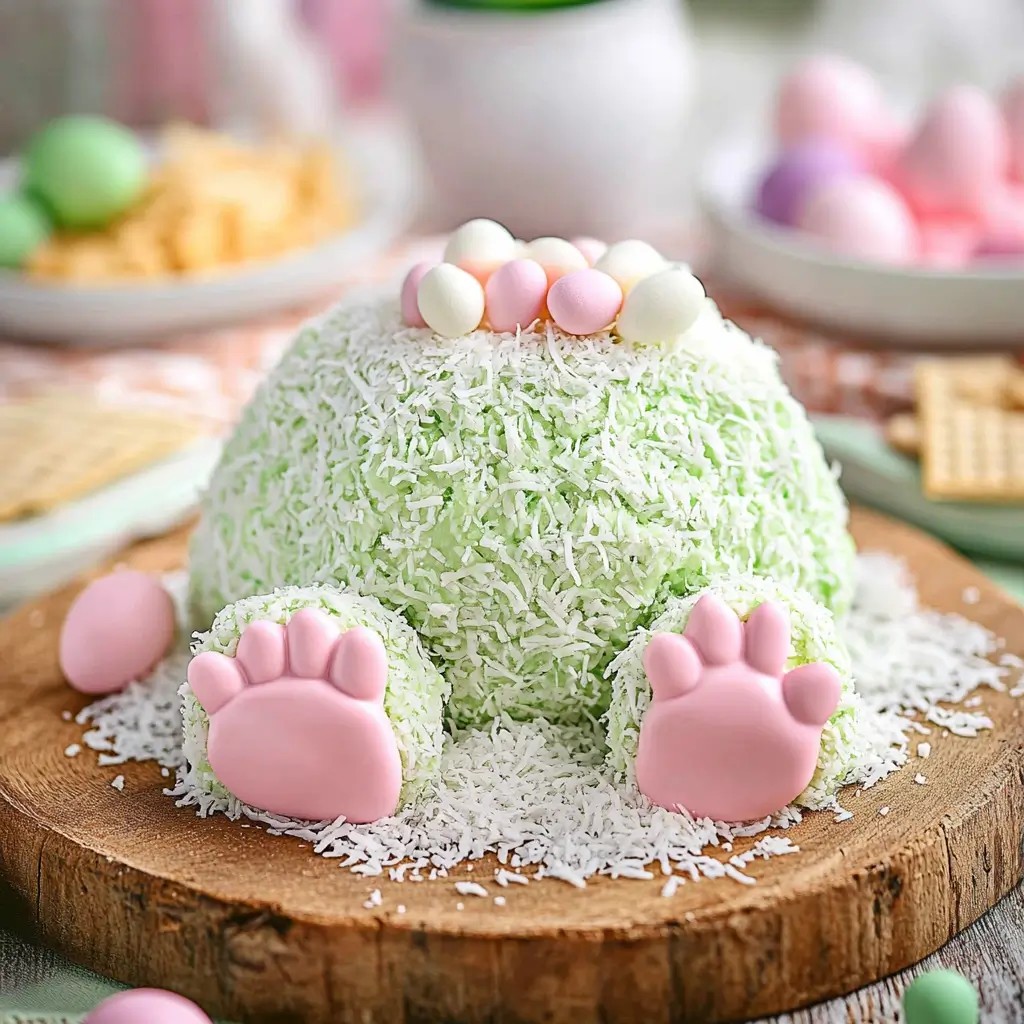
A cheese ball is a classic party food that is creamy, flavorful, and easy to make. Traditionally, cheese balls are made with a combination of cream cheese and shredded cheese, seasoned with various spices and mix-ins. However, this version takes it to the next level by turning it into a sweet dessert cheese ball. Coated with shredded coconut to resemble bunny fur, this cheese ball is shaped into a cute bunny butt, complete with little feet made of marshmallows and decorated with pink frosting or candy melts.
What makes this recipe truly special is its versatility. Whether you are hosting an Easter brunch, a spring gathering, or simply want a fun treat for kids, this Bunny Butt Cheese Ball is a guaranteed hit. It pairs wonderfully with graham crackers, vanilla wafers, or fresh fruit, making it a delightful and interactive dessert that guests of all ages will enjoy.
Even if you are new to making cheese balls, do not worry—this recipe is beginner-friendly and requires only a few simple ingredients. Plus, it can be made ahead of time, so you can focus on enjoying the holiday without last-minute stress.
In this article, we will go over everything you need to know to make the perfect Bunny Butt Cheese Ball, including why you will love it, its health benefits, preparation time, ingredients, step-by-step instructions, serving suggestions, storage tips, common mistakes to avoid, and pro tips. We will also cover frequently asked questions to ensure your cheese ball turns out perfectly.
Now, let’s dive into why this recipe will become your new Easter favorite!
Why You’ll Love This Recipe
This Bunny Butt Cheese Ball is not just about looks—it is also packed with flavor and fun. Here are a few reasons why this recipe is a must-try for your Easter celebrations:
1. It’s Absolutely Adorable
The first thing that will grab everyone’s attention is the presentation. Shaped like a fluffy bunny butt, complete with tiny paws, this cheese ball is a show-stopping centerpiece for any Easter table. Whether you are serving kids, family, or friends, everyone will smile when they see this cute creation.
2. Perfect for Easter and Spring Gatherings
Easter is all about fun, and this recipe brings an element of creativity and playfulness to the table. It is a conversation starter that will have guests admiring its cuteness before digging in.
3. Sweet and Creamy Flavor
Unlike savory cheese balls, this one is sweet and creamy, making it the perfect dessert dip. The combination of cream cheese, powdered sugar, vanilla, and crushed cookies creates a deliciously rich and slightly tangy flavor that pairs well with a variety of dippables.
4. Easy to Make with Simple Ingredients
One of the best things about this recipe is how simple it is. You only need a handful of ingredients that are easy to find at any grocery store. Plus, the assembly process is straightforward, making it a great kid-friendly activity.
5. Customizable to Your Taste
Want to add a chocolatey twist? Mix in some crushed Oreos. Prefer a nutty flavor? Stir in chopped pecans or almonds. You can even add a hint of citrus zest or a splash of flavored extract to make it unique to your preferences.
6. Make-Ahead Friendly
If you are hosting a big Easter gathering, you will love the fact that this recipe can be made a day in advance. Simply store it in the refrigerator and serve when ready, saving you time on the day of the celebration.
Now that you know why this recipe is so lovable, let’s explore the health benefits of the key ingredients used in this Bunny Butt Cheese Ball.
Health Benefits
While this recipe is definitely a treat, some of its ingredients offer nutritional benefits as well. Here is a closer look at some of the key components:
1. Cream Cheese
Cream cheese is the base of this cheese ball, giving it its creamy texture. It is a good source of calcium, which helps maintain strong bones and teeth. It also contains healthy fats that provide energy.
2. Coconut
Shredded coconut is not just for looks—it is packed with fiber, healthy fats, and essential minerals. It also adds a natural sweetness to the cheese ball, reducing the need for excessive sugar.
3. Vanilla Extract
Vanilla extract not only enhances flavor but also contains antioxidants that help protect the body from free radicals. It has also been linked to mood-enhancing properties, making it a great ingredient for feel-good desserts.
4. Crushed Cookies
Depending on the type of cookies used, you can add extra fiber, iron, or even some vitamins to the recipe. For a healthier option, whole-grain or low-sugar cookies can be substituted.
5. Powdered Sugar
Although powdered sugar is mainly for sweetness, using it in moderation ensures the cheese ball has the perfect balance of flavors without being overly sugary.
While this dessert is meant to be an indulgence, knowing that some of its ingredients have nutritional value makes it even more enjoyable.
Now, let’s move on to the essential details of preparation time, servings, and nutritional information.
Preparation Time, Servings, and Nutritional Information
Before you start making your Bunny Butt Cheese Ball, it is helpful to know how much time you will need and the estimated nutrition per serving.
Preparation Time
- Mixing and shaping: 15 minutes
- Chilling time: 1 hour
- Decorating and assembling: 10 minutes
- Total time: Approximately 1 hour 25 minutes
Servings
This recipe makes one large cheese ball, which serves about 8 to 10 people. If you are hosting a larger crowd, you can double the recipe for a bigger batch.
Nutritional Information (Per Serving, Approximate)
- Calories: 280
- Total Fat: 18g
- Saturated Fat: 11g
- Carbohydrates: 28g
- Sugar: 22g
- Protein: 3g
- Fiber: 2g
Now that you have an idea of the preparation details, let’s take a look at what ingredients you will need.
Ingredients List
To make this adorable and delicious Bunny Butt Cheese Ball, gather the following ingredients:
For the Cheese Ball Base:
- 8 oz cream cheese, softened
- ½ cup unsalted butter, softened
- 2 cups powdered sugar
- ½ teaspoon vanilla extract
- ½ cup crushed cookies (Golden Oreos or graham crackers work great!)
The Bunny Fur Coating:
- 1 cup shredded sweetened coconut
Decoration (Bunny Feet & Tail):
- Mini marshmallows (for the feet and tail)
- Pink candy melts or pink frosting (for the paw details)
With your ingredients ready, let’s move on to the step-by-step cooking instructions.
Step-By-Step Cooking Instructions
Now that you have gathered all your ingredients, it’s time to bring your Bunny Butt Cheese Ball to life. Follow these detailed step-by-step instructions to ensure your appetizer turns out perfectly.
Step 1: Prepare the Cheese Mixture
Start by placing the softened cream cheese and unsalted butter in a large mixing bowl. Using an electric mixer or a sturdy spoon, beat them together until the mixture is smooth and creamy. This step is essential to ensure that the cheese ball has a light and fluffy texture.
Next, add the powdered sugar gradually, mixing continuously to incorporate it evenly. If you add the sugar all at once, it may become lumpy or difficult to mix, so take your time.
After the sugar is well combined, stir in the vanilla extract for added flavor. Finally, fold in the crushed cookies. The cookie crumbs will add a subtle crunch and delicious flavor contrast to the creamy base. Mix everything well until you achieve a uniform consistency.
Step 2: Divide and Shape the Bunny Butt and Feet
Once the mixture is well blended, divide it into three portions:
- One large ball (about the size of a grapefruit) for the bunny’s butt
- Two smaller balls (about the size of golf balls) for the bunny’s feet
Use your hands or a spatula to shape each portion into smooth balls. If the mixture feels too sticky to handle, you can lightly grease your hands with butter or dust them with powdered sugar.
Step 3: Chill the Cheese Balls
For best results, place all three cheese balls on a baking sheet lined with parchment paper and refrigerate for at least one hour. Chilling helps the cheese ball firm up, making it easier to coat and assemble.
If you are in a hurry, you can speed up the process by placing the cheese balls in the freezer for about 20 to 30 minutes. However, be careful not to freeze them completely, as they should remain slightly soft for easy assembly.
Step 4: Coat with Coconut
Once the cheese balls have firmed up, it’s time to create the bunny’s fluffy “fur.” Pour the shredded sweetened coconut into a shallow dish.
Roll each cheese ball in the coconut, pressing gently to ensure the flakes stick well. If needed, you can slightly dampen your hands with water to help the coconut adhere better. Ensure all parts of the cheese balls are well coated so they resemble a soft and fluffy bunny.
Step 5: Assemble the Bunny Butt
Place the large cheese ball in the center of a serving plate to serve as the bunny’s bottom. Then, position the two smaller cheese balls at the front, slightly apart, to represent the feet. Press them gently against the large cheese ball to secure them in place.
For extra stability, you can use a small amount of cream cheese as “glue” to keep the feet attached.
Step 6: Create the Bunny Feet
To make the bunny’s adorable feet, place two mini marshmallows on each of the smaller cheese balls. These will serve as the base of the feet.
Next, melt the pink candy melts according to the package instructions. Use a small spoon or piping bag to draw paw prints on the marshmallow feet. If you don’t have candy melts, pink frosting or pink gel icing works just as well.
Once the paw prints are dry and set, attach the decorated marshmallows onto the cheese ball feet, securing them with a tiny dab of cream cheese.
Step 7: Add the Bunny Tail
For the final touch, take another mini marshmallow and roll it in a bit of cream cheese to create a small, fluffy tail. Attach it to the center of the large cheese ball to complete the bunny’s backside.
Step 8: Serve and Enjoy
Your Bunny Butt Cheese Ball is now ready to be served! Place a variety of dippers around the plate, such as:
- Graham crackers
- Vanilla wafers
- Pretzel sticks
- Fresh fruit slices (strawberries, apple slices, or banana slices)
Encourage guests to scoop up a bite of the cheese ball with their favorite dipper and enjoy this fun and festive treat.
How to Serve
The Bunny Butt Cheese Ball is not only a dessert but also a centerpiece that adds charm to your Easter table. Here are a few creative ways to present and serve it:
1. On a Decorative Easter Platter
Place the cheese ball on a pastel-colored serving dish or a wooden board. Surround it with festive Easter decorations like colored eggs, small bunny figurines, or edible flowers for an extra special touch.
2. With a Variety of Dippers
To enhance the experience, offer a selection of sweet and salty dippers. Besides cookies and crackers, you can also provide chocolate-covered pretzels, biscotti, or even rice cakes for a gluten-free option.
3. As an Easter Brunch Dessert
This cheese ball pairs beautifully with other Easter brunch favorites like hot cross buns, fruit parfaits, or pancakes. Guests will love scooping up a bite in between their savory brunch courses.
Pairing Suggestions
Since the Bunny Butt Cheese Ball is sweet and creamy, pairing it with complementary flavors can elevate its taste. Here are some great pairing options:
1. Drinks
- Hot Chocolate: The richness of hot chocolate pairs well with the creamy sweetness of the cheese ball.
- Fruit-Infused Water: A refreshing option that balances out the richness of the dessert.
- Milkshakes: Vanilla or strawberry milkshakes make an excellent match.
2. Other Easter Treats
- Carrot Cake: The spice from the cake complements the sweetness of the cheese ball.
- Lemon Bars: A tangy and citrusy contrast to the creamy cheese ball.
Storage, Freezing & Reheating Instructions
If you have leftovers or want to prepare the cheese ball ahead of time, here is how to store it properly:
Storing in the Refrigerator
Wrap the cheese ball tightly in plastic wrap and place it in an airtight container. It will stay fresh in the refrigerator for up to 3 days.
Freezing Instructions
If you want to make this cheese ball well in advance, freeze the uncoated cheese mixture. Place the cheese ball in an airtight freezer-safe bag and store it for up to 2 months.
When ready to serve, thaw it in the refrigerator overnight and coat with shredded coconut before assembling.
Common Mistakes to Avoid
1. Skipping the Chilling Step
If the cheese ball is not chilled properly, it will be too soft and difficult to shape.
2. Using Unsweetened Coconut
Sweetened coconut helps balance the flavors. If you use unsweetened coconut, the cheese ball may taste less dessert-like.
Pro Tips
- Use full-fat cream cheese for the best texture.
- Chill overnight for the best results.
- Customize flavors by adding orange zest, cinnamon, or nutmeg.
Frequently Asked Questions (FAQs)
1. Can I make this recipe ahead of time?
Yes! It can be made a day in advance and stored in the refrigerator.
2. What can I use instead of coconut?
If you don’t like coconut, try using crushed vanilla wafers, powdered sugar, or white sprinkles.
Conclusion & Call to Action
This Bunny Butt Cheese Ball is more than just a delicious appetizer—it is an Easter showstopper that brings fun and flavor to your celebration. Whether you are making it for kids, family, or friends, it is sure to be a hit.
If you enjoyed this recipe, be sure to share it with others and try making it for your next Easter gathering. Have fun creating and enjoy every bite!
Print
Bunny Butt Cheese Ball – The Cutest Easter Appetizer for Your Celebration!
- Total Time: 1 hour 15 minutes (includes chilling)
- Yield: 8-10 servings 1x
- Diet: Vegetarian
Description
This Bunny Butt Cheese Ball is an adorable, creamy, and sweet Easter appetizer coated in shredded coconut. Perfect for serving with cookies, fruit, or graham crackers.
Ingredients
- 8 oz cream cheese, softened
- ½ cup unsalted butter, softened
- 2 cups powdered sugar
- ½ tsp vanilla extract
- ½ cup crushed cookies (Golden Oreos work great!)
- 1 cup shredded sweetened coconut
- Mini marshmallows (for the bunny feet)
- Pink candy melts or frosting (for decorating the paws)
Instructions
- Beat cream cheese, butter, powdered sugar, vanilla, and crushed cookies until smooth.
- Shape into one large ball (bunny butt) and two smaller balls (bunny feet).
- Chill for 1 hour.
- Roll cheese balls in shredded coconut until fully coated.
- Assemble the bunny shape on a serving plate.
- Decorate feet with mini marshmallows and pink candy melts for paw prints.
- Add a marshmallow tail and serve with cookies or fruit.
Notes
- Chill the cheese ball before serving for better texture.
- Substitute shredded coconut with crushed vanilla wafers if preferred.
- Store leftovers in an airtight container in the fridge for up to 3 days.
- Prep Time: 10 minutes
- Cook Time: 0 minutes
- Category: Dessert, Appetizer
- Method: No-Bake
- Cuisine: American