
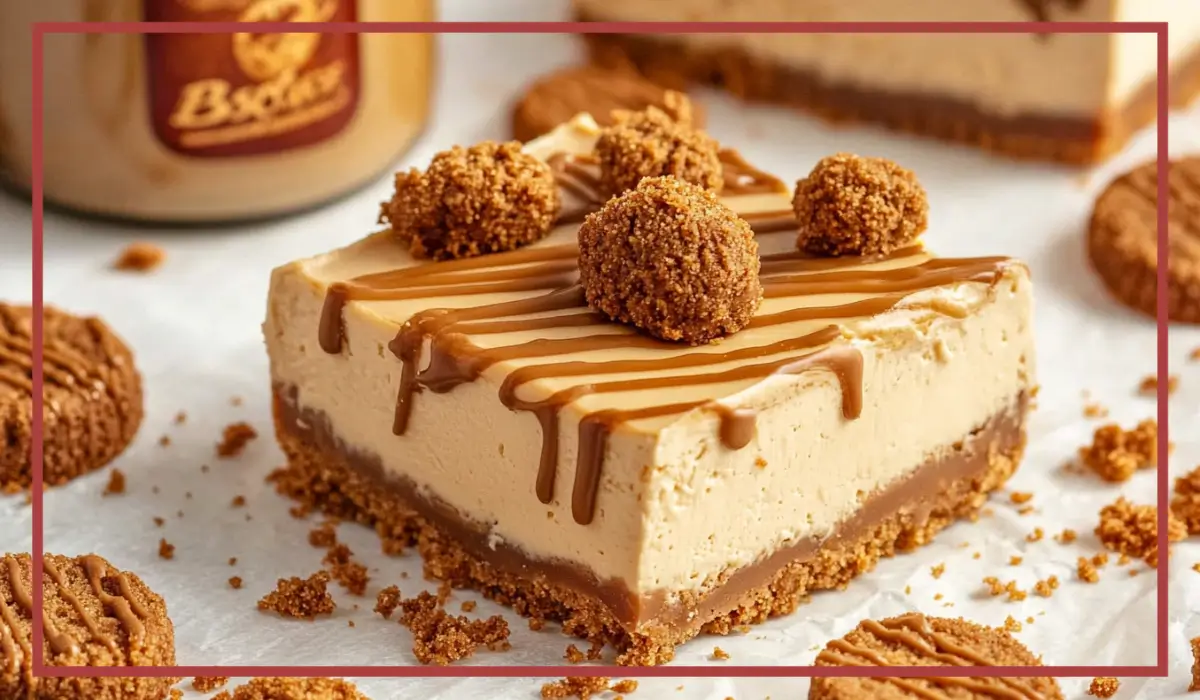
There are some desserts that simply speak to your soul, and this Biscoff Cookie Butter Cheesecake is one of them. It’s the kind of dessert that doesn’t just satisfy your sweet tooth—it wraps you in a sense of comfort and indulgence from the very first bite. Creamy, smooth, and spiced just right, this cheesecake is made with layers of deliciousness: a buttery Biscoff biscuit crust, a velvety filling made from whipped cream and Biscoff spread, and a glossy topping that’s nothing short of dessert perfection.
One of the best parts about this cheesecake is that it’s entirely no-bake. That’s right—no oven, no water bath, and no stress. It’s the type of dessert you can make ahead of time without any worry, which makes it perfect for gatherings, holidays, birthdays, or even as a last-minute treat. And since it sets beautifully in the fridge, you can focus on enjoying time with your family or guests while your cheesecake chills and works its magic.
I first made this cheesecake for a Sunday lunch with my family. It was one of those lazy weekends when everyone was gathered in the kitchen, talking, laughing, and of course, eating. I had a jar of Biscoff spread staring at me from the pantry shelf, and a half-used package of Biscoff biscuits. A quick idea turned into a dessert that became an instant family favorite. Since then, it’s become our go-to for potlucks, special occasions, and quiet nights when we just need a little pick-me-up.
What makes this cheesecake truly special, though, is the way it brings people together. Everyone—from kids to grandparents—goes back for seconds. Its rich yet balanced flavor profile makes it impossible to resist. Whether you’ve been baking for years or this is your very first dessert attempt, this recipe will make you feel like a total pro in the kitchen.
Why You’ll Love This Biscoff Cookie Butter Cheesecake Recipe
There are so many reasons to love this Biscoff Cookie Butter Cheesecake, and once you try it, you’ll see why it’s such a crowd-pleaser. First of all, the ease of preparation is a huge win. With no baking required, this recipe is approachable for beginners but impressive enough to wow even the pickiest dessert lovers. You don’t need fancy tools or complicated techniques—just a few mixing bowls, a whisk or mixer, and a bit of fridge space.
Next, the flavor combination is absolutely irresistible. The Biscoff biscuits add a sweet, spiced, almost caramel-like depth that pairs beautifully with the rich cream cheese and light, fluffy whipped cream. It’s indulgent without being heavy, which means you can enjoy every bite without feeling overwhelmed. The texture is another major highlight. The base is firm yet crumbly, providing just the right amount of crunch to contrast the creamy filling. And the topping? Silky, smooth, and slightly warm when poured, it sets into a shiny, rich glaze that looks as beautiful as it tastes.
Another reason to love this recipe is its versatility. You can make it in a springform pan for a classic cheesecake shape, or use a glass dish for a more casual, slice-and-serve presentation. It can be dressed up with a swirl of whipped cream, a drizzle of caramel, or even some chopped nuts for added crunch. And the best part is that it’s naturally vegetarian and can easily be made halal-friendly, which means more people can enjoy it.
Finally, this cheesecake is practically fail-proof. As long as you follow the steps and give it enough time to chill, it will set perfectly every single time. There’s no risk of overbaking or cracking, which makes it a reliable option when you want something sweet and stress-free. Whether you’re making it for a birthday celebration or just to enjoy after dinner, this Biscoff cheesecake is a guaranteed hit.
Health Benefits of this Biscoff Cookie Butter Cheesecake
While desserts are typically enjoyed for their flavor and indulgence rather than their health benefits, this no-bake cheesecake does offer a few unexpected upsides when compared to traditional baked cheesecakes or store-bought sweets. First, let’s talk about the ingredients. By choosing high-quality cream cheese and fresh double cream, you’re incorporating a good dose of calcium and healthy fats into your dessert. Calcium is essential for bone health, and when consumed in moderation, full-fat dairy can be part of a balanced diet.
Biscoff Cookie Butter Cheesecake and spread are made primarily from wheat flour, oils, and spices like cinnamon, which adds not only flavor but a subtle antioxidant boost. While they are indulgent, they are also free from artificial colors and preservatives, making them a more natural choice compared to some overly processed alternatives. When paired with fresh dairy, the result is a dessert that feels a little less guilty and a lot more satisfying.
Another health advantage lies in the no-bake nature of this recipe. By not baking the cheesecake, you preserve more of the nutrients in the dairy products. Additionally, there’s no need to add extra sugar to the filling—the Biscoff spread brings just the right amount of sweetness, meaning you can avoid excess sugar without sacrificing flavor. This makes it a slightly better option for those watching their sugar intake.
Portion control is also easier with this cheesecake. Because it’s rich and flavorful, smaller slices are just as satisfying, which can help with mindful eating. You’ll find that guests are content with a modest serving, making this dessert ideal for sharing. It’s also helpful that you can make it ahead and portion it out, which helps you avoid last-minute dessert runs or impulsive snack choices.
In moderation, this cheesecake offers a balance of indulgence and nourishment. It’s the perfect example of how you can enjoy something truly delicious while still being mindful of the ingredients and portion sizes. So while it may not be a health food in the traditional sense, it’s definitely a dessert you can feel good about enjoying now and then.
Preparation Time, Servings, and Nutritional Information
When planning a dessert, especially for a gathering, it’s always helpful to know exactly how much time and effort is involved. Luckily, this No-Bake Biscoff Cheesecake keeps things beautifully simple from start to finish.
Preparation Time:
- Prep time: 25 minutes
- Chilling time: 4 to 6 hours (or overnight for best results)
- Total time: Approximately 6.5 hours, mostly hands-off
Because this is a no-bake recipe, your hands-on time is minimal. Most of the process involves mixing and assembling, and then letting your fridge do the rest of the work. This is perfect if you’re entertaining or just looking to prep dessert ahead of time.
Servings:
- This recipe serves 10 to 12 people, depending on how generous your slices are.
- It’s easy to double the ingredients and make two cheesecakes if you’re serving a larger crowd.
Nutritional Information (per serving, based on 12 servings):
- Calories: Approximately 435
- Protein: 4g
- Fat: 34g
- Saturated Fat: 20g
- Carbohydrates: 28g
- Sugar: 17g
- Fiber: 1g
- Sodium: 180mg
Please note that the nutritional values are estimated and may vary based on the brands of ingredients used. If you’d like to reduce the calories or fat content, you can try using light cream cheese and reduced-fat cream, though the texture may be slightly less rich.
Ingredients List of this Biscoff Cookie Butter Cheesecake
This Biscoff Cookie Butter Cheesecake requires just a handful of pantry and fridge staples, which makes it both simple and budget-friendly. Each ingredient plays a specific role in delivering the creamy, dreamy texture and flavor we’re after.
For the Base:
- 200g Biscoff biscuits, crushed – These cookies are packed with warm spices and caramelized flavor. When crushed and mixed with butter, they form a deliciously crunchy crust.
- 80g unsalted butter, melted – The butter binds the crushed biscuits together and helps the crust firm up as it chills.
For the Cheesecake Filling:
- 300ml double cream, cold – Cold cream is essential for whipping into a thick, fluffy consistency that gives the filling its airy texture.
- 400g full-fat cream cheese (Philadelphia recommended) – Full-fat cream cheese adds richness and ensures the cheesecake sets firmly. Philadelphia is a reliable option because it has a smooth, creamy consistency and a slightly tangy flavor.
- 200g Biscoff spread – This is the star of the show. It infuses the filling with that unmistakable spiced sweetness and blends perfectly with the cream cheese.
For the Topping:
- 150g Biscoff spread, melted gently – When melted, this spread becomes smooth and pourable, making it perfect for a glossy topping.
- 50g Biscoff biscuits, crushed – These crumbs add a decorative and textural finish that makes the cheesecake look polished and bakery-quality.
Each ingredient has been chosen for its ability to balance flavor, texture, and consistency. Don’t be tempted to skip or substitute unless absolutely necessary, especially when it comes to full-fat cream cheese and chilled cream. The quality of these ingredients really does make a difference in the final product.
Step-By-Step Cooking Instructions
Let’s walk through each step of making this Biscoff Cookie Butter Cheesecake in detail. These instructions are beginner-friendly, so don’t worry if this is your first time making cheesecake. With each layer, you’ll see just how simple and satisfying it is to bring this dessert together.
Step 1: Prepare Your Equipment
Before you begin, gather everything you need to keep the process smooth and stress-free. You’ll need:
- A 20cm (8-inch) springform pan or a removable-base cake tin
- A large mixing bowl
- A medium mixing bowl
- An electric hand mixer or stand mixer with a whisk attachment
- A spatula
- Measuring scales or cups
- A food processor or a rolling pin and ziplock bag to crush biscuits
Start by lining the base of your cake tin with parchment paper. This step makes it easier to remove the cheesecake once it’s set. If using a springform pan, make sure it’s securely latched so the filling doesn’t leak.
Step 2: Make the Biscuit Base
Place the Biscoff biscuits in a food processor and blitz until you get fine crumbs. If you don’t have a food processor, place the biscuits in a ziplock bag and crush them with a rolling pin. You want a texture similar to coarse sand.
Transfer the crushed biscuits to a mixing bowl. Add the melted butter and stir until every crumb is coated and the mixture resembles wet sand. This is what helps it bind together when pressed into the pan.
Spoon the mixture into the base of your prepared cake tin. Using the back of a spoon or the bottom of a glass, press it down firmly and evenly. Be sure to press the mixture all the way to the edges, creating a solid foundation for your filling.
Place the tin in the fridge while you move on to the next step. Chilling the base helps it firm up, so it stays crisp and structured when the filling is added.
Step 3: Whip the Double Cream
In a clean, cold bowl, pour in the 300ml of double cream. Using an electric hand mixer or a stand mixer fitted with the whisk attachment, whip the cream until it holds stiff peaks. This usually takes about 3–4 minutes on medium-high speed.
Stiff peaks mean the cream should hold its shape when you lift the beaters. Be careful not to over-whip the cream—it should be thick and fluffy, not grainy or curdled.
Set the whipped cream aside. This step is important because folding it into the cream cheese mixture later helps give the cheesecake its signature light texture.
Step 4: Prepare the Cheesecake Filling
In a separate large bowl, add the full-fat cream cheese and Biscoff spread. Mix on medium speed until the two are fully combined, smooth, and creamy. This should take about 1–2 minutes.
Scrape down the sides of the bowl with a spatula to ensure everything is well mixed. At this point, the mixture should be thick, rich, and slightly golden in color thanks to the Biscoff spread.
Now, gently fold the whipped cream into the cream cheese and Biscoff mixture. Use a spatula or large spoon and take your time. Fold gently to maintain the airiness of the whipped cream, which gives the filling a mousse-like texture.
Once the mixture is fully incorporated and uniform in color and consistency, you’re ready to move on.
Step 5: Assemble the Cheesecake
Remove the chilled base from the fridge. Spoon the cheesecake filling onto the biscuit base, smoothing it out with a spatula. Spread the mixture evenly, pushing it toward the edges so the surface is level and clean.
Tap the tin gently on the counter a few times to release any air bubbles and help the mixture settle.
Cover the tin with plastic wrap or foil and place it in the refrigerator. Let the cheesecake chill for at least 3 hours, but ideally overnight. This time allows the filling to firm up and develop its final texture.
Step 6: Make the Topping
When the cheesecake is fully chilled and firm to the touch, it’s time to add the topping. Place the remaining 150g of Biscoff spread in a microwave-safe bowl. Heat it gently in the microwave in 10-second intervals until just melted. Stir in between intervals to avoid overheating.
Pour the melted Biscoff spread over the top of the cheesecake while it’s still in the tin. Work quickly, as the spread begins to set as it cools. Use the back of a spoon to smooth it out gently. Don’t press too hard, or you’ll disturb the filling underneath.
Sprinkle the crushed Biscoff biscuits around the edge or across the top as a decorative touch. You can get creative with your pattern here—whether it’s a full circle of crumbs, a simple line down the center, or a sprinkle over the entire top.
Return the cheesecake to the fridge for at least one more hour so the topping can set completely.
Step 7: Serve and Enjoy
When you’re ready to serve, carefully run a knife around the edge of the cheesecake to loosen it from the sides of the pan. Release the springform and lift off the outer ring.
Use a long, sharp knife dipped in hot water and wiped dry between cuts to get clean, sharp slices.
The cheesecake is now ready to be enjoyed. It’s creamy, indulgent, and every bite offers that signature Biscoff flavor we all love.

How to Serve of this Biscoff Cookie Butter Cheesecake
Serving this Biscoff Cookie Butter Cheesecake can be as casual or as elegant as you like. Whether you’re bringing it to a dinner party or just enjoying it after a weeknight meal, presentation can enhance the experience.
One classic way to serve it is straight from the fridge, chilled but not too cold. This gives the filling a silky texture and keeps the crust crisp. Use a warm knife for slicing—just run it under hot water and wipe dry between each cut to get smooth, clean edges.
You can also dress up individual slices. Here are a few simple serving ideas:
- Add a dollop of whipped cream and a mini Biscoff biscuit on top for a charming finish.
- Drizzle with extra melted Biscoff or a touch of caramel sauce for an even more indulgent treat.
- Garnish with fresh berries like raspberries or strawberries for a pop of color and a touch of tartness.
- Dust with powdered sugar for a classic bakery-style presentation.
- Serve with a scoop of vanilla or cinnamon ice cream for a fun dessert twist.
If you’re hosting a party or bringing the cheesecake to a potluck, pre-slice it and place the pieces on a decorative platter with small dessert forks. It’s convenient and makes it easy for guests to help themselves.
Whether served simply or styled for a celebration, this cheesecake always brings smiles.
Pairing Suggestions
The flavors in this Biscoff Cookie Butter Cheesecake are sweet, spiced, and slightly caramelized, which opens up a world of pairing possibilities. Whether you’re serving it with a beverage or a complementary dish, these suggestions will enhance your dessert experience.
Hot Beverages
- Chai tea: The warm spices in chai pair beautifully with the cinnamon and caramel notes in Biscoff.
- Coffee or espresso: A rich cup of coffee balances the sweetness of the cheesecake and makes for a classic dessert pairing.
- Cinnamon or vanilla herbal tea: These teas complement the warm flavors in the cheesecake without overpowering it.
Cold Drinks
- Iced coffee with oat milk: The creaminess of oat milk pairs well with the cheesecake’s texture, and the coffee cuts the richness.
- Milkshakes: A vanilla or cookie-flavored milkshake served alongside a small slice of cheesecake is pure indulgence.
- Sparkling water with citrus: A light and refreshing option that helps cleanse the palate between bites.
Food Pairings
- Fresh fruit platter: Serve with berries, sliced apples, or pears to add freshness and acidity to balance the richness.
- Mini cinnamon rolls: If you’re hosting a brunch, serve this cheesecake with bite-sized cinnamon rolls for a cohesive spiced dessert theme.
- Dessert board: Create a mini dessert charcuterie with cheesecake slices, chocolate truffles, cookies, and fresh fruits.
These thoughtful pairings elevate the experience and make your cheesecake feel even more special, no matter the occasion.
Storage, Freezing & Reheating Instructions
One of the best things about this No-Bake Biscoff Cheesecake—aside from how delicious it is—is how well it stores. You can easily make it ahead of time, save leftovers, or even freeze a whole cheesecake for another occasion. Here’s exactly how to store, freeze, and serve it later without losing that lovely creamy texture.
Storing in the Fridge
Once your cheesecake has fully set in the fridge, you can store it directly in the pan or transfer it to an airtight container. If you’re keeping it in the pan, just cover the top with plastic wrap or foil to prevent it from absorbing fridge odors or drying out.
- Shelf life: This cheesecake will stay fresh in the refrigerator for up to 5 days.
- Tip: For best results, store it in the coldest part of your fridge—not in the door—so it stays firm.
If you’ve already sliced the cheesecake, consider placing a piece of parchment or wax paper between the slices to prevent them from sticking together.
Freezing the Cheesecake
Freezing this no-bake cheesecake is a great way to enjoy it at a later date. The texture holds up very well in the freezer, which makes it perfect for prepping ahead.
To freeze the entire cheesecake:
- Let it set fully in the fridge first.
- Remove it from the springform pan and place it (with the base) on a freezer-safe plate.
- Wrap it tightly in plastic wrap, then in aluminum foil for extra protection.
- Label it with the date and freeze for up to 2 months.
To freeze individual slices:
- Place the slices on a baking tray lined with parchment paper.
- Freeze for 1–2 hours until firm.
- Wrap each slice in plastic wrap and store in a ziplock freezer bag.
Thawing and Reheating
Since this is a no-bake cheesecake, there’s no actual “reheating” needed. However, proper thawing is essential for the best texture.
To thaw a whole cheesecake:
- Remove the wrapping and transfer the cheesecake to a serving plate.
- Cover loosely and let it thaw in the fridge for at least 6 hours, preferably overnight.
To thaw individual slices:
- Unwrap the slice and place it on a plate in the fridge.
- Let it thaw for 2–3 hours before serving.
Avoid microwaving the cheesecake to thaw it quickly, as this can cause the filling to break down and become runny.
Once thawed, do not refreeze. Instead, enjoy within 2–3 days for optimal taste and texture.
With proper storage and thawing, your cheesecake will taste just as amazing as the day you made it—creamy, smooth, and full of that irresistible Biscoff flavor.
Common Mistakes to Avoid
Even though this Biscoff Cookie Butter Cheesecake is very forgiving, a few small missteps can affect the texture or appearance. Here are the most common mistakes and how to avoid them so your dessert turns out picture-perfect every time.
Using Low-Fat Cream Cheese
This is probably the number one culprit when a no-bake cheesecake doesn’t set properly. Low-fat or reduced-fat cream cheese often contains more moisture and less fat, which means your cheesecake won’t firm up as well in the fridge. Always use full-fat cream cheese for the best texture and taste.
Not Whipping the Cream Properly
The whipped double cream adds air and volume to your cheesecake filling. If it’s under-whipped, your filling may end up too soft. If it’s over-whipped, it can become grainy or separate. Aim for stiff peaks—where the cream holds its shape but still looks smooth and fluffy.
Skipping the Chill Time
It might be tempting to dive into the cheesecake early, but it truly needs a solid 4–6 hours in the fridge (preferably overnight) to set completely. Cutting into it too soon can result in a runny or messy slice. Patience really does pay off here.
Overmixing the Filling
Once the whipped cream is added to the cream cheese and Biscoff mixture, you should fold it in gently. Overmixing at this stage can deflate the whipped cream and result in a dense or heavy filling. Use a spatula and a light hand.
Not Pressing the Base Firmly
The crust provides the foundation for your cheesecake, so it needs to be compact and solid. If it’s too loose or crumbly, it might fall apart when you slice the cheesecake. Be sure to press the base firmly and evenly across the bottom of the pan using the back of a spoon or a flat-bottomed glass.
By keeping these tips in mind, you’ll avoid the common pitfalls and end up with a cheesecake that’s both beautiful and delicious.
Pro Tips
Want to make your No-Bake Biscoff Cheesecake truly next-level? These professional tips will help you master the technique, add personal flair, and impress every guest who takes a bite.
Use a Springform Pan for Easy Removal
A springform pan allows you to remove the cheesecake without flipping it or damaging the sides. It’s especially useful for no-bake desserts that need to set in the fridge. If you don’t have one, you can also use a cake tin with a removable base and line the sides with parchment for easier lifting.
Chill the Bowl and Whisk Before Whipping Cream
Cold tools make a huge difference when whipping cream. Pop your mixing bowl and whisk in the freezer for 10–15 minutes before starting. This helps the cream whip faster and hold its shape better, which leads to a fluffier filling.
Gently Warm the Biscoff Spread for the Topping
To get that smooth, shiny finish on top of your cheesecake, make sure the Biscoff spread is just gently melted—not hot. Use 10-second intervals in the microwave, stirring in between, until it reaches a pourable consistency. If it’s too hot, it could melt the filling underneath.
Slice Cleanly with a Hot Knife
For bakery-quality slices, dip your knife in hot water and wipe it dry before each cut. This keeps the blade warm and clean, helping it glide smoothly through the filling and topping without dragging or smudging.
Add a Little Salt to the Base for Balance
If you love a flavor contrast, try adding a small pinch of fine sea salt to your biscuit base before pressing it into the pan. It brings out the caramel notes in the Biscoff and adds a delicious balance to the sweetness.
These small, thoughtful touches can make a big difference and help you turn a simple recipe into an unforgettable dessert.
Frequently Asked Questions (FAQs)
Can I use store-brand cream cheese instead of Philadelphia?
Yes, you can use store-brand cream cheese, but make sure it’s full-fat and has a thick, creamy texture. Some lower-quality cream cheeses have a higher water content, which can affect how well your cheesecake sets.
Is it okay to use light cream instead of double cream?
It’s best to stick with double cream or heavy whipping cream because it whips up better and holds its shape longer. Light cream may not give the filling enough structure, and your cheesecake could end up too soft.
What can I use if I don’t have Biscoff spread?
If you can’t find Biscoff spread, you can use any cookie butter or spiced biscuit spread available in your area. Just make sure the consistency is similar—smooth and thick—so it blends well with the cream cheese.
How far in advance can I make this cheesecake?
You can make this cheesecake up to two days in advance. Just keep it covered in the fridge, and add the topping a few hours before serving to keep it looking fresh and glossy.
Can I freeze the cheesecake with the topping on?
Yes, you can freeze it fully assembled with the topping. Just be sure to wrap it well in plastic and foil to protect it from freezer burn. Let it thaw slowly in the fridge before serving.
How do I know if the cheesecake is set?
Gently press the top of the cheesecake with your finger. It should feel firm and hold its shape. You can also insert a toothpick into the center—it should come out mostly clean, without wet filling sticking to it.
Can I make mini versions of this cheesecake?
Absolutely. You can use cupcake liners in a muffin tin to create mini cheesecakes. Just divide the base and filling evenly, and chill as directed. These make perfect party portions.
Is this cheesecake halal?
Yes, this recipe is halal as long as all your ingredients are certified halal. Most brands of Biscoff spread and biscuits are, and there’s no alcohol or gelatin in this recipe.
Can I make this cheesecake gluten-free?
Yes. Simply substitute the Biscoff biscuits with your favorite gluten-free spiced cookies or graham crackers. Be sure to check that all other ingredients are gluten-free as well.
What if my cheesecake doesn’t set?
If your cheesecake hasn’t set after the suggested chilling time, it may need a few more hours in the fridge. Make sure you used full-fat cream cheese and whipped the cream to stiff peaks. If it’s still soft, try freezing it briefly to help firm it up before serving.
Conclusion & Call to Action
Now that you’ve seen just how easy, indulgent, and versatile this No-Bake Biscoff Cheesecake can be, it’s time to try it for yourself. Whether you’re planning a birthday dinner, hosting a holiday feast, or just craving something sweet to enjoy with a cup of tea, this cheesecake will never disappoint. From its buttery Biscoff crust to its creamy, dreamy filling and shiny caramelized topping, every bite delivers comfort and satisfaction.
Even if you’re new to making desserts, you’ll find that this recipe is incredibly forgiving and surprisingly simple. Just follow the steps, take your time with the chilling process, and have fun with the toppings and presentation. There’s so much room for creativity here, which is part of what makes this recipe such a favorite.
Once you’ve made it, don’t forget to share your results. Snap a photo of your cheesecake and tag me on social media—I absolutely love seeing how you bring these recipes to life in your own kitchen. And if you have questions or want to share a variation you tried, drop a comment below. Your feedback helps others and builds a community of home cooks who are passionate about delicious food.
So grab your mixing bowls, chill that cream, and let’s make dessert the highlight of the week. Happy no-baking!
Print
Biscoff Cookie Butter Cheesecake – Easy No-Bake Dessert Recipe
- Total Time: 25 minutes
- Yield: 10–12 servings 1x
- Diet: Vegetarian
Description
This creamy and indulgent no-bake Biscoff cheesecake features a buttery cookie base, light whipped cream filling, and a smooth, rich Biscoff topping. It’s easy to make and perfect for any occasion.
Ingredients
-
Base:
-
200g Biscoff biscuits, crushed
-
80g unsalted butter, melted
-
-
Filling:
-
300ml double cream, cold
-
400g full-fat cream cheese (e.g., Philadelphia)
-
200g Biscoff spread
-
-
Topping:
-
150g Biscoff spread, gently melted
-
50g Biscoff biscuits, crushed
-
Instructions
-
Mix crushed biscuits with melted butter. Press into a lined cake tin. Chill.
-
Whip the cold double cream to stiff peaks.
-
In another bowl, beat cream cheese and Biscoff spread until smooth. Fold in whipped cream.
-
Spoon filling onto the biscuit base. Smooth the top. Chill for at least 3 hours.
-
Pour gently melted Biscoff spread over the set filling. Sprinkle crushed biscuits.
-
Chill for 1 more hour before slicing. Serve cold.
Notes
-
For clean slices, dip your knife in hot water and wipe it between each cut.
-
The cheesecake can be made 1–2 days in advance.
-
Use full-fat cream cheese for best results.
- Prep Time: 25 minutes
- Cook Time: 0 minutes
- Category: Dessert
- Method: No-Bake
- Cuisine: American