
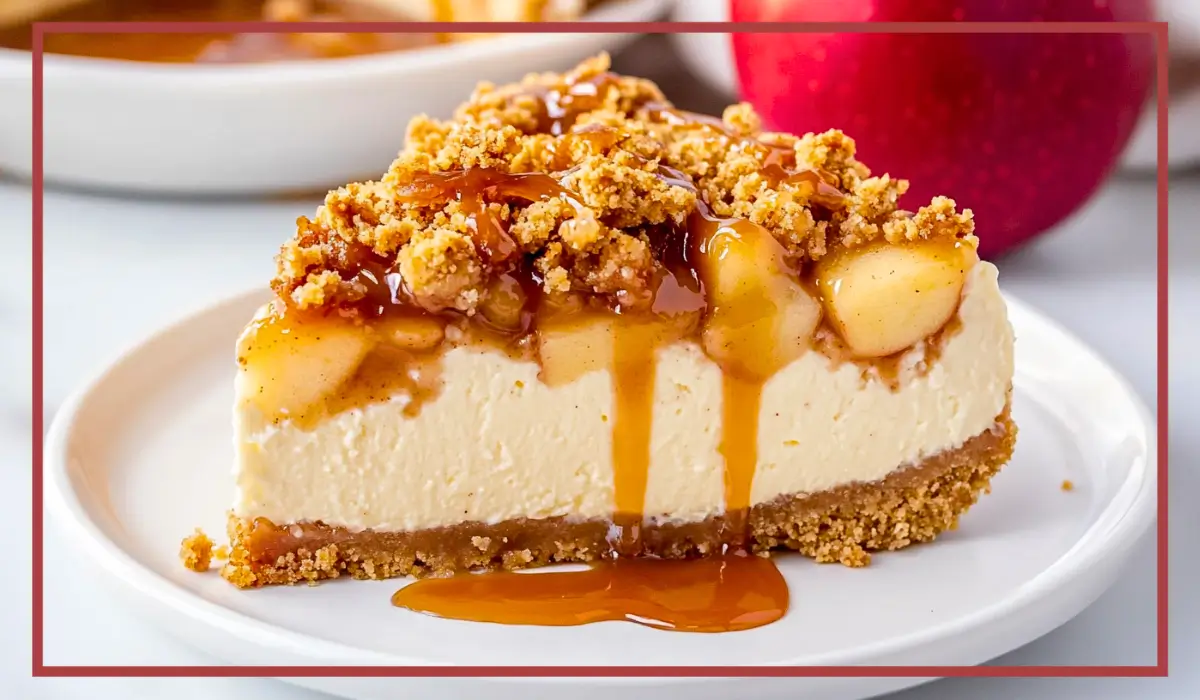
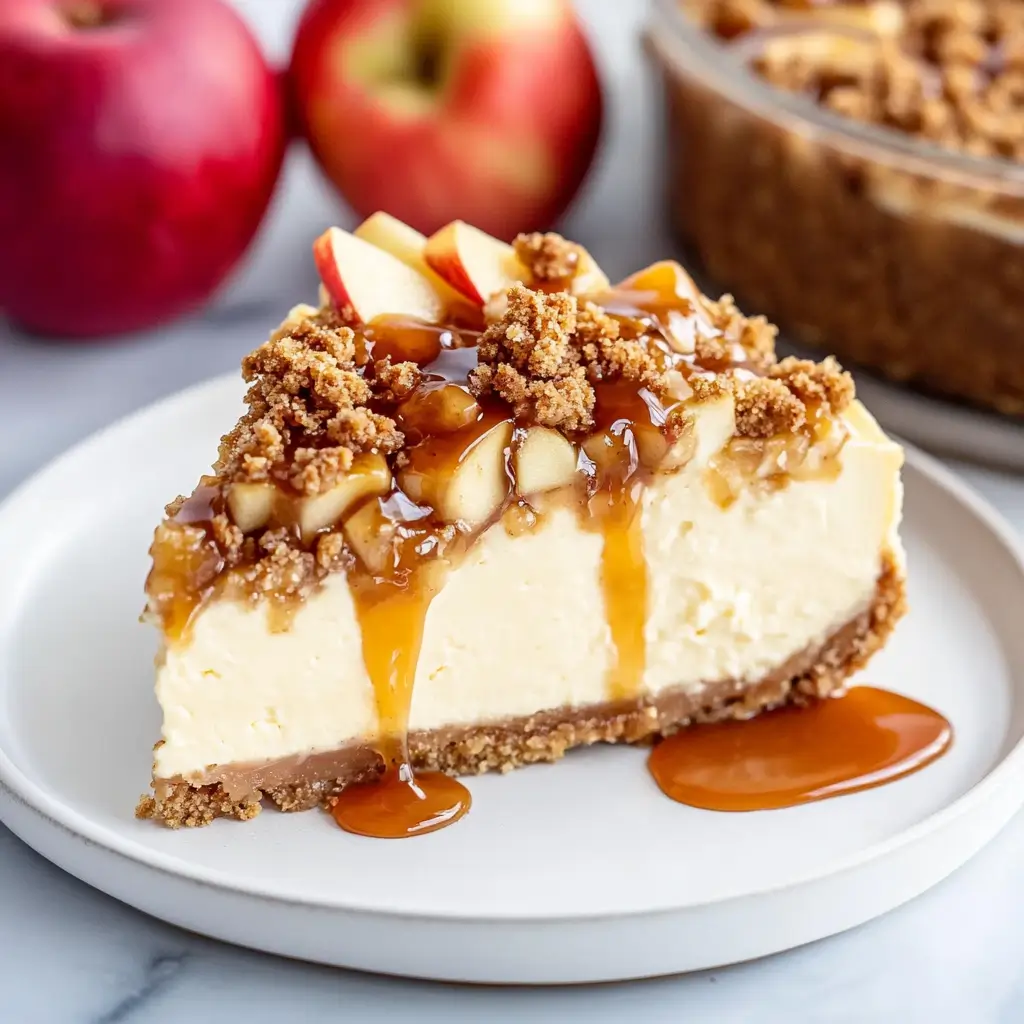
There’s something magical about a slice of apple crumble cheesecake that feels like a warm hug on a chilly evening. Imagine a buttery graham cracker crust, topped with velvety, creamy cheesecake, generously layered with cinnamon-spiced apples, and finished with a golden, crumbly topping. Each bite is a dreamy blend of creamy, sweet, and crunchy textures that leaves you craving more. Whether you’re serving it at a holiday gathering or just indulging yourself on a quiet night, this apple crumble cheesecake is pure comfort food at its finest.
This recipe isn’t just about creating a dessert; it’s about crafting an experience. The aroma of cinnamon and apples baking in the oven is enough to make your entire house smell like fall, even if it’s the middle of summer. And when you take that first bite, it’s like all the flavors of a classic apple pie and creamy cheesecake have collided in the most beautiful way.
I remember making this dessert for the first time during a family Thanksgiving dinner. It was a gamble—trying something new when everyone is expecting the same old pumpkin pie. But as soon as I served it, I knew I had a winner. Plates were licked clean, and everyone kept asking for the recipe. Since then, this apple crumble cheesecake has become a staple in my home, requested by friends and family alike.
What I love most about this recipe is how adaptable it is. You can swap the apples for pears or even mixed berries if you’re feeling adventurous. And while it looks impressive, the steps are straightforward enough that even a beginner can nail it on their first try. Trust me, if you’re looking for a dessert that’s bound to impress without causing you a headache in the kitchen, this is it.
Why You’ll Love This Recipe
This apple crumble cheesecake recipe is the dessert you never knew you needed in your life. Here’s why you’ll fall head over heels for it:
Easy-to-Make Crust: The graham cracker crust requires just three ingredients and less than ten minutes of your time. No fancy techniques or special equipment needed—just mix, press, and bake.
Creamy Cheesecake Layer: The rich, smooth, and slightly tangy cheesecake layer pairs perfectly with the sweet and tart apples. Using cream cheese, sugar, and just a hint of lemon juice gives it that perfect balance of flavors.
Apple Topping with a Kick: Granny Smith or Honeycrisp apples work wonders in this recipe, providing the ideal combination of sweetness and tartness. The cinnamon and brown sugar bring out the warmth and coziness that make this dessert feel like a big, comforting hug.
Crispy, Buttery Crumble: The oat-based crumble topping adds that perfect crunchy texture. It’s a must-have layer that beautifully complements the creamy cheesecake and tender apples.
Customizable & Crowd-Pleasing: Whether you’re serving this at a family dinner or a casual get-together with friends, it’s guaranteed to be a hit. And if you’re feeling creative, you can easily adjust the toppings and flavorings to suit your mood.
Aromatic & Visual Delight: Not only does this cheesecake taste incredible, but it also looks stunning when served. The golden crumble topping with bits of apples peeking through makes for a drool-worthy presentation.
Make-Ahead Friendly: You can prepare this cheesecake a day in advance, making it perfect for stress-free entertaining.
This dessert is truly a showstopper, whether it’s for a holiday feast, a birthday celebration, or just a cozy night at home with a hot cup of tea.
Health Benefits
While this apple crumble cheesecake is undeniably an indulgence, it does come with some surprising health benefits. Here’s why you can feel good about enjoying every delicious bite:
Rich in Protein: Thanks to the cream cheese and eggs, each slice of this cheesecake offers a decent amount of protein. This can help keep you feeling full and satisfied longer, making it more than just a sugary treat.
Apples Are Nutrient-Packed: The apples used in the topping provide essential vitamins and minerals, including vitamin C, potassium, and fiber. They also contain antioxidants, which may help protect your cells from damage caused by free radicals.
Oats for Heart Health: The crumble topping features rolled oats, which are known for their heart-healthy benefits. Oats contain beta-glucan, a type of soluble fiber that can help reduce cholesterol levels and promote better digestion.
Energy-Boosting Carbohydrates: The combination of graham cracker crust, apples, and sugar provides a quick energy boost, which can be especially satisfying when you need a pick-me-up.
Bone-Strengthening Ingredients: The cream cheese, sour cream, or heavy cream used in the cheesecake layer contributes calcium, an essential mineral for maintaining strong bones and teeth.
Mood-Enhancing Qualities: Dessert lovers know that enjoying a sweet treat can boost your mood. The comforting flavors of apples, cinnamon, and creamy cheesecake can bring instant happiness and a sense of relaxation.
It’s worth mentioning that while this dessert is indulgent, it can still fit into a balanced diet when enjoyed in moderation. If you’re looking to make it a little healthier, you can always experiment with reducing the sugar or using whole-grain options for the crust.
Preparation Time, Servings, and Nutritional Information
Total Time: Approximately 6 hours (includes chilling time)
Prep Time: 30 minutes
Cook Time: 1 hour 10 minutes
Cooling Time: 30 minutes
Chilling Time: At least 4 hours, preferably overnight
Servings: This recipe makes about 12 servings, depending on how large or small you slice the pieces.
Nutritional Information (per serving):
Calories: 450
Protein: 6g
Carbohydrates: 48g
Fat: 28g
Saturated Fat: 17g
Cholesterol: 125mg
Sodium: 350mg
Fiber: 2g
Sugars: 35g
Keep in mind that these nutritional values are estimates and can vary depending on the exact ingredients you use. But overall, this apple crumble cheesecake is a luscious dessert that’s worth every single calorie.
Ingredients List
For the Crust:
- 1 ½ cups graham cracker crumbs (about 12 full graham crackers, crushed)
- 6 tablespoons unsalted butter, melted
- 2 tablespoons granulated sugar
For the Cheesecake Layer:
- 24 ounces cream cheese, softened (three 8-ounce packages)
- 1 cup granulated sugar
- 3 large eggs, at room temperature
- 1 teaspoon vanilla extract
- 1 tablespoon lemon juice (optional, for extra brightness)
- 1/4 cup sour cream or heavy cream (for extra creaminess)
For the Apple Topping:
- 3 cups apples, peeled and diced (Granny Smith or Honeycrisp work best)
- 1/4 cup brown sugar
- 1/2 teaspoon cinnamon
- 1 tablespoon lemon juice (to prevent browning)
For the Crumble Topping:
- 1/2 cup all-purpose flour
- 1/2 cup rolled oats
- 1/4 cup brown sugar
- 1/2 teaspoon cinnamon
- 1/4 cup unsalted butter, melted
Step-By-Step Cooking Instructions
Making this apple crumble cheesecake may look like a lot of work, but it’s actually quite simple once you break it down. Just take it one layer at a time, and you’ll have a stunning dessert ready to impress. Here’s how to do it:
Step 1: Prepare the Crust
- Preheat the Oven: Start by preheating your oven to 325°F (163°C). This ensures even baking for your crust and cheesecake.
- Mix the Ingredients: In a medium-sized bowl, combine the graham cracker crumbs, melted butter, and granulated sugar. Stir until all the crumbs are evenly coated with butter and the mixture looks like wet sand.
- Press the Crust: Pour the crust mixture into the bottom of a 9-inch springform pan. Use the back of a spoon or the bottom of a flat glass to firmly press the crumbs into an even layer. Make sure the crust is compact to hold the cheesecake filling.
- Bake the Crust: Place the springform pan in the preheated oven and bake for 8 minutes. This helps the crust set and gives it a nice, toasty flavor.
- Cool the Crust: Remove the pan from the oven and let the crust cool completely while you prepare the filling. You can speed up the cooling process by placing it in the refrigerator.
Step 2: Make the Cheesecake Layer
- Beat the Cream Cheese: In a large mixing bowl, beat the softened cream cheese with an electric mixer on medium speed until it’s completely smooth and creamy. This should take about 2–3 minutes. Make sure there are no lumps.
- Add the Sugar and Eggs: Gradually add the granulated sugar and beat until fully combined. Then, add the eggs one at a time, mixing well after each addition. This slow addition of eggs helps maintain a smooth texture.
- Incorporate Vanilla, Lemon Juice, and Cream: Add the vanilla extract, lemon juice (if using), and sour cream or heavy cream. Beat just until combined. The mixture should be rich, smooth, and velvety.
- Pour Over Crust: Pour the cheesecake mixture over the cooled graham cracker crust. Use a spatula to smooth the top evenly.
Step 3: Prepare the Apple Topping
- Toss the Apples: In a medium bowl, combine the peeled and diced apples, brown sugar, cinnamon, and lemon juice. Toss well until all the apple pieces are evenly coated.
- Spread the Apple Mixture: Gently spread the apple mixture over the cheesecake layer. Make sure the apples are distributed evenly, so each slice gets a good amount of that sweet-tart apple flavor.
Step 4: Make the Crumble Topping
- Combine Dry Ingredients: In a separate bowl, mix together the flour, rolled oats, brown sugar, and cinnamon. Stir until well combined.
- Add the Butter: Pour the melted butter over the dry mixture and stir until it becomes a crumbly texture. The crumbs should be moist but not too wet, forming small clusters when squeezed between your fingers.
- Sprinkle the Crumble: Evenly sprinkle the crumble mixture over the apples, covering them as much as possible. Don’t worry if some apples are peeking through—that just adds to the rustic appeal.
Step 5: Bake the Cheesecake
- Bake: Place the springform pan in the oven and bake at 325°F (163°C) for 60–70 minutes. You’ll know it’s done when the edges are set but the center is still slightly jiggly.
- Cool Gradually: Turn off the oven and leave the cheesecake inside with the door slightly cracked open for about 30 minutes. This gradual cooling helps prevent cracks from forming on the surface.
- Chill Completely: Once the cheesecake has cooled to room temperature, cover it and place it in the refrigerator for at least 4 hours, but preferably overnight. This chilling time allows the flavors to meld and the cheesecake to fully set.
Step 6: Serve & Enjoy
- Release the Cheesecake: Carefully run a knife around the edges of the cheesecake before releasing it from the springform pan.
- Slice and Serve: Slice into generous portions and serve as-is, or with a drizzle of caramel sauce for extra decadence.
- Enjoy: Savor the incredible combination of creamy cheesecake, spiced apples, and buttery crumble.
How to Serve
This apple crumble cheesecake is delightful on its own, but here are some serving ideas to take it to the next level:
Serve with Whipped Cream: A dollop of freshly whipped cream on top adds an airy, creamy contrast to the dense, rich cheesecake.
Drizzle with Caramel Sauce: If you’re looking for a little extra indulgence, drizzle some homemade or store-bought caramel sauce over each slice. It pairs beautifully with the cinnamon-spiced apples.
Garnish with Fresh Apples: For a decorative touch, place thin slices of fresh apples on top of each serving.
Add a Scoop of Ice Cream: For the ultimate dessert experience, serve each slice with a scoop of vanilla or cinnamon ice cream.
Dust with Powdered Sugar: A light dusting of powdered sugar over the top of the cheesecake adds a touch of elegance.
Pair with a Hot Beverage: This cheesecake pairs wonderfully with a hot cup of tea, coffee, or a spiced chai latte. The warm drink complements the cozy flavors of the dessert.
Cut generous slices for those who love dessert or smaller portions if you’re serving this as part of a multi-course meal. Either way, you can’t go wrong.
Pairing Suggestions
While this apple crumble cheesecake can easily stand on its own, pairing it with complementary dishes and drinks can enhance the entire dining experience. Here are some ideas:
Hot Beverages:
- Freshly brewed coffee, especially if you opt for a dark roast. The boldness of the coffee contrasts beautifully with the sweet, creamy cheesecake.
- Chai tea or cinnamon-spiced tea for an autumnal feel.
- Hot apple cider, if you want to lean even more into the apple theme.
Cold Beverages:
- Iced caramel macchiato for a sweet and creamy touch.
- Vanilla milkshake for a rich, dreamy pairing.
- A sparkling apple soda for a refreshing contrast.
Side Dishes:
- Fresh fruit salad with apples, pears, and grapes to complement the flavors.
- Light, crisp salad with a citrus vinaigrette to cleanse the palate.
- A serving of warm oatmeal for a comforting, hearty combination.
Dessert Pairings:
- Cinnamon cookies or shortbread for added crunch.
- Vanilla or cinnamon ice cream, served on the side or melted over a warm slice.
- A slice of this cheesecake also pairs beautifully with chocolate truffles for a rich, decadent finish.
The key to pairing is to find flavors and textures that complement and enhance the cheesecake’s creamy, fruity, and crumbly goodness.
Storage, Freezing & Reheating Instructions
One of the best things about this apple crumble cheesecake is how well it stores. You can make it ahead of time, enjoy it for days, or even freeze it for later. Let’s break down how to store, freeze, and reheat this delicious dessert:
Storing in the Refrigerator
- Cooling Before Storing: Make sure your cheesecake has completely cooled and been chilled in the refrigerator for at least 4 hours before attempting to store it.
- Cover Properly: If you’re keeping it in the springform pan, simply cover it tightly with plastic wrap or aluminum foil. Otherwise, place the cheesecake in an airtight container.
- Shelf Life: Stored properly, the cheesecake will stay fresh for up to 5 days in the refrigerator. The crumble topping will slightly soften over time but will still taste amazing.
- Serving After Refrigeration: For best results, allow slices to sit at room temperature for about 15 minutes before serving. This helps bring out the creamy texture and flavor.
Freezing the Cheesecake
- Cooling Completely: Ensure the cheesecake is thoroughly chilled before freezing.
- Slicing or Freezing Whole: You can freeze the entire cheesecake or slice it into individual portions for easier serving later.
- Wrap It Up: Wrap the cheesecake (or slices) tightly in plastic wrap, then wrap it again in aluminum foil. Double-wrapping helps prevent freezer burn.
- Use an Airtight Container: For extra protection, place the wrapped cheesecake in a freezer-safe airtight container or resealable freezer bag.
- Freezing Duration: It can be frozen for up to 3 months. After that, the texture may begin to degrade.
- Thawing Instructions: To thaw, transfer the cheesecake to the refrigerator and let it defrost overnight. For quicker defrosting of individual slices, leave them at room temperature for about an hour.
Reheating or Serving After Freezing
- Enjoy Cold or Slightly Warmed: You can enjoy the cheesecake straight from the fridge or gently warm a slice in the microwave for about 10 seconds if you prefer a softer texture.
- Crisping the Crumble Topping: If you want to refresh the crumble topping, place a slice in a 350°F (175°C) oven for about 5 minutes. This will help restore some of the crispy texture.
Common Mistakes to Avoid
Even though this apple crumble cheesecake recipe is straightforward, there are a few common pitfalls to avoid. Here’s what to watch out for:
- Overmixing the Cheesecake Batter
Beating the cream cheese and sugar until smooth is essential, but once you start adding the eggs, be careful not to overmix. Too much mixing can incorporate air into the batter, causing the cheesecake to crack as it bakes. Mix just until the ingredients are combined. - Not Using Room Temperature Ingredients
Using cold cream cheese or eggs can lead to a lumpy batter. Make sure the cream cheese is softened and the eggs are at room temperature before mixing. This will ensure a smooth, creamy texture. - Skipping the Cooling Process
If you skip the gradual cooling process in the oven and transfer the cheesecake directly to the fridge, you risk having a cracked surface. Letting the cheesecake cool gradually allows it to settle properly. - Using the Wrong Pan Size
This recipe is designed for a 9-inch springform pan. If you use a smaller or larger pan, your baking time and texture will be affected. Stick to the correct size for the best results. - Not Preparing the Springform Pan Correctly
Always grease the pan or line the bottom with parchment paper to make it easier to remove the cheesecake once it’s done. This small step can make a huge difference. - Not Allowing Enough Chill Time
While it’s tempting to dig in right away, the cheesecake needs a minimum of 4 hours in the fridge to fully set. Ideally, let it chill overnight for the best texture and flavor. - Forgetting to Cover the Cheesecake
If you’re storing the cheesecake in the fridge without proper covering, it may absorb unwanted odors or dry out. Always keep it covered tightly to maintain freshness.
Pro Tips
To make sure your apple crumble cheesecake turns out perfectly every time, here are some additional pro tips:
- Use a Water Bath for Baking (Optional)
For an extra-smooth, crack-free cheesecake, you can bake the cheesecake with a water bath. Simply wrap the bottom of your springform pan in heavy-duty aluminum foil to prevent leaks, then place it in a larger baking dish. Pour hot water into the outer dish until it reaches halfway up the springform pan. - Draining Excess Liquid from Apples
If your apples are particularly juicy, you can place them in a strainer after tossing them with sugar and cinnamon. Let them sit for about 10 minutes before adding them to the cheesecake layer. This will help prevent a soggy top. - Chill Your Mixing Bowl for Better Whipping
If you’re making homemade whipped cream to serve with your cheesecake, chill your mixing bowl and beaters for about 15 minutes before whipping. This helps achieve a fluffier texture. - Use Heavy Cream for Extra Creaminess
While sour cream adds tanginess, heavy cream gives the cheesecake a silkier, creamier texture. Feel free to use whichever suits your preference. - Customize the Crumble Topping
Add chopped nuts, such as pecans or walnuts, to the crumble topping for extra crunch and flavor. You can also experiment with different spices like nutmeg or allspice to enhance the autumnal taste. - Prevent Sticking with Parchment Paper
If you’re worried about the crust sticking to the pan, line the bottom with parchment paper before pressing in the graham cracker mixture. This makes serving and slicing a breeze. - Chill Overnight for Best Results
If you can resist the temptation, allow your cheesecake to chill overnight. The flavors meld beautifully, and the texture firms up to perfection.
Frequently Asked Questions (FAQs)
Can I use low-fat cream cheese for this recipe?
Yes, you can use low-fat cream cheese, but keep in mind that the texture won’t be as rich and creamy. Full-fat cream cheese provides the best flavor and consistency.
What type of apples work best for this recipe?
Granny Smith and Honeycrisp apples are ideal. Granny Smiths offer a tartness that balances the sweetness of the cheesecake, while Honeycrisps add a juicy, sweet crunch.
Can I make this cheesecake gluten-free?
Absolutely! Simply use gluten-free graham crackers for the crust and gluten-free rolled oats for the crumble topping.
How do I prevent cracks in my cheesecake?
Avoid overmixing the batter and allow the cheesecake to cool gradually in the oven before chilling it. Using a water bath is also a great method for preventing cracks.
Can I prepare this cheesecake ahead of time?
Yes, this cheesecake is perfect for making ahead! You can store it in the refrigerator for up to 5 days or freeze it for up to 3 months.
Can I use other fruits instead of apples?
Yes! Pears, peaches, or even berries work beautifully with this recipe. Just be mindful of the moisture content.
Is it necessary to use a springform pan?
A springform pan is highly recommended for easy removal, but you can use a deep-dish pie pan in a pinch. Just be aware that serving the cheesecake may be a bit trickier.
How do I know when the cheesecake is done baking?
The cheesecake is done when the edges are set, but the center still has a slight jiggle. It will firm up as it cools.
Can I skip the crumble topping?
While the crumble topping is a key part of this recipe’s appeal, you can skip it if you prefer a smoother cheesecake texture. However, the buttery, crispy topping adds incredible flavor and texture, so I highly recommend including it.
Can I use pre-made pie filling instead of fresh apples?
Yes, you can use canned apple pie filling if you’re short on time. Just spread it over the cheesecake layer before adding the crumble topping. Keep in mind that homemade apples provide a fresher, more authentic flavor.
Conclusion & Call to Action
You’ve just unlocked the secret to making an irresistible apple crumble cheesecake that will steal the show at any dessert table. From the buttery graham cracker crust to the creamy cheesecake layer and the warm, spiced apples topped with a crispy crumble, every bite is a little piece of heaven. And the best part? It’s surprisingly easy to make, even for beginners.
This cheesecake has become one of my all-time favorite desserts to make and share with loved ones. It’s not just the amazing flavor that keeps me coming back—it’s the joy on everyone’s faces when they take that first bite. Whether it’s for a cozy family dinner, a special occasion, or just because you’re craving something truly decadent, this apple crumble cheesecake is always a hit.
Now that you have the recipe, it’s time to gather your ingredients and get baking. Trust me, once you try this apple crumble cheesecake, it’s going to be a regular in your dessert rotation. And don’t be afraid to make it your own! Experiment with different fruits, spices, or even adding a caramel drizzle for extra sweetness.
I’d love to hear how your apple crumble cheesecake turns out! Feel free to leave a comment with your experience, tips, or any creative twists you tried. And if you’re feeling extra generous, share a photo of your masterpiece on social media and tag me. I can’t wait to see your delicious creations!
Now, go ahead and treat yourself to a slice (or two) of pure dessert bliss. You’ve earned it!
Print
Apple Crumble Cheesecake – Creamy, Crunchy, and Irresistible!
- Total Time: 6 hours (including cooling and chilling)
- Yield: 12 servings 1x
- Diet: Vegetarian
Description
This Apple Crumble Cheesecake is the perfect combination of creamy cheesecake, cinnamon-spiced apples, and buttery oat crumble topping. It’s a rich, delicious dessert that’s ideal for cozy nights, family gatherings, and special occasions.
Ingredients
For the Crust:
- 1 ½ cups graham cracker crumbs
- 6 tbsp unsalted butter, melted
- 2 tbsp granulated sugar
For the Cheesecake Layer:
- 24 oz cream cheese, softened
- 1 cup granulated sugar
- 3 large eggs, at room temperature
- 1 tsp vanilla extract
- 1 tbsp lemon juice (optional)
- 1/4 cup sour cream or heavy cream
For the Apple Topping:
- 3 cups apples, peeled & diced (Granny Smith or Honeycrisp)
- 1/4 cup brown sugar
- 1/2 tsp cinnamon
- 1 tbsp lemon juice
For the Crumble Topping:
- 1/2 cup all-purpose flour
- 1/2 cup rolled oats
- 1/4 cup brown sugar
- 1/2 tsp cinnamon
- 1/4 cup unsalted butter, melted
Instructions
-
Prepare the Crust:
- Preheat oven to 325°F (163°C).
- Mix graham cracker crumbs, sugar, and melted butter.
- Press mixture into a 9-inch springform pan.
- Bake for 8 minutes and let cool.
-
Make the Cheesecake Layer:
- Beat softened cream cheese until smooth.
- Add sugar and mix well.
- Add eggs one at a time, mixing thoroughly.
- Mix in vanilla, lemon juice, and cream.
- Pour over the cooled crust and smooth the top.
-
Prepare the Apple Topping:
- Toss apples with brown sugar, cinnamon, and lemon juice.
- Spread evenly over the cheesecake layer.
-
Make the Crumble Topping:
- Combine flour, oats, brown sugar, cinnamon, and melted butter.
- Sprinkle evenly over the apple layer.
-
Bake:
- Bake for 60–70 minutes until the center is slightly jiggly.
- Turn off the oven and cool the cheesecake with the door slightly open for 30 minutes.
-
Chill & Serve:
- Refrigerate for at least 4 hours or overnight.
- Slice, serve, and enjoy!
Notes
- For best results, chill the cheesecake overnight for optimal flavor and texture.
- For a gluten-free version, use gluten-free graham crackers and oats.
- Store in the fridge for up to 5 days or freeze for up to 3 months.
- Prep Time: 30 minutes
- Cook Time: 1 hour 10 minutes
- Category: Dessert
- Method: Baking
- Cuisine: American