
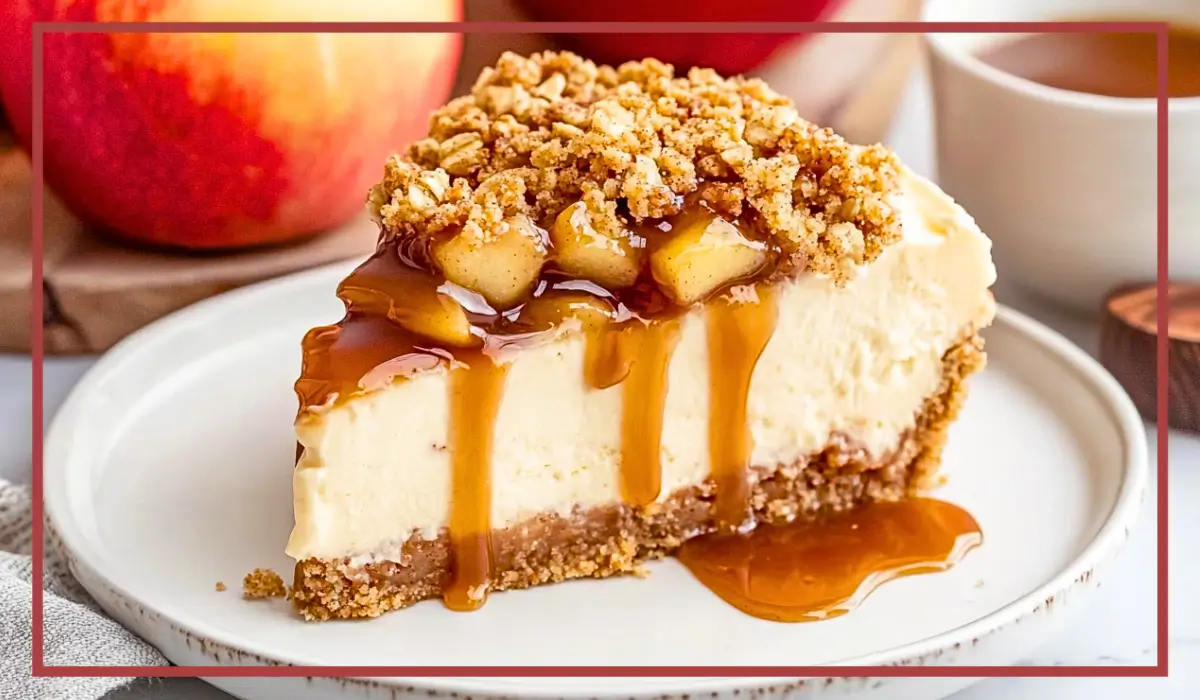
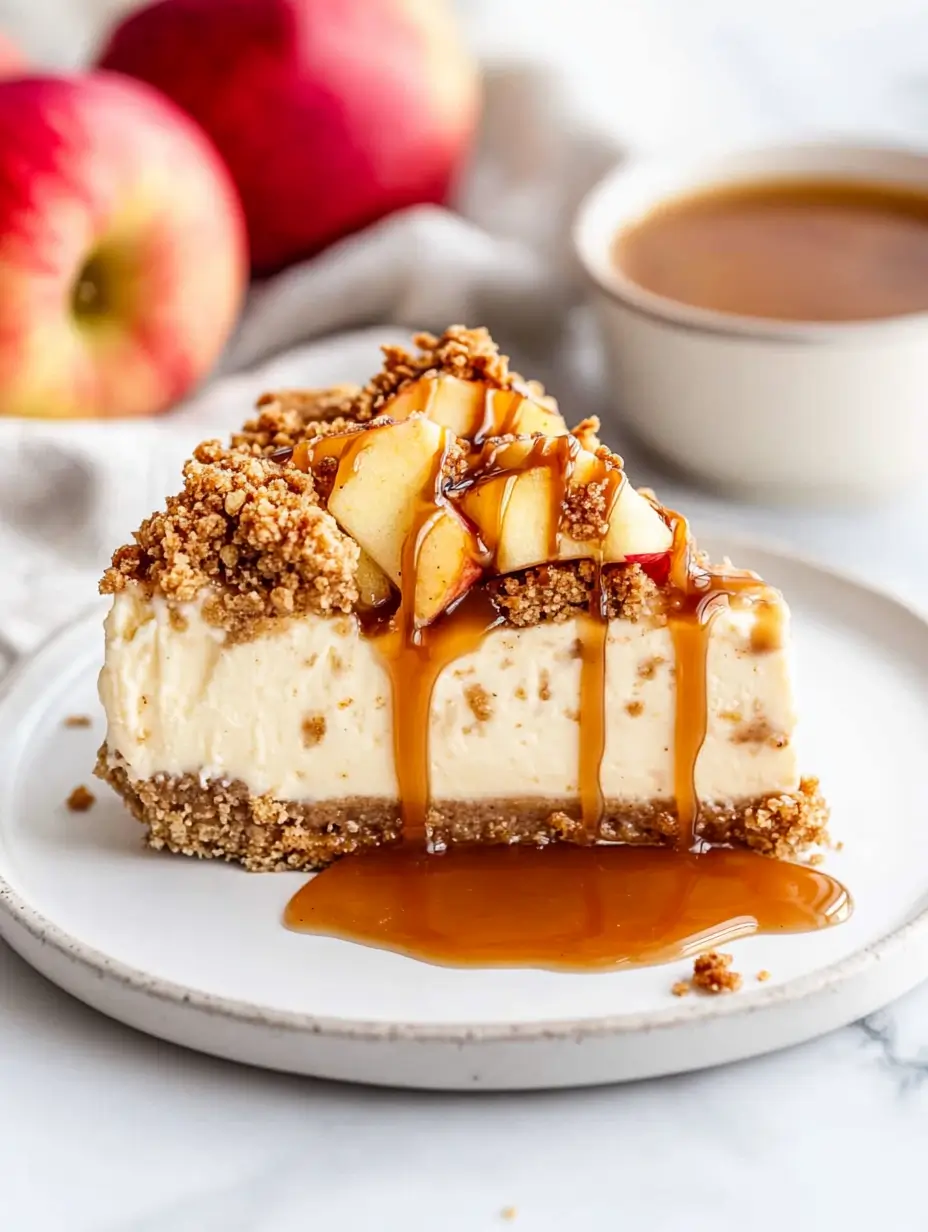
Imagine the rich, creamy goodness of a classic cheesecake, paired with the warm, cinnamon-spiced flavors of a homemade apple crisp. This Apple Crisp Cheesecake is the best of both worlds—a luscious, velvety cheesecake layered with tender, caramelized apples and finished with a golden, buttery oat crumble. It’s the ultimate cozy dessert, perfect for crisp fall evenings, holiday celebrations, or just because you need something utterly delicious in your life.
I first discovered this combination during a family holiday dinner. My mom had made her famous apple crisp, and I had brought a homemade cheesecake. As everyone piled their plates high with both desserts, it hit me—why not combine them into one show-stopping masterpiece? After a few test runs (and plenty of taste tests), this recipe was born, and let me tell you, it’s been a game-changer.
Not only does this dessert look stunning on the table, but it also delivers on taste. The contrast between the creamy cheesecake, the tart, cinnamon-kissed apples, and the crunchy oat topping is simply irresistible. Plus, the graham cracker crust ties everything together with its buttery, slightly sweet crunch. Whether you’re making this for Thanksgiving, a dinner party, or a weekend baking project, prepare for rave reviews.
And the best part? While it may look fancy, this cheesecake is surprisingly simple to make. With just a few basic ingredients and some patience (because, yes, you have to let it chill!), you can create a dessert that tastes like it came straight from a bakery. So, let’s get baking and make your kitchen smell like pure fall heaven.
Why You’ll Love This Recipe
This Apple Crisp Cheesecake isn’t just another dessert—it’s a masterpiece of textures and flavors that will have everyone coming back for seconds. Here’s why you’ll fall in love with it:
- It’s the Best of Two Desserts: Why choose between apple crisp and cheesecake when you can have both? This recipe gives you the creamy richness of cheesecake with the comforting warmth of spiced apples and a crisp, buttery topping.
- Perfect for Any Occasion: Whether it’s a holiday feast, a birthday celebration, or just a cozy night in, this cheesecake fits every occasion.
- Easy to Make Ahead: This cheesecake actually tastes better the next day, making it ideal for stress-free entertaining.
- A Beautiful Showstopper: With its layers of golden crumble, caramelized apples, and creamy cheesecake, this dessert is as stunning as it is delicious.
- Rich but Balanced: The tartness of the apples cuts through the richness of the cheesecake, making each bite perfectly balanced.
- Customizable: Love extra spice? Add a touch of nutmeg. Prefer a crunchier topping? Double the crisp layer. You can tweak this recipe to suit your preferences.
- Crowd-Pleasing Flavor: Even those who claim they’re “not dessert people” can’t resist a slice of this decadent treat.
Health Benefits
While this is definitely an indulgent dessert, it does offer a few nutritional benefits thanks to its key ingredients:
- Apples: Apples are rich in fiber, vitamins, and antioxidants. They support digestion, promote heart health, and provide natural sweetness that allows for less refined sugar in the recipe.
- Oats: The oat crumble topping adds a boost of whole grains, fiber, and healthy carbohydrates, which help provide sustained energy.
- Dairy: The cream cheese and sour cream in the cheesecake filling provide protein and calcium, which are essential for strong bones.
- Cinnamon: This warming spice is known for its anti-inflammatory properties and ability to help regulate blood sugar levels.
- Lemon Juice: Besides adding brightness to the apples and cheesecake, lemon juice is packed with vitamin C, which supports the immune system.
Of course, this is still a dessert, so moderation is key. But if you’re going to treat yourself, why not do it with something that offers a little extra goodness?
Preparation Time, Servings, and Nutritional Information
- Prep Time: 20 minutes
- Cook Time: 50 minutes
- Chill Time: At least 4 hours (overnight is best)
- Total Time: About 5 hours
- Servings: 10-12 slices
Estimated Nutritional Information per Slice (based on 12 servings)
- Calories: 420
- Fat: 24g
- Carbohydrates: 45g
- Protein: 6g
- Fiber: 3g
Ingredients List
For the Crust
- 1 ½ cups graham cracker crumbs
- ¼ cup melted butter
- 2 tablespoons sugar
For the Cheesecake Filling
- 16 ounces cream cheese, softened
- ½ cup sugar
- 2 large eggs
- ¼ cup sour cream
- 1 teaspoon vanilla extract
- 1 teaspoon lemon juice
For the Apple Layer
- 2 cups apples, peeled and diced (Granny Smith works best)
- 2 tablespoons sugar
- 1 teaspoon cinnamon
- 1 teaspoon lemon juice
For the Crisp Topping
- ½ cup rolled oats
- ¼ cup flour
- ¼ cup butter, cold and cut into small pieces
- ¼ cup brown sugar
- ½ teaspoon cinnamon
For the Drizzle (Optional but Recommended!)
- Caramel sauce for drizzling
Step-By-Step Cooking Instructions
1. Preheat and Prepare the Pan
Start by preheating your oven to 325°F (163°C). Grease a 9-inch springform pan with butter or nonstick spray to ensure easy removal later.
2. Make the Graham Cracker Crust
In a mixing bowl, combine the graham cracker crumbs, melted butter, and sugar. Stir until the mixture resembles wet sand. Press the mixture firmly into the bottom of the prepared pan, using the back of a spoon or a measuring cup to create an even layer. Bake for 8 minutes, then set aside to cool while you prepare the filling.
3. Prepare the Cheesecake Filling
In a large mixing bowl, beat the softened cream cheese and sugar until smooth and creamy. Add the eggs one at a time, mixing well after each addition. Stir in the sour cream, vanilla extract, and lemon juice until fully incorporated. Pour the cheesecake batter over the cooled crust, spreading it evenly.
4. Prepare the Apple Layer
In another bowl, toss the diced apples with sugar, cinnamon, and lemon juice. Evenly distribute the apple mixture over the cheesecake layer, gently pressing the apples into the batter so they nestle slightly into the surface.
5. Make the Crisp Topping
In a separate bowl, mix the rolled oats, flour, brown sugar, and cinnamon. Add the cold butter pieces and use a fork or your fingers to work the butter into the dry ingredients until it forms a crumbly mixture. Sprinkle the crisp topping over the apples, making sure to cover the surface evenly.
6. Bake the Cheesecake
Place the cheesecake in the oven and bake for 45-50 minutes, or until the center is just set (it should still have a slight jiggle). If the topping is browning too quickly, cover it loosely with foil for the last 10 minutes of baking.
7. Cool and Chill
Allow the cheesecake to cool at room temperature for about an hour. Then transfer it to the refrigerator and let it chill for at least 4 hours, preferably overnight. This step is essential for the cheesecake to fully set.
8. Drizzle and Serve
Before serving, drizzle the cheesecake with caramel sauce for an extra touch of indulgence. Slice, serve, and enjoy every creamy, crunchy bite.
How to Serve
Serving this Apple Crisp Cheesecake is all about enhancing its delightful textures and flavors. Whether you’re enjoying it as a casual dessert at home or presenting it at a special gathering, here are some ways to make each slice even more irresistible:
- Drizzle with Caramel Sauce: A warm caramel drizzle takes this cheesecake to the next level, adding a rich, buttery sweetness that complements the spiced apples perfectly.
- Top with Whipped Cream: A dollop of homemade whipped cream adds a light, airy contrast to the dense and creamy cheesecake.
- Sprinkle with Cinnamon Sugar: If you love warm spices, a light dusting of cinnamon sugar before serving enhances the cozy, autumnal flavors.
- Add a Scoop of Vanilla Ice Cream: Want to make it extra indulgent? Serve each slice with a scoop of creamy vanilla ice cream. The cold ice cream against the rich cheesecake is an unbeatable combination.
- Garnish with Fresh Apple Slices: For a decorative touch, fan out thin apple slices on top of each piece before serving. This adds a fresh and crisp contrast to the creamy texture.
For the best experience, serve this cheesecake slightly chilled but not straight from the fridge. Let it sit at room temperature for about 15 minutes before slicing so the flavors can fully develop.
Pairing Suggestions
Pairing the right drink or side with this Apple Crisp Cheesecake can elevate your dessert experience. Here are some excellent pairings:
Beverage Pairings
- Hot Apple Cider: The warm, spiced flavors of apple cider complement the cinnamon and apples in the cheesecake.
- Chai Tea Latte: The creamy, spiced notes of chai tea work beautifully with the warm flavors of the crisp topping.
- Coffee or Espresso: A strong black coffee or a shot of espresso balances the richness of the cheesecake, cutting through the sweetness.
- Milk or Almond Milk: A cold glass of milk, whether dairy or non-dairy, is a classic pairing that enhances the comforting nature of this dessert.
Side Pairings
- Roasted Nuts: A small bowl of toasted pecans or almonds on the side adds an extra crunchy contrast to the soft cheesecake.
- Cranberry Sauce: A spoonful of tangy cranberry sauce pairs surprisingly well with the sweet and spiced flavors of the cheesecake.
- Spiced Pecans or Candied Walnuts: These provide an extra crunch and a nutty flavor that works well with the oat crumble topping.
With these pairings, your Apple Crisp Cheesecake experience will feel even more special, whether you’re serving it after a holiday meal or just as a midweek treat.
Storage, Freezing & Reheating Instructions
Since this cheesecake takes time to set and develop its flavors, proper storage is key to keeping it fresh. Here’s how to store, freeze, and reheat it effectively:
Storing in the Refrigerator
- Once the cheesecake has fully cooled, cover it tightly with plastic wrap or store it in an airtight container.
- Keep it in the refrigerator for up to 5 days. The flavors actually deepen over time, making it even better after a day or two.
- If storing individual slices, place parchment paper between slices to prevent sticking.
Freezing Instructions
Want to save some for later? This cheesecake freezes beautifully. Here’s how to do it:
- Wrap the entire cheesecake (or individual slices) tightly in plastic wrap, then in aluminum foil to prevent freezer burn.
- Store in a freezer-safe container for up to 3 months.
- To thaw, transfer to the refrigerator overnight. Avoid thawing at room temperature, as this can cause condensation and make the crust soggy.
Reheating Instructions
While cheesecake is best served chilled, you can slightly warm it if you prefer:
- To warm individual slices, microwave for 10-15 seconds—just enough to take the chill off.
- If you’re reheating the entire cheesecake, place it in a low oven (275°F/135°C) for about 10 minutes, then let it cool slightly before serving.
Common Mistakes to Avoid
Even though this recipe is straightforward, a few common mistakes can affect the final result. Here’s how to avoid them:
- Not Softening the Cream Cheese Properly: Cold cream cheese doesn’t mix smoothly, leading to a lumpy batter. Let it sit at room temperature for at least 30 minutes before using.
- Overmixing the Batter: Beating the cheesecake filling too much incorporates excess air, which can cause cracks. Mix until just combined.
- Skipping the Cooling Process: If you rush the cooling and chilling time, the cheesecake won’t set properly. Let it cool at room temperature, then chill for at least 4 hours, preferably overnight.
- Using Warm Apples: If your apple mixture is too warm when added to the cheesecake, it can affect the baking process. Let the apples cool slightly before layering them in.
- Overbaking the Cheesecake: A cheesecake should still have a slight jiggle in the center when done. Overbaking makes it dry and dense.
- Not Covering While Chilling: Leaving the cheesecake uncovered in the fridge can cause it to absorb odors from other foods. Always cover it well.
Pro Tips for the Best Cheesecake
Want to make sure your Apple Crisp Cheesecake turns out perfect every time? Here are some expert tips:
- Use a Springform Pan: This makes removing the cheesecake much easier without damaging the crust or edges.
- Bake in a Water Bath (Optional for Extra Creaminess): If you want an ultra-smooth cheesecake, place the springform pan in a larger baking dish and fill it with about an inch of hot water. This prevents cracks by creating gentle, even heat.
- Chill Overnight for Best Flavor: While it’s tempting to cut into it early, letting the cheesecake chill overnight allows the flavors to develop fully.
- Use the Right Apples: Granny Smith apples are ideal because they hold their shape and have a tartness that balances the sweetness. If you prefer a sweeter apple, try Honeycrisp or Fuji.
- Toast the Oats for Extra Crunch: Lightly toasting the oats before making the crisp topping enhances their nutty flavor.
Frequently Asked Questions (FAQs)
1. Can I use a different type of crust?
Yes! Instead of a graham cracker crust, you can use crushed vanilla wafers, digestive biscuits, or even a shortbread crust for a slightly different flavor.
2. What if I don’t have a springform pan?
A deep-dish pie pan can work in a pinch, but removal will be trickier. Line the pan with parchment paper to help lift the cheesecake out.
3. Can I make this cheesecake gluten-free?
Yes! Use gluten-free graham crackers for the crust and substitute almond flour or a gluten-free baking mix for the crisp topping.
4. How do I prevent cracks in my cheesecake?
Don’t overmix the batter, avoid overbaking, and let the cheesecake cool gradually. A water bath also helps.
5. Can I add nuts to the topping?
Absolutely! Chopped pecans or walnuts add a wonderful crunch and extra flavor to the crisp layer.
6. Can I make this cheesecake ahead of time?
Yes! It’s actually best when made a day ahead so it can fully set in the fridge.
7. What’s the best way to slice this cheesecake cleanly?
Use a sharp knife dipped in warm water, wiping it clean between slices.
8. Can I use canned apple pie filling instead of fresh apples?
Fresh apples provide the best texture and flavor, but in a pinch, you can use canned apple pie filling—just reduce the added sugar.
9. How do I know when my cheesecake is done?
The edges should be set, but the center should still have a slight jiggle when gently shaken.
10. Can I skip the oat crisp topping?
You can, but it adds a wonderful crunch that balances the creamy cheesecake. If omitting, consider adding a crumbly streusel instead.
Conclusion & Call to Action
This Apple Crisp Cheesecake is the ultimate dessert, bringing together the best elements of two beloved classics. It’s creamy, crunchy, spiced, and completely irresistible. Whether you’re making it for a holiday, a birthday, or just because, it’s sure to impress.
Now that you have all the steps, tips, and tricks, it’s time to get baking! If you try this recipe, let me know how it turned out. Share your photos, leave a comment, or tag me on social media. I’d love to see your delicious creations!
Print
Apple Crisp Cheesecake – Creamy, Crunchy, and Irresistible
- Total Time: ~5 hours (including chilling)
- Yield: 10-12 servings 1x
- Diet: Vegetarian
Description
This Apple Crisp Cheesecake is the best of both worlds—smooth, creamy cheesecake layered with cinnamon-spiced apples and topped with a crunchy oat crumble. It’s the perfect dessert for fall, holidays, or any special occasion.
Ingredients
For the Crust:
- 1 ½ cups graham cracker crumbs
- ¼ cup melted butter
- 2 tbsp sugar
For the Cheesecake Filling:
- 16 oz cream cheese, softened
- ½ cup sugar
- 2 eggs
- ¼ cup sour cream
- 1 tsp vanilla extract
- 1 tsp lemon juice
For the Apple Layer:
- 2 cups diced Granny Smith apples (peeled)
- 2 tbsp sugar
- 1 tsp cinnamon
- 1 tsp lemon juice
For the Crisp Topping:
- ½ cup rolled oats
- ¼ cup flour
- ¼ cup butter, cold and cubed
- ¼ cup brown sugar
- ½ tsp cinnamon
For the Drizzle (Optional):
- Caramel sauce
Instructions
- Preheat oven to 325°F (163°C) and grease a 9-inch springform pan.
- Make the crust: Mix graham cracker crumbs, melted butter, and sugar. Press into the pan and bake for 8 minutes. Cool.
- Prepare the cheesecake filling: Beat cream cheese and sugar until smooth. Add eggs one at a time, then mix in sour cream, vanilla, and lemon juice. Pour over the crust.
- Make the apple layer: Toss diced apples with sugar, cinnamon, and lemon juice. Spread evenly over the cheesecake batter.
- Prepare the crisp topping: Combine oats, flour, brown sugar, and cinnamon. Cut in cold butter until crumbly. Sprinkle over the apples.
- Bake for 45-50 minutes, until the center is set but slightly jiggly.
- Cool at room temperature, then refrigerate for at least 4 hours or overnight.
- Drizzle with caramel sauce before serving.
Notes
- Let cheesecake sit at room temperature for 15 minutes before slicing for the best texture.
- Use cold butter for a crunchier topping.
- Granny Smith apples work best for a tart contrast.
- Prep Time: 20 minutes
- Cook Time: 50 minutes
- Category: Dessert
- Method: Baking
- Cuisine: American