
I once attempted to bake a red velvet cake for a dear friend’s birthday. Everything seemed to be going perfectly—until I took that first bite. My taste buds were hit with an unexpected and, shall we say, “salty” surprise. Yep, you guessed it—I accidentally used salt instead of sugar. 😂 To this day, my friend loves to bring up that memorable cake disaster whenever we reminisce about birthdays. But don’t worry, this red velvet cake recipe has been perfected since then, and it’s an absolute showstopper. It’s soft, moist, with just the right hint of cocoa, and when paired with creamy, tangy cream cheese frosting and fresh strawberries, it becomes pure magic. Trust me, this cake will steal the show at any gathering, whether it’s a birthday, anniversary, or just because you’re craving something sweet.
Not only is this cake easy to whip up, but it’s also foolproof if you follow the steps. And if you’re worried about complicated techniques or fancy equipment, let me assure you—this recipe is beginner-friendly. So, let’s dive into the details and create a cake that’s so good, people will think you ordered it from a bakery.
Why You’ll Love This Red velvet cake
This red velvet cake isn’t just any dessert—it’s a slice of happiness on a plate. Here’s why you’re going to fall head over heels for it:
- Incredibly Moist and Fluffy: The combination of buttermilk and oil keeps the cake super tender and light.
- Rich Flavor with a Cocoa Kick: The subtle chocolate undertone from the cocoa powder gives it a sophisticated depth.
- Perfect Balance of Sweet and Tangy: The cream cheese frosting adds a luscious tanginess that complements the sweetness of the cake.
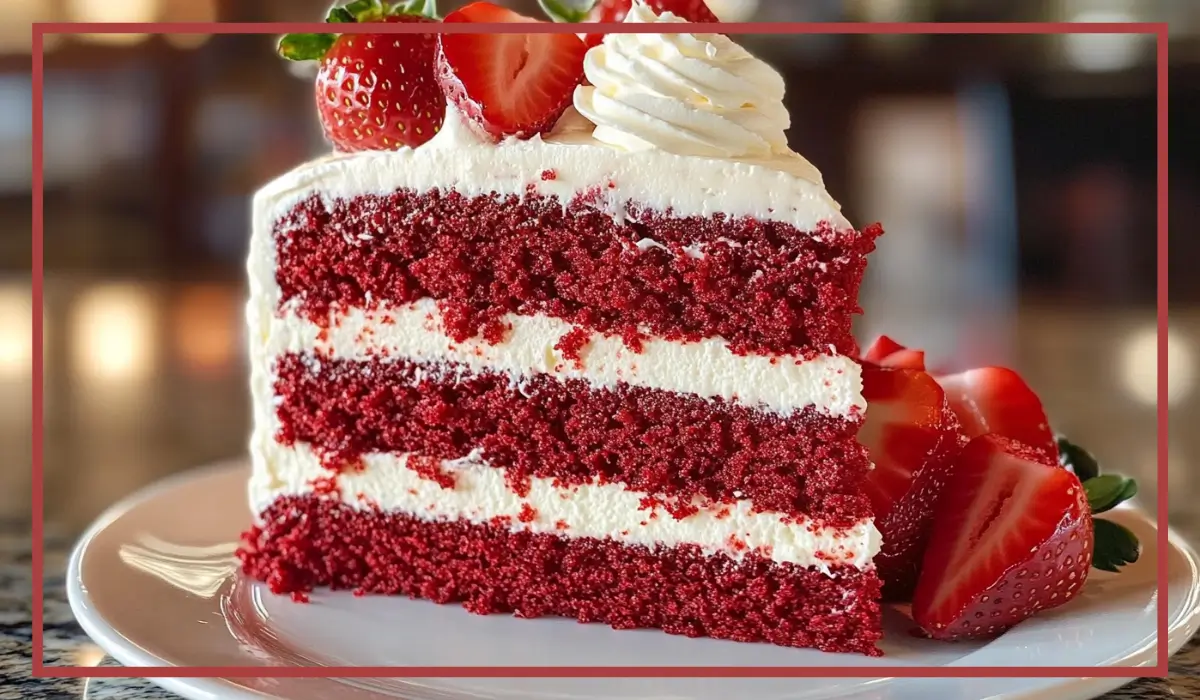
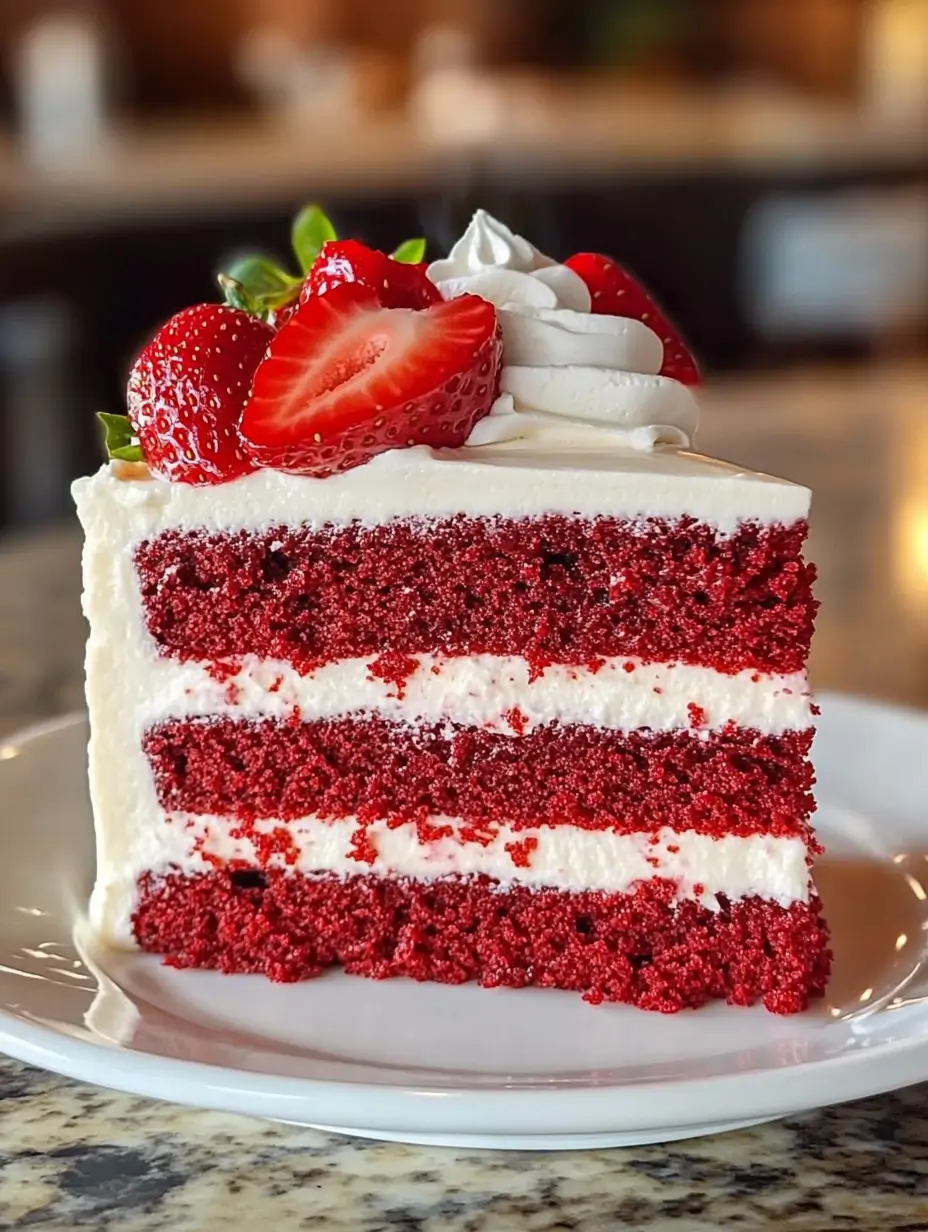
- Eye-Catching Presentation: The vibrant red hue with fresh strawberries makes it a true centerpiece dessert.
- Easy to Make: No fancy tools or techniques needed—just straightforward steps for a stunning result.
Whether you’re a seasoned baker or just starting out, this red velvet cake will boost your baking confidence. And let’s be honest, who can resist a slice (or two) of velvety goodness topped with creamy frosting and juicy strawberries?
Preparation Time and Servings
Total Time: 1 hour 5 minutes
Preparation Time: 30 minutes
Cooking Time: 35 minutes
Servings: 12 slices
Nutritional Information (per slice):
- Calories: 600
- Fat: 35g
- Carbohydrates: 70g
- Protein: 6g
Ingredients You’ll Need to make the Best Red velvet cake recipe
For the cake:
- 2½ cups all-purpose flour (adds structure to the cake)
- 1½ cups granulated sugar (for sweetness)
- 1 teaspoon baking soda (helps the cake rise beautifully)
- 1 teaspoon cocoa powder (for that hint of chocolate)
- 1 teaspoon salt (balances the sweetness)
- 2 large eggs, at room temperature (for richness and structure)
- 1½ cups vegetable oil (keeps the cake moist)
- 1 cup buttermilk, at room temperature (adds tanginess and softness)
- 2 tablespoons red food coloring (for that signature vibrant hue)
- 1 teaspoon vanilla extract (enhances the flavor)
- 1 teaspoon white vinegar (reacts with baking soda for a fluffy texture)
For the frosting and decoration:
- 1 cup unsalted butter, softened (for creaminess)
- 4 cups powdered sugar (sweet and silky texture)
- 16 ounces cream cheese, softened (the star of the frosting)
- 1 teaspoon vanilla extract (for extra flavor)
- 1 cup fresh strawberries, chopped (adds a burst of freshness and color)
Step-by-Step Instructions
1. Preheat the Oven
First, preheat your oven to 350°F (175°C). Grease and lightly flour two 9-inch round cake pans. This ensures your cakes won’t stick to the pans and will slide out effortlessly.
2. Mix the Dry Ingredients
In a large mixing bowl, whisk together the flour, sugar, baking soda, cocoa powder, and salt. Whisking helps evenly distribute the ingredients and removes any lumps, making for a smooth batter later.
3. Combine the Wet Ingredients
In another bowl, lightly beat the eggs. Then, stir in the vegetable oil, buttermilk, red food coloring, vanilla extract, and white vinegar. Mix until everything is well combined. The mixture will look vibrant and silky, which is exactly what you want!
4. Create the Batter
Gradually add the dry ingredients to the wet ingredients, about a third at a time. Mix gently after each addition until the batter is smooth and lump-free. Be careful not to overmix; you want the batter to stay light and airy.
5. Bake the Cakes
Divide the batter evenly between the prepared cake pans. Smooth the tops with a spatula and pop them into the preheated oven. Bake for 30-35 minutes, or until a toothpick inserted in the center comes out clean. Once done, let the cakes cool in the pans for 10 minutes before transferring them to a wire rack to cool completely.
6. Prepare the Frosting
While the cakes are cooling, it’s time to whip up that heavenly cream cheese frosting. In a large bowl, beat the softened butter and cream cheese together until creamy and smooth. Gradually add the powdered sugar, one cup at a time, beating well after each addition. Finally, mix in the vanilla extract. The frosting should be thick yet spreadable, perfect for layering and decorating.
7. Assemble the Cake
Now for the fun part—assembling your masterpiece! Place one cake layer on a serving plate or cake stand. Spread a generous layer of cream cheese frosting on top, then sprinkle half of the chopped strawberries evenly over the frosting. Carefully place the second cake layer on top, and frost the top and sides of the cake with the remaining frosting. Finish by decorating with the rest of the strawberries.
How to Serve the Red velvet cake
Here are a few ways to enjoy your red velvet cake:
- Serve it as is with a cup of tea or coffee for a delightful treat.
- Pair with a scoop of vanilla ice cream for an indulgent dessert.
- For a fancy touch, drizzle with a bit of chocolate ganache or a sprinkle of powdered sugar.
Additional Tips for a Success Red velvet cake recipe
- Use Room Temperature Ingredients: Room temperature eggs and buttermilk blend more easily into the batter, creating a smoother cake.
- Measure Accurately: Baking is a science, so ensure your measurements are precise, especially for the flour and sugar.
- Don’t Skip the Vinegar: It may seem odd, but vinegar reacts with the baking soda, helping the cake rise and giving it that tender texture.
- Cool Cakes Completely: Frosting a warm cake can cause the frosting to melt and slide off, so patience is key.
- Apply a Crumb Coat: For a neat finish, spread a thin layer of frosting over the cake to catch any crumbs, then chill for 30 minutes before applying the final layer of frosting.
Recipe Variations
- Gluten-Free Version: Use a gluten-free all-purpose flour blend.
- Dairy-Free Option: Substitute buttermilk with almond or soy milk mixed with a teaspoon of vinegar, and use dairy-free cream cheese and butter.
- Chocolate Lover’s Twist: Add a handful of mini chocolate chips to the batter.
- Berry Blast: Swap the strawberries for raspberries or blueberries for a fresh twist.
- Layered Elegance: Make three thinner cake layers instead of two for a more dramatic presentation.
Freezing and Storage
If you have leftovers (though that’s unlikely!), store the cake in an airtight container in the fridge for up to 3 days. To freeze, wrap individual slices tightly in plastic wrap, then place them in a freezer-safe container. When you’re ready to enjoy, thaw the slices in the fridge overnight and bring them to room temperature before serving.
Special Equipment
- Two 9-inch Round Cake Pans: Essential for baking the layers.
- Wire Rack: For cooling the cakes evenly.
- Offset Spatula: Makes spreading the frosting much easier.
- Stand or Hand Mixer: Helps achieve a smooth batter and frosting.
Frequently Asked Questions about this Red velvet cake recipe
Can I make this cake ahead of time?
Absolutely! You can bake the cake layers a day in advance and store them wrapped in plastic wrap. Frost just before serving.
What if I don’t have buttermilk?
No problem—make a buttermilk substitute by mixing 1 tablespoon of vinegar or lemon juice with 1 cup of milk. Let it sit for 5 minutes before using.
Can I skip the food coloring?
Yes, the cake will still taste amazing, but it won’t have the classic red color.
Can I use a different frosting?
Sure! While cream cheese frosting is traditional, buttercream or even whipped cream frosting works well too.
How do I prevent the cake from sticking to the pans?
Grease and flour the pans thoroughly, or line the bottoms with parchment paper.
Conclusion
This red velvet cake is the ultimate crowd-pleaser, combining rich flavors, a soft crumb, and a touch of elegance. Whether you’re making it for a special celebration or just to satisfy your sweet tooth, it’s guaranteed to impress. I’d love to see your version, so don’t forget to share your photos and tag me. Happy baking, friends! Let’s make every bite a memorable one.
Print
Red Velvet Cake with Cream Cheese Frosting
- Total Time: 1 hour 5 minutes
- Yield: 12 slices 1x
- Diet: Vegetarian
Description
This red velvet cake is moist, fluffy, and rich in flavor with a subtle cocoa undertone. Topped with tangy cream cheese frosting and fresh strawberries, it’s perfect for birthdays, celebrations, or simply treating yourself to a delightful dessert.
Ingredients
- 2½ cups all-purpose flour
- 1½ cups granulated sugar
- 1 teaspoon baking soda
- 1 teaspoon cocoa powder
- 1 teaspoon salt
- 2 large eggs, at room temperature
- 1½ cups vegetable oil
- 1 cup buttermilk, at room temperature
- 2 tablespoons red food coloring
- 1 teaspoon vanilla extract
- 1 teaspoon white vinegar
- 1 cup unsalted butter, softened
- 4 cups powdered sugar
- 16 ounces cream cheese, softened
- 1 teaspoon vanilla extract
- 1 cup fresh strawberries, chopped
Instructions
- Preheat oven to 350°F (175°C). Grease and flour two 9-inch round cake pans.
- Whisk together flour, sugar, baking soda, cocoa powder, and salt in a large bowl.
- In another bowl, beat eggs. Add oil, buttermilk, red food coloring, vanilla, and vinegar. Mix well.
- Gradually combine dry ingredients with wet ingredients, mixing until smooth.
- Divide batter between pans and bake for 30-35 minutes. Cool on a wire rack.
- Beat softened butter and cream cheese for frosting. Gradually add powdered sugar and vanilla.
- Assemble by layering frosting and strawberries between the cakes. Frost the top and sides, then garnish with remaining strawberries.
Notes
- Use room temperature ingredients for best results.
- Apply a crumb coat before final frosting for a polished finish.
- Prep Time: 30 minutes
- Cook Time: 35 minutes
- Category: Dessert
- Method: Baking
- Cuisine: American