
Red velvet desserts have an irresistible charm. Maybe it’s the stunning red hue, the light cocoa flavor, or the smooth, moist texture that feels like a bite of heaven. Pair that classic red velvet cake with the creamy richness of cheesecake and the crunch of an Oreo crust, and you’ve got a dessert worthy of applause. This Velvety Red Velvet Oreo Delight is all about indulgence, perfect for special occasions or simply when you need a sweet treat to brighten your day.
I still remember the first time I made a red velvet cheesecake. It was meant to impress a group of friends at a dinner party, but I forgot the red food coloring. Imagine their surprise when I served a mystery cake that tasted divine but looked… ordinary. Lesson learned: double-check every ingredient! Since then, this cheesecake has become my go-to dessert for celebrations, with each layer offering a deliciously unique experience.
This recipe is easier than it looks, and the result is nothing short of spectacular. Whether you’re baking for a crowd or treating yourself, this cake is the ultimate combination of textures and flavors.
Why You’ll Love This Recipe
This isn’t just a dessert—it’s an experience. Here’s why you’ll fall in love with this Velvety Red Velvet Oreo Delight:
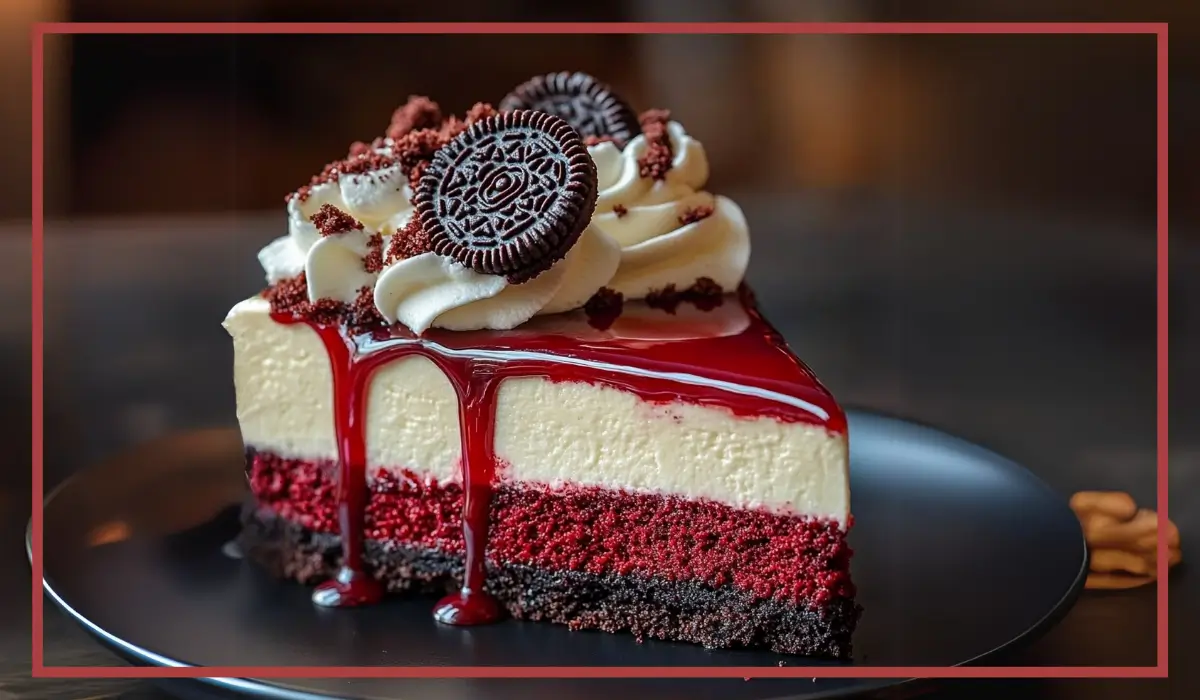
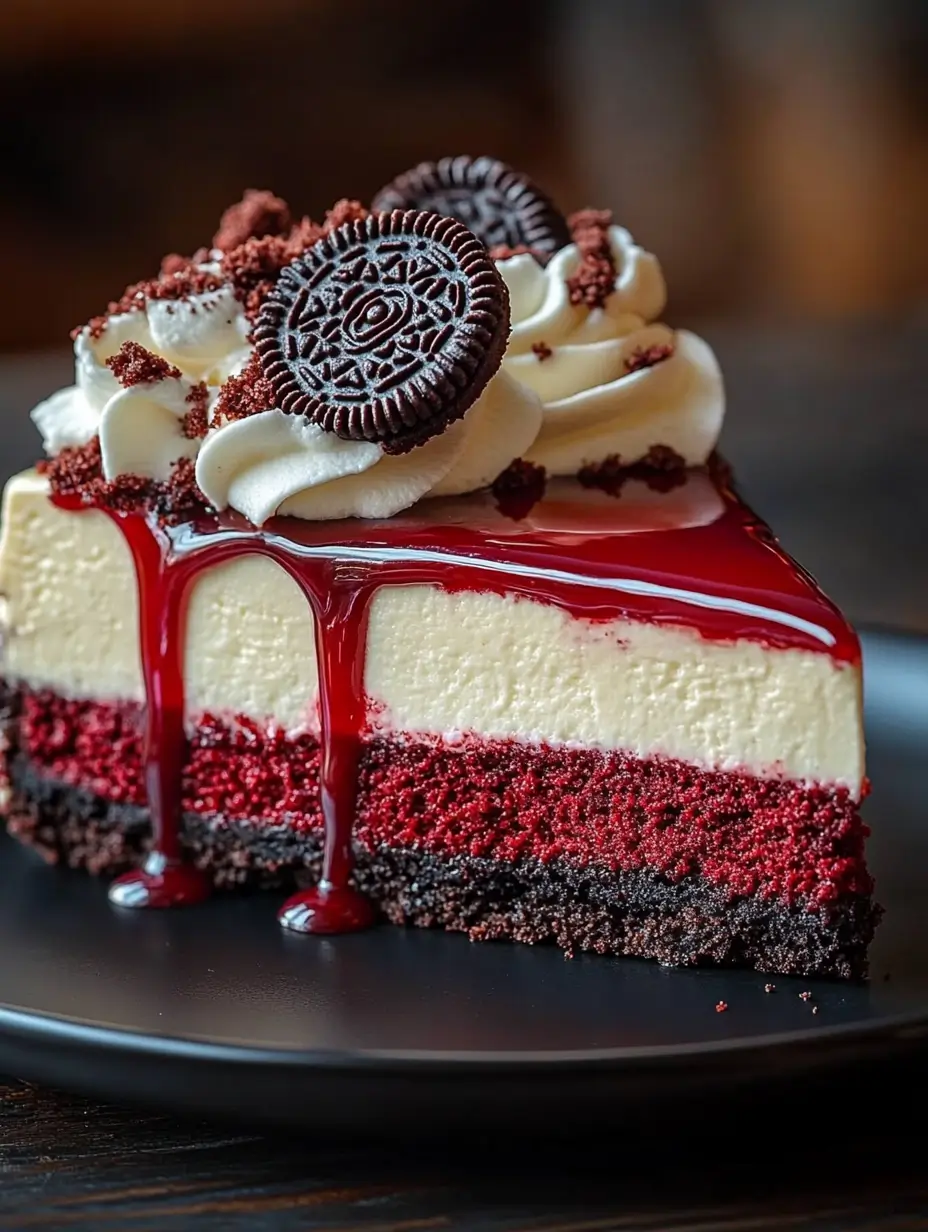
- Triple Layers of Bliss: The crunchy Oreo crust, moist red velvet cake, and creamy cheesecake layer come together to create the perfect dessert.
- Visually Stunning: The vibrant red velvet cake paired with the pale cheesecake and Oreo accents makes it a centerpiece for any dessert table.
- Bursting with Flavor: A subtle cocoa flavor in the cake, tangy cheesecake, and the classic chocolatey crunch of Oreos create an irresistible combination.
- Crowd-Pleaser: It’s kid-friendly, party-approved, and guaranteed to make jaws drop when you bring it out.
- Make-Ahead Friendly: This dessert tastes even better the next day, making it ideal for prepping ahead of time.
Now, let’s dive into the step-by-step process to create this showstopping dessert.
Preparation Time and Servings
- Prep Time: 45 minutes
- Cook Time: 1 hour 40 minutes
- Cooling & Chilling Time: At least 5 hours
- Total Time: 7 hours 25 minutes
- Servings: 12 slices
Ingredients
the Oreo Crust
- 2 cups Oreo cookie crumbs (about 20-25 cookies)
- ¼ cup unsalted butter, melted
the Red Velvet Cake Layer
- 1¼ cups all-purpose flour
- ¼ cup unsweetened cocoa powder
- ½ teaspoon baking powder
- ¼ teaspoon baking soda
- ¼ teaspoon salt
- ½ cup unsalted butter, softened
- 1 cup granulated sugar
- 2 large eggs
- ½ cup buttermilk
- 1 teaspoon vanilla extract
- 1 teaspoon white vinegar
- 1 tablespoon red food coloring
the Cheesecake Layer
- 16 oz (2 packages) cream cheese, softened
- ½ cup granulated sugar
- 2 large eggs
- 1 teaspoon vanilla extract
- ¼ cup sour cream
For the Toppings (Optional)
- Whipped cream
- Additional Oreo cookies, halved or crushed
- Reserved red velvet cake crumbs
Step-by-Step Instructions
Preparing the Oreo Crust
- Preheat your oven to 325°F (163°C).
- Crush Oreos into fine crumbs using a food processor or a zip-top bag and rolling pin.
- In a medium bowl, combine Oreo crumbs with melted butter. Mix until the crumbs are evenly coated and resemble wet sand.
- Press the mixture firmly into the bottom of a greased 9-inch springform pan to form an even crust. Use the back of a spoon to pack it tightly.
- Bake the crust for 8-10 minutes. Remove from the oven and set aside to cool completely.
Making the Red Velvet Cake Layer
- Increase the oven temperature to 350°F (175°C).
- In a large mixing bowl, sift together the flour, cocoa powder, baking powder, baking soda, and salt. This ensures a smooth, lump-free batter.
- In another bowl, cream the softened butter and sugar until light and fluffy using a hand or stand mixer.
- Add the eggs one at a time, beating well after each addition. This step creates a silky batter.
- Mix in the buttermilk, vanilla extract, vinegar, and red food coloring. Stir until fully combined.
- Gradually fold the dry ingredients into the wet ingredients. Mix gently until no streaks of flour remain. Avoid overmixing.
- Pour the batter into a greased and parchment-lined 9-inch cake pan.
- Bake for 25-30 minutes or until a toothpick inserted into the center comes out clean.
- Allow the cake to cool completely. If the top is domed, level it using a serrated knife and reserve the crumbs for garnish.
Preparing the Cheesecake Layer
- Reduce the oven temperature back to 325°F (163°C).
- In a large bowl, beat the softened cream cheese until smooth and creamy. This prevents lumps in your cheesecake.
- Add the granulated sugar and continue mixing until well combined.
- Beat in the eggs one at a time, ensuring each is fully incorporated before adding the next.
- Mix in the vanilla extract and sour cream. Stir until the batter is smooth and luscious.
Assembling the Cheesecake
- Place the cooled red velvet cake layer on top of the Oreo crust in the springform pan.
- Pour the cheesecake batter over the red velvet cake, spreading it evenly with a spatula.
- Wrap the bottom of the springform pan with aluminum foil to prevent water from seeping in.
- Place the springform pan in a larger roasting pan and fill the roasting pan with hot water until it reaches halfway up the sides of the springform pan.
Baking the Cheesecake
- Bake the cheesecake in the water bath for 60-70 minutes. The center should be set but slightly jiggly.
- Turn off the oven, crack the door open, and let the cheesecake cool in the oven for 1 hour. This step minimizes cracking.
- Remove the cheesecake from the water bath and refrigerate for at least 4 hours, preferably overnight, to fully set.
Garnishing and Serving
- Run a knife around the edge of the pan to loosen the cheesecake. Remove the springform sides carefully.
- Top the cheesecake with whipped cream, Oreo halves or crumbs, and reserved red velvet cake crumbs for a stunning finish.
- Slice and serve this decadent dessert to your eager guests!
Additional Tips for Success
- Crust Tip: Press the Oreo crust firmly to ensure it holds together when sliced.
- Level the Cake: Leveling the red velvet cake ensures an even surface for the cheesecake layer.
- Room Temperature Ingredients: Bring all ingredients to room temperature for a smoother batter and even baking.
- Water Bath: The water bath is crucial for a creamy, crack-free cheesecake. Don’t skip it!
- Chilling Time: Allow ample time for chilling to ensure the layers are set and easy to slice.
Recipe Variations
- Gluten-Free Option: Use gluten-free Oreos and a gluten-free flour blend for the cake layer.
- Spicy Twist: Add a pinch of cinnamon or cayenne to the red velvet batter for a subtle kick.
- Mini Cheesecakes: Make individual portions using cupcake tins and liners. Adjust the baking time accordingly.
- Extra Chocolate: Stir chocolate chips into the cheesecake batter or drizzle melted chocolate on top.
How to Serve
- Pair slices with a scoop of vanilla ice cream or fresh berries for a refreshing contrast.
- Serve as part of a dessert platter alongside chocolate-dipped strawberries and macarons.
Storing and Freezing
- Refrigeration: Store leftovers in an airtight container in the fridge for up to 3 days.
- Freezing: Wrap individual slices tightly in plastic wrap and foil. Freeze for up to 3 months. Thaw in the fridge overnight before serving.
Frequently Asked Questions
- Can I use store-bought Oreo crumbs? Absolutely! They save time and work just as well.
- What if I don’t have buttermilk? Mix ½ cup of milk with 1 teaspoon of vinegar or lemon juice and let it sit for 5 minutes.
- Can I skip the water bath? You can, but the cheesecake might crack. The water bath ensures even baking.
Conclusion
This Velvety Red Velvet Oreo Delight is everything you’d want in a dessert—rich, creamy, indulgent, and stunning to look at. Whether you’re a seasoned baker or a novice, this recipe is straightforward and rewarding. Gather your ingredients, put on your apron, and create a dessert masterpiece that will leave everyone asking for seconds. Don’t forget to share your creations; I’d love to see how yours turns out!
Print
Velvety Red Velvet Oreo Delight
- Total Time: 7 hours 25 minutes
- Yield: 12 slices
- Diet: Vegetarian
Description
A luscious layered dessert featuring a chocolatey Oreo crust, velvety red velvet cake, and a tangy, creamy cheesecake layer, all topped with whipped cream and Oreo accents. Perfect for parties and celebrations!
Ingredients
- Oreo Crust: Oreo crumbs, melted butter
- Red Velvet Cake: Flour, cocoa powder, baking powder, baking soda, salt, butter, sugar, eggs, buttermilk, vanilla extract, vinegar, red food coloring
- Cheesecake Layer: Cream cheese, sugar, eggs, vanilla extract, sour cream
- Toppings: Whipped cream, crushed Oreos, red velvet cake crumbs
Instructions
- Prepare and bake the Oreo crust at 325°F.
- Bake the red velvet cake layer at 350°F. Cool and level.
- Prepare cheesecake batter and pour over the cake.
- Bake the assembled layers in a water bath for a creamy finish.
- Chill for at least 4 hours, garnish, and serve!
Notes
For best results, chill overnight and garnish just before serving. Use room temperature ingredients for a smooth batter.
- Prep Time: 45 minutes
- Cook Time: 1 hour 40 minutes
- Category: Desserts
- Method: Baking
- Cuisine: American