
Garlic Bread Rolls are a delightful starter that can turn any mealtime into a gastronomic celebration. These rolls are perfectly fluffy, extremely flavorful, and filled with the incredible taste of garlic and herbs. When baked to golden perfection, they’re a comforting option that pairs beautifully with soups, salads, or pasta dishes. Seriously, who can resist the aroma of freshly baked garlic bread rolls wafting through the kitchen? They not only tantalize your taste buds, but also evoke a sense of warmth and nostalgia that everyone loves.
If you’ve ever ordered garlic bread at a restaurant, you know it’s hard to get enough of that buttery goodness. The best part? You can recreate this amazing experience in your own kitchen with this ultimate recipe for Garlic Bread Rolls. Whether you’re hosting a lively dinner party or simply looking for a cozy meal at home, these rolls will impress your family and friends. In this guide, we will explore why this recipe is a must-have, delve into the prep and cooking times, and provide you with a detailed ingredient list and straightforward instructions to create these little bites of heaven.
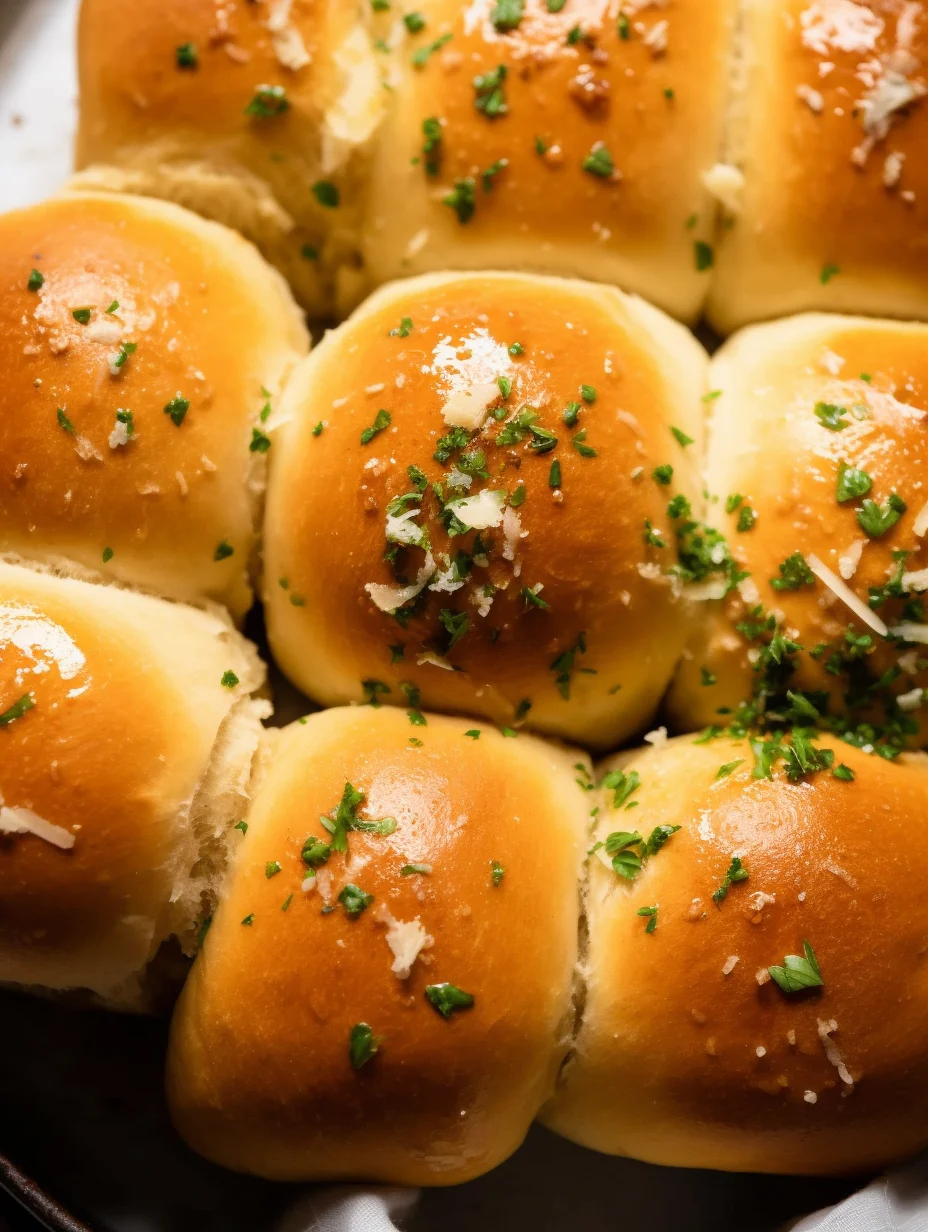
The allure of Garlic Bread Rolls lies in their versatility. They can serve as a side dish, an appetizer, or even a stand-alone snack. Imagine pulling these rolls out of the oven, their golden crust sparkling with garlic butter and fresh herbs, inviting everyone to dig in. Each bite is a crunchy, buttery explosion that melts in your mouth. Let’s get started on this incredible journey to make Garlic Bread Rolls that will wow your guests!
Why You’ll Love This Recipe
These Garlic Bread Rolls are more than just a side dish—they’re a culinary experience that will leave everyone asking for more. Here are several reasons why you’ll adore this recipe:
1. Easy to Make: Even if you are a beginner, the step-by-step instructions will guide you to success.
2. Flavorful: The combination of garlic, butter, and herbs creates a symphony of tastes that will elevate any meal.
3. Perfect Texture: With a crispy exterior and a soft, fluffy interior, each roll is satisfying to eat.
4. Customizable: Feel free to mix in your favorite spices or adjust the amount of garlic according to your taste.
5. Crowd-Pleaser: They make a fantastic addition to family dinners, parties, or any gathering, and they’re perfect for sharing.
6. Make-Ahead Option: You can prepare the dough in advance and bake them fresh right before serving—they’re best warm!
These factors make Garlic Bread Rolls a delightful addition to your cooking repertoire. You’ll understand why these rolls are a favorite for many once you take a bite, bursting with garlicky goodness that warms the soul.
Preparation and Cooking Time
Getting ready to make your Garlic Bread Rolls is easy and won’t take much of your time. Here’s a breakdown of the overall timeframe you can expect:
– Preparation Time: 30 minutes
– Cooking Time: 20-25 minutes
– Rising Time: 1 hour (includes resting time for the dough)
In total, you should set aside about 1 hour and 55 minutes to complete your Garlic Bread Rolls from start to finish. Once you’re done, you’ll be left with delightful rolls that are sure to receive rave reviews!
Ingredients
– 3 ½ to 4 cups all-purpose flour
– 1 packet (2 ¼ teaspoons) active dry yeast
– 1 cup warm water (about 110°F/43°C)
– ¼ cup sugar
– ½ teaspoon salt
– ¼ cup unsalted butter, melted
– 4 cloves garlic, minced
– 2 tablespoons fresh parsley or 1 tablespoon dried parsley (optional)
– 1 teaspoon dried oregano (optional)
– ½ cup grated Parmesan cheese (optional)
– Additional melted butter, for brushing on top
Step-by-Step Instructions
Follow these simple steps to create your Garlic Bread Rolls:
1. Activate the Yeast: In a small bowl, combine warm water, yeast, and sugar. Let it sit for 5-10 minutes until it becomes frothy.
2. Mix Dry Ingredients: In a large mixing bowl, whisk together 3 ½ cups of flour and salt.
3. Combine Ingredients: Once the yeast is activated, add it along with melted butter, minced garlic, and optional parsley to the dry ingredients.
4. Knead the Dough: Gradually mix the wet ingredients into the flour, adding more flour if necessary to form a soft dough. Knead the dough for about 5-7 minutes until smooth.
5. First Rise: Place the dough in a greased bowl, cover it with a clean kitchen towel, and let it rise in a warm area for about 1 hour or until doubled in size.
6. Shape the Rolls: After the dough has risen, punch it down and divide it into 12 equal pieces. Shape each piece into a ball and place them on a greased baking tray.
7. Second Rise: Cover the shaped rolls with a towel and let them rise for an additional 30 minutes.
8. Preheat Oven: While the rolls are rising, preheat your oven to 375°F (190°C).
9. Bake the Rolls: Brush the tops of the rolls with melted butter. Bake in the preheated oven for 20-25 minutes or until golden brown.
10. Add Final Touches: Remove from oven and immediately brush with additional melted butter and sprinkle with grated Parmesan, if using.
By following these steps, you’ll create incredibly delicious Garlic Bread Rolls that are sure to impress!
How to Serve
Presenting your Garlic Bread Rolls can enhance the eating experience. Here are some serving suggestions:
1. Presentation: Serve the rolls warm right out of the oven. Place them on a nice serving plate or basket lined with a cloth napkin.
2. Dipping Sauce: Offer a side of marinara sauce or garlic herb butter for dipping.
3. Garnish: Add fresh parsley on top for a touch of color and freshness.
4. Accompaniments: Serve alongside pasta dishes, soups, or salads to create a complete meal.
5. Perfect Pairings: These rolls pair beautifully with red wine or a light beer, enhancing the flavors even more.
By considering these tips, you’ll create an inviting atmosphere that encourages everyone to dig into your amazing Garlic Bread Rolls. Enjoy every moment of this culinary delight!
Additional Tips
– Use Fresh Garlic: Freshly minced garlic will give your Garlic Bread Rolls an incredible flavor compared to pre-minced or powdered options.
– Experiment with Herbs: Don’t be afraid to try different herbs like thyme or rosemary to customize the rolls to your liking.
– Serve Immediately: For the best texture, serve the rolls right out of the oven. However, they still taste great when warmed up later.
– Add Cheese: For an extra cheesy experience, place a small cube of mozzarella cheese inside each roll before baking.
– Perfect Bread Flour: If you want to enhance the texture, consider using bread flour instead of all-purpose flour.
Recipe Variation
Feel free to adapt this recipe to suit your tastes. Here are some variations you can try:
1. Cheesy Garlic Bread Rolls: Incorporate shredded cheese into the dough or place cheese inside each roll prior to baking for a gooey center.
2. Herbed Garlic Bread Rolls: Add a blend of different dried herbs like basil, thyme, or even a pinch of chili flakes to spice things up.
3. Whole Wheat Variation: Substitute half of the all-purpose flour with whole wheat flour for a denser and healthier option.
4. Garlic Herb Butter Glaze: For a flavorful twist, melt butter mixed with garlic and fresh herbs to brush on top before serving.
5. Bacon Bits: Include cooked and crumbled bacon in the dough for a savory addition.
Freezing and Storage
– Storage: Store leftover Garlic Bread Rolls in an airtight container at room temperature for up to 2 days. For longer freshness, keep them in the refrigerator.
– Freezing: To freeze, wrap each roll tightly in plastic wrap and then place them in a freezer bag. They can be frozen for up to 3 months.
– Reheating: When you’re ready to enjoy the frozen rolls, let them thaw overnight in the fridge and reheat in a preheated oven at 350°F (175°C) for about 10-15 minutes to regain their freshness.
Special Equipment
You will need a few tools to make the process easier:
– Mixing Bowls: A large bowl for mixing the dough and a small bowl for activating the yeast.
– Baking Tray: A greased baking tray to shape and bake your Garlic Bread Rolls.
– Whisk: For blending the dry ingredients together.
– Dough Scraper: Useful for dividing the dough into evenly sized pieces.
– Kitchen Towel: To cover the dough during the rising process, maintaining warmth and moisture.
Frequently Asked Questions
Can I use instant yeast instead of active dry yeast?
Yes, instant yeast can be used. There’s no need to activate it beforehand; just mix it with the dry ingredients.
Can I make Garlic Bread Rolls gluten-free?
Absolutely! Substitute the all-purpose flour with a gluten-free flour blend designed for baking.
What should I do if my dough isn’t rising?
Ensure that your yeast is active. If the water was too hot or cold, it may have affected the yeast. It should be warm, about 110°F (43°C).
Can I make these rolls ahead of time?
Yes! You can prepare the dough up to the second rise, then cover it and refrigerate overnight. Bring them to room temperature before baking.
How do I store leftover rolls?
Keep them covered in a container at room temperature for a couple of days, or freeze for later use.
Conclusion
Garlic Bread Rolls are an irresistible addition to any meal, whether it’s a cozy family dinner or a festive gathering. Their soft, fluffy texture combined with rich, garlicky flavor makes them a hit among adults and kids alike. With the given steps, variations, and tips, you can enjoy these delightful rolls straight from your oven. Perfecting this recipe will undoubtedly become one of your favorites in the kitchen, showcasing your culinary skills and delighting your loved ones.

Garlic Bread Rolls: An Amazing Ultimate Recipe for Everyone
- Total Time: 56 minute
Ingredients
– 3 ½ to 4 cups all-purpose flour
– 1 packet (2 ¼ teaspoons) active dry yeast
– 1 cup warm water (about 110°F/43°C)
– ¼ cup sugar
– ½ teaspoon salt
– ¼ cup unsalted butter, melted
– 4 cloves garlic, minced
– 2 tablespoons fresh parsley or 1 tablespoon dried parsley (optional)
– 1 teaspoon dried oregano (optional)
– ½ cup grated Parmesan cheese (optional)
– Additional melted butter, for brushing on top
Instructions
Follow these simple steps to create your Garlic Bread Rolls:
1. Activate the Yeast: In a small bowl, combine warm water, yeast, and sugar. Let it sit for 5-10 minutes until it becomes frothy.
2. Mix Dry Ingredients: In a large mixing bowl, whisk together 3 ½ cups of flour and salt.
3. Combine Ingredients: Once the yeast is activated, add it along with melted butter, minced garlic, and optional parsley to the dry ingredients.
4. Knead the Dough: Gradually mix the wet ingredients into the flour, adding more flour if necessary to form a soft dough. Knead the dough for about 5-7 minutes until smooth.
5. First Rise: Place the dough in a greased bowl, cover it with a clean kitchen towel, and let it rise in a warm area for about 1 hour or until doubled in size.
6. Shape the Rolls: After the dough has risen, punch it down and divide it into 12 equal pieces. Shape each piece into a ball and place them on a greased baking tray.
7. Second Rise: Cover the shaped rolls with a towel and let them rise for an additional 30 minutes.
8. Preheat Oven: While the rolls are rising, preheat your oven to 375°F (190°C).
9. Bake the Rolls: Brush the tops of the rolls with melted butter. Bake in the preheated oven for 20-25 minutes or until golden brown.
10. Add Final Touches: Remove from oven and immediately brush with additional melted butter and sprinkle with grated Parmesan, if using.
By following these steps, you’ll create incredibly delicious Garlic Bread Rolls that are sure to impress!
- Prep Time: 15 minutes
- Cook Time: 20-25 minutes
Nutrition
- Serving Size: 12 rolls
- Calories: Approximately 180 kcal per roll
- Fat: 6g
- Protein: 4g