
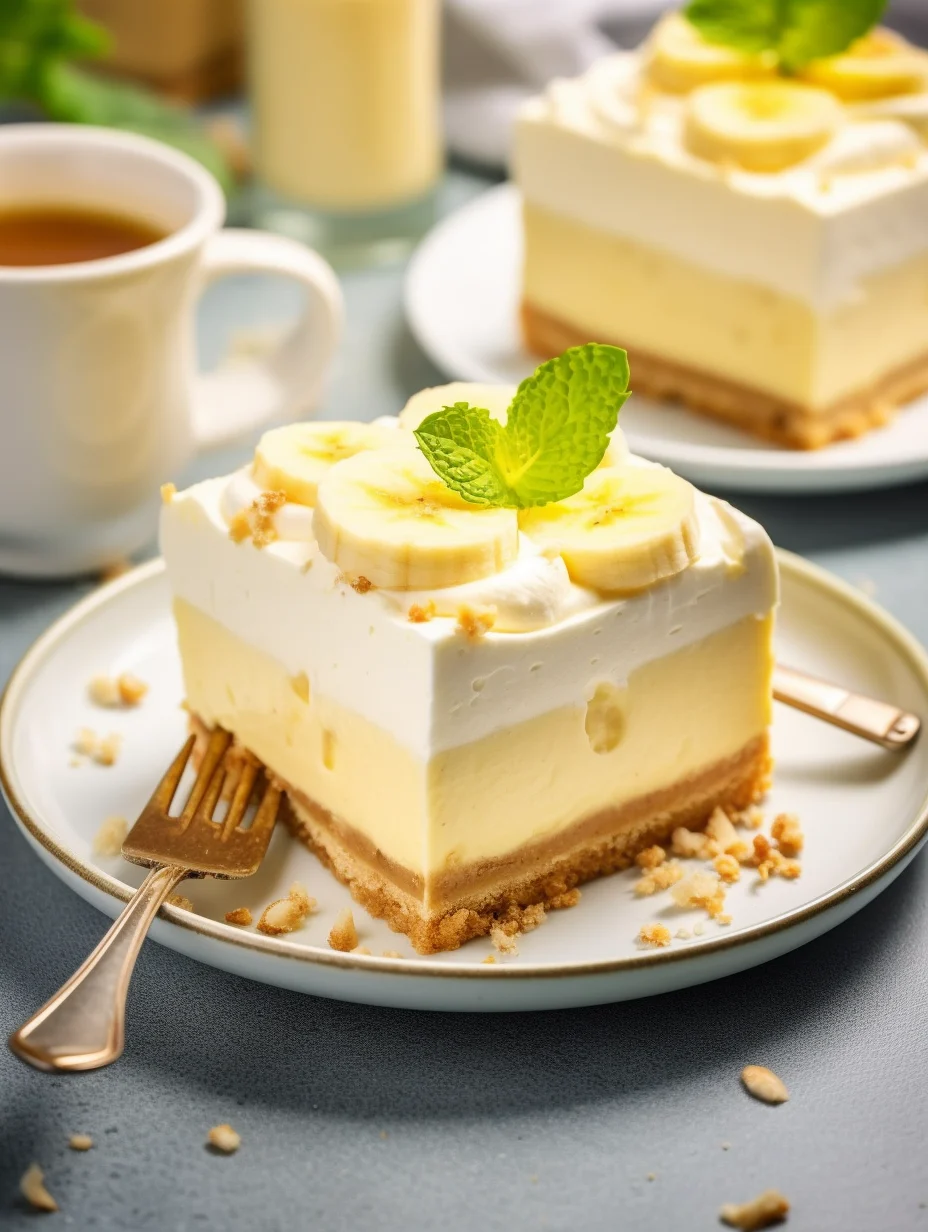
Banana Pudding Bars are the perfect dessert for those who love the classic combination of bananas, creamy pudding, and a delightful cookie crust. This treat celebrates the beloved flavors of banana pudding in an easy-to-serve bar form. With creamy, luscious layers and a crunchy base, it’s a dessert that everyone will enjoy. Whether you’re hosting a summer picnic or simply satisfying your sweet tooth, these bars are guaranteed to be a hit.
Imagine indulging in a refreshing, chilled banana dessert topped with whipped cream and sliced bananas. Each bite is a symphony of flavors and textures, combining the sweetness of ripe bananas, the smoothness of vanilla pudding, and the crunch from the crust. What’s more, these bars are incredibly simple to make, allowing you to bring the joy of homemade treats into your kitchen without spending hours baking.
If you’re curious about how to create this delightful dessert, you’ve come to the right place. In this article, we will delve into why Banana Pudding Bars are an amazing treat to prepare, the essential ingredients required, and step-by-step instructions for making them. You will discover tips for serving them to impress your family and friends. Get ready to learn how to make this ultimate dessert that will leave everyone asking for seconds!
Why You’ll Love This Recipe
Banana Pudding Bars offer a variety of merits that make them irresistible. Here are several reasons why you’ll adore this recipe:
1. Quick and Easy: These bars require minimal effort to prepare, making them perfect for busy individuals and families.
2. Family-Friendly: Kids love banana pudding, and this bar version is an easy way to serve a crowd.
3. Versatile Serving Options: You can enjoy these bars as a dessert, snack, or even a sweet breakfast treat.
4. Refreshing Treat: Perfect for warm weather, they can be served chilled for a refreshing dessert.
5. Delicious Flavors: The combination of banana, vanilla pudding, and the crunchy crust creates a wonderful flavor profile.
6. Appealing Presentation: The layers and toppings of these bars make for an appealing visual treat that impresses.
7. Flexible Ingredients: You can easily customize the recipe to suit dietary needs or personal preferences.
With all these delightful qualities, it’s no wonder that Banana Pudding Bars are a beloved choice among dessert lovers.
Preparation and Cooking Time
Preparing the incredible Banana Pudding Bars will take approximately 2 hours. Here’s a breakdown of the time required:
– Preparation Time: 30 minutes
– Chilling Time: 1 hour
– Total Time: 1 hour and 30 minutes
These times may fluctuate slightly based on your kitchen skills and equipment, but this gives a solid estimate of what to expect.
Ingredients
– 1 ½ cups crushed vanilla wafers
– ½ cup unsalted butter, melted
– 2 cups instant vanilla pudding mix
– 4 cups whole milk
– 1 ½ cups ripe bananas, sliced
– 1 cup whipped cream, for topping
– Additional sliced bananas for garnish
– ¼ cup chocolate shavings or graham cracker crumbs for garnish (optional)
Step-by-Step Instructions
Creating Banana Pudding Bars is straightforward if you follow these steps carefully:
1. Preheat Oven: Preheat your oven to 350°F (175°C).
2. Prepare the Crust: In a bowl, combine crushed vanilla wafers with melted butter. Mix until well combined.
3. Press Crust in Pan: Firmly press the mixture into the bottom of a greased 9×13 inch baking dish to form an even layer.
4. Bake the Crust: Place the crust in the preheated oven and bake for 10-12 minutes until lightly golden. Remove and let cool.
5. Make the Pudding: In another large mixing bowl, combine instant vanilla pudding and milk. Whisk until the mixture thickens, which should take about 2 minutes.
6. Layer Bananas: Once the pudding is ready, layer the sliced bananas evenly over the cooled crust.
7. Spread Pudding: Pour the vanilla pudding mixture over the banana layer, spreading it evenly.
8. Chill: Cover the dish with plastic wrap and refrigerate for about 1 hour to let the pudding set.
9. Add Whipped Cream: After chilling, remove the bars from the fridge and spread the whipped cream over the pudding layer.
10. Garnish: Top with additional sliced bananas and chocolate shavings or graham cracker crumbs if desired.
11. Slice and Serve: Cut into squares and enjoy!
These steps guide you through creating fantastic Banana Pudding Bars effortlessly.
How to Serve
When it’s time to serve those delightful Banana Pudding Bars, consider these tips:
1. Chilled Presentation: Keep the bars in the refrigerator until you’re ready to serve to maintain a refreshing chill.
2. Use a Sharp Knife: For clean cuts, use a sharp knife to slice the bars into squares.
3. Plate Artfully: Serve them on dessert plates, and consider adding a dollop of additional whipped cream on top for styling.
4. Add Garnishes: A sprinkle of chocolate shavings or a few fresh sliced bananas can elevate the visual appeal.
5. Beverage Pairings: Serve with iced tea, lemonade, or coffee for a delightful combination.
6. Offer Seconds: Bananas and pudding are always appealing, so don’t be surprised if guests request seconds!
Banana Pudding Bars are not only a treat for the taste buds but also a feast for the eyes. Their delightful presentation and refreshing taste make them an ideal dessert for any occasion!
Additional Tips
– Use Ripe Bananas: Ensure your bananas are perfectly ripe for the best flavor and sweetness in your Banana Pudding Bars.
– Chill Overnight: For the best texture and flavor, consider chilling the bars overnight before serving.
– Experiment with Flavors: Add a drizzle of caramel or chocolate sauce over the whipped cream for an extra indulgence.
– Avoid Browning: To prevent banana slices from browning, sprinkle a little lemon juice over them before layering.
– Serve with Fresh Fruit: Pair the bars with extra sliced bananas or other fresh fruits for a refreshing contrast.
Recipe Variation
Feel free to get creative with these Banana Pudding Bars! Here are some variations to try:
1. Nutty Delight: Add chopped walnuts or pecans in the crust for an added crunch and flavor.
2. Dairy-Free Version: Substitute the milk with almond milk or coconut milk and use dairy-free whipped topping.
3. Chocolate Banana Pudding Bars: Use chocolate pudding instead of vanilla for a chocolatey twist.
4. Layered Delight: Alternate layers of banana pudding and chocolate pudding for a delightful two-flavor combination.
5. Key Lime Twist: Mix in some zest from key limes in the pudding for a citrusy fresh flavor contrast.
Freezing and Storage
– Storage: Store Banana Pudding Bars in an airtight container in the refrigerator for up to 4 days.
– Freezing: These bars can be frozen for up to 2 months. Cut into squares, wrap securely, and place in a freezer-safe container.
– Thawing: To enjoy frozen bars, let them thaw in the refrigerator overnight before serving.
Special Equipment
To prepare your Banana Pudding Bars, you may find the following tools useful:
– 9×13 inch baking pan
– Mixing bowls
– Whisk for mixing pudding
– Plastic wrap for chilling
– Sharp knife for slicing
Frequently Asked Questions
Can I use regular pudding instead of instant?
Yes, but the recipe will require additional cooking time as you would need to prepare the pudding first.
How can I tell when the bars are sufficiently chilled?
The pudding should be set and firm to the touch. Generally, 1 hour in the refrigerator is enough, but overnight is ideal.
Can I make these bars gluten-free?
Yes, substitute crushed gluten-free cookies or crackers for the vanilla wafers in the crust.
What can I use instead of whipped cream?
You can use a dairy-free whipped topping or make your own whipped coconut cream for a lighter alternative.
Do these bars need to be refrigerated?
Yes, to maintain their freshness and prevent spoilage, it’s best to refrigerate the bars.
Conclusion
Banana Pudding Bars are an ideal dessert for various occasions, offering a delightful blend of flavor, texture, and a visual appeal that is sure to impress. Their creamy layers and easy preparation make them a must-try treat for anyone who loves bananas and pudding. Perfectly chilled and topped with whipped cream, these bars can bring joy to family gatherings, summertime picnics, or even a cozy night in. Don’t hesitate; gather your ingredients and create your very own Banana Pudding Bars today!

Banana Pudding Bars: The Amazing Ultimate Recipe for Everyone
- Total Time: 42 minutes
Ingredients
– 1 ½ cups crushed vanilla wafers
– ½ cup unsalted butter, melted
– 2 cups instant vanilla pudding mix
– 4 cups whole milk
– 1 ½ cups ripe bananas, sliced
– 1 cup whipped cream, for topping
– Additional sliced bananas for garnish
– ¼ cup chocolate shavings or graham cracker crumbs for garnish (optional)
Instructions
Creating Banana Pudding Bars is straightforward if you follow these steps carefully:
1. Preheat Oven: Preheat your oven to 350°F (175°C).
2. Prepare the Crust: In a bowl, combine crushed vanilla wafers with melted butter. Mix until well combined.
3. Press Crust in Pan: Firmly press the mixture into the bottom of a greased 9×13 inch baking dish to form an even layer.
4. Bake the Crust: Place the crust in the preheated oven and bake for 10-12 minutes until lightly golden. Remove and let cool.
5. Make the Pudding: In another large mixing bowl, combine instant vanilla pudding and milk. Whisk until the mixture thickens, which should take about 2 minutes.
6. Layer Bananas: Once the pudding is ready, layer the sliced bananas evenly over the cooled crust.
7. Spread Pudding: Pour the vanilla pudding mixture over the banana layer, spreading it evenly.
8. Chill: Cover the dish with plastic wrap and refrigerate for about 1 hour to let the pudding set.
9. Add Whipped Cream: After chilling, remove the bars from the fridge and spread the whipped cream over the pudding layer.
10. Garnish: Top with additional sliced bananas and chocolate shavings or graham cracker crumbs if desired.
11. Slice and Serve: Cut into squares and enjoy!
These steps guide you through creating fantastic Banana Pudding Bars effortlessly.
- Prep Time: 30 minutes
- Cook Time: 12 minutes
Nutrition
- Serving Size: 12 bars
- Calories: 230 kcal
- Fat: 10g
- Protein: 3g