
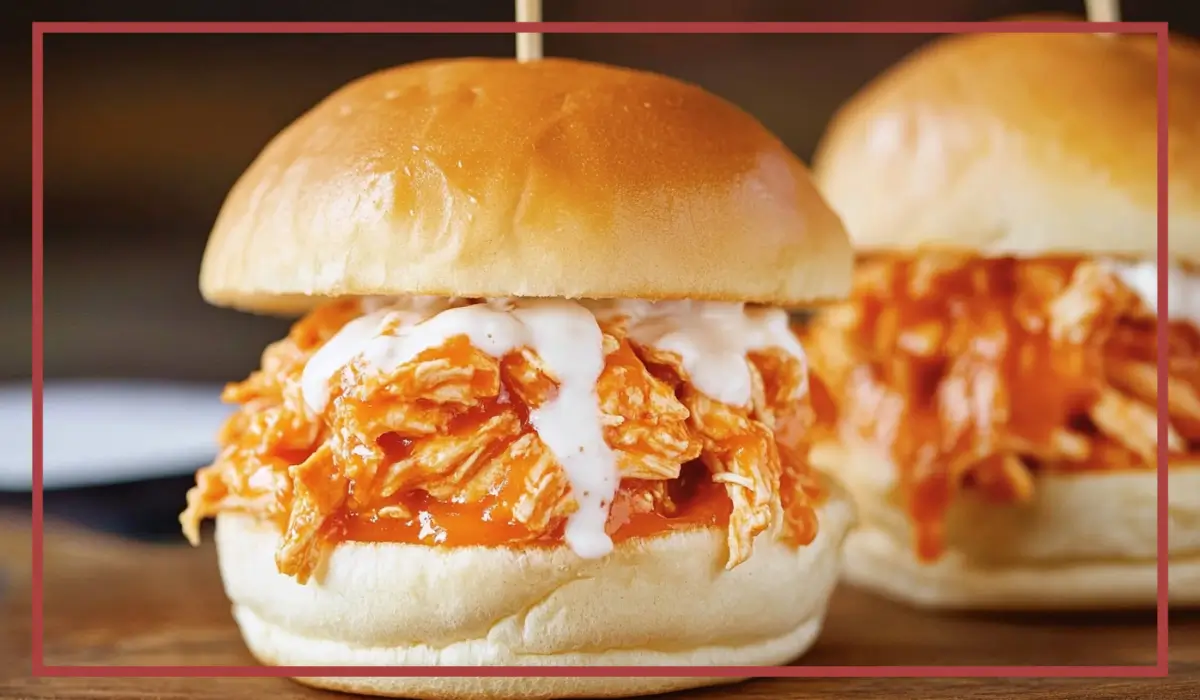
There’s something deeply comforting about a warm, cheesy, saucy slider. And not just any slider—Cheesy Baked Chicken Sliders, with crispy chicken, gooey mozzarella, savory pasta sauce, and soft, golden rolls. It’s the kind of food that brings people together, whether it’s a quiet weeknight at home or a game-day gathering with friends. These sliders are small in size but big in flavor, and once you take a bite, you’ll see why they’ve become a staple in so many homes—including mine.
I still remember the first time I made this recipe. It was a chilly Friday evening, and I needed something that felt a little indulgent but not too fussy. I had some leftover chicken tenders in the fridge, a bag of slider buns in the pantry, and a jar of pasta sauce just waiting to be used. In under 30 minutes, dinner was served—and let me tell you, everyone around the table was reaching for seconds before I could even sit down.
What makes these sliders so special is their versatility. They’re hearty enough to serve as a main course but fun enough to bring to a potluck or picnic. You can prep them ahead, pop them in the oven when you’re ready, and serve them straight from the baking dish. Plus, they’re kid-friendly, freezer-friendly, and endlessly customizable. Whether you’re making dinner for two or feeding a crowd, these Chicken Parmesan Sliders are a total win.
And here’s the best part: they taste like a labor of love, but they’re incredibly easy to pull off. The recipe uses fully cooked chicken tenders, store-bought or homemade, which means you save time without sacrificing flavor. Everything else—cheese, sauce, rolls—is easy to find, and the whole dish comes together with minimal effort. In fact, it’s so simple, you might just find yourself making it on repeat.
So if you’re in the mood for something cozy, cheesy, and guaranteed to satisfy, you’re in the right place. Let’s dig into why this recipe needs to be the next thing you make.
Why You’ll Love This Cheesy Baked Chicken Sliders Recipe
There are plenty of reasons to love these Chicken Parmesan Sliders, but here are a few that really stand out.
First and foremost, this recipe is incredibly easy. Thanks to the use of pre-cooked chicken tenders, there’s no need to worry about raw meat or complex prep. You simply layer the ingredients, brush on a flavorful garlic butter topping, and let the oven do the work. It’s the kind of meal you can throw together on a busy evening and still feel like a hero when dinner is served.
Secondly, these sliders are crowd-pleasers. Kids love the cheesy, saucy goodness. Adults appreciate the crispy chicken and Italian-inspired flavors. Whether you’re serving these at a family dinner, a potluck, or a holiday party, you can bet they’ll disappear quickly. They’re just the right size for picking up and devouring in a few bites, and no one will stop at just one.
Another reason this recipe shines is the flavor combination. You’ve got crispy chicken that holds its own even after being baked, rich tomato sauce that brings just the right amount of acidity and sweetness, and the melty mix of mozzarella and Parmesan that ties everything together. All of that goodness gets nestled into soft, slightly sweet rolls that toast up beautifully in the oven. Add a buttery garlic and Italian herb topping, and you’ve got layers of flavor in every bite.
These sliders are also endlessly customizable. Want to add a little spice? Toss in some red pepper flakes or use a spicy marinara. Prefer extra cheese? Go ahead and load it up. You can even use different types of buns or swap out the chicken for a vegetarian alternative. It’s a forgiving recipe that you can make your own.
Finally, they’re perfect for make-ahead and meal-prep situations. You can assemble everything in advance, refrigerate the tray, and bake them when you’re ready to serve. They also reheat well, making them a great leftover option.
All in all, these Chicken Parmesan Sliders are the kind of recipe that checks every box: easy, delicious, family-friendly, versatile, and just plain fun to eat.
Health Benefits of these Cheesy Baked Chicken Sliders
While comfort food like this doesn’t usually scream “healthy,” these sliders do have some nutritional benefits worth mentioning—especially if you tweak the recipe to suit your dietary needs.
Let’s start with the protein. Using fully cooked chicken tenders means you’re getting a good dose of lean protein with every slider. Protein helps build muscle, supports immune function, and keeps you full longer, which is especially important if you’re serving this meal to hungry kids or active adults.
Then there’s the tomato sauce. A quality marinara or pasta sauce—like Rao’s or any low-sugar version—adds more than just flavor. Tomatoes are rich in lycopene, a powerful antioxidant known for reducing inflammation and potentially lowering the risk of heart disease and certain cancers. Cooked tomatoes, like those in pasta sauce, make that lycopene even more available to your body.
Cheese, while often seen as indulgent, offers important nutrients too. Mozzarella is a good source of calcium and protein, while Parmesan adds a punch of flavor without needing a lot. Both contribute to bone health and provide essential fats that help with vitamin absorption.
You can also make simple swaps to increase the health benefits. For example, using whole grain or low-carb slider buns can add fiber, which supports digestion and helps maintain stable blood sugar levels. Choosing baked chicken tenders over fried reduces added fat, and using part-skim cheese or vegan alternatives can lower the saturated fat content.
The garlic and Italian seasoning in the butter topping do more than just taste good. Garlic contains compounds like allicin, which have been linked to lower blood pressure and cholesterol. Herbs like oregano and basil bring antioxidants to the table, supporting overall immune health.
So while these sliders may be classified as comfort food, they don’t have to be a guilty pleasure. With a few mindful choices and quality ingredients, they can be both delicious and nourishing.
Preparation Time, Servings, and Nutritional Information
One of the most convenient aspects of this Cheesy Baked Chicken Sliders recipe is how quickly it comes together. You don’t need hours in the kitchen or any complicated steps. Everything is straightforward, and you’ll have piping hot sliders ready in no time.
Preparation Time:
- Prep Time: 10 minutes
- Cook Time: 20 minutes
- Total Time: 30 minutes
Servings:
This recipe makes 12 sliders, which typically serves 4 to 6 people depending on appetite and what sides you serve with them. For a party, plan on two sliders per person if there are other dishes available.
Nutritional Information (per slider, approximate):
- Calories: 320
- Protein: 18g
- Carbohydrates: 22g
- Fat: 16g
- Saturated Fat: 7g
- Cholesterol: 45mg
- Sodium: 550mg
- Fiber: 1g
- Sugar: 4g
These numbers can vary depending on the brands of chicken, sauce, and cheese you use. For a lighter version, you can opt for baked chicken tenders, use low-fat cheese, or swap in a lower-sugar marinara.
Ingredients List of these Cheesy Baked Chicken Sliders
Here’s everything you’ll need to make these Chicken Parmesan Sliders. All of the ingredients are easy to find and pantry-friendly, which makes this dish a go-to for last-minute meals.
Slider Rolls:
- 12 Hawaiian sweet rolls (or any small slider buns)
- Why it matters: Hawaiian rolls add a hint of sweetness that balances beautifully with the savory chicken and sauce.
Chicken Tenders:
- 1 pound fully cooked breaded chicken tenders (homemade or store-bought)
- Why it matters: Using pre-cooked chicken saves time while still giving you that crispy texture. Look for tenders that are well-seasoned and crispy.
Pasta Sauce:
- 2 cups pasta sauce (such as marinara, Rao’s recommended for a rich, well-balanced flavor)
- Why it matters: This is the heart of your sliders, so choose a sauce that tastes great straight from the jar. You can use a homemade version too.
Cheese Blend:
- 2 cups shredded mozzarella cheese
- ½ cup shredded Parmesan cheese
- Why it matters: Mozzarella provides meltiness, while Parmesan brings that salty, nutty depth. Mixing the two gives you the best of both worlds.
Garlic Butter Topping:
- 3 tablespoons butter, melted
- 1 teaspoon garlic powder (or more to taste)
- 1 teaspoon Italian seasoning
- Why it matters: This flavorful topping adds a buttery crunch to the top of the rolls and brings everything together with classic Italian herbs.
Optional Additions:
- Fresh basil or parsley for garnish
- Crushed red pepper flakes for a little heat
- A sprinkle of onion powder or smoked paprika in the butter mixture for added depth
Now that your ingredients are ready, let’s get cooking.
Step-By-Step Cooking Instructions of these Cheesy Baked Chicken Sliders
Step 1: Preheat Your Oven
Preheat your oven to 350°F (175°C). You’ll want it hot and ready so that the sliders bake evenly and the cheese melts perfectly. Meanwhile, lightly grease a 9×13-inch baking dish or a sheet pan to prevent sticking.
Step 2: Prepare the Bottom Rolls
Carefully slice the slider rolls in half horizontally, keeping the tops and bottoms connected as much as possible. Place the bottom halves into your greased baking dish in a single layer. You want them snug but not squished.
Step 3: Add the Chicken
Place one fully cooked chicken tender on each roll bottom. If the tenders are long, you can cut them in half or trim them to fit neatly on each bun. The goal is for each roll to have an even layer of chicken so that every bite is balanced.
Step 4: Spoon on the Sauce
Using a spoon, add about 2 tablespoons of pasta sauce over each chicken piece. Spread it slightly to make sure the top of the chicken is covered. This will keep the chicken moist and add that classic Italian tomato flavor to every bite.
Step 5: Layer on the Cheese
In a small bowl, mix together the shredded mozzarella and Parmesan cheeses. Sprinkle the mixture evenly over the sauced chicken. Be generous—it’s the cheese that brings this whole dish together with a gooey, irresistible finish.
Step 6: Add the Top Buns
Carefully place the top halves of the slider buns over the cheese layer. Press down gently to help everything stick together, but don’t squash them too much.
Step 7: Make the Garlic Butter
In a small bowl, combine the melted butter with garlic powder and Italian seasoning. Stir until the seasonings are well distributed. This simple mixture adds a huge punch of flavor to the rolls.
Step 8: Brush the Tops
Using a pastry brush or spoon, generously coat the tops of the buns with the garlic butter mixture. Make sure each one gets a nice even layer. This is what will give you that golden, slightly crisp top with a hint of garlic and herbs.
Step 9: Cover and Bake
Cover the dish with foil and bake in your preheated oven for 10 minutes. This helps the cheese melt and the sliders heat evenly without drying out the tops.
Step 10: Uncover and Finish Baking
After 10 minutes, remove the foil and continue baking for another 10 minutes. This allows the tops to toast and the cheese to bubble. Keep an eye on them during the last few minutes to ensure the tops don’t burn.
Step 11: Serve and Enjoy
Once baked, remove from the oven and let the sliders sit for about 3 to 5 minutes. This helps everything settle and makes cutting easier. Use a sharp knife or spatula to separate the sliders, then serve warm.

How to Serve these Cheesy Baked Chicken Sliders
Once your Cheesy Baked Chicken Sliders are hot and fresh from the oven, the real fun begins—serving them up. These little sandwiches are incredibly versatile when it comes to presentation and pairing, so you can tailor the experience to suit anything from a casual lunch to a dinner party with friends.
To begin with, serve these sliders immediately while the cheese is still melted and gooey. The best way to separate them is by using a serrated knife or a sharp spatula to cut through the rolls and lift them gently out of the pan. They’ll hold together nicely, and you’ll get that irresistible cheese pull when you lift the first one out.
If you’re serving these for dinner, consider plating two or three sliders per person alongside a hearty side dish. They’re filling, but not overwhelming, so they work perfectly as a main course.
For more casual occasions, such as potlucks or game day parties, you can leave the sliders right in the baking dish. Set them out buffet-style so guests can help themselves. These travel well, too, so if you’re taking them to someone else’s home, just cover the baking dish in foil and reheat briefly before serving.
If you want to dress them up a bit, sprinkle the tops with fresh chopped parsley or basil right before serving. A small bowl of extra marinara sauce on the side makes a great dipping option, especially for those who love a little extra sauciness.
And finally, don’t underestimate how much kids will love these. Serve them with carrot sticks, a few apple slices, or even some oven fries for a kid-friendly meal that still satisfies grown-up taste buds.
Pairing Suggestions for these Cheesy Baked Chicken Sliders
These Cheesy Baked Chicken Sliders are fantastic on their own, but they shine even brighter when served with thoughtfully chosen sides and beverages. Whether you’re hosting a family dinner or a casual gathering, here are some pairing ideas that complement the flavors and balance the meal.
Side Dishes
Crispy Oven Fries
Golden and crunchy on the outside, soft on the inside—oven fries make a satisfying, no-fuss side dish. You can season them with garlic, rosemary, or even Parmesan to echo the flavors of the sliders.
Simple Garden Salad
A fresh, crisp salad adds contrast and balance to this cheesy, saucy main. Toss together mixed greens, cucumbers, cherry tomatoes, and a light vinaigrette to keep things fresh and simple.
Roasted Vegetables
Roasted zucchini, bell peppers, and eggplant bring an earthy, slightly sweet component to the meal. Drizzle with olive oil, sprinkle with Italian herbs, and roast until tender.
Garlic Green Beans
Quickly sautéed green beans with garlic and a touch of lemon make for a bright, fresh side dish that doesn’t overpower the sliders.
Dipping Sauces
Extra Marinara
Warm up a small bowl of the same pasta sauce used in the sliders and serve it on the side for dipping. This adds an extra punch of flavor and is especially helpful if you’re serving guests who love extra sauce.
Spicy Garlic Mayo
Mix mayonnaise with a dash of hot sauce and a pinch of garlic powder. This creamy dip brings a little heat and makes each bite extra indulgent.
Beverage Options
Sparkling Water with Lemon or Lime
If you’re keeping it casual, sparkling water with a citrus twist is refreshing and light enough to balance the richness of the dish.
Iced Herbal Tea
Try a fruity or minty iced tea to cleanse the palate between bites. It’s a great non-caffeinated option that pairs well with savory dishes.
Mocktails for Special Occasions
A sparkling cranberry and orange mocktail or a chilled apple spritzer can elevate the meal without requiring any alcohol.
With these pairings, your sliders go from simple to sensational. Whether you’re aiming for comfort food or a complete dinner spread, these combinations ensure everyone leaves the table happy.
Storage, Freezing & Reheating Instructions
One of the most convenient things about these sliders is how well they store and reheat. Whether you’re prepping ahead for a busy weeknight or saving leftovers for another day, these tips will help you enjoy your sliders fresh every time.
Storing Leftovers
If you have leftovers, let the sliders cool completely before storing them. Once they’ve cooled, place them in an airtight container. You can store them either together in a single container or wrap individual sliders in foil or parchment for easy grab-and-go lunches.
- Refrigerator Storage: Store in the fridge for up to 3 days. Keep them in a sealed container to prevent them from drying out or absorbing other fridge odors.
- Tip: If the rolls seem soggy from the sauce, reheat them uncovered to help crisp them up again.
Freezing Instructions
These sliders freeze surprisingly well. Freezing is a great option if you want to prepare a batch ahead of time or save some for future meals.
- Freeze Before Baking: After assembling the sliders but before baking, wrap the entire dish tightly in plastic wrap and then foil. Freeze for up to 3 months. When ready to bake, thaw overnight in the fridge, then follow the baking instructions.
- Freeze After Baking: Let baked sliders cool completely, then wrap them individually or place in a freezer-safe container. Freeze for up to 2 months.
Reheating Instructions
To reheat, you can choose between the oven and microwave depending on your time and preference.
- Oven: Preheat oven to 350°F (175°C). Place sliders on a baking sheet and cover loosely with foil to prevent them from drying out. Bake for 10–15 minutes or until heated through. For a crisp top, remove the foil in the last 5 minutes.
- Microwave: Place a slider on a microwave-safe plate and heat on high for 45–60 seconds. This method is faster but may soften the rolls more than baking would.
With these steps, your sliders will taste almost as good as the day you made them—perhaps even better after the flavors have had more time to meld.
Common Mistakes to Avoid
Even though this recipe is easy and forgiving, there are a few common pitfalls that can affect your final result. Here’s what to watch out for so you can enjoy perfect sliders every time.
Using Wet Chicken
If your chicken tenders are overly greasy or wet (especially after being stored in the fridge), they can make the buns soggy. Pat them dry with a paper towel before layering them onto the rolls.
Skipping the Butter Topping
Don’t skip or skimp on the garlic butter topping—it’s essential for that golden, flavorful crust on top of the sliders. It adds depth and prevents the rolls from drying out in the oven.
Overloading the Sauce
It’s tempting to go heavy on the marinara, but too much sauce can make everything soggy. Stick to about 2 tablespoons per slider for the perfect balance of moisture and structure.
Using Cold Ingredients
If your chicken or sauce is straight from the fridge, it can affect how evenly the sliders heat through. Let your ingredients come to room temperature before assembling if you have time.
Overbaking
Baking too long or at too high a temperature can dry out the chicken and over-toast the buns. Be sure to stick to the recommended baking times and keep an eye on them during the second half of baking.
By avoiding these simple mistakes, you’ll ensure your sliders turn out crispy on the edges, cheesy in the middle, and absolutely delicious every time.
Pro Tips
Want to take your Chicken Parmesan Sliders from great to unforgettable? These extra tips will help you master the recipe and impress everyone at the table.
Toast the Bottom Buns First
If you’re worried about sogginess, remove the tops and toast the bottom halves of the rolls in the oven for a few minutes before adding the chicken. This creates a barrier between the bread and the sauce.
Use Homemade Chicken Tenders
While store-bought is convenient, making your own chicken tenders gives you control over seasoning and crispiness. A simple breading of flour, eggs, and seasoned breadcrumbs baked until golden does the trick.
Add a Slice of Fresh Mozzarella
For an even creamier cheese layer, place a thin slice of fresh mozzarella on top of each piece of chicken before sprinkling the shredded cheese blend. It melts beautifully and adds a luxurious texture.
Broil for Extra Crispness
After baking, pop the dish under the broiler for 1–2 minutes to crisp up the tops even more. Just be sure to watch closely so they don’t burn.
Double the Garlic Butter
If you’re a garlic lover, feel free to double the garlic butter and brush some on the bottom buns too. This will infuse even more flavor into every layer.
These pro tips don’t require much extra effort, but they can seriously elevate your sliders. Whether you’re aiming to impress guests or just want a killer weeknight dinner, these small tweaks make a big difference.
Frequently Asked Questions (FAQs)
Can I use grilled or unbreaded chicken instead of breaded tenders?
Absolutely. While breaded chicken tenders add a crunchy texture and more of a traditional “chicken parm” vibe, grilled or unbreaded chicken breasts or thighs can work just as well. Just make sure they’re fully cooked and sliced to fit the rolls. This swap also lightens the dish a bit if you’re looking to reduce fat or carbs.
What’s the best pasta sauce to use?
Choose a thick, flavorful marinara or pasta sauce with minimal added sugar. Rao’s is a favorite for its rich taste and clean ingredients, but you can also use a homemade sauce or any brand you love. Just avoid watery sauces—they can make the sliders soggy.
Can I prepare these sliders ahead of time?
Yes, you can assemble the sliders up to 24 hours in advance. Cover the assembled (but unbaked) sliders tightly with foil and refrigerate. When you’re ready to bake, simply pop them into a preheated oven, adding a few extra minutes to account for the chill.
Do I have to use Hawaiian sweet rolls?
Not at all. Hawaiian rolls offer a sweet and fluffy contrast to the savory filling, but you can use any type of slider buns, dinner rolls, or even mini ciabatta rolls. Choose rolls that are soft enough to soak in the flavor but sturdy enough to hold everything together.
Can I make this recipe halal?
Definitely. Just make sure your chicken tenders are halal-certified, and check that your cheese doesn’t contain animal rennet. Everything else in the recipe is already halal-friendly. You can also make your own tenders using halal chicken and breadcrumbs.
How do I keep the bottom buns from getting soggy?
To keep the buns from soaking up too much moisture, you can toast the bottom halves for a few minutes before assembling. Another trick is to add a light layer of cheese under the chicken—this acts as a barrier between the sauce and bread.
Can I freeze leftovers?
Yes, and they reheat beautifully. Wrap each cooled slider individually in plastic wrap and foil, or place them in an airtight freezer-safe container. When you’re ready to eat, reheat in the oven at 350°F until warmed through. Avoid microwaving from frozen as it can turn the buns rubbery.
What can I use instead of mozzarella?
You can use provolone, Monterey Jack, or a blend of Italian cheeses if you prefer. Just make sure whatever cheese you use melts well. For extra richness, a slice of fresh mozzarella adds creaminess and depth.
How can I make this dish spicy?
To add a kick, sprinkle crushed red pepper flakes into the sauce or on top of the cheese layer before baking. You can also mix a bit of hot sauce into the garlic butter for a fiery finish.
Can I serve this as a main dish or just an appetizer?
Both! These sliders are filling enough to be a main course when served with sides, but they also make a fantastic appetizer at parties, potlucks, or game nights. Just adjust the portion size depending on the setting.
These FAQs cover most of the common questions and troubleshooting concerns, making sure you feel confident and prepared no matter how you’re serving these sliders.
Conclusion & Call to Action
There’s something about the combination of crispy chicken, tangy tomato sauce, gooey cheese, and buttery rolls that feels like a warm hug in food form. These Chicken Parmesan Sliders are everything you love about classic comfort food, wrapped up in a fun, bite-sized package that works for any occasion.
Whether you’re cooking for picky eaters, feeding a crowd, or just trying to get a satisfying dinner on the table fast, this recipe delivers. It’s simple enough for a weeknight, tasty enough for a celebration, and flexible enough to adapt to whatever you have on hand. Plus, it’s one of those dishes that makes people say, “Wow, you made this?”
I hope this recipe becomes as beloved in your kitchen as it is in mine. It’s one of those go-to meals you’ll want to make again and again—not just because it’s delicious, but because it’s so easy to pull off and so hard to mess up.
If you try this recipe, I’d love to hear how it turns out for you. Did you make any tweaks or additions? Serve it at a party or just for your family? Let me know in the comments, and don’t forget to snap a photo and tag me if you share it online. Seeing your creations always makes my day.
Now go preheat that oven, grab your favorite sauce, and get ready to make the cheesiest, crispiest, most crowd-pleasing Chicken Parmesan Sliders of your life. You’ve got this. Enjoy every bite!
Print
Cheesy Baked Chicken Sliders – Easy Family Dinner in 30 Minutes
- Total Time: 30 minutes
- Yield: 12 sliders 1x
- Diet: Halal
Description
These easy Chicken Parmesan Sliders are made with crispy chicken tenders, rich marinara, melty mozzarella, and buttery garlic rolls—perfect for dinner, parties, or game day snacking.
Ingredients
-
12 Hawaiian sweet rolls
-
1 lb fully cooked breaded chicken tenders
-
2 cups marinara or pasta sauce (Rao’s recommended)
-
2 cups shredded mozzarella cheese
-
½ cup shredded Parmesan cheese
-
3 tablespoons butter, melted
-
1 teaspoon garlic powder
-
1 teaspoon Italian seasoning
Instructions
-
Preheat oven to 350°F (175°C). Grease a baking dish.
-
Slice rolls in half and place bottom halves in the dish.
-
Place one chicken tender on each roll bottom.
-
Spoon marinara sauce over each tender.
-
Sprinkle combined mozzarella and Parmesan over the sauce.
-
Place top buns over cheese.
-
Mix melted butter with garlic powder and Italian seasoning. Brush over tops.
-
Cover with foil and bake for 10 minutes.
-
Remove foil and bake another 10 minutes until cheese is melted and tops are golden.
-
Serve hot and enjoy!
Notes
-
Use store-bought or homemade chicken tenders.
-
Add red pepper flakes for a spicy kick.
-
Fresh basil or parsley adds a flavorful garnish.
-
Easily make ahead and refrigerate before baking.
- Prep Time: 10 minutes
- Cook Time: 20 minutes
- Category: Dinner, Appetizer
- Method: Baking
- Cuisine: American