
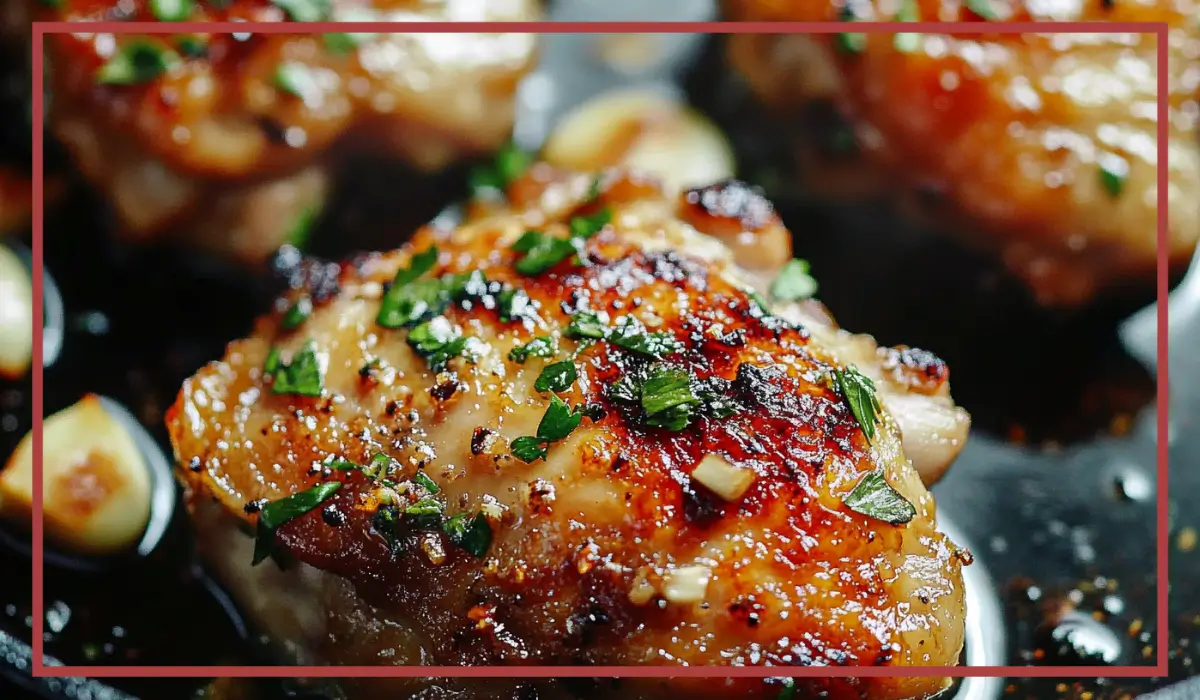
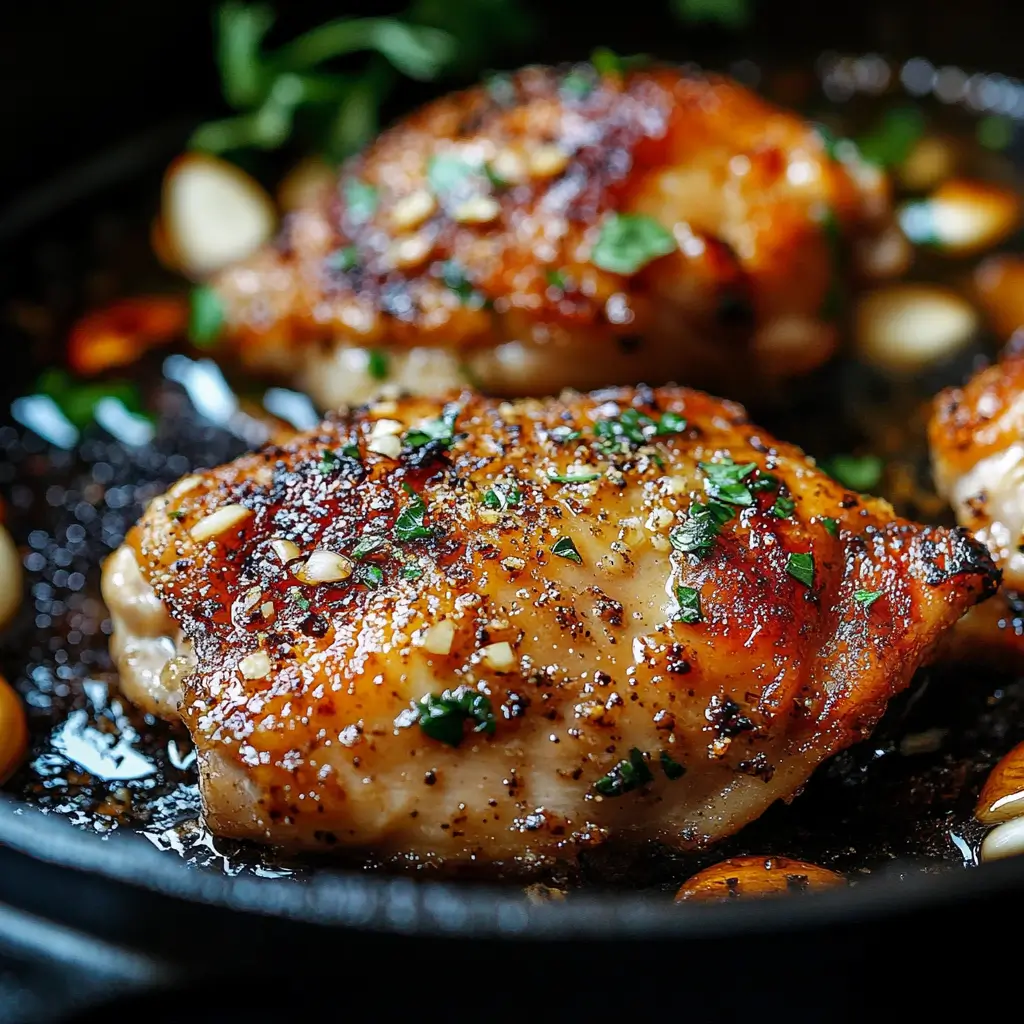
There’s something deeply comforting about a golden, sizzling chicken thigh straight from the oven—especially when it’s been bathed in a rich, garlicky butter sauce. This garlic butter chicken thighs recipe is one of those tried-and-true meals that never disappoint. It’s the kind of dish that feels rustic and homey but could just as easily steal the show at a dinner party. What makes this recipe truly shine is its simplicity. You don’t need an endless ingredient list or advanced culinary skills. If you’ve got chicken, butter, garlic, and a few pantry staples, you’re already halfway there.
The first time I made this, I wasn’t trying to impress anyone. I just wanted a cozy dinner after a long day. But as the chicken sizzled in the pan and the garlic butter filled the kitchen with its rich, nutty aroma, I knew I had stumbled on something special. That crispy skin? Absolute magic. The tender, juicy chicken that practically melts in your mouth? Even better. And the sauce—oh, that buttery, garlicky sauce—is pure comfort on a plate.
What I love most about this dish is how easily it comes together. With only one skillet, minimal prep, and a quick sear before finishing in the oven, this recipe is perfect for busy weeknights or lazy Sunday dinners. And cleanup? A breeze. Whether you’re feeding a hungry family, meal prepping for the week, or treating yourself to a solo dinner with all the cozy vibes, garlic butter chicken thighs are the answer. Keep reading, because we’re going to break it all down—step by step, tip by tip—so you can bring this irresistible dish to life in your own kitchen.
Why You’ll Love This Recipe
There are so many reasons to fall in love with garlic butter chicken thighs, but let’s start with the most obvious one—flavor. The combination of crispy skin, juicy meat, and a buttery garlic sauce creates an experience that’s both indulgent and deeply satisfying. Every bite offers a contrast of textures, from the golden, seared exterior to the tender, flavorful chicken inside.
This recipe is incredibly approachable. You don’t need fancy equipment or hard-to-find ingredients. In fact, you likely have everything on hand already. Chicken thighs are one of the most forgiving cuts of meat—you’d have to try pretty hard to mess them up. They stay moist, flavorful, and juicy even if you get distracted mid-cook. Plus, cooking them skin-side down first gives you that golden crust without deep frying or heavy breading.
Another reason this recipe stands out is its versatility. You can serve it with mashed potatoes for a hearty dinner, toss it over salad greens for a lighter lunch, or shred the leftovers into wraps and sandwiches. It’s naturally low in carbs and easy to make gluten-free if needed. And with only one skillet required, the cleanup is minimal.
Let’s also not overlook the crowd-pleasing nature of this dish. Kids, adults, picky eaters, and foodies alike all go back for seconds. It’s elegant enough for company but cozy enough for a pajama dinner at home. Once you make it, it’ll definitely become one of your go-to chicken recipes for any day of the week.
Health Benefits
Even though this recipe feels indulgent thanks to the garlic butter sauce and crispy skin, there are several health benefits that make it a solid choice for regular meals. Starting with the star ingredient—chicken thighs. While they are slightly higher in fat than chicken breasts, that extra fat provides more flavor and helps keep the meat moist during cooking. Importantly, they’re a great source of high-quality protein, which is essential for muscle repair, immune health, and staying fuller for longer.
Chicken also provides several key vitamins and minerals, including B vitamins like niacin and B6, which support energy metabolism and brain function. It’s also a good source of selenium and phosphorus—two nutrients that play important roles in thyroid health and bone strength.
Garlic, another hero in this recipe, brings more than just flavor to the table. It contains compounds like allicin, which may have antimicrobial and heart-health benefits. Regular consumption of garlic is linked to improved cholesterol levels and blood pressure management, and it’s widely considered a superfood thanks to its antioxidant properties.
Olive oil, used for searing the chicken, is a heart-healthy fat that’s rich in monounsaturated fatty acids. It supports cardiovascular health and helps reduce inflammation. Even butter, when used in moderation, provides fat-soluble vitamins like A, D, E, and K. When used mindfully, butter can be part of a balanced, wholesome meal.
This recipe doesn’t rely on heavy cream, processed ingredients, or added sugars. It’s naturally gluten-free and can easily fit into a low-carb or keto lifestyle. Paired with fiber-rich veggies or whole grains on the side, garlic butter chicken thighs offer a balanced, nutritious meal that doesn’t skimp on taste.
Preparation Time, Servings, and Nutritional Information
Before diving into the step-by-step, let’s look at how much time and effort you’ll actually need for this dish. Spoiler: it’s not much.
Preparation Time:
10 minutes for prep
35 minutes for cooking
Total Time: 45 minutes
Servings:
This recipe serves 4 to 5 people, depending on portion sizes and side dishes.
Nutritional Information (per serving):
Calories: 410
Protein: 28g
Fat: 32g
Carbohydrates: 2g
Fiber: 0g
Sugar: 0g
Sodium: 340mg
Cholesterol: 135mg
These values are approximate and can vary based on portion size and specific ingredients used. Keep in mind, you can reduce the overall fat by using less butter or removing the skin after cooking—but that crispy skin is truly part of the magic.
Ingredients List
Let’s take a closer look at what you’ll need and why each ingredient matters in this simple yet delicious dish.
5 chicken thighs, skin-on and bone-in
These are the star of the show. Skin-on thighs not only provide extra flavor, but the skin also crisps up beautifully in the pan. Bone-in cuts stay juicier and more flavorful than boneless, making them perfect for baking.
Salt and black pepper, to taste
Essential for seasoning. Salt enhances the flavor of the chicken, while black pepper adds a subtle heat and complexity.
1 tablespoon olive oil
Used to sear the chicken, giving the skin a crispy, golden finish. Olive oil also brings heart-healthy fats and a mild, savory flavor.
¼ cup unsalted butter
Butter creates the base of the garlic sauce. It gives the chicken richness and a smooth, velvety coating that makes every bite feel luxurious.
5 cloves garlic, crushed
The real flavor powerhouse. Crushed garlic quickly infuses the butter with that deep, savory aroma and taste we all know and love.
Fresh parsley, chopped (for garnish)
Adds a fresh, herbaceous touch at the end and brightens up the dish both in flavor and appearance.
That’s it. Just six core ingredients, most of which are pantry staples. No fancy marinades, no complicated sauces—just good ingredients prepared with love.
Step-By-Step Cooking Instructions
Now for the fun part. These steps walk you through exactly how to make garlic butter chicken thighs from start to finish. Don’t worry, I’ll explain everything in detail and include helpful tips along the way so you feel confident every step of the way.
Step 1: Preheat the Oven and Prep the Chicken
Start by preheating your oven to 400°F (200°C). Move the oven rack to the center position to ensure even cooking.
While the oven preheats, take your chicken thighs out of the fridge and pat them completely dry using paper towels. Removing surface moisture is key for crispy skin. Moisture on the skin can cause steaming instead of searing.
Season both sides generously with salt and black pepper. Make sure to rub the seasoning into all the little crevices to maximize flavor.
Step 2: Sear the Chicken
Place a 10-inch cast iron skillet (or any oven-safe skillet) over medium heat. Add the tablespoon of olive oil and let it heat until shimmering.
Once the oil is hot, carefully place the chicken thighs into the skillet, skin-side down. You should hear an immediate sizzle—that’s a good sign.
Let them cook without moving them for about 5 to 6 minutes, or until the skin is deeply golden and crispy. If your skillet starts to smoke, lower the heat slightly.
Flip each thigh over and let the underside cook for another 2 to 3 minutes.
If there’s a lot of rendered fat in the pan after searing, use a spoon to carefully remove some of it. You want enough to keep everything moist, but not so much that it becomes greasy.
Step 3: Add Garlic Butter
Now it’s time to introduce the butter. Add the ¼ cup of unsalted butter directly into the pan and let it melt.
Once melted, stir in the crushed garlic and sauté it for about 30 seconds. Be careful not to brown or burn the garlic—it should just become fragrant. This quick infusion turns the butter into a rich, savory sauce that coats every part of the chicken.
Tilt the skillet slightly to spoon some of the garlic butter over each thigh before transferring the pan to the oven.
Step 4: Bake to Perfection
Carefully place the skillet in the preheated oven and bake for about 30 minutes, or until the internal temperature of the chicken reaches 165°F (74°C). Use a meat thermometer inserted into the thickest part of the thigh (without touching the bone) for an accurate reading.
Halfway through baking, you can baste the chicken with the garlic butter from the bottom of the skillet. This helps deepen the flavor and keeps everything juicy.
If your skillet isn’t oven-safe, simply transfer the chicken and garlic butter into a baking dish before placing it in the oven.
Step 5: Rest and Serve
Once the chicken is fully cooked and the skin is golden brown, remove the skillet from the oven. Let the chicken rest for about 5 minutes to allow the juices to redistribute.
Spoon more of the garlic butter over the top before serving and sprinkle with chopped fresh parsley for a bright finish.
And just like that, dinner is ready. Juicy, crispy, buttery chicken thighs that smell amazing and taste even better.
How to Serve
This dish is incredibly flexible when it comes to serving options. Whether you’re putting together a weeknight dinner or planning a cozy family meal, here are a few tasty ideas to round out the plate.
Serve the chicken over a bed of fluffy mashed potatoes to soak up all that delicious garlic butter. Add a spoonful of pan sauce over the top for extra richness.
For a lighter option, pair the chicken with steamed broccoli, green beans, or a simple arugula salad tossed with lemon juice and olive oil.
You can also shred the chicken and serve it in wraps, sandwiches, or rice bowls. The garlic butter sauce adds so much flavor, you don’t even need dressing or extra condiments.
Feeling a little extra? Toast some crusty bread to dip in the buttery pan drippings. It’s an indulgent, satisfying side that complements the savory flavors of the chicken perfectly.
Next up, let’s explore what drinks, sides, and accompaniments pair beautifully with this dish in our pairing suggestions.
Pairing Suggestions
Garlic butter chicken thighs are incredibly versatile, and their rich, savory profile makes them a dream to pair with a variety of sides and beverages. Whether you want a light, wholesome accompaniment or a hearty, comforting spread, there’s a pairing option here for you.
Side Dish Pairings
Mashed Potatoes:
Creamy mashed potatoes are a natural fit for garlic butter chicken thighs. They soak up the buttery pan sauce beautifully and add a velvety texture that balances the crispiness of the chicken skin.
Roasted Vegetables:
Try roasting carrots, Brussels sprouts, or a medley of root vegetables alongside the chicken. Their caramelized edges and earthy flavors enhance the rustic nature of this dish while adding fiber and nutrients.
Steamed Rice or Brown Rice:
A simple bowl of rice makes a neutral base that complements the garlic butter sauce. You can even drizzle a bit of the sauce directly onto the rice for an easy flavor upgrade.
Garlic Bread or Dinner Rolls:
For an indulgent twist, serve with warm bread or rolls to mop up all the extra garlic butter in the pan. This makes every bite a satisfying mix of crunchy, juicy, and buttery.
Fresh Green Salad:
If you’re looking for something on the lighter side, toss together a crisp green salad with cucumbers, cherry tomatoes, and a lemon vinaigrette. The acidity helps cut through the richness of the chicken.
Beverage Pairings
Sparkling Water with Lemon:
The effervescence and citrus help cleanse the palate between bites, keeping the meal feeling fresh and light.
Mint or Cucumber-Infused Water:
Herb- and fruit-infused waters are refreshing and provide a cooling contrast to the rich, warm flavors of the chicken.
Pomegranate Juice or Apple Cider:
If you’re avoiding alcohol and still want something special, go for a glass of chilled pomegranate juice or lightly spiced apple cider. Both have a hint of sweetness and acidity that work well with the dish’s savory elements.
Chai Tea or Mint Tea:
Warm teas are an unexpected but delightful pairing—especially if you’re serving this meal in the cooler months. A mild tea can enhance the experience without overpowering the garlic butter notes.
With the right pairings, your garlic butter chicken dinner transforms into a complete, balanced, and deeply satisfying meal. And if you have leftovers (lucky you), the next section has you covered.
Storage, Freezing & Reheating Instructions
One of the best things about garlic butter chicken thighs is how well they keep. Whether you’re prepping ahead for the week or saving leftovers, this dish stores beautifully and reheats without losing its charm.
How to Store Leftovers
Allow the chicken to cool to room temperature before storing. Place it in an airtight container and refrigerate within two hours of cooking to maintain food safety.
Refrigerator Storage:
Store the chicken in the fridge for up to 3 days. Keep the leftover garlic butter sauce in the same container so you can reheat everything together.
Container Tip:
Use a glass container or a BPA-free plastic one with a tight-fitting lid to avoid spills and preserve freshness.
How to Freeze Garlic Butter Chicken Thighs
This dish freezes surprisingly well and makes a great addition to your meal prep rotation.
Freezing Instructions:
Place cooled chicken thighs on a parchment-lined baking sheet and freeze until solid (about 2 hours). Then, transfer them to a freezer-safe bag or airtight container. Label with the date and use within 2–3 months.
If you have leftover garlic butter sauce, you can freeze it separately in an ice cube tray and pop out individual cubes to reheat later.
Reheating Tips
For best results, reheat slowly to retain moisture and flavor.
Oven Reheating:
Preheat your oven to 350°F (175°C). Place chicken in a baking dish, add a splash of chicken broth or extra butter to keep it moist, and cover with foil. Heat for 20–25 minutes or until warmed through.
Stovetop Reheating:
Heat a skillet over medium-low heat, add a little butter or oil, and warm the chicken slowly, turning occasionally. Add a spoonful of leftover garlic butter or a splash of broth for moisture.
Microwave Reheating (Quick Option):
Place chicken on a microwave-safe plate. Cover with a damp paper towel and microwave in 30-second intervals until heated through. Be cautious not to overheat or the meat may dry out.
Freezing and reheating this dish is simple and effective, making it perfect for batch cooking or saving that last piece for a delicious lunch the next day.
Common Mistakes to Avoid
Even with a straightforward recipe like this, a few missteps can affect your final result. Here’s a breakdown of common mistakes and how to avoid them so your chicken turns out perfect every single time.
1. Not Drying the Chicken
One of the most crucial steps in this recipe is patting the chicken thighs dry before seasoning and searing. Skipping this step results in steamed chicken skin rather than the crisp, golden crust you’re aiming for. Use paper towels and really take your time here—moisture is the enemy of crispy skin.
2. Overcrowding the Pan
If your pan is too small for all the thighs to sit flat without touching, cook them in batches. Overcrowding the pan traps steam and prevents the chicken from searing properly, leading to soggy skin and uneven cooking.
3. Not Preheating the Pan
Always heat the skillet and oil before adding the chicken. If you place chicken into a cold pan, it won’t sear—it’ll stick, tear, and cook unevenly. Wait until the oil shimmers before adding the meat.
4. Burning the Garlic
Garlic cooks quickly—just 30 seconds in hot butter is enough. If you cook it too long or over too high heat, it will burn and turn bitter. Stir constantly and keep an eye on it once it hits the pan.
5. Skipping the Resting Period
After the chicken comes out of the oven, it needs a few minutes to rest. Cutting into it too soon causes the juices to run out, leaving the meat drier than it should be. Give it 5 to 10 minutes before serving.
By avoiding these common mistakes, you’ll enjoy perfectly cooked, juicy chicken with every attempt. But let’s take it a step further—how about a few pro-level tips to elevate your dish even more?
Pro Tips
Want to take your garlic butter chicken thighs from good to unforgettable? Here are some of my favorite pro tips that can help you get the most flavor, texture, and wow-factor out of every bite.
1. Use a Cast Iron Skillet
Cast iron holds and distributes heat evenly, giving you a better sear and more consistent cooking. If you have one, definitely use it for this recipe. It also transitions seamlessly from stovetop to oven.
2. Let Chicken Come to Room Temperature Before Cooking
Taking the chill off your chicken helps it cook more evenly. Let it sit at room temperature for about 15–20 minutes before searing. This prevents a cold center and reduces cooking time.
3. Toast Garlic Before Adding Butter (Optional Step)
If you want a deeper, nuttier garlic flavor, try gently toasting the garlic in the olive oil before adding the butter. It adds an extra layer of complexity without much effort.
4. Add a Squeeze of Lemon Juice at the End
A splash of acidity brightens up the richness of the garlic butter. Just a teaspoon of fresh lemon juice right before serving can make the flavors pop.
5. Elevate the Garnish
Fresh parsley is great, but you can also add chopped chives, dill, or even a sprinkle of crushed red pepper flakes if you like a little heat. These little touches can give the dish a new twist every time.
Whether you’re making this for the first time or the tenth, these small tweaks can make a big difference. Now, let’s answer some of the most frequently asked questions that come up with this recipe.
Frequently Asked Questions (FAQs)
Can I use boneless, skinless chicken thighs?
Yes, you can, but keep in mind that you’ll lose the crispy skin factor. Boneless thighs will cook faster, so reduce the oven time to around 20–25 minutes and always check for doneness with a thermometer (165°F is the goal).
Can I make this recipe dairy-free?
Absolutely. Swap the butter for a high-quality dairy-free alternative like vegan butter or use extra olive oil. The flavor will be slightly different but still delicious.
What if I don’t have an oven-safe skillet?
No problem at all. After searing the chicken and making the garlic butter sauce, just transfer everything to a baking dish and continue the cooking process in the oven.
How do I make this recipe spicier?
Add a pinch of chili flakes or a few dashes of hot sauce into the garlic butter before baking. You can also add diced jalapeño or smoked paprika for extra heat.
Can I double the recipe?
Yes, just make sure you have a large enough skillet or bake the chicken in batches. The key is not to overcrowd the pan during searing so that every thigh gets a proper crisp.
Can I use chicken breasts instead?
You can, but breasts dry out more easily. Be sure to monitor them closely and reduce baking time. Consider brining them beforehand or marinating them in olive oil and lemon juice to help lock in moisture.
Is this recipe kid-friendly?
Definitely. The flavors are savory and mild, making it great for kids. You can skip the parsley garnish if your little ones are picky about green things.
Can I prepare this dish ahead of time?
Yes. You can sear the chicken and make the garlic butter sauce ahead of time, then refrigerate and bake just before serving. Just be sure to bring the dish to room temperature before placing it in the oven.
What are some low-carb side dishes to serve with this?
Cauliflower mash, roasted zucchini, sautéed spinach, or a cabbage slaw would all be excellent low-carb choices that pair well with the garlic butter flavor.
How do I know when the chicken is done?
Use a meat thermometer to check the thickest part of the thigh, avoiding the bone. It should register 165°F (74°C). Also, juices should run clear when the chicken is pierced.
We’re almost done—just one more section to tie it all together.
Conclusion & Call to Action
There’s something undeniably special about a recipe that delivers so much flavor with so little fuss. Garlic butter chicken thighs are everything you want in a weeknight dinner: simple, comforting, quick to make, and absolutely delicious. It’s a meal you can count on—one that feels indulgent without requiring hours in the kitchen or expensive ingredients.
Whether you’re cooking for one or feeding a full house, this dish checks all the boxes. Crispy skin? Check. Juicy meat? Check. Rich, garlicky butter sauce that you’ll want to pour over everything? Absolutely. It’s an experience, not just a recipe, and it’s one you’ll come back to again and again.
I hope you give this one a try soon. And when you do, I’d love to hear how it turned out for you. Did you add your own twist? Serve it with your favorite side? Share your thoughts and experiences in the comments below or tag me in your kitchen creations on social media. I can’t wait to see what you cook up.
So go ahead—grab those chicken thighs, heat up your skillet, and let the magic happen. Happy cooking!
Print
Garlic Butter Chicken Thighs – Crispy, Juicy, and Easy Dinner
- Total Time: 45 minutes
- Yield: 4 servings 1x
- Diet: Halal
Description
These garlic butter chicken thighs are the perfect mix of crispy skin, juicy meat, and savory garlic butter flavor—all in one skillet and under 45 minutes!
Ingredients
-
5 chicken thighs, skin-on and bone-in
-
Salt and black pepper, to taste
-
1 tablespoon olive oil
-
¼ cup unsalted butter
-
5 cloves garlic, crushed
-
Fresh parsley, chopped (for garnish)
Instructions
-
Preheat oven to 400°F (200°C); move oven rack to center.
-
Pat chicken dry and season with salt and pepper.
-
Heat olive oil in a skillet over medium heat. Sear chicken skin-side down for 5–6 minutes until crispy. Flip and cook 2–3 more minutes.
-
Remove excess fat. Add butter and crushed garlic. Stir for 30 seconds until fragrant.
-
Transfer skillet to oven and bake for 30 minutes or until internal temperature reaches 165°F.
-
Spoon garlic butter over chicken. Rest 5 minutes. Garnish with parsley and serve.
Notes
-
Use a cast iron skillet for best results.
-
If skillet is not oven-safe, transfer to baking dish after searing.
-
Baste chicken halfway through for extra flavor.
-
Let chicken rest before cutting to keep it juicy.
- Prep Time: 10 minutes
- Cook Time: 35 minutes
- Category: Main Dish
- Method: Sear + Bake
- Cuisine: American