
There’s something undeniably nostalgic and comforting about an icebox cake. Maybe it’s the way the graham crackers soften into a cake-like texture as they chill, or how the creamy layers melt in your mouth with each cool, fruity bite. Either way, this no-bake berry graham cracker icebox cake has earned a permanent spot in my summer dessert rotation. It’s the kind of dish that brings everyone back for seconds—and sometimes thirds.
The beauty of this recipe lies in its simplicity. There’s no baking required, just a little bit of mixing, layering, and chilling. With only a few basic ingredients—most of which you probably already have in your pantry or fridge—you can create a show-stopping dessert that’s as perfect for weekend cookouts as it is for casual weeknight dinners. It’s especially ideal during those peak summer months when fresh berries are sweet and abundant, and no one wants to heat up the kitchen.
I remember the first time I made this dessert for a family gathering. It was a last-minute decision, thrown together with what I had on hand. But the way everyone reacted—asking for the recipe, sneaking back into the kitchen for extra helpings—it was clear that this one was a winner. Over time, I’ve fine-tuned it just a bit, but the heart of it remains the same: simple, creamy, and bursting with berry flavor.
What makes this dessert even more special is how adaptable it is. Don’t have blueberries? Use blackberries or raspberries instead. Prefer homemade whipped cream? Go for it. Want to make it a day in advance? Absolutely—it only gets better with time. Whether you’re an experienced home cook or someone just learning the ropes, this recipe will make you feel like a dessert pro.
So let’s dive into the details and see exactly why this no-bake berry icebox cake should be your next go-to dessert.
Why You’ll Love This No-bake berry cake Recipe
This recipe is the ultimate combination of convenience and flavor. First and foremost, it’s no-bake, which means you don’t need to worry about preheating an oven or dealing with complicated baking times. It’s ideal for warm weather or busy days when you need something sweet but simple.
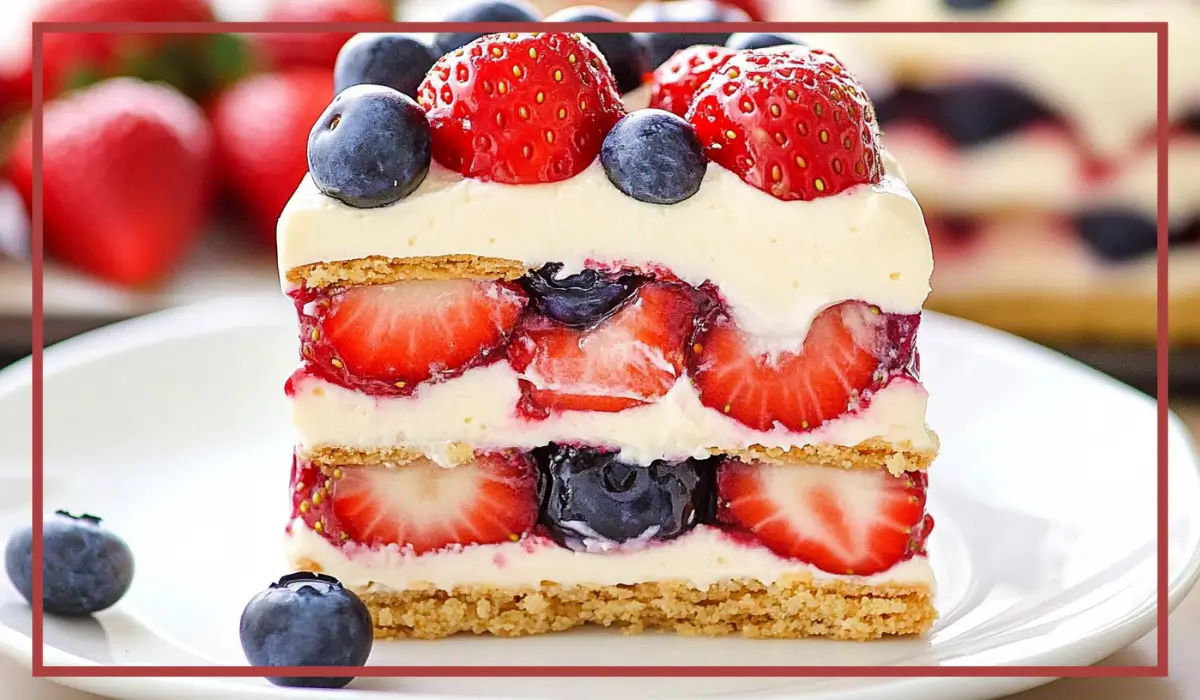
One of the standout features of this dessert is the texture. As it chills, the graham crackers absorb moisture from the creamy pudding layer, transforming into a soft, cake-like consistency. It’s the kind of texture that’s hard to believe comes from a cracker. Every bite is layered with silky vanilla pudding, fluffy whipped topping, and juicy, fresh berries that burst with every spoonful.
You’ll also love how versatile and forgiving this recipe is. Forgot to soften your cream cheese? Give it a few seconds in the microwave. Only have frozen berries? Let them thaw and pat them dry before layering. Want to get creative? Add a splash of lemon zest or a handful of shredded coconut to the cream layer for extra flavor.
It’s also a crowd-pleaser in every sense. Kids love the creamy sweetness, while adults appreciate the freshness of the berries and the nostalgic nod to classic icebox desserts. Plus, it travels well, making it perfect for potlucks, picnics, and holiday gatherings.
Another reason to love this recipe is that it’s make-ahead friendly. In fact, it needs time to chill—ideally at least four hours or overnight—so you can prepare it the day before and forget about it until it’s time to serve. And honestly, it tastes even better the next day.
So whether you’re planning a backyard barbecue, a birthday party, or just want a sweet treat to enjoy after dinner, this no-bake berry graham cracker icebox cake checks all the boxes: easy, creamy, fruity, and absolutely delicious.
Health Benefits of this No-bake berry cake
While this dessert is certainly a treat, it does offer a few health benefits—especially when compared to heavier baked goods or processed sweets. One of the best things about this recipe is the inclusion of fresh fruit. Strawberries and blueberries aren’t just delicious; they’re packed with antioxidants, vitamins, and fiber that support your overall health.
Strawberries are a great source of vitamin C, which plays a crucial role in immune function and skin health. They’re also rich in manganese and folate and provide a natural sweetness that helps you reduce the need for added sugar. Blueberries, on the other hand, are known as a superfood for a reason. They contain anthocyanins, powerful antioxidants that may help reduce inflammation and improve brain function.
The whipped topping in this recipe can be substituted with a light or reduced-fat version to help cut down on saturated fat. Alternatively, you can make your own whipped cream using heavy cream and a small amount of natural sweetener like honey or maple syrup. This not only gives you more control over what goes into your dessert but also allows you to avoid unnecessary preservatives.
The use of instant pudding adds creaminess without the need for eggs or stovetop cooking. While it does contain some sugar, it also brings calcium to the table, which is essential for healthy bones and teeth. Choosing a lower-fat or sugar-free version of pudding can make this dessert even more suitable for those watching their sugar intake.
Lastly, graham crackers offer some fiber and are lower in fat than many other cookie or crust options. When combined with the other ingredients, they provide a balanced base that holds the layers together while adding a mild sweetness that complements the berries and cream.
All in all, while this dessert isn’t intended to be a health food, its ingredients offer some redeeming nutritional value—especially when enjoyed in moderation as part of a balanced diet.
Preparation Time, Servings, and Nutritional Information
One of the many great things about this no-bake berry graham cracker icebox cake is how quick and easy it is to prepare. You don’t need to be an expert baker or spend hours in the kitchen to create a dessert that looks and tastes like it came from a bakery.
Here’s a breakdown of the time and servings you can expect:
Preparation Time:
- Prep time: 20 minutes
- Chill time: 4 hours minimum (overnight recommended for best results)
Servings:
- Serves: 12 generous portions
This makes it perfect for gatherings, parties, or large family dinners. If you’re making it for a smaller group, you can easily cut the recipe in half and use a smaller dish, or you can make the full batch and freeze individual portions for later.
Estimated Nutritional Information (Per Serving):
- Calories: Approximately 280
- Protein: 3 grams
- Carbohydrates: 38 grams
- Sugars: 23 grams
- Fat: 13 grams
- Saturated Fat: 8 grams
- Fiber: 2 grams
- Calcium: 10% of daily value
- Vitamin C: 25% of daily value (thanks to those berries)
These numbers are estimates and can vary depending on the specific brands you use. If you’d like to lighten the dish up, consider using low-fat cream cheese, sugar-free pudding, or light whipped topping. For a homemade version of the whipped cream, use heavy cream and a small amount of powdered sugar.
Now that you know what to expect in terms of prep and nutrition, let’s move on to the good stuff—what you’ll need to make this berry delight come to life.
Ingredients List of this No-bake berry cake
Before you start, it’s helpful to gather and prep all your ingredients. Here’s everything you’ll need to make this beautiful layered icebox cake:
Main Ingredients:
- 19 ounces graham crackers (approximately 14 full cracker sheets)
Graham crackers are the foundation of this dessert. They soften as the cake chills, creating that signature cake-like texture. You’ll layer them between the cream and fruit for structure and flavor. - 8 ounces cream cheese, softened
Cream cheese adds a slight tang and richness to the pudding layer. Make sure it’s softened for easy mixing. If you forget to leave it out, microwave it in 10-second intervals until soft but not melted. - 2 (3.4 oz) boxes of vanilla instant pudding mix
These give the dessert its creamy vanilla base. Instant pudding is key here because it sets without heating, keeping the recipe no-bake and fuss-free. - 2½ cups cold milk
Milk activates the instant pudding and brings everything together. Whole or 2% milk works best for a thicker, creamier texture, but you can also use plant-based milk if preferred. - 12 ounces Cool Whip or homemade whipped cream
This adds a light, fluffy layer that makes the whole dessert feel like a cloud. You’ll use most of it for the filling and reserve a small amount for the bottom layer. - 3 cups fresh strawberries, sliced
Strawberries bring color, juiciness, and a burst of natural sweetness. Slice them evenly for the best layering. - 1½ cups fresh blueberries
Blueberries balance out the strawberries with their slightly tart flavor. Their small size makes them perfect for tucking between layers. - 2 ounces white chocolate chips
These are melted and drizzled on top as the final touch. White chocolate adds just the right hint of extra sweetness and a pretty finish.
With these simple yet flavorful ingredients, you’ll create a dessert that’s as beautiful as it is delicious.
Step-By-Step Cooking Instructions of this No-bake berry cake
Now that you’ve got everything prepped and ready, it’s time to put this gorgeous no-bake dessert together. These steps are easy to follow, and with a few tips along the way, you’ll get perfect results every time. So let’s walk through it together, step by step.
Step 1: Make the Cream Layer
Start by preparing the creamy, dreamy filling that will bring everything together. This mixture is the heart of the icebox cake—it’s soft, rich, and just sweet enough to highlight the berries.
- In a large mixing bowl, add the softened cream cheese and both boxes of vanilla instant pudding.
- Using a hand mixer or stand mixer, beat them together on medium speed until the mixture is smooth and free of lumps. This might take 1–2 minutes.
- Slowly pour in the cold milk while continuing to beat on low. This helps the pudding mix incorporate fully without clumping.
- Once the mixture begins to thicken (you’ll notice it starts to resemble mousse), stop mixing.
- Use a spatula to gently fold in about 11½ ounces of the Cool Whip, reserving the remaining ½ cup for the bottom layer. Fold gently until fully combined. Avoid overmixing so the mixture stays light and airy.
At this point, you should have a bowl of fluffy, sweet vanilla cream that smells amazing. Set it aside for a moment while you prepare the base of your dessert.
Step 2: Create the Bottom Layer
To help the graham crackers stick and soften properly, you’ll start with a base layer of Cool Whip. This helps anchor the first layer of crackers and adds just a bit of extra creaminess.
- Grab a 9×13-inch baking dish and spread the reserved ½ cup of Cool Whip evenly across the bottom.
- Don’t worry if the layer is thin—it’s just meant to help the graham crackers settle into place.
This simple step gives your dessert a clean start and makes layering easier.
Step 3: Layer the Graham Crackers
Now it’s time to build the structure of your cake. Graham crackers will form three layers in total, acting like the cake in a traditional trifle.
- Lay 5 full graham cracker sheets across the center of the pan.
- Break 2 additional crackers to fill in the gaps around the edges as needed.
- Try to create a mostly even, solid layer. It doesn’t have to be perfect—once everything chills, the layers will blend beautifully.
The crackers will start softening as soon as the pudding layer touches them, so it’s important to work quickly once you start layering.
Step 4: Add the Cream Mixture
Now we’re getting into the good stuff. The cream layer is what transforms this dessert from simple to stunning.
- Spoon about one-third of the cream mixture over the graham crackers.
- Use an offset spatula or the back of a spoon to spread it evenly, making sure to cover the entire surface all the way to the edges.
- You want a nice thick layer here, so don’t be shy—make it generous.
The cream will soak into the graham crackers and start that magical transformation. At this stage, the dessert already starts to look beautiful and inviting.
Step 5: Add the Berries
Here’s where the color and freshness come in. The berry layer not only looks pretty but also adds a burst of juicy sweetness that balances the creamy filling.
- Take one-third of your sliced strawberries and scatter them evenly over the cream layer.
- Follow with one-third of the blueberries, tucking them into any gaps between the strawberries.
Try to distribute the berries as evenly as possible so each bite has a mix of both. You can arrange the berries in a pattern or just scatter them naturally for a rustic look.
Step 6: Repeat the Layers
Now that you’ve got your base layer down, you’ll repeat the process twice more for a total of three complete layers.
- Add another layer of graham crackers on top of the berries.
- Spread another third of the cream mixture evenly across the crackers.
- Top with another third of the strawberries and blueberries.
Repeat once more:
- Add the final layer of graham crackers.
- Top with the remaining cream mixture, spreading it carefully and evenly.
- Finish with the last portion of strawberries and blueberries, making the top as pretty as you’d like. You can scatter them or arrange in a decorative pattern for presentation.
At this point, your pan should be full and bursting with color, creaminess, and berry goodness.
Step 7: Chill the Cake
This step is essential. The magic of an icebox cake happens while it rests in the fridge.
- Cover the pan tightly with plastic wrap or a lid if your dish has one.
- Place it in the refrigerator for at least 4 hours, but ideally overnight.
This resting time allows the graham crackers to fully absorb the moisture from the cream layer, softening into a tender, cake-like consistency. The flavors also meld beautifully, creating a cohesive and indulgent dessert.
Step 8: Add the Finishing Touch
Just before serving, you’ll add a simple yet elegant drizzle of melted white chocolate. This gives the dessert a final touch of sweetness and visual flair.
- Melt the white chocolate chips according to the package directions. You can do this in the microwave in short 20-second bursts, stirring in between, until smooth.
- Using a spoon, drizzle the melted chocolate over the top of the cake.
- For a cleaner look, pour the chocolate into a zip-top plastic bag, snip a small corner, and pipe it in zigzag patterns across the top.
Let the chocolate set for a few minutes before slicing.
And that’s it. You now have a beautifully layered, flavor-packed dessert that’s ready to impress everyone at the table.
How to Serve this No-bake berry cake
When it comes to serving this no-bake berry icebox cake, you have a few different options depending on the occasion. This dessert is incredibly versatile, and you can dress it up or down as needed.
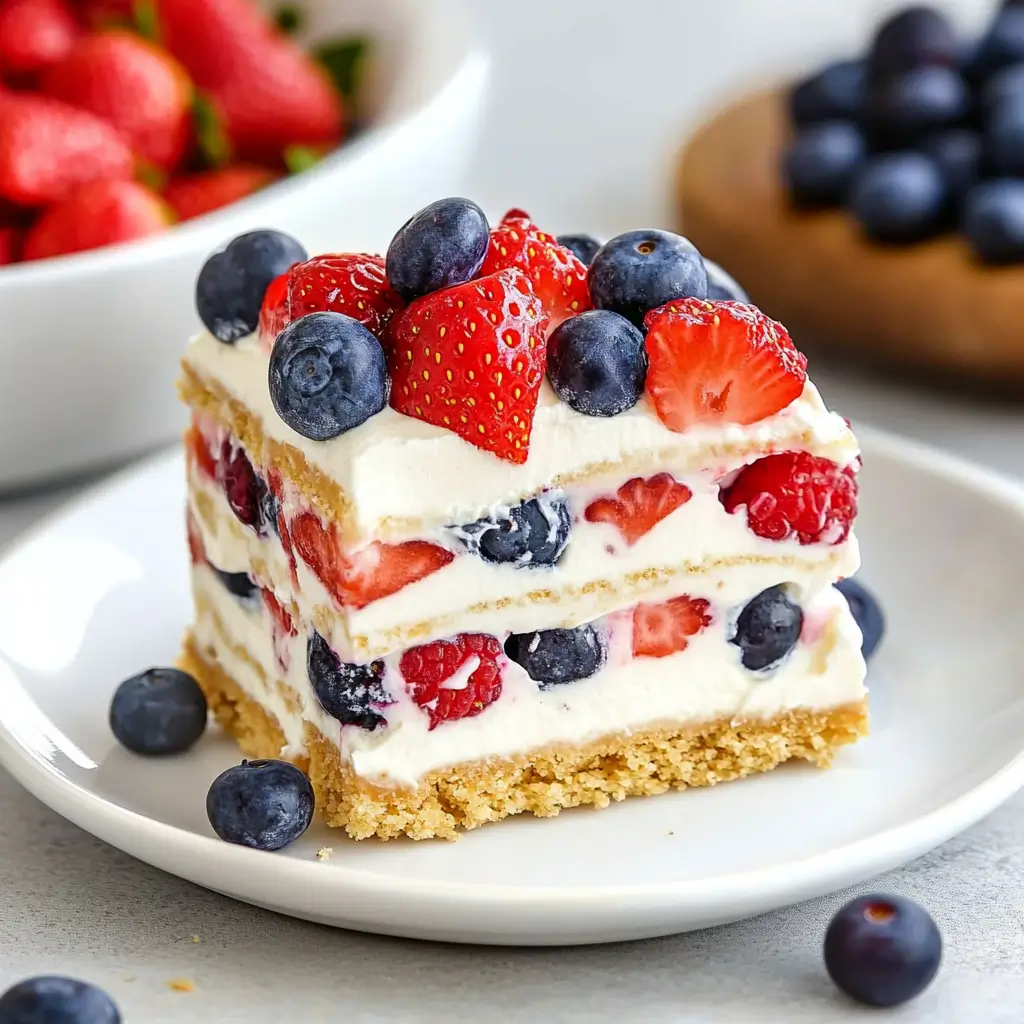
The most traditional way is to serve it chilled, straight from the refrigerator. Because the layers are soft and creamy, it slices easily with a sharp knife. Use a flat spatula to lift each piece carefully from the pan and place it onto dessert plates. The layers should hold their shape, revealing those beautiful stripes of graham cracker, cream, and berries.
If you’re serving this at a more formal event or party, consider garnishing each slice with a dollop of extra whipped cream and a couple of fresh berries on top. You could also add a small mint leaf for a pop of green—it’s a small detail that makes each plate look restaurant-ready.
For more casual gatherings, like barbecues or picnics, you can pre-slice the entire dessert and store the pieces in small containers for easy grab-and-go servings. These travel well and are always a hit.
You could even layer this dessert in individual jars or parfait glasses for a fun twist. This option works great for portion control and adds a lovely visual appeal when hosting guests.
Finally, don’t forget to serve this cake cold. The texture and flavor are at their best when fully chilled, and the creamy layers stay firm and luscious.
Now that you know how to present your creation, let’s explore what to serve alongside it to round out the meal.
Pairing Suggestions
Pairing the right accompaniments with this no-bake berry graham cracker icebox cake can turn a simple dessert into a full, satisfying culinary experience. Since the cake is cool, creamy, and berry-forward, your best pairings will contrast or complement its flavors and textures without overpowering them.
Let’s start with beverages. For something refreshing and non-alcoholic, try serving this cake with a cold glass of fresh lemonade or a sparkling citrus mocktail. The brightness of the lemon enhances the tartness of the berries and balances the richness of the cream layer. Alternatively, a light iced green tea with a hint of mint or berry flavor works beautifully as a sophisticated, herbal pairing.
If you’re serving this dessert after dinner, consider a decaf coffee or an iced latte. The warmth and slight bitterness of coffee contrast nicely with the cool sweetness of the cake. If you’re feeling a little fancy, a cinnamon or vanilla-spiced chai latte can bring out the warm undertones of the graham crackers.
Moving on to food pairings, this dessert shines best after a light, summery meal. Think grilled chicken or turkey burgers, a crisp garden salad with vinaigrette, or a chilled pasta salad with olive oil and fresh herbs. These kinds of dishes won’t leave your guests too full, making room for a generous slice of dessert.
If you’re planning a full summer menu, you could also offer a side of extra fruit—perhaps macerated berries with a touch of honey and lemon zest—to spoon over the top of the cake slices. This is a great option if you want to serve a more indulgent-looking plate without adding extra calories from heavier sauces.
For the kids, pair this dessert with a glass of cold milk or a vanilla milkshake for an ultra-creamy experience. It’s always a hit.
Whether you’re keeping it casual or hosting something more formal, the right pairing will elevate this no-bake berry icebox cake into the perfect sweet ending to any meal.
Storage, Freezing & Reheating Instructions
One of the best things about this icebox cake is how well it stores. Because it’s a chilled dessert, it actually improves in texture and flavor over time, making it perfect for make-ahead occasions or saving leftovers for later.
To store the cake in the refrigerator, simply cover the pan tightly with plastic wrap or an airtight lid. It will stay fresh in the fridge for up to 4 days. During this time, the graham crackers will continue to soften, and the berries will mingle even more with the cream layers. Just note that after a couple of days, the berries may release more juice, slightly altering the look of the top layer—but the taste will still be delicious.
For longer storage, freezing is a great option. To freeze the entire cake, first allow it to chill in the refrigerator for a few hours so it firms up. Then wrap the dish tightly in a double layer of plastic wrap, followed by a layer of aluminum foil to protect against freezer burn. You can store it this way for up to 2 months.
If you’d rather freeze individual portions, slice the cake and place the slices on a parchment-lined baking sheet. Freeze until solid, then transfer the slices to a freezer-safe container or zip-top bag with parchment paper between each slice to prevent sticking.
When you’re ready to enjoy, remove the cake from the freezer and let it thaw in the refrigerator for several hours or overnight. The texture should return to its original creamy state without becoming soggy.
Because this is a no-bake dessert, there’s no need to reheat it. Just slice and serve straight from the fridge or once thawed if frozen.
These storage options make the dessert incredibly versatile. Whether you’re prepping ahead for a gathering or saving a sweet treat for yourself later, this icebox cake is built for convenience without compromising on flavor.
Common Mistakes to Avoid
Even though this no-bake icebox cake is simple and beginner-friendly, a few small missteps can affect the final result. Here are some common mistakes to avoid so your dessert turns out perfect every time.
One of the most common issues is not softening the cream cheese enough before mixing. If the cream cheese is too cold, it won’t blend smoothly with the pudding mix and milk. This can result in a lumpy cream layer that’s harder to spread. Always allow the cream cheese to sit at room temperature for about 30 minutes before starting, or microwave it briefly in short bursts to soften it evenly.
Another mistake is using too much milk. It’s important to follow the recipe closely and not exceed the recommended 2½ cups. Adding extra milk can make the pudding too runny, which will prevent the layers from setting properly and make the final dessert too wet.
Some people also skip the chill time or try to rush it. This is a big one. The graham crackers need at least 4 hours in the fridge—ideally overnight—to fully soften and absorb the moisture from the cream. Cutting into the cake too early may give you a crunchy or dry texture instead of that tender, cake-like result.
Improper layering can also cause uneven slices or messy presentation. Take your time when spreading the cream layer and arranging the berries. Make sure each layer is as even as possible so every bite is balanced.
Lastly, don’t overdo the berries. While it’s tempting to pile on extra fruit, using too much can release excess moisture into the cake and make it soggy. Stick with the suggested amounts for best results, or make sure to pat the berries dry if they seem especially juicy.
Avoiding these simple mistakes will set you up for success and help you make the most delicious version of this recipe.
Pro Tips
To take your no-bake berry graham cracker icebox cake from great to absolutely irresistible, here are some of my favorite pro tips. These come from years of making—and tweaking—this recipe for every occasion you can imagine.
Start by using full-fat cream cheese. While reduced-fat versions work, full-fat cream cheese gives the richest, smoothest texture. It’s especially important in no-bake recipes where texture can’t be improved with cooking.
Always chill your mixing bowl and beaters before whipping the cream (if you’re making it from scratch). Cold tools help the cream whip up faster and create a more stable, fluffy texture that holds its shape better in the layers.
If you want even more flavor in your pudding layer, try adding a teaspoon of vanilla extract or a touch of almond extract. A pinch of salt also enhances the sweetness without making the dessert taste salty.
To prevent the graham crackers from shifting as you build the layers, press down gently on each layer after assembling. Don’t push too hard—just enough to help the crackers settle into the cream and lock in place.
For a decorative finish, reserve a few berries to place on top just before serving. Add a final drizzle of white chocolate and sprinkle a few crushed graham cracker crumbs or shaved white chocolate on top for extra texture and visual appeal.
If you’re serving this at a party, you can assemble it in a trifle bowl or clear glass dish to showcase the beautiful layers. It’s a showstopper that looks just as good as it tastes.
And finally, don’t skip the chill time. The longer it rests, the better it gets. Overnight is ideal, so if you can plan ahead, your taste buds will thank you.
These simple pro tips can elevate your dessert game and make this icebox cake your signature dish.
Frequently Asked Questions (FAQs)
As easy as this no-bake berry graham cracker icebox cake is to prepare, it’s normal to have a few questions pop up along the way. Here are answers to some of the most frequently asked questions to help guide you toward success every time.
Can I use homemade whipped cream instead of Cool Whip?
Yes, absolutely. If you prefer to avoid store-bought whipped toppings, homemade whipped cream is a wonderful alternative. Just whip 1½ cups of heavy cream with a few tablespoons of powdered sugar until stiff peaks form. It will give the dessert a slightly fresher taste and a lighter texture.
What if I only have one type of berry?
No problem. This dessert is incredibly flexible. If you only have strawberries or just blueberries, go ahead and use what you have. You can even substitute other berries like raspberries or blackberries. Just make sure to pat them dry to avoid extra moisture in the layers.
Can I make this dessert ahead of time?
Definitely. In fact, making it the night before serving is recommended. It needs time to chill and set, and the flavor improves as the graham crackers soften and the layers meld together. You can prepare it up to 24 hours in advance and store it covered in the fridge.
What type of graham crackers should I use?
Regular honey graham crackers are perfect for this recipe. If you’d like a twist, you can use cinnamon graham crackers for a slightly spiced flavor. Avoid chocolate graham crackers as they may overpower the delicate vanilla and berry flavors.
Can I make this dessert gluten-free?
Yes. Just swap the regular graham crackers with a gluten-free version. Many grocery stores carry gluten-free graham-style crackers that will work just as well. Also, be sure to check that your pudding mix and whipped topping are labeled gluten-free.
What can I do if my pudding layer turns out too runny?
Make sure you’re using instant pudding and not the cook-and-serve kind. Also, double-check your milk measurements—adding too much can result in a thin mixture. If it’s still too loose, try letting it sit in the fridge for 15–20 minutes before layering.
How long can I keep leftovers?
Leftovers can be stored in the refrigerator for up to 4 days. Just cover the dish tightly to keep the layers from drying out. The cake may become slightly softer with time, but it will still taste delicious.
Can I freeze this dessert in individual portions?
Yes. Slice the cake and freeze the individual portions on a tray. Once frozen, transfer them to a container or freezer bag with parchment paper between each slice. Thaw in the fridge before serving.
Do I need to spray or grease the pan?
Nope! There’s no need to grease the dish. The bottom layer of whipped topping prevents sticking, and the creamy layers ensure everything lifts out smoothly.
Can I add other ingredients, like nuts or coconut?
Sure. If you’d like to add some crunch, sprinkle chopped nuts or shredded coconut between the layers. Just be mindful of any allergies your guests might have. Toasted almonds or pecans work especially well with the berries and cream.
These FAQs should clear up most concerns, but if you ever get creative with your own twist on the recipe, feel free to experiment and see what delicious variations you come up with.
Conclusion & Call to Action
There’s something undeniably satisfying about making a dessert that not only looks beautiful but also tastes like a dream—and this no-bake berry graham cracker icebox cake delivers on both counts. From the first bite to the last spoonful, it’s an irresistible combination of creamy vanilla layers, tender graham crackers, and juicy fresh berries.
Whether you’re serving this at a summer picnic, a family get-together, or just making a treat to enjoy at home, this dessert hits all the right notes. It’s light yet indulgent, simple yet impressive. And because it’s a no-bake recipe, there’s no stress involved—just easy assembly, a bit of chill time, and then pure deliciousness.
The best part is that anyone can make it. You don’t need fancy equipment or advanced baking skills. With just a few common ingredients and some layering magic, you’ll have a dessert that earns rave reviews every time. And if you’re like me, you’ll find yourself making it again and again—swapping out fruits based on the season, or experimenting with new flavors just for fun.
So now it’s your turn. Give this recipe a try, and don’t be surprised if it becomes your go-to dessert for every occasion. Once you’ve made it and tasted the magic, I’d love to hear how it turned out. Did you make any fun additions or changes? Was it a hit with your friends and family?
Leave a comment with your feedback, or tag me on social media if you post a photo—I genuinely love seeing your creations and how you make this recipe your own. And if you know someone who’d enjoy a slice of this berry-packed beauty, don’t forget to share the recipe.
Now go grab those graham crackers, gather your berries, and get ready to make a dessert that’s guaranteed to impress. You’ve got this—and your fridge is about to be home to your new favorite treat.
Print
No-Bake Berry Cake with Graham Crackers and Creamy Vanilla
- Total Time: 4 hours 20 minutes (including chill time)
- Yield: 12 servings 1x
- Diet: Vegetarian
Description
A fruity and creamy no-bake dessert made with layers of graham crackers, vanilla pudding, whipped topping, and fresh berries. Chill and serve!
Ingredients
-
19 oz graham crackers
-
8 oz cream cheese, softened
-
2 (3.4 oz) boxes vanilla instant pudding mix
-
2½ cups cold milk
-
12 oz Cool Whip or homemade whipped cream
-
3 cups fresh strawberries, sliced
-
1½ cups fresh blueberries
-
2 oz white chocolate chips (for drizzle)
Instructions
-
Beat cream cheese and pudding mixes until smooth.
-
Add milk gradually and mix until thickened.
-
Fold in Cool Whip, reserving ½ cup for the base.
-
Spread reserved Cool Whip in 9×13-inch dish.
-
Layer graham crackers → cream mixture → berries. Repeat 3 times.
-
Cover and refrigerate for 4 hours or overnight.
-
Drizzle melted white chocolate over the top before serving.
Notes
-
For best texture, chill overnight.
-
Swap berries based on season or availability.
-
Use gluten-free graham crackers if needed.
-
For extra flavor, add a teaspoon of vanilla or almond extract to the cream.
- Prep Time: 20 minutes
- Cook Time: 0 minutes
- Category: Dessert
- Method: No-Bake
- Cuisine: American