
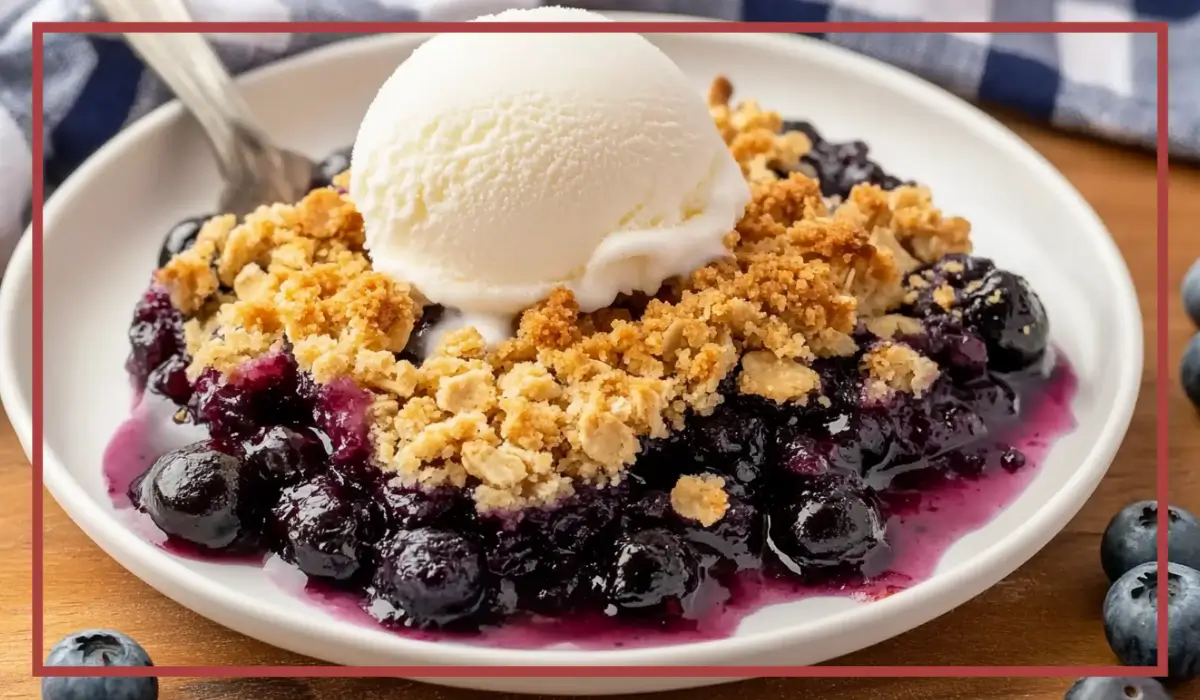
There’s a special kind of comfort that only a homemade dessert can offer, and blueberry crisp is at the very top of that list. The way it comes together with minimal effort yet delivers maximum flavor makes it one of those magical recipes you’ll want to return to again and again. Imagine sweet, juicy blueberries bursting with flavor, tucked beneath a buttery, golden topping that’s just the right amount of crisp. Now imagine how your whole kitchen smells as it bakes—warm, fruity, and rich with the scent of vanilla and lemon zest. That’s what this Blueberry Crisp Recipe is all about.
What makes blueberry crisp so special is its simplicity. You don’t need any fancy ingredients or complicated techniques. You don’t even need a mixer or a rolling pin. Just a bowl, a fork, and a baking dish. Whether you’re using fresh blueberries in the summer or frozen ones in the colder months, this recipe works like a charm all year round. And if you’re new to baking, don’t worry. This is one of the most beginner-friendly desserts out there. It’s nearly impossible to mess up, and even if the topping looks a little rustic or the filling bubbles over a bit, it still tastes absolutely perfect.
For me, blueberry crisp is more than just a dessert. It’s a memory of slow Sunday afternoons, of impromptu get-togethers where dessert just happens because you’ve got some berries and a stick of butter on hand. It’s the first thing I learned to bake on my own, and the one recipe I can always count on to impress without stress. Whether you’re making it for a crowd or just for yourself, this dessert has that magical ability to bring joy with every spoonful. Let’s dive in and make it together.
Why You’ll Love This Blueberry Crisp Recipe Recipe
There are so many reasons to fall head over heels for this blueberry crisp recipe. First of all, it’s incredibly easy. Even if you’ve never baked a thing in your life, you can pull this off with zero stress. The steps are simple and forgiving, and the ingredients are all pantry staples. No need to run to the store for anything fancy—chances are, you already have what you need sitting in your kitchen.
Another thing to love is the flexibility. Whether you’re making it for a weekday treat or serving it up at a holiday gathering, this recipe adapts beautifully. You can use fresh or frozen blueberries, swap out the flour and sugar to fit dietary needs, and even add extra flavors like cinnamon or nutmeg for a personal twist. Plus, if you’re aiming for a gluten-free version, almond flour works like a dream for the crisp topping.
But let’s talk about the flavor. The blueberries become soft and jammy as they bake, releasing their sweet-tart juices and bubbling up in that unmistakable homemade way. Then there’s the topping—crisp and golden, buttery but not too rich, with just a hint of salt and lemon zest to brighten everything up. It’s that perfect contrast between warm fruit and crunchy topping that makes every bite irresistible.
And of course, this dessert is a crowd-pleaser. It’s naturally family-friendly, with no alcohol or artificial flavorings, and it’s just the kind of dish people love to gather around. Top it with a scoop of vanilla ice cream or a dollop of whipped cream, and you’ve got something that tastes and feels luxurious, even though it took you less than an hour to make. If you’re looking for a recipe that’s easy, adaptable, and bursting with flavor, this blueberry crisp checks all the boxes.
Health Benefits of this Blueberry Crisp Recipe
While blueberry crisp is undoubtedly a dessert, that doesn’t mean it can’t offer a few health perks along the way. Thanks to the generous amount of blueberries in this recipe, you’re actually getting a solid boost of nutrients with every serving. Blueberries are loaded with antioxidants, especially anthocyanins, which give them their deep purple-blue color. These antioxidants help protect the body from oxidative stress and inflammation, which are linked to many chronic conditions.
In addition to antioxidants, blueberries are a great source of fiber. A single cup contains about 4 grams, which helps support digestion, balance blood sugar levels, and keep you feeling full longer. They also offer a good dose of vitamin C, which is essential for a strong immune system and healthy skin. And because this dessert doesn’t rely on heavy creams or custards, it’s naturally lighter than many other traditional sweets.
The crisp topping, when made with almond flour or coconut oil, can also be modified to suit specific dietary goals. Almond flour adds protein and healthy fats, while coconut oil provides medium-chain triglycerides (MCTs), which may offer metabolic benefits. You can also adjust the sugar content by using alternatives like Swerve or coconut sugar, which have a lower glycemic impact than refined white sugar.
For those avoiding gluten, the switch to almond flour or a gluten-free flour blend is seamless in this recipe. You’ll still get that signature crisp texture, just without the wheat. And because it doesn’t include dairy-based creams or cheese, this dessert can easily be made dairy-free as well.
So while blueberry crisp may be a treat, it’s one you can feel good about. Packed with fruit, adaptable to various health needs, and free of unnecessary additives, it’s proof that dessert can be both delicious and nourishing.
Preparation Time, Servings, and Nutritional Information
One of the best parts about this blueberry crisp recipe is just how quick and easy it is to prepare. You don’t need to carve out an entire afternoon for this dessert. In fact, from start to finish, you can have it ready in just over an hour, including bake and cool time. Here’s how the timing breaks down:
Preparation Time: 15 minutes
Baking Time: 45–55 minutes
Cooling Time: 30 minutes
Total Time: About 1 hour and 30 minutes
This recipe is designed to fit perfectly into an 8×8-inch baking dish, making it ideal for small family dinners or casual get-togethers. It yields approximately 6 to 8 servings, depending on how generous your portions are. If you’re feeding a larger group, it’s easy to double the recipe and use a 9×13-inch baking dish instead.
When it comes to nutritional value, a single serving of blueberry crisp (based on 8 servings total) contains the following approximate values:
Calories: 320
Protein: 2g
Carbohydrates: 42g
Sugars: 26g
Fiber: 3g
Fat: 15g
Saturated Fat: 9g
Cholesterol: 30mg
Sodium: 170mg
Of course, these values will vary slightly depending on whether you make substitutions like using coconut oil, almond flour, or a sugar alternative. If you’re looking to lower the calorie or sugar content, those swaps are simple and effective.
So if you’re trying to balance flavor with convenience and reasonable nutrition, this dessert is a perfect fit. It’s just indulgent enough to satisfy your sweet tooth but doesn’t go overboard in richness or complexity. That’s a win-win in any baker’s book.
Ingredients List of this Blueberry Crisp Recipe
The ingredients in this blueberry crisp recipe are straightforward, wholesome, and versatile. Here’s everything you’ll need, along with a little insight into why each one plays a key role in making this dessert absolutely delicious.
For the Filling:
4 cups blueberries (fresh or frozen) – The star of the show, blueberries provide natural sweetness, vibrant color, and that juicy burst of flavor when baked. If you’re using frozen berries, there’s no need to thaw them first—just toss them in as they are.
2 tablespoons flour (or 1 tablespoon cornstarch) – This helps to thicken the filling as it bakes, creating a luscious, syrupy consistency that holds together beautifully. Cornstarch works especially well if you prefer a glossy, clearer finish.
2 tablespoons granulated sugar (or coconut sugar or Swerve) – This small amount of sugar enhances the natural sweetness of the berries without overpowering them. Feel free to adjust up or down depending on the ripeness of your fruit.
For the Crisp Topping:
1 cup sifted flour (or almond flour for gluten-free) – The base of the topping, flour creates that crumbly, crisp texture we all love. Almond flour adds a subtle nuttiness and makes this dish gluten-free without sacrificing flavor or crunch.
½ cup cold butter (or coconut oil) – Cold butter is essential for a crumbly topping. When it melts during baking, it creates that golden, slightly crispy finish. If you’re going dairy-free, coconut oil is a great substitute.
½ teaspoon salt – Just a touch of salt helps balance the sweetness and enhances all the other flavors.
1 cup granulated sugar (or coconut sugar or Swerve) – This adds sweetness to the topping and helps with caramelization in the oven. Coconut sugar gives a deeper, more caramel-like flavor if you want a bit of complexity.
½ teaspoon baking powder – This gives the topping a little lightness, preventing it from becoming too dense.
½ teaspoon vanilla extract – Vanilla adds warmth and depth to the flavor, tying together the butter, sugar, and fruit beautifully.
2 teaspoons lemon zest (optional) – The zest brightens everything up with a citrusy zing, complementing the blueberries and adding a fresh note that’s especially lovely in spring and summer.
With just these ingredients, you’re set to create a dessert that tastes far more complex than it actually is. And the best part? Most of these items are already in your pantry, making this a perfect last-minute option when you want something homemade and satisfying.
Step-By-Step Cooking Instructions of this Blueberry Crisp Recipe
Now that you’ve got all your ingredients ready, it’s time to get into the fun part—bringing this blueberry crisp to life. Whether you’re a seasoned baker or someone who usually avoids the kitchen, these instructions will walk you through the process in a way that’s simple, stress-free, and totally doable. Let’s start baking.
Step 1: Preheat Your Oven
Begin by preheating your oven to 375°F (190°C). This is the ideal temperature to ensure that the blueberries bubble up beautifully and the topping turns a lovely golden-brown. While the oven heats, you can move on to preparing your baking dish and ingredients.
Step 2: Prepare Your Baking Dish
Use butter, coconut oil, or a neutral baking spray to grease an 8×8-inch baking dish. Make sure to cover the sides as well as the bottom so nothing sticks. This will also make cleanup a breeze later on. If you’re doubling the recipe, a 9×13-inch dish will be your go-to.
Step 3: Make the Blueberry Filling
In a medium-sized mixing bowl, combine your blueberries, 2 tablespoons of flour (or 1 tablespoon of cornstarch), and 2 tablespoons of sugar. Gently toss everything together with a spoon or rubber spatula until the berries are evenly coated.
If you’re using frozen berries, it’s totally okay if they clump a little with the flour at first. As they bake, they’ll release moisture and thicken up just fine. The sugar will not only enhance the fruit’s natural sweetness but also help draw out the juices to create that classic syrupy texture.
Once mixed, pour the blueberry mixture into the bottom of your prepared baking dish and spread it out evenly. You want the berries to be in a nice, even layer so the topping bakes uniformly over the top.
Step 4: Make the Crisp Topping
In a separate large bowl, combine 1 cup sifted flour (or almond flour for gluten-free), ½ teaspoon of salt, 1 cup of sugar (or coconut sugar/Swerve), and ½ teaspoon of baking powder. Give it a quick mix with a fork or whisk to blend the dry ingredients.
Next, add your cold butter, cut into small cubes. If you’re using coconut oil instead, make sure it’s firm, not melted, for the best texture. Use a pastry cutter, two knives, or even your fingertips to work the butter into the dry ingredients. The goal is to create a crumbly mixture with pea-sized chunks of butter still visible. These little pockets of butter are what create the crispy, golden topping when baked.
Once the mixture looks crumbly and coarse, stir in ½ teaspoon of vanilla extract and the optional 2 teaspoons of lemon zest. The vanilla gives a warm undertone to the topping, while the lemon zest adds a fresh citrus brightness that pairs perfectly with the blueberries.
Step 5: Assemble the Crisp
Take your prepared topping and sprinkle it evenly over the blueberries in the baking dish. Try not to press it down—you want it to sit lightly on top so that the butter can melt and crisp up nicely in the oven. Cover all the berries, but don’t worry if a few peek through here and there. Those little bubbles of fruit make the finished dessert look beautifully rustic.
Step 6: Bake
Place the dish in your preheated oven and bake for 45 to 55 minutes. You’re looking for a golden-brown topping and a filling that’s actively bubbling around the edges. Depending on your oven, you might need to rotate the dish once halfway through to ensure even browning.
If the top is browning too quickly and the filling isn’t bubbling yet, loosely tent the dish with aluminum foil to prevent burning while the fruit finishes cooking. The bubbling is key—it means the fruit has thickened properly and is fully cooked through.
Step 7: Cool Before Serving
Once your blueberry crisp is done baking, remove it from the oven and place it on a wire rack to cool for at least 30 minutes. This step might be the hardest because the smell is so tempting, but letting it rest helps the filling thicken up and gives the topping time to set. If you serve it too early, the filling might be a little runny, although still delicious.
After cooling, the crisp will hold together better when served and the contrast between warm fruit and crunchy topping will be just right.
Step 8: Serve and Enjoy
Scoop generous portions into bowls and serve warm. This dessert is delightful all on its own, but if you want to take things up a notch, add a scoop of vanilla ice cream or a dollop of whipped cream. The cold creaminess melts into the warm berries and creates a truly indulgent experience.
And there you have it—your blueberry crisp is ready to enjoy. Whether it’s for a special occasion or a quiet night in, this dessert delivers on every level.

How to Serve this Blueberry Crisp Recipe
When it comes to serving blueberry crisp, the possibilities are both simple and satisfying. Because the dessert is so naturally flavorful, you don’t need to do much to make it shine. Still, a few thoughtful additions can elevate your presentation and create a beautiful contrast of textures and temperatures.
Start by serving it warm. That gentle heat brings out the sweetness in the blueberries and keeps the topping delightfully crisp. Use a large spoon to scoop portions directly from the baking dish into serving bowls or small dessert plates. Don’t worry if it’s a little messy—that rustic, bubbling-over-the-edge look is part of its charm.
Now, for the perfect companion: vanilla ice cream. There’s just something about the way that creamy, cold scoop melts into the warm crisp that makes every bite an experience. The combination of textures—cold and creamy with warm and crunchy—is what makes this pairing so beloved. If ice cream isn’t your thing or you’re looking for a dairy-free option, try a spoonful of coconut whipped cream or a drizzle of non-dairy creamer for a similar effect.
For a breakfast-style twist, you can even serve leftovers the next morning with a dollop of Greek yogurt and a sprinkle of granola. It’s an unexpectedly delightful way to enjoy dessert in the daylight hours.
If you’re entertaining, consider garnishing each serving with a few fresh blueberries or a tiny sprig of mint. These small touches go a long way in making the dish feel polished and elegant without much effort.
No matter how you choose to serve it, the key is to enjoy every bite slowly and savor the contrast of flavors and textures that make blueberry crisp such a favorite.
Pairing Suggestions
Pairing this blueberry crisp with the right drink or side dish can turn it from a simple dessert into a complete dining experience. While the crisp itself is full of bold, sweet-tart flavor, the right accompaniments can highlight those notes and make the entire meal feel thoughtfully curated.
Let’s start with beverages. Since this is a halal-friendly recipe, we’ll focus on non-alcoholic options that bring out the dessert’s best qualities. A glass of sparkling apple cider or a chilled berry mocktail can be a refreshing, fizzy complement to the warmth and sweetness of the crisp. For a cozy evening dessert, serve it with a mug of herbal tea—chamomile, lemon verbena, or mint are lovely choices that won’t overpower the dessert’s flavor. Alternatively, a warm vanilla almond milk latte or a cinnamon-spiced chai also pairs wonderfully, especially during cooler months.
If you’re serving blueberry crisp as part of a brunch spread or casual dinner, think about what other dishes might complement it. A fruit salad with melon, strawberries, and kiwi can brighten up the plate and add some contrast. For a richer option, try a side of honey-glazed roasted nuts or a light lemon cake to echo the citrusy notes in the crisp.
For a complete dessert table, balance the fruity sweetness of the blueberry crisp with something creamy, like a homemade pudding or a mild custard. This way, your guests can enjoy a variety of textures and flavors.
Finally, don’t overlook how well this dessert plays with herbs. A little fresh thyme or basil in your fruit salad or even a tiny sprinkle on top of the crisp itself can add an unexpected layer of depth. With the right pairings, your blueberry crisp won’t just be a sweet ending—it’ll be the highlight of the meal.
Storage, Freezing & Reheating Instructions
One of the best things about this blueberry crisp recipe—aside from how easy and delicious it is—is how well it stores. Whether you’re prepping in advance for a gathering or just want to savor leftovers the next day, this dessert holds up beautifully with just a little care.
Let’s start with short-term storage. After the crisp has cooled completely, cover the baking dish tightly with foil or transfer the leftovers to an airtight container. Store it in the refrigerator for up to 3 to 4 days. The topping may soften slightly over time, but the flavor will still be outstanding. If you’d like to revive that crisp texture, simply reheat a portion in the oven at 350°F (175°C) for 10 to 15 minutes. This helps the topping regain its crunch while warming the filling evenly.
For single servings, you can also reheat in the microwave for about 30 to 60 seconds, but keep in mind that this method will warm the dessert quickly at the expense of a softer topping. If texture is important to you, a quick trip to the oven or toaster oven is worth the extra few minutes.
Freezing is also an excellent option. If you want to freeze your blueberry crisp before baking, assemble the filling and topping separately in a freezer-safe dish and cover tightly with a double layer of plastic wrap and aluminum foil. It can be frozen this way for up to 3 months. When ready to bake, simply thaw in the refrigerator overnight and then bake as directed.
If you’ve already baked the crisp, you can still freeze it. Let the dish cool completely, then cut it into individual portions and wrap each one tightly. Store the wrapped pieces in a freezer-safe bag or container. To reheat, place the frozen portions in an oven-safe dish and warm at 350°F (175°C) for 20 to 25 minutes, or until heated through.
With proper storage and reheating, you’ll find that blueberry crisp is just as satisfying the second (or third) time around. This makes it an ideal make-ahead dessert or the perfect answer to late-night sweet cravings.
Common Mistakes to Avoid
Even though blueberry crisp is a simple, forgiving dessert, there are a few common pitfalls that can affect the final result. Avoiding these mistakes will help ensure that every bite turns out just right—crispy, juicy, and packed with flavor.
One of the most common mistakes is not thickening the filling properly. Blueberries release a lot of juice as they bake, and if you skip the flour or cornstarch in the filling, you might end up with a watery base that never sets. Make sure to toss your berries with the correct amount of thickener before assembling the crisp.
Another issue is using warm or melted butter for the topping. It might be tempting to take a shortcut and melt the butter to make mixing easier, but doing so will create a dough-like texture instead of a crumbly topping. The key is to use cold butter and cut it into the dry ingredients to form coarse crumbs. This ensures the topping bakes up golden and crisp rather than dense and greasy.
Overloading the crisp with sugar is another common error. Blueberries are already naturally sweet, especially when they’re in season. Adding too much sugar can overwhelm the fruit and make the dessert overly rich. Stick to the suggested amounts and adjust based on the sweetness of your berries.
Also, don’t forget to allow the crisp to cool before serving. It’s tempting to dig in right away, but letting it sit for at least 30 minutes allows the filling to thicken and the flavors to develop. If you serve it too soon, it might be too runny and hot to fully enjoy.
Lastly, avoid using a baking dish that’s too large or too shallow. This can spread the ingredients too thin and prevent the topping from crisping properly. Stick with an 8×8-inch dish for the best ratio of fruit to topping.
By steering clear of these common mistakes, you’ll set yourself up for crisp success every time.
Pro Tips
If you’re looking to elevate your blueberry crisp from good to unforgettable, a few expert tricks can make all the difference. These pro tips will help you refine your technique and customize the dessert to suit your taste, dietary needs, or available ingredients.
First, always taste your blueberries before baking. This might seem obvious, but the sweetness and tartness of blueberries can vary widely depending on the season and whether you’re using fresh or frozen fruit. If your berries are especially tart, feel free to add an extra tablespoon of sugar. If they’re very sweet, you can reduce the sugar slightly to keep the dessert balanced.
Draining frozen blueberries slightly before mixing can also help. While you don’t need to thaw them entirely, letting them sit in a strainer for a few minutes will release excess moisture and prevent a watery filling. Tossing them with cornstarch instead of flour can be more effective in absorbing that extra liquid and creating a glossy, jammy texture.
For the crisp topping, chilling it for 10 minutes before baking can really enhance the texture. This extra step helps the butter stay solid as the dessert goes into the oven, which contributes to a better rise and crispness during baking.
Try mixing in a handful of chopped nuts—such as pecans, walnuts, or almonds—into the topping for added crunch and flavor. Toasted coconut flakes also work beautifully if you’re after a more tropical twist.
Adding a pinch of cinnamon or nutmeg to the topping can bring a cozy, warm flavor that complements the blueberries, especially during fall or winter.
And finally, if you’re serving a crowd, consider baking the crisp in individual ramekins. This not only looks impressive but also makes portioning a breeze and gives everyone their own perfectly crisped topping.
Little details like these can turn your blueberry crisp into a show-stopping dessert that everyone will be talking about.
Frequently Asked Questions (FAQs)
Can I use frozen blueberries instead of fresh?
Absolutely. Frozen blueberries work just as well as fresh ones in this recipe. There’s no need to thaw them completely—just toss them with the flour or cornstarch and sugar, and they’ll bake up beautifully. You may need to add a few extra minutes to the baking time to account for the lower starting temperature.
What can I use instead of butter?
If you’re avoiding dairy, coconut oil is an excellent substitute. Use it in solid form, not melted, to maintain the crumbly texture of the topping. You could also try a plant-based butter alternative that’s suitable for baking.
Is it possible to make this recipe gluten-free?
Yes, and it’s super simple. Just replace the all-purpose flour in the topping with almond flour or a gluten-free flour blend. If you’re using cornstarch in the filling instead of flour, make sure it’s certified gluten-free.
Can I prepare blueberry crisp in advance?
Definitely. You can assemble the entire dessert—filling and topping—and refrigerate it unbaked for up to 24 hours. When you’re ready to bake, let it sit at room temperature for 15 minutes, then bake as usual. Alternatively, you can freeze the unbaked crisp and bake it straight from frozen, adding about 10 extra minutes to the baking time.
How can I make the topping extra crispy?
To get a really crispy topping, chill it in the refrigerator for 10 to 15 minutes before baking. Also, avoid pressing the topping into the fruit—sprinkle it loosely so the butter can melt evenly. For an even crispier finish, broil the top for the last 2 minutes of baking, watching carefully so it doesn’t burn.
Why is my blueberry crisp runny?
This usually happens when the filling hasn’t thickened properly. Make sure to include the flour or cornstarch in the filling, and allow the dessert to cool for at least 30 minutes after baking. This rest time helps the filling set.
Can I use other fruits in this recipe?
Yes, this recipe is highly versatile. You can swap or mix in fruits like strawberries, raspberries, blackberries, or even peaches and apples. Just make sure to adjust the sugar and thickening agent depending on the water content of the fruit.
What’s the best way to reheat leftovers?
For best results, reheat leftovers in the oven at 350°F (175°C) for 10 to 15 minutes. This helps the topping regain its crispness. If you’re in a hurry, you can microwave individual servings, though the topping may become a bit soft.
Can I reduce the sugar in this recipe?
Absolutely. If you prefer a less sweet dessert, reduce the sugar in the topping and filling by a tablespoon or two. You can also use a sugar substitute like Swerve for a lower-glycemic option.
Is blueberry crisp healthy enough for breakfast?
While it’s still a dessert, blueberry crisp can be a fun breakfast treat when served with plain yogurt or a sprinkle of granola. It’s loaded with fruit and can be adapted to be lower in sugar and fat, making it a more wholesome option than many pastries or store-bought muffins.
Conclusion & Call to Action
By now, you’ve probably realized just how simple, versatile, and satisfying blueberry crisp can be. It’s one of those go-to recipes that doesn’t just deliver on flavor—it also brings a sense of warmth and nostalgia to your table. Whether you’re serving it at a dinner party, making it on a whim for a cozy night in, or sneaking bites straight from the dish the next morning, this dessert has a way of making everything feel a little more special.
It’s also the kind of recipe you can truly make your own. Whether you prefer it super crisp or a little gooey, with coconut sugar or traditional white sugar, topped with ice cream or plain, there’s no wrong way to enjoy it. And once you’ve mastered the basics, you’ll find yourself dreaming up all kinds of variations—think mixed berry, peach-blueberry, or even a holiday-inspired apple and cranberry crisp.
If you’ve never made a fruit crisp before, let this be your starting point. And if you’re already a seasoned baker, consider this a fresh, foolproof version to add to your rotation. It’s easy, it’s customizable, and it’s endlessly delicious.
Now that you’ve got everything you need, it’s time to preheat that oven, gather your ingredients, and get baking. I’d love to see how your blueberry crisp turns out—don’t forget to share your version, add your own twist, and pass the recipe along to anyone who needs a little sweet inspiration in their life. Happy baking!
Print
Blueberry Crisp Recipe – Easy, Classic, and Perfectly Crispy
- Total Time: 1 hour 5 minutes
- Yield: 6-8 servings 1x
- Diet: Vegetarian
Description
This blueberry crisp is the ultimate comfort dessert—sweet, juicy blueberries with a golden, buttery crumble topping. Easy to make, endlessly delicious.
Ingredients
For the Filling:
-
4 cups blueberries (fresh or frozen)
-
2 tablespoons flour (or 1 tablespoon cornstarch)
-
2 tablespoons granulated sugar (or coconut sugar or Swerve)
For the Topping:
-
1 cup sifted flour (or almond flour)
-
½ cup cold butter (or coconut oil)
-
½ teaspoon salt
-
1 cup granulated sugar (or coconut sugar or Swerve)
-
½ teaspoon baking powder
-
½ teaspoon vanilla extract
-
2 teaspoons lemon zest (optional)
Instructions
-
Preheat oven to 375°F (190°C) and grease an 8×8-inch baking dish.
-
Toss blueberries with flour and sugar. Spread in the dish.
-
In a bowl, combine topping ingredients. Cut in butter until crumbly.
-
Add vanilla and lemon zest. Mix lightly.
-
Sprinkle topping over blueberries evenly.
-
Bake 45–55 minutes until topping is golden and filling is bubbling.
-
Cool for 30 minutes before serving. Serve warm with ice cream or whipped cream.
Notes
-
Use almond flour for gluten-free.
-
Coconut oil is a great dairy-free substitute.
-
Frozen berries can be used straight from the freezer.
-
Optional lemon zest brightens the flavor.
- Prep Time: 15 minutes
- Cook Time: 50 minutes
- Category: Dessert
- Method: Baking
- Cuisine: American