
There’s something undeniably nostalgic about No-bake banana pudding. It brings back memories of family cookouts, church picnics, and weekend potlucks where everyone gathered around the dessert table just a little bit faster when this creamy, banana-filled treat made its appearance. While some desserts come and go with the trends, banana pudding is that timeless classic we all know and love. It’s comforting, it’s cool and creamy, and best of all—it’s incredibly easy to make.
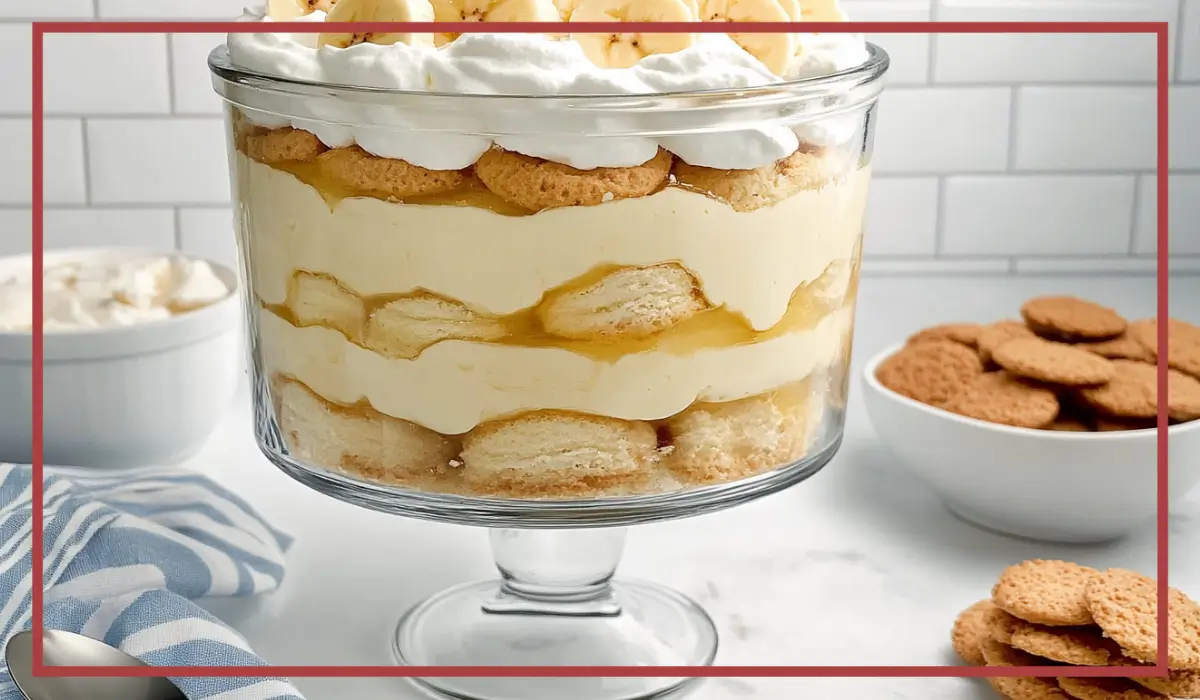
This particular version is a no-bake banana pudding trifle that takes the traditional southern dessert and makes it even more approachable. There’s no need to turn on your oven, no need for a complicated custard cooked over a stove, and no fancy equipment required. All you need are a few simple ingredients, a little bit of mixing, and some layering magic. What you end up with is a dessert that’s layered with vanilla wafers, sliced bananas, a velvety pudding-cream cheese filling, and a cloud-like topping of Cool Whip.
What sets this banana pudding apart is the texture and flavor combination. The cream cheese adds a subtle tang and rich creaminess that balances the sweetness of the condensed milk and pudding. The bananas provide that natural, fruity freshness that pairs perfectly with the crunchy-yet-softening vanilla wafers. And the Cool Whip ties it all together like a soft, fluffy bow on top.
I first made this recipe for a casual weekend gathering with some friends. It was one of those spur-of-the-moment get-togethers, and I didn’t have time to bake. I had a few ripe bananas on the counter, a box of vanilla wafers in the pantry, and some pudding mix stashed in the cabinet. One hour later, dessert was chilling in the fridge, and by the end of the night, there wasn’t a spoonful left. Since then, this banana pudding trifle has become my go-to no-bake dessert, and it never fails to impress.
Whether you’re looking for a make-ahead treat for a birthday, a crowd-pleaser for a potluck, or just a cozy dessert to end a weeknight dinner, this banana pudding hits the mark every time. Let’s dive into what makes this dish so special and how you can whip it up in your own kitchen.
Why You’ll Love This No-bake banana pudding Recipe
There are countless reasons to fall in love with this banana pudding trifle, and once you try it, you’ll see why it’s such a hit. First and foremost, it’s incredibly easy to make. You don’t need to be a baking expert or have any special equipment on hand. If you can mix and layer, you can make this dessert with total confidence.
Another reason this recipe shines is its make-ahead nature. It actually tastes better the longer it chills, which means you can prepare it the night before and spend your event or dinner stress-free. The longer it sits, the more the vanilla wafers soak up the creamy filling, softening into a cake-like texture that makes each bite irresistibly smooth and luscious.
The flavor is another standout feature. The cream cheese adds a slight tang that cuts through the sweetness, while the sweetened condensed milk delivers that signature richness we all expect from banana pudding. The bananas, especially if they’re ripe and slightly spotted, bring in a burst of natural fruitiness that contrasts beautifully with the silky pudding. Every spoonful feels like a balanced bite of creamy, fruity, crunchy perfection.
Then there’s the versatility. While this recipe is written for a classic trifle or 9×13-inch pan, you can just as easily portion it into individual cups or jars for easy serving at parties or picnics. Want to make it a little extra special? Garnish it with a sprinkle of crushed vanilla wafers, a dollop of whipped topping, or even a few chocolate shavings. There’s room to get creative and tailor it to your preferences.
Lastly, it’s kid-friendly and adult-approved. Kids love the familiar banana-vanilla flavor combo, and adults appreciate the elevated cream cheese twist. Whether you’re serving it at a casual barbecue or a more formal gathering, it’s always one of the first dishes to disappear.
Health Benefits of this No-bake banana pudding
While banana pudding isn’t typically considered a health food, this particular version does offer a few surprising nutritional perks when enjoyed in moderation. To start, bananas are naturally rich in potassium, a mineral essential for maintaining proper heart function and regulating blood pressure. Bananas also contain vitamin C, vitamin B6, and dietary fiber, all of which support overall health and digestion.
The pudding layer includes milk, which provides calcium and vitamin D—both important for maintaining strong bones and teeth. If you choose to use low-fat or skim milk, you can reduce the saturated fat content while still keeping the pudding creamy and smooth.
Cream cheese, while indulgent, offers a small amount of protein and also contains vitamin A, which is crucial for healthy skin and vision. You can opt for reduced-fat cream cheese to cut back on overall fat and calories without sacrificing too much of that velvety texture.
Cool Whip, though not the most nutrient-dense ingredient, does contribute a lightness to the dessert. If you’re looking for a slightly healthier option, there are now “Lite” or sugar-free versions of Cool Whip available in most grocery stores. These variations can help lower the overall sugar and calorie content of the dish.
Finally, this banana pudding recipe is no-bake, which means there’s no need for added oils, butter, or heavy cream that are often used in baked versions. By skipping the baking process, you’re also preserving some of the natural nutrients found in the bananas.
Of course, banana pudding is still very much a dessert, and it’s best enjoyed as a treat rather than a dietary staple. But thanks to its real fruit content and potential for lighter ingredient swaps, you can feel a little better about indulging in a bowl—or two—of this creamy classic.
Preparation Time, Servings, and Nutritional Information
One of the best things about this banana pudding trifle is how quickly it comes together. From start to finish, you’re looking at less than 30 minutes of hands-on prep time. The rest of the magic happens in the fridge while it chills and sets, allowing the flavors to meld and the layers to settle beautifully.
Total Preparation Time:
- Active prep: 25–30 minutes
- Chill time: At least 4 hours (ideally overnight for best results)
Servings:
- This recipe yields about 12 to 14 servings, depending on portion size. It’s perfect for feeding a crowd at parties or family gatherings.
Nutritional Information (Per Serving, Approximate):
- Calories: 350
- Protein: 5g
- Carbohydrates: 45g
- Sugars: 28g
- Fat: 16g
- Saturated Fat: 9g
- Fiber: 2g
- Sodium: 250mg
Please note that these values may vary depending on specific ingredient brands used and serving sizes.
This makes it a moderately indulgent dessert—rich and satisfying, but not overwhelmingly heavy. And with its built-in portion control thanks to the layered presentation, it’s easy to enjoy a treat without going overboard.
Ingredients List of this No-bake banana pudding
This banana pudding trifle calls for simple pantry and refrigerator staples, many of which you probably already have on hand. Here’s a detailed breakdown of everything you’ll need, including a few helpful notes on each ingredient.
Cream Cheese – 8 oz, softened:
Cream cheese is the base of the creamy filling. It adds richness and a slightly tangy flavor that balances the sweetness of the pudding. Make sure it’s softened to room temperature so it blends smoothly.
Sweetened Condensed Milk – 1 (14 oz) can:
This provides that luscious sweetness and a thick, creamy consistency. It helps bind everything together without the need for cooking.
Instant Vanilla Pudding Mix – 2 boxes (3.4 oz each):
Instant pudding is a shortcut that brings flavor and structure to the dish. Make sure it’s the instant kind, not cook-and-serve, for the no-bake convenience.
Cold Milk – 2¾ cups:
Used to prepare the pudding. Cold milk helps the pudding set quickly. Whole milk gives the richest texture, but any type will work—including low-fat or non-dairy alternatives.
Cool Whip – 8 oz, divided:
Half is folded into the filling for a lighter, airier texture, and the other half is spread on top as the final, fluffy layer.
Vanilla Wafers – 60 or more, as needed for layering:
These are essential for the structure and crunch. They soften slightly as the dessert chills, becoming almost cake-like. You can use any brand, or substitute with other vanilla-flavored cookies if desired.
Ripe Bananas – 5 to 7, sliced:
Go for bananas with brown spots—they’re sweeter and have the best texture for this dessert. Slice them just before layering to keep them from browning too quickly.
Optional Garnishes:
- Crushed vanilla wafers for sprinkling on top
- Fresh banana slices for serving (add just before serving to prevent browning)
Step-By-Step Cooking Instructions
Let’s walk through the process of creating this no-bake banana pudding trifle from start to finish. Don’t worry—there’s nothing complicated here. Each step builds on the last, and with a little mixing and layering, you’ll have a showstopping dessert ready to chill. This section will guide you through every detail, ensuring you feel confident and stress-free in the kitchen.
Step 1: Soften the Cream Cheese
Before anything else, take your cream cheese out of the fridge and let it come to room temperature. This step is important because softened cream cheese mixes more smoothly with the other ingredients. If you’re short on time, you can cut the block into smaller pieces to help it warm up faster or place it (still in its wrapper) in a bowl of warm water for about 10 minutes.
Once softened, place it in a large mixing bowl. Using a hand mixer or stand mixer, beat the cream cheese on medium speed until it’s completely smooth and creamy. There should be no visible lumps, so take your time here—it makes a big difference in the final texture.
Step 2: Mix in the Sweetened Condensed Milk
Once the cream cheese is smooth, pour in the entire can of sweetened condensed milk. Beat on low speed at first to avoid splashing, then increase to medium speed. Mix until the two ingredients are completely combined. You’ll notice the mixture becoming glossier and a bit thicker. Scrape down the sides of the bowl to make sure everything is incorporated evenly.
This step is where the base of your pudding mixture starts to take shape. It should be silky and sweet, with a slight tang from the cream cheese.
Step 3: Prepare the Pudding Mixture
In a separate medium-sized mixing bowl, combine the two boxes of instant vanilla pudding with 2¾ cups of cold milk. Using a whisk or an electric hand mixer, beat the mixture until it thickens—this usually takes about 2 to 3 minutes. The pudding should hold its shape when you lift the whisk. If it’s too runny, let it sit for another minute or two to firm up before combining it with the cream base.
Avoid using warm or room temperature milk, as the pudding won’t set properly. Cold milk is essential for achieving the right consistency.
Step 4: Combine Pudding and Cream Base
Now it’s time to bring the pudding and cream cheese mixture together. Pour the pudding into the large bowl with the cream cheese base. Using a spatula or mixer on low speed, gently fold or stir the two together until fully combined. You want a smooth, unified texture without any streaks of pudding or cream cheese remaining.
At this point, the filling should be thick, creamy, and slightly fluffy.
Step 5: Fold in Cool Whip
Next, fold in half of the Cool Whip—about 4 oz—into the pudding mixture. Use a gentle folding motion with a spatula rather than stirring aggressively. This helps maintain the light, airy texture of the Cool Whip and ensures your filling doesn’t become too dense.
This final touch lightens up the mixture, making the pudding feel like a dreamy mousse that melts in your mouth.
Step 6: Slice the Bananas
Right before you start layering, slice your bananas into ¼-inch rounds. Depending on their size, you’ll use around 5 to 7 ripe bananas. Choose bananas with some brown speckling, as they’re sweeter and have the best texture for pudding.
Try not to slice the bananas too far in advance, as they can begin to brown. If you’re worried about discoloration, you can lightly brush the slices with lemon juice, though this might slightly alter the taste.
Step 7: Layer the Dessert
Now the fun begins. Choose your dish: a trifle dish for a stunning vertical presentation or a 9×13-inch glass pan for easy, crowd-friendly serving.
Start by placing a single layer of vanilla wafers on the bottom. They don’t have to be perfectly spaced—just make sure most of the surface is covered.
Next, add a layer of sliced bananas over the wafers. You want a good amount of banana coverage, so don’t skimp here. Each bite should have a piece of banana.
Then, spread a generous layer of the pudding mixture over the bananas. Use the back of a spoon or an offset spatula to gently smooth it out.
Repeat the layers in this order—wafers, bananas, pudding—until you’ve used all the pudding mixture or reached the top of your dish. In a trifle dish, you can typically fit 3 to 4 layers. In a 9×13-inch pan, expect around 2 full layers depending on thickness.
Step 8: Top with Remaining Cool Whip
Once all the layers are in place, spread the remaining Cool Whip over the top. This final layer seals in the dessert and gives it a clean, fluffy finish. You can spread it smooth or create soft peaks and swirls for visual appeal.
If you’re feeling fancy, now is the time to decorate. Sprinkle crushed vanilla wafers across the top for a bit of texture and visual interest. If serving shortly after chilling, you can add fresh banana slices as a garnish, but be mindful they may brown over time.
Step 9: Chill and Set
This step is crucial. Cover the dessert tightly with plastic wrap and place it in the refrigerator for at least 4 hours. For best results, let it chill overnight. This resting time allows the layers to set and the flavors to meld together. The wafers will soften, the pudding will firm up slightly, and everything will come together into a cohesive, dreamy dessert.
Resist the urge to dive in early—the wait is worth it.
Step 10: Serve and Enjoy
When you’re ready to serve, remove the dessert from the fridge. If desired, garnish with extra crushed wafers or fresh banana slices right before serving. Scoop into bowls or plates and enjoy every creamy, banana-filled bite.
Whether you’re serving it to a large crowd or keeping it all to yourself (no judgment), this banana pudding is sure to become a staple in your dessert rotation.

How to Serve this No-bake banana pudding
This banana pudding trifle is versatile and fits seamlessly into a variety of occasions. The presentation can be as simple or elegant as you’d like, making it perfect for both casual gatherings and special celebrations.
One classic way to serve this dessert is in a trifle dish. The clear sides showcase the beautiful layers of golden wafers, creamy pudding, and ripe bananas. It’s a showstopper on any dessert table and draws everyone in with its inviting appearance.
If you’re feeding a larger group, a 9×13-inch baking dish is practical and easy to transport. It allows for generous scoops and is ideal for potlucks, family dinners, or celebrations where seconds (and maybe thirds) are expected.
For individual servings, spoon the banana pudding into mason jars, small dessert cups, or ramekins. This is especially fun for birthday parties, baby showers, or picnics, as it allows each guest to have their own perfectly portioned treat.
To elevate the presentation, top each serving with a dollop of whipped topping, a dusting of crushed wafers, or a fan of fresh banana slices. For added flair, drizzle with a touch of caramel sauce or sprinkle with cinnamon for a warm, spiced twist.
No matter how you serve it, this banana pudding is guaranteed to bring smiles, spoonful after spoonful. And with each chilled, creamy bite, you’ll understand why it’s a go-to dessert for so many families.
Pairing Suggestions
While banana pudding is certainly a star on its own, pairing it with the right dishes and drinks can make your dessert spread feel even more complete. Because this pudding is creamy, fruity, and sweet, it pairs well with a range of sides and beverages that balance or enhance its flavors.
Food Pairings:
- Grilled or Roasted Chicken: If you’re serving banana pudding as part of a full meal, it complements lighter main courses like grilled or roasted chicken with herbs. The contrast of savory and sweet works beautifully.
- Southern-Style Barbecue: Banana pudding is a classic follow-up to smoky, tangy barbecue. Think pulled chicken, baked beans, and coleslaw followed by a cold, creamy dessert.
- Light Sandwiches or Wraps: For a picnic or brunch, pair this dessert with tea sandwiches, turkey wraps, or veggie platters to keep things balanced.
Beverage Pairings:
- Iced Tea: Whether sweetened or unsweetened, iced tea is a perfect non-alcoholic beverage to enjoy alongside banana pudding. Its refreshing nature cuts through the richness of the dessert.
- Coffee or Cold Brew: A bold cup of coffee complements the creaminess and sweetness, especially if you’re enjoying banana pudding as a mid-day treat or brunch dessert.
- Sparkling Water or Lemonade: If you’re looking for something light and refreshing, go for citrusy drinks like lemonade or sparkling water with a slice of lemon or lime to cleanse the palate.
Whether you’re planning a backyard get-together or a holiday potluck, these pairings can turn your banana pudding into the sweet ending to a truly memorable meal.
Storage, Freezing & Reheating Instructions
One of the many things to love about this banana pudding trifle is how well it stores. It’s a perfect make-ahead dessert, and it even gets better as it chills—so don’t be afraid to prepare it a day before your event. That said, storing and preserving it the right way is key to maintaining its texture, freshness, and overall appeal.
Storing in the Refrigerator
After assembling your banana pudding trifle, cover the dish tightly with plastic wrap or an airtight lid. If you’re using a trifle bowl, you may need to wrap it tightly with two layers of plastic wrap to seal in freshness. Store it in the refrigerator for up to 3 days. Beyond this, the bananas may begin to brown and the wafers may become overly soft.
If you plan to serve it in individual jars or cups, cover each one individually. This method is excellent for grab-and-go convenience and portion control.
To keep the banana slices from browning too quickly, especially if they’re near the top, try lightly brushing them with lemon juice before assembling. Just be cautious—too much lemon juice can affect the flavor, so use it sparingly.
Freezing Banana Pudding
While freezing traditional banana pudding is not usually recommended due to the high water content in the bananas and the whipped topping, you can freeze portions if you’re willing to compromise slightly on texture.
To freeze:
- Spoon the banana pudding into freezer-safe containers, leaving some space at the top to allow for expansion.
- Seal tightly and freeze for up to 1 month.
Keep in mind that the texture of the bananas may change slightly upon thawing, becoming a bit mushy. The wafers may also become quite soft, and the pudding might separate a little. However, if you’re okay with a slightly different texture, it can still be a tasty frozen treat.
To thaw:
- Transfer from the freezer to the fridge and let thaw slowly overnight.
- Stir gently before serving to recombine any separated ingredients.
- Add a fresh topping of Cool Whip and crushed wafers to refresh the appearance.
Reheating
This banana pudding is meant to be served chilled, so there’s no need to reheat it. In fact, warming it would negatively affect the texture, particularly the whipped topping and bananas.
If you’ve taken it out of the fridge and want to serve it at its creamiest, let it sit at room temperature for about 10–15 minutes before serving. This takes the chill off and enhances the pudding’s smoothness without making it too soft.
By following these simple storage and freezing tips, you can keep your banana pudding fresh, flavorful, and ready to enjoy—even a day or two later.
Common Mistakes to Avoid in this No-bake banana pudding
Even though this recipe is incredibly simple, there are still a few common mistakes that can affect the final result. Being aware of them in advance will help you avoid pitfalls and make a flawless banana pudding every single time.
1. Using Cook-and-Serve Pudding Instead of Instant
This is one of the most frequent mistakes. The recipe calls for instant vanilla pudding mix, which thickens quickly when combined with cold milk. If you accidentally use cook-and-serve pudding, the mixture won’t thicken properly without being heated, and your dessert will turn out soupy. Always double-check the box label to ensure you’re using the instant version.
2. Not Softening the Cream Cheese
Trying to mix cold cream cheese with other ingredients will result in a lumpy, uneven texture. It’s crucial to allow the cream cheese to come to room temperature before beating it. Softened cream cheese blends smoothly, giving your pudding base that velvety consistency.
3. Overmixing the Cool Whip
When you fold in the Cool Whip, use a light hand. Overmixing can deflate it, resulting in a dense and less airy pudding. Gently fold using a spatula until just combined—this helps maintain the fluffy texture.
4. Slicing Bananas Too Early
Bananas can brown quickly once sliced, especially when exposed to air. Wait until just before layering to slice your bananas. If you’re preparing ahead of time, you can very lightly coat the banana slices with lemon juice to slow down oxidation—but be careful not to alter the flavor too much.
5. Not Letting the Pudding Set
Rushing the chilling process is another mistake. While the pudding might seem ready to eat after assembly, it truly benefits from several hours in the fridge. This resting period helps the flavors meld and gives the wafers time to soften to that perfect cake-like texture.
6. Using Too Few Bananas or Wafers
The balance between the layers is what makes this trifle shine. Skimping on bananas or wafers can make the pudding feel one-dimensional. Don’t be afraid to be generous with both—they add essential flavor, texture, and structure.
Avoiding these common mistakes will ensure your banana pudding is consistently smooth, flavorful, and as delicious as possible every time you make it.
Pro Tips of this No-bake banana pudding
Want to take your banana pudding from great to unforgettable? Here are a few expert-level tips that make a big difference in flavor, texture, and presentation.
1. Use Room Temperature Ingredients for a Smooth Filling
Allow both the cream cheese and milk to come to room temperature before mixing. This helps avoid lumps and ensures a smooth, even blend in your pudding base. Cold milk is fine for the instant pudding, but once that’s incorporated, room temperature ingredients help everything combine better.
2. Choose Ripe Bananas with Brown Speckles
The best bananas for this recipe are those that are fully ripe with brown spots on the peel. These bananas are sweeter, softer, and blend seamlessly into the creamy layers. Avoid overly green bananas, as they can be too firm and lack flavor.
3. Toast Your Vanilla Wafers for Extra Crunch
If you want an added crunch in the first few bites, lightly toast some of your vanilla wafers in the oven before layering. This technique won’t preserve their texture through long chilling times, but it will add a subtle roasted flavor and a bit more bite in the earlier servings.
4. Make Mini Individual Servings for Parties
Instead of using a large dish, serve this dessert in individual mason jars or dessert cups for portion control and visual appeal. This makes it easier to serve at parties or picnics, and everyone gets their own little banana pudding treat.
5. Add a Flavor Boost with Real Vanilla or Cinnamon
To elevate the flavor, add ½ teaspoon of pure vanilla extract to the pudding mixture or sprinkle a little ground cinnamon between layers. These subtle enhancements bring warmth and depth to the overall dessert without overshadowing the banana flavor.
6. Refresh with a Garnish Right Before Serving
For a pretty finish, garnish the top with freshly sliced bananas, a sprinkle of crushed vanilla wafers, or even a few curls of dark chocolate. Adding the garnish right before serving ensures it stays fresh and eye-catching.
Incorporating these pro tips into your process will help you elevate the classic banana pudding trifle into a recipe you’ll be proud to share over and over again.
Frequently Asked Questions (FAQs)
Can I make this No-bake banana pudding in advance?
Yes, and in fact, it’s even better when made ahead. Prepare and assemble the pudding, cover tightly, and refrigerate for at least 4 hours or up to 24 hours before serving. The longer it chills, the better the wafers soften and the flavors meld.
Can I use homemade whipped cream instead of Cool Whip?
Absolutely. If you prefer a homemade touch, you can whip 1 cup of heavy cream with 2 tablespoons of powdered sugar until soft peaks form. Use this in place of Cool Whip, both in the pudding mixture and for the topping.
What’s the best way to keep bananas from turning brown?
To slow the browning process, slice bananas just before assembling the dessert. You can also very lightly brush the slices with lemon juice or dip them in a mixture of water and lemon juice. Be cautious not to use too much, as it can alter the flavor.
Can I make this No-bake banana pudding recipe gluten-free?
Yes. To make this banana pudding gluten-free, use certified gluten-free vanilla wafers. Many specialty stores and online retailers carry them. Make sure all other ingredients, like pudding mix and Cool Whip, are labeled gluten-free.
What if I don’t have a trifle dish?
No problem. A 9×13-inch baking dish works perfectly. You can also use smaller glass bowls, individual cups, or even a deep pie dish. The layering and chilling process remain the same.
Can I use banana-flavored pudding instead of vanilla?
You can, but vanilla pudding is traditionally used because it allows the natural banana flavor from the fruit to shine. Banana-flavored pudding can make the dessert overly sweet or artificial-tasting, depending on the brand.
How do I know when it’s set and ready to serve?
After chilling for at least 4 hours, the pudding should be firm enough to hold its shape when scooped. The wafers will have softened, and the entire dessert should feel cold and cohesive.
Can I add other fruits?
While bananas are the star here, you can add a layer of fresh berries like strawberries or blueberries for a twist. Just be cautious with watery fruits, as they can affect the pudding’s consistency.
Is this No-bake banana pudding dessert suitable for kids?
Definitely. Banana pudding is loved by kids and adults alike. The smooth texture, mild flavors, and fun layering make it a kid-approved treat.
Can I double this No-bake banana pudding recipe?
Yes, simply double all ingredients and use a larger dish or two separate pans. It’s a great option when you’re serving a crowd or want to ensure there’s enough for seconds.
Conclusion & Call to Action
There’s just something special about a dessert that combines ease, nostalgia, and irresistible flavor—and this no-bake banana pudding trifle checks every single box. Whether you’re making it for a summer BBQ, a cozy family dinner, a birthday celebration, or simply because you have a bunch of ripe bananas on your counter, this recipe is a guaranteed crowd-pleaser.
It’s rich, yet not heavy. Sweet, but not cloying. And most importantly, it’s so simple that even beginner home cooks can whip it up with confidence. With just a handful of common ingredients and some basic layering, you’ll end up with a dessert that looks impressive, tastes like a dream, and disappears faster than you can say “banana pudding.”
What makes this banana pudding so special is how beautifully the textures come together. The creamy pudding base with tangy cream cheese, the fluffy whipped topping, the softening vanilla wafers, and the natural sweetness of ripe bananas—it’s a balance that works every time. You can dress it up for a party or keep it simple for a weeknight indulgence. Either way, it never disappoints.
Now it’s your turn to give it a try. Grab those ripe bananas, raid your pantry, and let your mixing bowls do the rest. Don’t be afraid to make it your own—add some cinnamon, swap in homemade whipped cream, or serve it in cute little jars. However you choose to present it, the most important thing is that you enjoy the process (and, of course, the final result).
Once you’ve made this banana pudding, I’d love to hear how it turned out. Did your family go back for seconds? Did your friends ask for the recipe? Share your stories in the comments below and let me know how you served it. If you snapped a picture, feel free to tag me on Instagram—I always love seeing your kitchen creations and how you make these recipes your own.
Until next time, happy mixing and happy eating. And remember, dessert doesn’t have to be complicated to be completely delicious.
Print
No-Bake Banana Pudding Trifle – Easy Southern Dessert Recipe
- Total Time: 4 hours 25 minutes (includes chill time)
- Yield: 12–14 servings 1x
- Diet: Vegetarian
Description
This creamy no-bake banana pudding trifle is an easy, crowd-pleasing dessert layered with vanilla wafers, ripe bananas, and a rich pudding filling. Perfect for holidays, potlucks, and family dinners.
Ingredients
-
8 oz cream cheese, softened
-
1 (14 oz) can sweetened condensed milk
-
2 (3.4 oz) boxes instant vanilla pudding
-
2¾ cups cold milk
-
8 oz Cool Whip, divided
-
60 vanilla wafers (more as needed)
-
5–7 ripe bananas, sliced
-
Optional: crushed wafers and banana slices for garnish
Instructions
-
Beat softened cream cheese until smooth.
-
Add sweetened condensed milk and mix until creamy.
-
In a separate bowl, whisk pudding mix and cold milk until thick.
-
Combine pudding with cream cheese mixture. Mix until smooth.
-
Fold in 4 oz of Cool Whip.
-
In a dish, layer wafers, bananas, and pudding. Repeat layers.
-
Spread remaining Cool Whip on top.
-
Chill for at least 4 hours or overnight.
-
Garnish with crushed wafers and banana slices before serving.
Notes
-
Use ripe bananas with brown speckles for the best flavor.
-
You can substitute Cool Whip with homemade whipped cream.
-
Assemble in a trifle dish, 9×13 pan, or individual cups.
- Prep Time: 25 minutes
- Cook Time: 0 minutes
- Category: Dessert
- Method: No-Bake
- Cuisine: American, Southern