
There are desserts that earn a polite nod at the end of a meal, and then there are those that disappear within minutes, leaving behind nothing but praise and a few lingering spoonfuls. This Blueberry Angel Food Cake Trifle definitely falls into the second category. It’s that perfect combination of light and luscious, sweet and creamy, with bursts of blueberry goodness in every bite.
What makes this dessert so special is how effortlessly it comes together. With layers of fluffy angel food cake, rich vanilla pudding mixed with tangy sour cream, whipped topping, and sweet blueberry pie filling, this trifle is a crowd-pleaser through and through. And because it’s a no-bake dessert, it’s practically foolproof. You don’t have to worry about getting the perfect rise on a sponge cake or whether your custard will set. Everything in this dessert is about ease, comfort, and that satisfying “mmm” factor.
I first made this trifle on a summer afternoon when we were hosting a backyard get-together with friends. I was short on time, had a store-bought angel food cake on hand, and happened to have blueberry pie filling in the pantry. What started as a quick-fix dessert turned into one of the most requested treats in our circle of friends. Now, it’s a staple in our house—perfect for holidays, potlucks, birthdays, or any time you want to bring something that looks impressive but takes very little effort.
So whether you’re brand new to making layered desserts or you’re just in the mood for something simple yet stunning, this recipe is going to become one of your favorites. Let’s break it down together.
Why You’ll Love This Blueberry Angel Food Cake Recipe
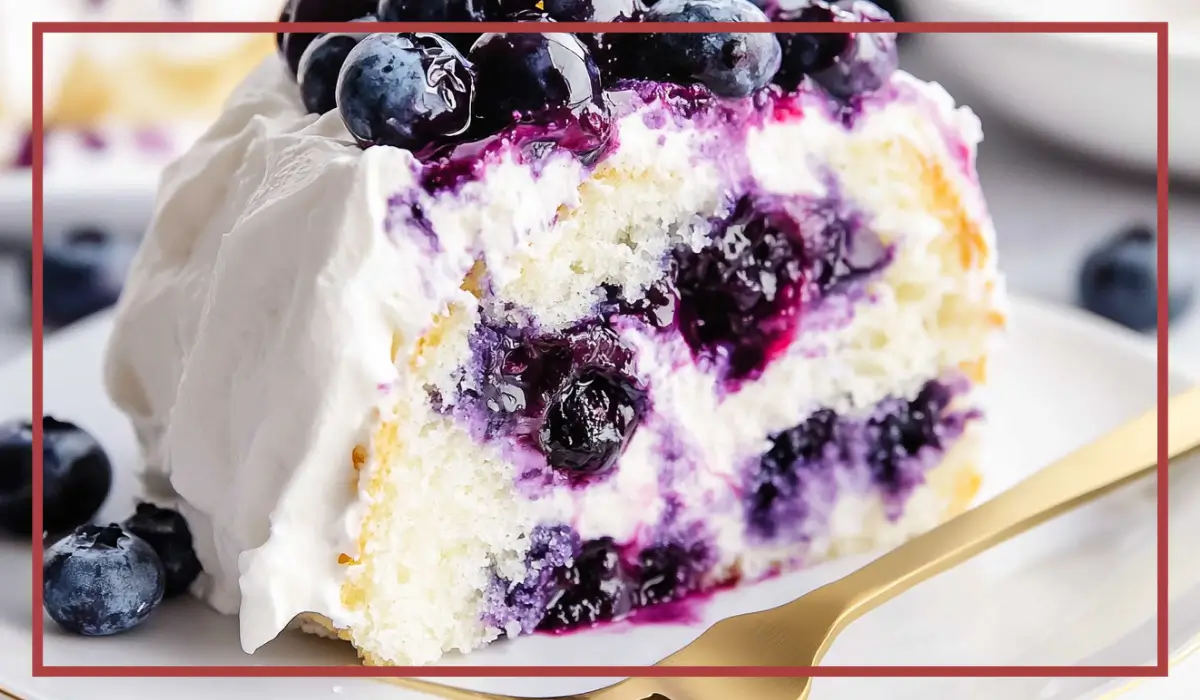
There are so many reasons to love this Blueberry Angel Food Cake Trifle, but let’s start with the most obvious one—flavor. The soft, airy texture of the angel food cake is the ideal base for this dessert. It soaks up just enough moisture from the creamy layers to stay tender without ever becoming soggy. The vanilla pudding adds a silky, rich quality that balances beautifully with the lightness of the Cool Whip topping. And then, of course, there’s the blueberry pie filling. Sweet, slightly tart, and deeply fruity, it cuts through the richness and adds a vibrant contrast that wakes up your palate.
Not only is it delicious, but it’s also incredibly easy to make. There’s no baking required if you’re using a pre-made cake, and the entire dessert comes together in under 20 minutes. That means you can whip this up in the morning before a gathering, or even the night before to let the flavors meld beautifully in the fridge overnight.
Another huge plus is its visual appeal. Served in a trifle dish or a clear glass pan, this dessert looks downright elegant. The layers are eye-catching—the golden cake cubes, the glossy blueberry filling, and the pillowy clouds of whipped topping make for a presentation that feels fancy, even though the ingredients are simple.
And let’s not forget how versatile it is. You can easily switch up the fruit filling (more on that later), make it in individual cups for a party, or scale it up for a large group. It’s also a great dessert for warmer months when turning on the oven is the last thing you want to do.
Finally, this dessert is a hit with kids and adults alike. It’s not too sweet, it has that nostalgic pudding-and-cake vibe, and it’s incredibly satisfying without feeling heavy. Whether you’re hosting brunch, planning a summer picnic, or just need a little pick-me-up after a long week, this trifle has your back.
Health Benefits
Now, let’s talk about the lighter side of this indulgent treat. While it may look like a full-on dessert splurge, this Blueberry Angel Food Cake Trifle actually has a few redeeming qualities when it comes to health and balance—especially compared to richer, heavier desserts like cheesecake or chocolate lava cake.
First, let’s look at the base: angel food cake. This type of cake is naturally lower in fat because it’s made without butter or oil. Most traditional recipes rely on whipped egg whites for structure, which makes the cake airy and low in calories compared to other cakes. If you opt for a store-bought version, you’ll also find many labeled as “fat-free” or “light,” making them a great option for those watching their fat intake.
Next up is the pudding mixture. Using 2% milk instead of whole milk keeps the fat content lower without sacrificing creaminess. Plus, the instant vanilla pudding adds calcium and protein, and when paired with sour cream, the result is a creamy layer that’s tangy and rich but still lighter than heavy cream or custard-based fillings.
The blueberries add their own nutritional punch. While pie filling does include added sugars, blueberries are still a natural source of antioxidants, particularly anthocyanins, which support heart and brain health. They’re also rich in vitamin C and fiber, which is a nice bonus in a dessert setting.
Cool Whip is another ingredient that’s often lighter than homemade whipped cream. It’s stabilized, which helps the dessert hold its shape, and while it’s not a health food per se, many light versions are available that contain fewer calories and less fat.
Overall, while this isn’t a “diet dessert,” it’s certainly one you can enjoy in moderation without feeling weighed down. And if you’re making it for a crowd, the portion sizes tend to be smaller, since a little goes a long way. You get all the satisfaction of a creamy, fruity dessert without the heaviness of more traditional options.
Preparation Time, Servings, and Nutritional Information
One of the best things about this dessert—aside from how delicious it is—is how quickly it comes together. From start to finish, you’ll need no more than 20 minutes to prep everything and layer it up. The only additional time required is chilling, which is totally hands-off.
Preparation Time: 20 minutes
Chill Time: 4–5 hours (or overnight for best results)
Total Time: About 5 hours, including chilling
Servings: 9 to 12 servings (depending on portion size)
This trifle is perfect for gatherings because it makes a generous amount, and you can easily double it for larger crowds. If you’re serving it in a 9×9-inch pan, you’ll get about 9 large servings or up to 12 smaller portions if you’re serving other desserts alongside it.
Now let’s take a look at the nutritional breakdown per serving (based on 12 servings):
Calories: 240
Total Fat: 7g
Saturated Fat: 4g
Cholesterol: 20mg
Sodium: 180mg
Total Carbohydrates: 38g
Dietary Fiber: 1g
Sugars: 26g
Protein: 3g
Calcium: 8% DV
Vitamin C: 2% DV
Keep in mind that these values may vary slightly depending on the exact brands and quantities you use. For example, using a lighter version of sour cream or whipped topping can reduce the fat and calorie count. You can also swap in sugar-free pudding mix or a lighter pie filling to make it even more waistline-friendly.
Whether you’re watching your sugar intake or just aiming to make more balanced dessert choices, this recipe gives you flexibility without sacrificing flavor.
Ingredients List
The beauty of this Blueberry Angel Food Cake Trifle lies in its simplicity. Every ingredient plays a specific role, coming together to create a dessert that’s layered, flavorful, and wonderfully textured. Here’s everything you’ll need:
- 1 angel food cake, cubed (store-bought or baked and cooled from mix)
- 1 (21 oz) can blueberry pie filling
- 1 (3.6 oz) package instant vanilla pudding mix
- 1½ cups 2% milk
- 1 cup sour cream
- 8 oz Cool Whip, thawed
Let’s break that down a bit further and talk about why each ingredient matters.
Angel Food Cake: This light, spongy cake is the perfect base. Because it’s so airy, it soaks up moisture from the creamy layers without becoming dense. You can use a store-bought version to save time, or bake one from a boxed mix if you prefer the homemade touch. Just make sure it’s completely cooled before cubing.
Blueberry Pie Filling: This adds that bold pop of flavor and gorgeous color. The pie filling is sweet and slightly tart, which complements the creamy layers perfectly. You’ll use most of the can between the layers, saving a little for the decorative top.
Instant Vanilla Pudding Mix: Choose the instant kind to keep this recipe quick and easy. The pudding adds a luscious vanilla flavor and creamy texture to the dessert. It also helps stabilize the sour cream layer.
Milk: 2% milk works beautifully here—it provides creaminess without the heaviness of whole milk. If you only have whole or skim, those can work in a pinch, but 2% strikes the best balance for texture and flavor.
Sour Cream: This might seem like a surprise ingredient in a sweet dessert, but it’s actually the secret weapon. It gives the pudding layer a tangy edge that balances out the sweetness and adds depth.
Cool Whip: This whipped topping is smooth, sweet, and holds its shape well. It adds that final airy layer and helps the dessert feel light and fluffy. Be sure it’s fully thawed so it spreads easily.
With just six ingredients, you’re already on your way to a show-stopping dessert.
Step-by-Step Cooking Instructions
Now that we’ve covered the ingredients and why they work so well together, it’s time to dive into the heart of this recipe: how to put it all together. The steps are incredibly simple, but I’ll walk you through each one with plenty of tips along the way so you can create a trifle that’s just as beautiful as it is delicious. Whether you’re making this in a 9×9-inch dish or a tall trifle bowl, the process is the same.
Step 1: Cube the Angel Food Cake
Start by preparing the cake base. If you’re using a store-bought angel food cake, remove it from the packaging and place it on a large cutting board. If you’ve baked your own from a mix, be sure it’s completely cool before you cut it—warm cake is more likely to tear or compress.
Use a serrated knife, which works best for this soft, spongy cake. Cut the cake into 1-inch cubes. You want pieces that are bite-sized but still substantial enough to hold their shape in the trifle.
Tip: Try not to press down too hard as you cut. Let the knife do the work, using a gentle sawing motion to avoid squishing the cake.
Once the cake is cubed, set it aside in a large bowl or on a baking sheet while you prepare the next layers.
Step 2: Create the First Layer
In your trifle dish or 9×9-inch baking dish, spread half of the cubed cake evenly across the bottom. Don’t worry if some pieces stack or overlap; the goal is to create an even base, but this doesn’t need to be perfect.
Once you’ve added the cake, open your can of blueberry pie filling. Spoon about two-thirds of the filling over the cake cubes. Use the back of a spoon or a small spatula to gently spread it out, making sure you cover the surface. Some of it will drip down between the cubes, which is perfect—it helps flavor the entire layer.
Tip: If you’re using a glass dish, spread the filling closer to the sides so it’s visible from the outside. It creates that beautiful layered effect everyone loves in a trifle.
Step 3: Add the Remaining Cake
Next, take the second half of your cake cubes and layer them on top of the blueberry filling. Again, aim for even coverage, pressing down gently to create a fairly level surface.
At this point, you’re halfway done layering, and you’re probably already starting to see how gorgeous this dessert is going to look.
Step 4: Make the Vanilla Pudding Mixture
Now it’s time to whip up that luscious, creamy middle layer. In a medium mixing bowl, combine the instant vanilla pudding mix and 1½ cups of 2% milk. Whisk it together until smooth, which should take about 1–2 minutes. You want it to be thickened but not fully set.
Once the pudding has reached a nice, smooth consistency, stir in the sour cream. This step is what gives your pudding layer that special tang and a slightly more luxurious mouthfeel.
Tip: If you like a lighter texture, you can fold in a couple of spoonfuls of Cool Whip here too—it’s totally optional but creates a slightly mousse-like layer.
Once the pudding and sour cream are fully combined, spoon the mixture over the top layer of cake. Again, use a spatula to spread it out evenly, making sure it reaches the corners and edges.
Step 5: Add the Whipped Topping
Now it’s time to crown your trifle with a thick, fluffy layer of Cool Whip. Make sure it’s fully thawed before spreading, which helps it glide over the surface without dragging or pulling the pudding layer beneath.
Using an offset spatula or the back of a large spoon, gently spread the whipped topping across the surface. Don’t rush this step—take your time to create a smooth, even layer that covers the entire top.
If you want to get fancy, you can transfer some of the Cool Whip to a piping bag and pipe decorative swirls or dollops across the top. This is especially lovely if you’re making the trifle for a holiday or special event.
Step 6: Finish with the Remaining Blueberry Filling
Now, take the remaining third of your blueberry pie filling and spoon it over the whipped topping. You can do this in small spoonfuls scattered across the surface, or you can create a swirling pattern by dragging a knife gently through the filling and Cool Whip to create a marbled effect.
Tip: Use a light hand with the swirling—too much movement and the layers can start to blend together. A few gentle figure-eights with a skewer or butter knife is all you need.
This final touch gives your trifle a gorgeous, glossy finish and lets everyone know what fruity goodness is hiding inside.
Step 7: Chill the Trifle
Once all your layers are in place, cover the dish tightly with plastic wrap or a fitted lid and refrigerate for at least 4–5 hours. Overnight is even better, as it gives the flavors time to meld and the textures to settle.
During this time, the cake will absorb some of the moisture from the pudding and blueberries, becoming even more tender and flavorful.
Step 8: Serve and Enjoy
When it’s time to serve, simply remove the plastic wrap and grab a large spoon or serving spatula. Scoop generous portions into bowls or dessert cups, making sure each serving includes a bit of every layer.
Optional Garnish Ideas:
- Fresh blueberries for extra color and freshness
- A sprinkle of crushed graham crackers or vanilla wafers on top
- A dusting of powdered sugar for an elegant finish
- Mint leaves for a touch of green and contrast
And just like that, you’ve created a dessert that’s simple, elegant, and guaranteed to wow every guest at the table.

How to Serve
Serving this Blueberry Angel Food Cake Trifle is just as easy and fuss-free as making it. Because it’s chilled and layered, it holds up beautifully on a dessert table, making it perfect for events where guests serve themselves.
One of the most popular ways to serve this dish is family-style, right from the dish you made it in. Just place it on the table with a serving spoon and let everyone help themselves. The key is to scoop down deep enough to get a little bit of every layer—the cake, the blueberry filling, the pudding mixture, and the whipped topping.
If you want to make the presentation a bit more elegant or portion-controlled, consider serving the trifle in individual dessert cups or small mason jars. This approach works especially well for dinner parties, picnics, or baby showers, where guests can simply grab a cup and go. Plus, the individual layers are even more visually striking in a clear glass.
For a more casual twist, you can also serve it with a side of extra blueberries, whipped topping, or even a drizzle of vanilla sauce for guests who want to customize their portion.
If you’re serving it at a buffet or potluck, place a card next to the dish listing ingredients in case of allergies. Since this dessert contains dairy and gluten, it’s helpful to let guests know ahead of time.
Whether you serve it in a big dish for a family celebration or in elegant glasses at a bridal shower, this dessert is going to look beautiful and taste even better.
Pairing Suggestions
Pairing this Blueberry Angel Food Cake Trifle with the right sides, drinks, and even a complementary main dish can elevate it from a simple dessert to the crown jewel of your meal. Because this dessert is light, fruity, and creamy, you’ll want to serve it with items that either match its freshness or offer a pleasing contrast.
Beverage Pairings
Since we’re keeping things halal and family-friendly, we’ll focus on alcohol-free drinks that pair well with sweet and fruity desserts. Here are some top picks:
- Sparkling White Grape Juice – The bubbles offer a fun, festive vibe, and the crisp grape flavor pairs well with the tartness of blueberries.
- Mint Lemonade – A chilled, citrusy drink with fresh mint leaves helps cut through the creaminess of the trifle.
- Chilled Herbal Tea – Chamomile or hibiscus tea served over ice makes a lovely light beverage to accompany this dessert.
- Fruit-Infused Water – Add fresh slices of lemon, lime, or cucumber to water for a clean, refreshing sip between bites of trifle.
Main Dish Pairings
You might be wondering what type of meal this dessert follows best. Given how airy and refreshing it is, it’s an ideal closer for meals that are lighter in nature. Consider serving it after:
- Grilled Chicken or Fish – Something with citrus marinade or herbs will complement the fruit notes in the trifle.
- Pasta Primavera – A vegetarian option with colorful vegetables and a light garlic sauce sets the stage for something sweet and fruity.
- Rice Pilaf and Roasted Vegetables – For a more neutral main course, this allows the dessert to shine as the standout flavor.
Side and Snack Pairings
If you’re offering a dessert table or planning an afternoon tea-style setup, you might want to add some lighter snack items alongside the trifle:
- Mini Lemon Muffins or Madeleines – Their subtle citrus flavor works beautifully with blueberry.
- Fresh Fruit Skewers – Keep things light and colorful with bite-sized fruit served on skewers.
- Almond or Coconut Macaroons – Slightly chewy and naturally sweet, they provide a textural contrast to the creamy trifle.
Whether you’re putting together a holiday spread, a picnic lunch, or a bridal shower menu, pairing this trifle with fresh, bright flavors makes the entire meal feel cohesive and well thought out.
Storage, Freezing & Reheating Instructions
One of the best things about this Blueberry Angel Food Cake Trifle—besides how easy it is to make—is that it stores really well. In fact, letting it rest in the fridge overnight only improves the flavor and texture, making it a perfect make-ahead dessert.
Storing Leftovers
If you’ve got leftovers (which doesn’t always happen with this one), they’ll keep well in the fridge for up to three days. Just cover the trifle tightly with plastic wrap or transfer it to an airtight container. The cake will continue to absorb the moisture from the pudding and pie filling, which means the texture may get softer over time—but it’s still totally delicious.
Tip: If you’re making individual portions in jars or cups, simply seal each one with a lid or plastic wrap before storing. This makes grab-and-go treats for the next day easy and fun.
Freezing Instructions
While you can technically freeze the trifle, it’s not always the best idea texture-wise. The whipped topping and pudding may separate slightly when thawed, and the cake may become overly soggy. That said, if you really want to freeze it, follow these steps:
- Scoop leftovers into a freezer-safe, airtight container.
- Freeze for up to one month.
- Thaw in the refrigerator overnight before serving.
Tip: If you’re planning to make this dessert ahead and freeze it intentionally, consider leaving the whipped topping and final blueberry layer off until after thawing. Add those fresh to improve the final presentation and texture.
Reheating
This is a no-bake, chilled dessert, so reheating doesn’t apply. However, you’ll want to serve it cold. If the dessert has been sitting out for a long time—say, at a picnic or party—it’s a good idea to pop it back into the fridge for 15–20 minutes to firm up again before serving.
Overall, this is a very storage-friendly dessert that’s ideal for making ahead and enjoying over a couple of days. It’s one less thing to stress over when you’re planning a big event or simply prepping your meals for the week.
Common Mistakes to Avoid
Even the easiest desserts can go sideways if you’re not careful, so let’s go over a few common mistakes people might run into with this trifle—and how to avoid them.
Using a Warm Cake
This is one of the biggest mistakes to watch for. If your angel food cake is still warm when you cube and layer it, it will steam inside the dish and cause your creamy layers to thin out and slide around. Always make sure your cake is fully cooled before cutting and assembling the trifle.
Overmixing the Pudding
When combining the pudding mix with milk and sour cream, be careful not to over-whip it. You want a smooth, thick mixture—not a runny one. Overmixing can also cause the sour cream to become watery, which affects the structure of your dessert.
Not Letting It Chill Long Enough
The chilling time isn’t just a suggestion—it’s key to achieving the right texture. If you serve the trifle too soon, the layers won’t have had time to set, and the flavors won’t meld as beautifully. Try to let it sit for at least 4 hours, or even better, overnight.
Adding Too Much Fruit on Top
While it’s tempting to pile on the blueberry pie filling for that dramatic finish, too much fruit on top can weigh down the whipped topping and make the trifle look messy. Stick to about one-third of the can for the top layer, and use it strategically for the best visual effect.
Using the Wrong Dish
Using too shallow or too small of a dish can make layering tricky and prevent the beautiful stacked look you’re going for. Aim for a deep 9×9-inch pan or a classic trifle dish. Clear glass is ideal so you can show off all the lovely layers.
Avoiding these simple mistakes will help ensure your trifle comes out looking and tasting absolutely perfect every single time.
Pro Tips
Creating a great dessert is one thing—but turning it into a showstopper? That comes down to a few insider tips that can really make a difference. These pro tips will help you get the most out of your Blueberry Angel Food Cake Trifle, whether you’re making it for the first time or the tenth.
1. Chill Your Mixing Bowls
When preparing the pudding mixture or working with whipped topping, using chilled bowls can help everything come together more smoothly. Cold bowls help maintain the thick, creamy consistency you’re aiming for, especially when mixing the pudding and sour cream layer.
2. Use a Trifle Dish for Maximum Impact
While a glass baking dish works just fine, using a tall trifle bowl makes this dessert a true centerpiece. The visible layers of cake, blueberry filling, and creamy topping are stunning when viewed from the side, turning a simple dish into something worthy of a celebration.
3. Let the Trifle Rest Overnight
Though it only needs 4–5 hours to set, letting the trifle chill overnight enhances the flavors and improves the texture. The cake becomes more tender, the pudding layer thickens slightly, and the entire dessert holds together better when serving.
4. Customize with Texture
If you want to add a bit of crunch, try layering in crushed graham crackers, vanilla wafers, or slivered almonds. These additions bring extra texture and flavor contrast that can take your trifle to the next level.
5. Don’t Skip the Sour Cream
It might sound odd to add sour cream to a sweet dessert, but trust the process. It cuts through the sweetness and gives the vanilla pudding a tangy depth that keeps the dish from feeling too sugary or one-dimensional. You won’t taste the sour cream directly—it just makes everything taste better.
6. Serve with a Cold Spoon
This may seem minor, but serving trifle with a chilled metal spoon helps maintain its structure when scooping. A warm spoon can cause the whipped topping to melt slightly, which might make the layers look messy when serving.
7. Use Full-Fat Sour Cream for Best Flavor
If you’re not strictly watching fat intake, go for the full-fat sour cream. The richness it adds to the pudding layer is worth it, and it helps the texture stay firm and luxurious.
These pro tips are all about maximizing flavor, presentation, and ease. With just a few small tweaks, you can make this simple dessert truly unforgettable.
Frequently Asked Questions (FAQs)
Every recipe brings a few questions along with it, especially one as flexible and beloved as this Blueberry Angel Food Cake Trifle. Here are some of the most common questions I’ve received—and the answers to help you feel confident every step of the way.
Can I use homemade blueberry pie filling?
Yes, absolutely. If you have fresh or frozen blueberries on hand and prefer to make your own filling, go for it. Just make sure it has a similar consistency to canned pie filling so it layers nicely. A simple filling made from blueberries, sugar, lemon juice, and cornstarch will work beautifully.
Can I substitute the sour cream?
You can! If you prefer a lighter option, you can use plain Greek yogurt instead of sour cream. It has a similar tangy flavor and creamy texture, and it adds a bit more protein to the dish. Just keep in mind that Greek yogurt is a bit thicker, so you may need to adjust the pudding consistency with a splash of extra milk.
What if I don’t have instant pudding?
Instant pudding is the easiest and fastest choice, but if you only have cook-and-serve pudding, you can still make it work. Just prepare the pudding according to the package instructions and let it cool completely before mixing it with the sour cream.
Can I make this ahead of time?
Yes, and you should! This trifle is best when it has time to rest and chill. You can make it up to 24 hours in advance, and it will hold up beautifully in the fridge. In fact, the flavor and texture actually improve with time.
Can I use a different fruit?
Definitely. While blueberry is a classic and delicious choice, this recipe is endlessly adaptable. You can use cherry pie filling, strawberry compote, peach preserves, or even a combination of fruits for a mixed berry version. Just stick to a fruit filling that has a thick, jammy consistency.
What if I don’t have a trifle dish?
No worries! A 9×9-inch glass baking dish or even a large glass bowl will work just fine. The key is to choose something with enough depth to accommodate the layers. If you want to get creative, you can also make individual trifles in mason jars, parfait glasses, or dessert cups.
Can I freeze the trifle?
You can, but it’s not ideal. The texture of the whipped topping and pudding can become watery and separate after thawing. If you must freeze it, do so in individual portions and let it thaw slowly in the fridge. For best results, enjoy it fresh or chilled from the fridge.
How long does it last in the fridge?
This trifle will keep well in the refrigerator for about three days. After that, the layers start to lose their texture and become overly soft. Be sure to store it tightly covered to maintain freshness.
Can I make this gluten-free?
Yes. To make this trifle gluten-free, simply use a gluten-free angel food cake. Many grocery stores carry them in the freezer or bakery section. Double-check all other ingredients (like pie filling and pudding mix) to ensure they’re certified gluten-free as well.
How do I keep the whipped topping from deflating?
The best way to maintain the whipped topping’s volume is to use it while it’s still cold and fully thawed. Don’t try to spread it while it’s still semi-frozen. Also, avoid over-handling it—just a gentle, even spread is all you need.
Conclusion & Call to Action
At the end of the day, there’s something undeniably comforting about a dessert that’s both easy to make and completely crowd-pleasing. This Blueberry Angel Food Cake Trifle hits all the right notes—it’s light yet rich, sweet but not overly so, and layered with just enough texture and flavor to keep you going back for more.
Whether you’re preparing it for a weekend get-together, a family birthday party, or just as a mid-week treat, this recipe never disappoints. It looks gorgeous, tastes amazing, and comes together in less than 30 minutes of hands-on time. Plus, it’s flexible enough to adapt to whatever ingredients you have on hand or whatever fruit is in season.
So now that you know how it’s done—from the ingredients and prep to all the pro tips and storage hacks—it’s your turn to bring this beautiful trifle to life in your own kitchen. Don’t worry if it’s your first time layering a dessert like this. The beauty of a trifle is in its rustic charm and forgiving nature. A little extra pudding here, a swirl of blueberries there—it all comes together in the most delicious way.
If you try this recipe, I’d love to hear how it turned out. Share your experience, let me know what fruit combinations you tried, or snap a photo and tag me if you post it on social media. Seeing your creations brings me so much joy—and I know you’re going to make something truly special.
So go ahead and grab those ingredients. You’re just a few steps away from a show-stopping dessert that everyone will be talking about long after the last spoonful is gone. Happy layering!
Print
Blueberry Angel Food Cake Trifle – Easy No-Bake Dessert Recipe
- Total Time: 5 hours (includes chilling)
- Yield: 9–12 servings 1x
- Diet: Vegetarian
Description
A light, creamy, and fruit-filled no-bake dessert layered with angel food cake, blueberry pie filling, and a luscious vanilla pudding cream.
Ingredients
-
1 angel food cake, cubed
-
1 (21 oz) can blueberry pie filling
-
1 (3.6 oz) package instant vanilla pudding mix
-
1½ cups 2% milk
-
1 cup sour cream
-
8 oz Cool Whip, thawed
Instructions
-
Cube the angel food cake into 1-inch pieces.
-
Layer half the cake cubes in a trifle or 9×9-inch dish.
-
Spread ⅔ of the blueberry pie filling over the cake.
-
Add the remaining cake cubes as the next layer.
-
In a bowl, whisk pudding mix, milk, and sour cream until smooth.
-
Spread pudding mixture over the cake layer.
-
Top with Cool Whip and swirl in the remaining ⅓ pie filling.
-
Chill for 4–5 hours or overnight before serving.
Notes
-
Make ahead for better flavor.
-
Substitute sour cream with Greek yogurt for a lighter version.
-
Swap blueberries with other fruit fillings for variety.
- Prep Time: 20 minutes
- Cook Time: 0 minutes
- Category: Dessert
- Method: Stovetop
- Cuisine: American