
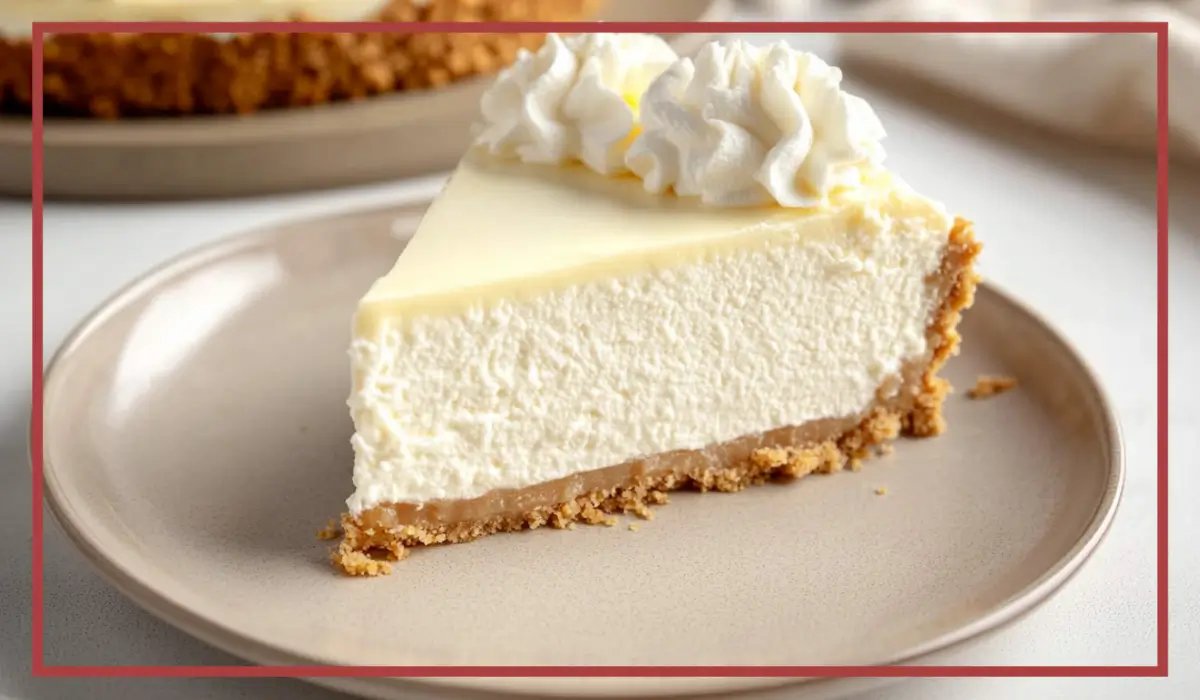
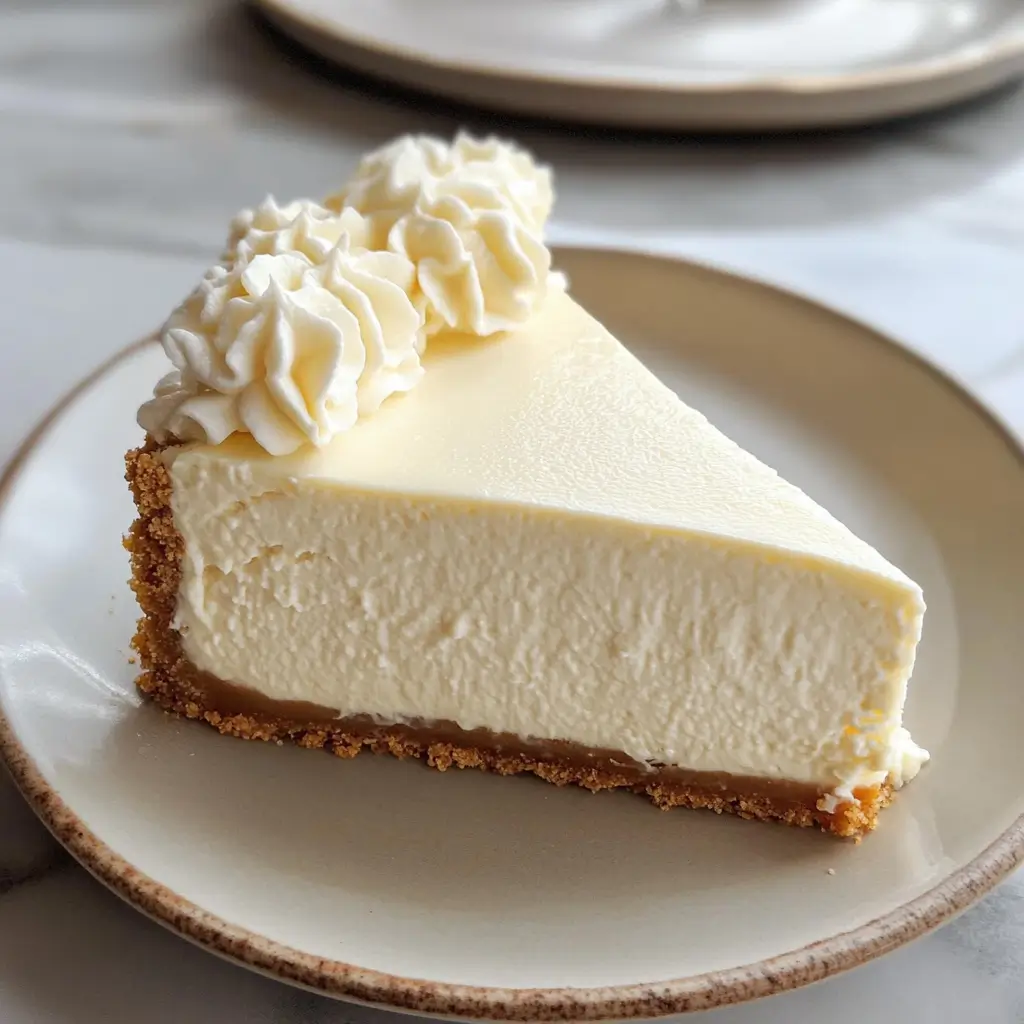
There’s something timeless and comforting about a slice of cheesecake. It’s rich, velvety, and indulgent without being overwhelming. Whether it’s served at a celebration, tucked into the corner of a family dinner, or enjoyed solo with a warm mug of coffee after a long day, cheesecake brings a little luxury to the everyday. And when it comes to cheesecakes, nothing quite beats the classic New York Style Cheesecake. It’s dense yet creamy, tangy yet sweet, and the buttery graham cracker crust provides the perfect contrast to the silky smooth filling. This recipe captures all those signature characteristics with just the right balance of flavor, texture, and ease of execution.
What makes this recipe extra special is how approachable it is. Even though cheesecake has a reputation for being a bit high-maintenance — with its water baths, chilling times, and risk of cracking — I promise you this version is totally doable, even if you’ve never made one before. With just a few smart steps and some patience, you’ll be rewarded with a dessert that’s every bit as good as what you’d find in a fancy bakery.
I remember the first time I made this cheesecake. It was for my brother’s birthday, and I was both nervous and excited. I followed the steps meticulously, from room-temperature cream cheese to the gentle water bath, and when I pulled it out of the oven and saw that perfectly golden top with just the right amount of jiggle in the center, I knew I was onto something. Since then, this cheesecake has become a go-to dessert for celebrations and get-togethers, always earning glowing reviews and requests for seconds (and the recipe).
But beyond the texture and taste, what I love most is the way this cheesecake brings people together. Whether you’re sharing it with family after Friday dinner, bringing it to a potluck, or simply enjoying a quiet slice for yourself, this cheesecake feels special every time.
Let’s dive into the details and get you baking the creamiest, most foolproof New York-style cheesecake you’ve ever made.
Why You’ll Love This New York Style Cheesecake Recipe
There are plenty of reasons to fall in love with this cheesecake, starting with its classic appeal. It checks all the boxes: creamy, dense, not-too-sweet, and just tangy enough to keep things interesting. But what really makes this recipe a keeper is how well it balances flavor, texture, and simplicity.
First, it’s beginner-friendly without sacrificing any of the traditional characteristics that make a great New York-style cheesecake. The steps are clear, and with a little prep, the process becomes surprisingly relaxing. Bringing the ingredients to room temperature helps everything blend smoothly, and using a water bath ensures a slow, even bake — which is the secret to that dreamy, crack-free top.
Second, the crust. A buttery graham cracker crust is a must for cheesecake, and this one holds up beautifully. It’s got just the right amount of sweetness and crunch, and it anchors the silky filling in a way that’s nothing short of perfect.
Then, there’s the filling. Made with full-fat cream cheese, sour cream, heavy cream, and a splash of lemon juice, it’s everything you want it to be — rich, smooth, and satisfying. The vanilla rounds out the flavor, and the cornstarch provides just enough stability without making it gummy.
Even better, this cheesecake is versatile. You can dress it up with whipped cream, fresh berries, or fruit compote, or you can serve it plain and let the flavor shine. Either way, it’s guaranteed to impress.
So, if you’ve been searching for a cheesecake that’s reliable, classic, and absolutely delicious, this is the one. Whether it’s your first cheesecake or your fiftieth, this recipe delivers every time.
Health Benefits of this New York Style Cheesecake
While cheesecake is undoubtedly a treat, that doesn’t mean it can’t offer some nutritional value as well. When enjoyed in moderation, this dessert can be part of a balanced lifestyle — especially when you’re using real, high-quality ingredients.
One of the key components of this cheesecake is cream cheese, which provides a rich source of calcium and protein. Calcium is essential for bone health, and protein helps with muscle repair and maintenance. Full-fat dairy also includes fat-soluble vitamins like A, D, and E, which are important for immune function, skin health, and more.
Sour cream and heavy cream, also found in the filling, contribute similar nutrients. They add creaminess and body, but they also help you feel satisfied after just one slice, making it easier to indulge mindfully. And while this dessert is higher in fat, the presence of fat can slow digestion slightly, helping prevent blood sugar spikes when paired with sweet ingredients.
Graham crackers, while used primarily for flavor and texture, often contain a mix of whole grains and refined flour. When you choose a graham cracker that’s higher in fiber, you add a little digestive support and a bit more staying power to each slice.
The optional use of lemon juice introduces a hint of vitamin C and brightness, which not only enhances flavor but supports your immune system and digestion.
And finally, making your cheesecake at home means you’re in control of every ingredient. There are no preservatives, artificial flavors, or unnecessary fillers. You can even adapt the recipe by reducing the sugar slightly or choosing a lighter topping, depending on your health goals.
All in all, while cheesecake may not be a health food in the traditional sense, it’s a satisfying treat made from real ingredients that offer genuine nutritional value. A thoughtful, homemade dessert like this one is a delicious way to enjoy the sweeter side of life — without sacrificing wellness.
Preparation Time, Servings, and Nutritional Information of this New York Style Cheesecake
One of the best parts about this cheesecake is how manageable it is in terms of prep and cook time. While it does take a bit of patience (mostly during the chilling process), the actual hands-on work is minimal, and the results are well worth the wait.
Preparation Time:
- Prep: 30 minutes
- Baking: 75 to 80 minutes
- Cooling: 2 to 3 hours
- Chilling (refrigeration): At least 8 hours, preferably overnight
Total Time: Approximately 12 hours (including chill time)
Servings:
- This recipe yields 12 generous slices. You can stretch it to 14 or 16 smaller slices if you’re serving a crowd or pairing it with other desserts.
Nutritional Information (per slice, based on 12 servings):
- Calories: Approximately 460
- Protein: 6g
- Fat: 34g
- Saturated Fat: 20g
- Carbohydrates: 32g
- Sugars: 24g
- Fiber: 0.5g
- Sodium: 310mg
Keep in mind that the exact nutritional values may vary slightly depending on the specific brands of ingredients used and any substitutions or toppings added. If you’re looking to lighten things up, you can swap in a lower-fat cream cheese or reduce the sugar slightly without compromising the texture too much.
Ingredients List of this New York Style Cheesecake
Before we dive into the cooking process, let’s get organized with a complete list of ingredients. Each element plays a role in creating that signature New York-style texture and flavor, so try not to skip or substitute unless absolutely necessary.
For the Crust:
- 190 grams graham crackers (about 1½ sleeves)
- 35 grams sugar (about 2 tablespoons, optional)
- 75 grams unsalted butter, melted (about 5 tablespoons)
The graham crackers form the base of the crust, providing a sweet, nutty crunch that perfectly contrasts with the creamy filling. The added sugar is optional but enhances the flavor and helps the crust hold together. Melted butter binds everything and adds richness.
For the Filling:
- 32 ounces full-fat cream cheese (4 blocks), at room temperature
- 325 grams granulated sugar (about 1½ cups)
- ½ teaspoon salt
- 1 teaspoon vanilla extract
- 4 large eggs, at room temperature
- 120 grams heavy cream (½ cup)
- 240 grams sour cream (1 cup)
- 2 to 3 tablespoons lemon juice (fresh is best)
- 1 tablespoon cornstarch
Cream cheese is the star of the show here, and using full-fat ensures the smoothest, most luxurious texture. The sugar sweetens the deal without overwhelming the other flavors, while the salt and lemon juice brighten things up and balance the richness. Sour cream and heavy cream contribute extra creaminess and tang, and the cornstarch provides stability without altering the texture.
Optional Topping:
- Whipped heavy cream (unsweetened or lightly sweetened, depending on preference)
This cheesecake really doesn’t need a topping to shine, but if you love a little extra flourish, a simple swirl of whipped cream is a beautiful (and delicious) touch.
Step-By-Step Cooking Instructions of this New York Style Cheesecake
Creating the perfect New York-style cheesecake may seem a little intimidating at first, especially if it’s your first time working with water baths and cream cheese-based batters. But the truth is, once you break it down step by step, it becomes a calm, almost therapeutic process. Here’s how to do it from start to finish with tips and guidance to make sure every step is crystal clear.
Step 1: Prep Your Ingredients and Tools
Before you even turn on the oven, make sure all your ingredients are at room temperature. This is one of the most important things you can do to ensure a smooth, lump-free batter. Cold cream cheese will clump and resist mixing, so let it sit out for at least an hour before starting.
Also gather your tools:
- 9-inch springform pan
- Aluminum foil
- Food processor or rolling pin (for crust)
- Stand mixer or hand mixer
- Large roasting pan (for the water bath)
- Mixing bowls
- Rubber spatula
- Whisk
Preheat your oven to 350°F. This initial temperature is for baking the crust. We’ll lower it after that.
Prepare your springform pan by wrapping the outside in at least two layers of heavy-duty aluminum foil. This step is essential because you’ll be placing the pan into a water bath later, and you want to avoid any leaks.
Step 2: Make the Graham Cracker Crust
Add the graham crackers to a food processor and pulse until you get fine crumbs. If you don’t have a processor, place the crackers in a zip-top bag and crush them with a rolling pin.
Next, pour the melted butter over the crumbs and add the sugar if using. Mix until the texture resembles wet sand. When you press it between your fingers, it should clump together slightly.
Transfer the crumb mixture into your prepared springform pan. Use the bottom of a glass or measuring cup to press the crumbs firmly into an even layer on the bottom. If you like, you can press some crumbs slightly up the sides for a bit of texture contrast.
Bake the crust for 8 minutes at 350°F. Remove from the oven and immediately reduce the temperature to 325°F. Let the crust cool slightly while you make the filling.
Step 3: Prepare the Cheesecake Filling
In a large mixing bowl or stand mixer fitted with a paddle attachment, add your room-temperature cream cheese, sugar, salt, and vanilla extract. Beat on medium speed for about 3–5 minutes, scraping down the sides of the bowl frequently. The goal here is to create a silky, lump-free base.
Meanwhile, in a separate bowl, lightly whisk the eggs. You don’t want to beat too much air into them — just enough to break the yolks and mix them evenly.
With the mixer on low speed, slowly pour in the eggs a little at a time, allowing them to fully incorporate before adding more. This gradual method helps avoid overmixing, which can lead to cracks during baking.
Once the eggs are in, add the heavy cream, sour cream, lemon juice, and cornstarch. Mix just until everything is combined. Be careful not to overbeat at this stage — too much air in the batter can cause the cheesecake to rise and fall unevenly.
Scrape the sides and bottom of the bowl well to ensure everything is smoothly blended. Your batter should be thick, creamy, and pourable.
Step 4: Assemble and Bake the Cheesecake
Pour the cheesecake batter into the cooled crust. Smooth the top with a spatula to create an even surface.
Place the springform pan into a larger roasting pan or deep baking dish. Carefully pour boiling water into the outer pan until it reaches about halfway up the sides of the springform pan. This water bath creates a humid environment in the oven, which helps prevent cracks and promotes even baking.
Place the entire setup into the oven and bake at 325°F for 75 to 80 minutes. Resist the urge to open the oven during this time — any sudden temperature changes can cause the cheesecake to deflate or crack.
You’ll know the cheesecake is done when the edges are set, but the center still has a slight jiggle when you nudge the pan. It should look firm but not dry, with a smooth surface that’s just beginning to turn golden.
Step 5: Cool Gradually
When baking is complete, turn off the oven but leave the cheesecake inside with the door slightly open for about an hour. This gentle cooling period helps prevent sudden temperature shifts that can cause the cheesecake to crack.
After an hour, remove the cheesecake from the oven and the water bath. Carefully peel away the foil and place the springform pan on a wire rack to cool at room temperature for another 2 to 3 hours.
Once it has cooled, run a thin knife or spatula around the edge of the cake to loosen it from the sides of the pan. This helps prevent cracks as it chills.
Cover the cheesecake (still in the pan) with foil or plastic wrap and place it in the refrigerator. Chill for at least 8 hours, ideally overnight. This long rest helps the flavors develop and allows the texture to set properly.
Step 6: Serve and Enjoy
When ready to serve, remove the cheesecake from the fridge and unlatch the springform pan. Use a long, sharp knife dipped in hot water and wiped clean between cuts to get clean, beautiful slices.
You can serve the cheesecake as-is for a pure, classic flavor, or you can add a dollop of whipped cream on top for an extra touch. Fresh berries, a fruit compote, or a drizzle of chocolate or caramel sauce also make excellent additions.
This cheesecake is best served chilled, straight from the fridge, and will hold its shape and creamy texture for hours.
How to Serve this New York Style Cheesecake
There’s no wrong way to serve cheesecake, but there are certainly a few ways to make it shine depending on the occasion and your preferences.
Here are a few of our favorite serving ideas:
- Keep it classic: Serve plain slices with no topping at all. The rich flavor and creamy texture speak for themselves and don’t need embellishment.
- Add whipped cream: Lightly sweetened whipped cream piped or dolloped on top adds contrast in texture and gives the dessert a beautiful, airy finish.
- Top with fresh fruit: Strawberries, blueberries, raspberries, or sliced kiwi make for a bright, refreshing addition. Their natural tartness pairs perfectly with the richness of the cheesecake.
- Fruit compote or sauce: A warm berry compote or a tangy lemon curd drizzled on each slice elevates the experience, especially when entertaining.
- Chocolate drizzle: For chocolate lovers, a simple ganache or melted dark chocolate can be poured over the top for an indulgent twist.
- Nut toppings: Toasted almonds, pecans, or walnuts add a lovely crunch and extra layer of flavor.
- As part of a dessert board: Slice your cheesecake into small squares and serve alongside other bite-sized desserts like brownies, cookies, and fruit skewers for a fun and varied presentation.
No matter how you serve it, cheesecake always feels like a treat. The key is balancing the richness with a light topping or a fresh element to keep the flavors dynamic and satisfying.
Next, let’s talk about the best drinks and side pairings to complement your masterpiece.
Pairing Suggestions for this New York Style Cheesecake
Pairing your New York-style cheesecake with the right beverages or side items can turn an already delightful dessert into a fully immersive experience. Since cheesecake is rich and creamy, contrasting it with light, bright, or slightly acidic flavors will help enhance its complexity and balance out its indulgent nature.
Beverages That Complement Cheesecake
1. Freshly Brewed Coffee or Espresso:
The slight bitterness of coffee contrasts beautifully with the creamy sweetness of cheesecake. A well-brewed cup of dark roast or a rich espresso shot enhances the vanilla and lemon notes while cleansing the palate between bites.
2. Herbal Teas:
Chamomile, mint, or a light citrus blend provides a soothing, caffeine-free option that won’t overpower the cheesecake’s subtle flavors. These teas bring freshness and lightness to the table.
3. Sparkling Water with Lemon:
Simple and elegant, sparkling water with a lemon wedge refreshes the palate and complements the tangy sour cream and lemon juice in the filling.
4. Fruit Juices:
Freshly squeezed orange or apple juice, especially if slightly tart, can brighten the dessert course and add a touch of contrast.
5. Halal Mocktails or Sparkling Grape Juice:
Non-alcoholic sparkling drinks, particularly those with berry or citrus undertones, pair well with the richness of the cheesecake without clashing with its creamy texture.
Side Treats and Flavor Boosters
1. Berry Compote:
Warm or chilled berry sauce adds a sweet and tart contrast that cuts through the richness of the cheesecake. Use blueberries, strawberries, or a mix of raspberries for best results.
2. Light Fruit Salad:
A refreshing bowl of seasonal fruits like mango, pineapple, kiwi, and grapes offers a juicy, vibrant balance and pairs wonderfully with the smooth texture of the cheesecake.
3. Crushed Nuts or Toasted Coconut:
For extra texture, serve each slice with a sprinkle of chopped toasted almonds or shredded coconut. These toppings provide crunch and added flavor dimension.
4. Shortbread Cookies or Biscotti:
For a crunchy pairing, offer a side of crisp shortbread or nutty biscotti. These dry cookies balance out the creamy filling and can be dipped into tea or coffee.
5. Mini Dessert Sampler:
Create a dessert spread by offering small portions of complementary treats like mini chocolate cups, fruit tarts, or mousse. A tiny bite of chocolate mousse followed by a spoonful of cheesecake is the kind of experience guests won’t forget.
Ultimately, choose pairings based on the setting. If it’s a quiet evening dessert, a warm drink and a cozy topping are perfect. For larger gatherings, a table of colorful toppings and sides can let everyone create their dream slice.
Storage, Freezing & Reheating Instructions
Cheesecake holds up exceptionally well when stored properly, which means you can make it ahead of time and still enjoy that luscious texture days later. Whether you’re dealing with leftovers or prepping in advance, here’s how to keep it fresh and delicious.
Storing in the Refrigerator
Once your cheesecake has cooled and set in the refrigerator for at least 8 hours, cover it tightly with plastic wrap or aluminum foil.
Storage Tips:
- Store the cheesecake in the springform pan with the top covered to prevent it from absorbing fridge odors.
- It will stay fresh for up to 5 days in the refrigerator.
- To keep the top looking clean, place a layer of parchment or wax paper over the surface before covering it with foil or wrap.
If you’ve already sliced the cheesecake, you can store individual slices in airtight containers, separated by parchment paper to prevent sticking.
Freezing the Cheesecake
This cheesecake freezes beautifully and can be a real time-saver if you’re hosting an event or want to keep portions on hand for later.
To Freeze a Whole Cheesecake:
- Chill it overnight as usual.
- Remove the springform ring, then wrap the entire cheesecake in plastic wrap and then again in foil.
- Freeze flat on a shelf in the freezer.
- It can be frozen for up to 3 months.
To Freeze Slices:
- Cut individual slices and place them on a baking sheet lined with parchment paper.
- Freeze for 1 hour until firm.
- Wrap each slice tightly in plastic wrap and store in a freezer-safe bag or container.
Reheating or Thawing
To Thaw a Whole Cheesecake:
- Place in the fridge overnight to thaw slowly. Remove all wrapping before thawing to prevent condensation from soaking into the cake.
To Thaw Individual Slices:
- Let slices thaw in the refrigerator for a few hours or at room temperature for 30–60 minutes.
- Avoid microwaving to speed up the process — it can ruin the texture and make the crust soggy.
Whether frozen or refrigerated, your cheesecake will maintain its delicious flavor and texture as long as it’s properly wrapped and protected from air and moisture.
Common Mistakes to Avoid in this New York Style Cheesecake
Even though cheesecake is a relatively simple dessert in terms of ingredients, it does have a few quirks. Avoiding these common mistakes can help you achieve that perfect smooth texture and crack-free surface.
1. Not Using Room-Temperature Ingredients
Cold cream cheese will not blend properly, leaving you with a lumpy batter. Always allow your cream cheese, eggs, sour cream, and heavy cream to come to room temperature before starting.
2. Overmixing the Batter
Once the eggs are added, mix just until combined. Overbeating introduces too much air into the batter, which causes the cheesecake to rise too much in the oven and then collapse or crack as it cools.
3. Skipping the Water Bath
The water bath creates a humid environment that ensures gentle, even cooking. Without it, your cheesecake is more likely to crack, brown unevenly, or dry out around the edges.
4. Opening the Oven Door During Baking
Resist the urge to check on your cheesecake. Sudden changes in temperature can cause it to sink in the center or develop cracks. Trust the process and peek only when absolutely necessary near the end of the baking time.
5. Rushing the Cooling Process
Letting the cheesecake cool gradually and completely is essential. Don’t move it directly from oven to fridge — allow it to cool in stages to prevent the surface from cracking due to temperature shock.
6. Cutting Before It’s Set
Cutting into your cheesecake before it’s had time to fully chill will ruin the texture. It needs at least 8 hours in the fridge to firm up and slice cleanly.
By keeping an eye on these details, you can avoid the most common pitfalls and serve up a flawless, professional-quality cheesecake every single time.
Pro Tips of this New York Style Cheesecake
If you’re looking to elevate your cheesecake game even further, these insider tips will help you take things from great to absolutely spectacular.
1. Use a Springform Pan
There’s no substitute for a springform pan when it comes to making cheesecake. It allows you to remove the cake without inverting or damaging the delicate top, making for a flawless presentation.
2. Wrap Your Pan Tightly
When using a water bath, you must wrap your springform pan with at least two layers of foil to prevent leaks. Even a small gap can let water in, which will make your crust soggy.
3. Add Cornstarch to Prevent Cracks
A small amount of cornstarch stabilizes the batter and reduces the chances of cracking. It also helps the cheesecake hold together without becoming overly firm.
4. Chill Overnight
It can be tempting to cut into your cheesecake early, but letting it chill overnight results in the smoothest texture and most developed flavor. It’s worth the wait.
5. Clean Slices with a Warm Knife
To get those clean, bakery-style slices, use a large sharp knife dipped in hot water and wiped dry between each cut. This prevents the filling from sticking and smearing.
6. Flavor Variations Are Easy
Once you master the base, you can add your own twist with flavored extracts (like almond or coconut), swirls of fruit puree, or chocolate chips. Just don’t overload the batter.
7. Let It Come to Room Temperature Before Serving
Take your cheesecake out of the fridge about 20 minutes before serving to let the texture soften slightly. It enhances the mouthfeel and flavor.
Mastering these tips will ensure that your cheesecake turns out perfect every time — creamy, rich, and absolutely beautiful.
Frequently Asked Questions (FAQs)
Can I use low-fat cream cheese?
Technically, yes, but it will affect the texture and richness. Full-fat cream cheese yields the best results, especially for that classic New York-style density. Low-fat versions may cause the filling to be thinner and less flavorful.
Can I skip the water bath?
You can, but it’s not recommended. The water bath ensures even baking and helps prevent the dreaded cracks on the surface. If you choose to skip it, place a pan of hot water on the lower rack of the oven to add some moisture.
What if I don’t have a food processor for the crust?
No problem. Simply place the graham crackers in a large zip-top bag and crush them using a rolling pin or heavy glass until finely ground.
Can I freeze this cheesecake?
Absolutely. It freezes very well either whole or in slices. Just be sure to wrap it tightly and thaw slowly in the fridge to preserve its texture.
Why did my cheesecake crack?
Common causes include overmixing the batter, skipping the water bath, baking too long, or cooling too quickly. Following the steps and tips in this recipe will greatly reduce the chance of cracking.
How do I know when the cheesecake is done baking?
The edges should be set, and the center should still have a slight wobble when gently shaken. It will continue to firm up as it cools, so don’t overbake.
Can I make this ahead of time?
Yes, and you should. Cheesecake tastes even better the next day. Make it up to 2–3 days in advance and store it tightly wrapped in the fridge.
Do I need to use lemon juice?
Lemon juice helps brighten the flavor and balance the richness. You can reduce the amount if you prefer a more neutral flavor, but leaving it out entirely might make the cheesecake feel too heavy.
Can I use a different kind of crust?
Definitely. While graham crackers are traditional, you can use crushed digestive biscuits, vanilla wafers, or even chocolate cookies for a different twist.
What’s the best way to transport cheesecake?
Keep it in the springform pan and cover it tightly. If you’re transporting it in slices, use an airtight container with parchment paper between layers to prevent sticking.
Conclusion & Call to Action
Cheesecake is one of those desserts that feels like a celebration, no matter the occasion. This classic New York-style version delivers everything you love — a rich, creamy texture, a perfectly balanced tangy sweetness, and a buttery crust that holds it all together like a dream.
What sets this recipe apart is its reliability. Whether you’re baking for a holiday, a birthday, or just because you’re craving something extra special, you can count on this cheesecake to deliver bakery-level results right from your own kitchen.
Even if you’ve never made cheesecake before, I hope this guide gave you the confidence to dive in and try. With detailed instructions, practical tips, and plenty of flexibility, this is the kind of recipe that grows with you — simple enough for beginners, but with room to play for experienced bakers.
If you do give this recipe a try, I’d love to hear how it turns out. Share your thoughts in the comments, or better yet, tag me on social media with a photo of your masterpiece. I genuinely love seeing your creations and hearing the stories behind them.
So go ahead — gather your ingredients, clear a little space in the kitchen, and bake a cheesecake that’s every bit as comforting and satisfying as it looks. Here’s to sweet moments, shared slices, and dessert that feels like home.
Print
New York Style Cheesecake: Rich, Creamy, and Easy to Make
- Total Time: Approx. 12 hours (includes chilling)
- Yield: 12 slices 1x
- Diet: Halal
Description
This rich and creamy New York Style Cheesecake features a smooth, tangy filling and a buttery graham cracker crust. It’s a classic dessert that’s perfect for any occasion.
Ingredients
-
Crust:
-
190g graham crackers
-
35g sugar (optional)
-
75g unsalted butter, melted
-
-
Filling:
-
32 oz full-fat cream cheese (4 blocks), room temp
-
325g granulated sugar (~1½ cups)
-
½ tsp salt
-
1 tsp vanilla extract
-
4 large eggs, room temp
-
120g heavy cream (½ cup)
-
240g sour cream (1 cup)
-
2–3 tbsp lemon juice
-
1 tbsp cornstarch
-
-
Optional Topping:
-
Whipped heavy cream (unsweetened)
-
Instructions
-
Bring all ingredients to room temperature.
-
Preheat oven to 350°F. Wrap springform pan in foil.
-
Pulse crust ingredients and press into pan. Bake for 8 mins.
-
Reduce oven to 325°F.
-
Beat cream cheese, sugar, salt, and vanilla until smooth.
-
Whisk eggs and mix in slowly.
-
Add cream, sour cream, lemon juice, and cornstarch. Mix gently.
-
Pour batter into crust.
-
Place pan in a water bath and bake for 75–80 mins.
-
Cool gradually, then refrigerate overnight.
-
Slice and serve with optional whipped cream.
Notes
-
Let ingredients come to room temperature before mixing.
-
Don’t overmix after adding eggs to avoid air pockets.
-
A water bath prevents cracks.
-
Refrigerate overnight for best texture.
- Prep Time: 30 minutes
- Cook Time: 80 minutes
- Category: Dessert
- Method: Baking
- Cuisine: American