
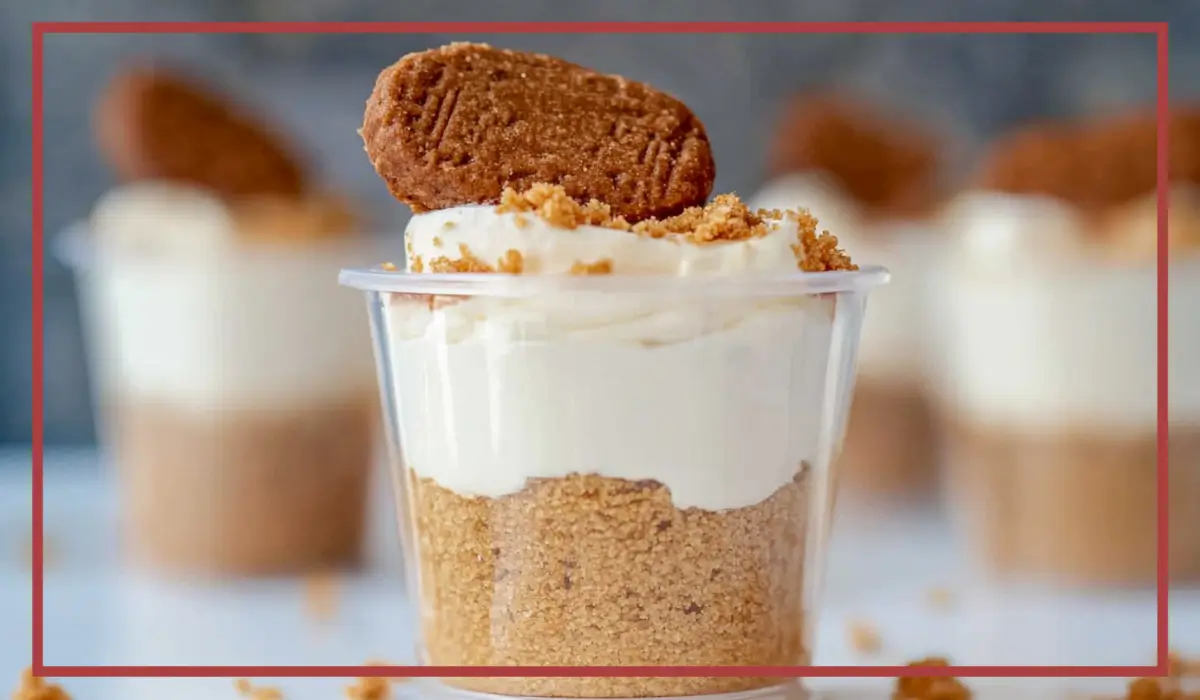
There’s something undeniably magical about Lotus Biscoff—the way it melts on your tongue, its warm caramel flavor with just the right hint of spice, and that unmistakable crunch. Now, imagine all of that goodness swirled into a luscious, creamy cheesecake layered neatly in a cup. That’s exactly what we’re making today: No-Bake Lotus Biscoff Cheesecake Cups. This dessert is pure indulgence, yet it’s so easy to whip up that you’ll wonder why you ever bothered with complicated recipes.
What makes these cheesecake cups so special is their rich yet balanced flavor profile. The base of crushed Biscoff biscuits sets the tone with a slightly crisp, buttery crunch. Then comes the star of the show—the cheesecake filling, which is light, airy, and infused with the creamy warmth of Biscoff spread. Finally, the dessert is topped with a glossy layer of melted Biscoff and finished off with more biscuit crumbs. It’s a three-layered dream that looks fancy but comes together in under 30 minutes.
I first made these for a small family dinner after a long workweek, and let me tell you, they disappeared within minutes. The simplicity of the recipe meant I wasn’t stressed out before dinner, and the reaction from everyone at the table—wide eyes, happy hums, and quick requests for seconds—was totally worth it. Since then, this recipe has become my go-to for everything from potlucks and birthdays to quiet evenings when I just want something a little special.
The beauty of these no-bake cheesecake cups is that they’re perfect for any season. During summer, you’ll love that they don’t require turning on the oven. In the cooler months, their warm caramel notes and creamy texture make them feel like a cozy treat. Whether you’re an experienced baker or someone who rarely steps foot in the kitchen, these dessert cups will make you feel like a pro. So grab your mixing bowls and let’s get into the details—you’re going to love this one.
Why You’ll Love This Lotus Biscoff Cheesecake Cups Recipe
If you’re a fan of desserts that taste like they came straight out of a bakery but require zero baking, this recipe is about to become your new best friend. One of the biggest reasons to love these Lotus Biscoff cheesecake cups is how incredibly simple they are to make. There’s no baking involved, no fancy equipment needed, and no long list of ingredients to hunt down. Everything is straightforward and easy to find at your local grocery store.
In addition to being effortless, this dessert is a guaranteed crowd-pleaser. The flavor is rich without being overwhelming. The Biscoff spread adds a unique caramelized depth that pairs beautifully with the tangy cream cheese, while the whipped cream keeps the texture light and airy. It’s the kind of treat that both kids and adults will rave about. And because these are individual servings, they’re perfect for parties or gatherings—no slicing or serving hassle required.
Visually, these cheesecake cups are stunning. The layered look is elegant and makes each cup feel like a mini masterpiece. They’re Instagram-worthy, yes, but more importantly, they’re made with real, wholesome ingredients. There’s nothing artificial here—just good, honest flavor.
Let’s also talk about versatility. While this recipe features the classic Biscoff flavor throughout, it’s easy to adjust it to your personal tastes. Want to add a swirl of chocolate or a hint of cinnamon? Go for it. Need to make a bigger batch? Simply double the ingredients. You can even prep these a day in advance, making them perfect for busy schedules.
So, whether you’re planning a dinner party, surprising a loved one with a homemade treat, or just satisfying your own sweet tooth, these no-bake cheesecake cups deliver every single time. They’re easy, delicious, beautiful, and endlessly customizable—what’s not to love?
Health Benefits
While these Lotus Biscoff cheesecake cups are certainly a treat, that doesn’t mean they can’t offer a few redeeming qualities from a health perspective. It’s important to remember that balance is key when it comes to enjoying desserts. And when made with thoughtful ingredients and portioned into individual cups, this dessert fits nicely into a balanced lifestyle.
First, let’s start with portion control. Because this recipe is served in individual cups, it naturally encourages moderation. Each cup is satisfying without being overwhelming, which helps you enjoy dessert without overindulging. This is especially helpful if you’re watching your sugar intake or managing your portion sizes.
Another positive element comes from the cream cheese and heavy cream. Both are excellent sources of healthy fats, which help keep you full and satisfied. Cream cheese also provides a small amount of protein and calcium, which are important for maintaining strong bones and muscles. While this dessert isn’t a protein powerhouse by any means, it still contributes to your daily intake in a delicious way.
Moreover, the Biscoff spread contains a blend of vegetable oils and carbohydrates that provide a quick source of energy. While it’s best enjoyed in moderation due to its sugar content, it can certainly be part of a balanced diet when enjoyed as an occasional treat. Additionally, the warming spices in the Biscoff—like cinnamon and nutmeg—have been linked to digestive and anti-inflammatory benefits, which is a nice little bonus.
Lastly, let’s not forget the mental health benefits of treating yourself once in a while. Desserts like these can bring joy, foster connections at social gatherings, and help you celebrate special moments. Sharing a dessert you’ve made with love is one of the simplest, most heartwarming acts. So while it’s not a “health food” in the traditional sense, this recipe certainly has a place in a well-rounded lifestyle.
Preparation Time, Servings, and Nutritional Information
Before you dive into mixing and assembling, let’s take a quick look at how much time you’ll need and what kind of nutritional profile you can expect from these delicious cheesecake cups.
Total Preparation Time:
- Prep time: 20 minutes
- Chill time: 4 hours (or overnight for best results)
- Total time: About 4 hours and 20 minutes (mostly inactive)
Servings:
- This recipe makes approximately 8 individual dessert cups, each filled with about ¼ cup of cheesecake mixture and topped with Biscoff spread and biscuit crumbs.
Nutritional Information (Per Serving, Approximate):
- Calories: 420
- Fat: 30g
- Saturated Fat: 18g
- Carbohydrates: 32g
- Sugar: 21g
- Protein: 4g
- Fiber: 1g
- Sodium: 170mg
Keep in mind that these values are estimates and can vary depending on the exact ingredients and brands you use. However, this gives you a general idea of what to expect. If you’re looking to lighten the recipe a bit, you could experiment with low-fat cream cheese or a whipped topping alternative—but for the classic creamy texture, full-fat ingredients work best.
Ingredients List
The ingredient list for these no-bake Lotus Biscoff cheesecake cups is wonderfully short and straightforward. You likely have most of these items in your pantry or refrigerator already, and if not, they’re all easy to find in any standard grocery store.
For the Crust:
- 10–15 Lotus Biscoff biscuits, crushed (about 1 tablespoon per cup)
These biscuits form the buttery, crumbly base of your cheesecake cup. You can crush them by pulsing in a food processor or placing them in a zip-top bag and crushing with a rolling pin.
For the Cheesecake Filling:
- 8 oz cream cheese, softened (room temperature)
Cream cheese adds richness and tang to the filling. Letting it come to room temperature makes it easier to blend smoothly. - 1¼ cup heavy whipping cream, cold
Cold whipping cream is key to getting a light, fluffy texture. Whipping it separately from the cream cheese ensures the filling stays airy. - 1 tsp vanilla extract (or vanilla bean paste)
Vanilla enhances the flavor of the filling and brings out the caramel notes of the Biscoff. - ½ cup powdered sugar
Powdered sugar sweetens the cheesecake without making it gritty. It’s important to use powdered rather than granulated for a smooth texture. - ¾ cup Lotus Biscoff spread
This magical spread is the heart of the recipe. Its deep caramel flavor makes the filling irresistibly rich.
For the Topping:
- ½ cup Lotus Biscoff spread, melted
Melting the spread allows it to form a smooth, glossy layer over each cup. - 6 Lotus Biscoff biscuits, crushed
A sprinkle of crushed cookies on top adds texture and a beautiful finishing touch.
Now that your ingredients are ready, it’s time to get into the fun part—putting everything together.
Step-By-Step Cooking Instructions
Step 1: Make the Crust
Start by crushing your Biscoff biscuits. You can do this in a food processor by pulsing until you get fine crumbs. Alternatively, place the cookies in a zip-top bag and crush them using a rolling pin or heavy glass. The crumbs should be uniform, but a few larger bits are fine if you like a bit more texture.
Next, divide the crushed biscuits evenly among 8 dessert cups or small jars. Each cup should get about 1 tablespoon of crumbs, which will serve as the base for your cheesecake. Press the crumbs down gently with the back of a spoon or your fingers to create a flat surface. There’s no need to add butter here—the Biscoff biscuits hold together well enough on their own in a no-bake dessert.
Step 2: Prepare the Cheesecake Filling
In a medium bowl, use a hand mixer or stand mixer to whip the softened cream cheese until smooth and creamy. This step is crucial for eliminating lumps and creating a silky base. Then, add in the ¾ cup of Biscoff spread and mix again until the two are fully combined. Set this bowl aside for now while you move on to the whipped cream.
Step 3: Whip the Cream
In a separate, chilled mixing bowl, pour in the cold heavy whipping cream. Add the vanilla extract and powdered sugar. Using a hand mixer or stand mixer fitted with the whisk attachment, whip the mixture until soft peaks form. Be careful not to overmix—stop once the cream is fluffy and holds its shape but is still soft and airy.
Step 4: Combine the Mixtures
Gently fold the whipped cream into the Biscoff cream cheese mixture. Do this in batches to keep the mixture as light and airy as possible. Use a rubber spatula and fold carefully, taking your time. Once fully combined, you’ll be left with a smooth, fluffy, caramel-colored cheesecake filling.
Transfer the mixture into a piping bag fitted with a large round tip, or simply use a spoon to fill each cup with about ¼ cup of cheesecake mixture. Smooth the tops gently with the back of a spoon or an offset spatula if needed.
Step 5: Add the Biscoff Topping
Now it’s time to add that irresistible final layer. Melt ½ cup of Biscoff spread in the microwave for about 20–25 seconds until it’s pourable but not too hot. Carefully spoon or pipe a thin layer of the melted spread over each cheesecake cup, making sure to cover the surface.
Sprinkle each cup with a generous pinch of crushed Biscoff biscuits for a bit of texture and a pretty, bakery-style finish.
Step 6: Chill
Refrigerate the assembled cups for at least 4 hours, or preferably overnight. This step is essential for letting the cheesecake filling set properly. The result will be a firm but creamy dessert that holds its shape beautifully.
After chilling, your Biscoff cheesecake cups are ready to serve and enjoy. They’re best served cold and can be made a day ahead with no problem.

How to Serve
Once your Lotus Biscoff cheesecake cups have fully chilled and set, it’s time to serve them up in style. These individual desserts are already visually impressive, thanks to their neat layers and caramel-colored topping. However, there are a few simple ways to elevate the presentation and create a memorable dessert moment.
First, consider the containers you’re using. Clear glass or plastic cups work best for this recipe because they allow the beautiful layers to shine through. If you’re serving at a party or special occasion, mini mason jars or small dessert glasses can make the dish look even more elegant.
When you’re ready to serve, you can garnish each cup with a little extra flair. Add a dollop of whipped cream on top for a bit of extra indulgence. You can also tuck in a whole Biscoff biscuit upright in the cream for a dramatic touch. If you want a bit of color contrast, a tiny mint leaf or a sprinkle of cinnamon dust adds a lovely visual pop.
These cheesecake cups are best served chilled straight from the fridge. The texture is firm yet creamy, and the contrast between the cold filling and the rich, glossy Biscoff topping is pure bliss. If you’re entertaining, you can set the cups out on a decorative tray with small dessert spoons or teaspoons, making it easy for guests to grab and enjoy.
Another fun idea is to serve these cups as part of a dessert buffet. Arrange them alongside other bite-sized sweets like mini brownies, fruit skewers, or chocolate-dipped strawberries. Because the cups are portioned individually, they’re easy to serve and even easier to enjoy—no slicing, scooping, or mess required.
Whether you’re serving them for a birthday celebration, an intimate dinner, or just a cozy evening at home, these no-bake cheesecake cups deliver elegance, comfort, and flavor in every single bite.
Pairing Suggestions
While these Lotus Biscoff cheesecake cups are rich and satisfying on their own, the right pairings can elevate the entire dessert experience. Whether you’re planning a dinner party or just want to add a little something extra, here are some thoughtful ideas to complete your sweet course.
Beverage Pairings
Let’s start with drinks. For a cozy dessert vibe, pair these cheesecake cups with a warm beverage. A spiced chai latte or cinnamon cappuccino works beautifully with the caramel and spice notes of the Biscoff. The creamy, frothy texture of a latte echoes the smoothness of the cheesecake and enhances the dessert’s cozy feel.
If you prefer something cold, try serving the cups with a glass of iced coffee or cold brew. The bitter richness of the coffee balances the sweetness of the dessert. For a kid-friendly pairing, a cold glass of milk or even a vanilla milkshake is a classic option that never fails.
Side Treats
To add some variety to your dessert spread, serve the cheesecake cups alongside a few complementary sweets. Chocolate-dipped fruit, such as strawberries or banana slices, offers a bright, juicy contrast. You could also provide a small bowl of fresh berries like raspberries or blueberries, which cut through the richness with their natural tartness.
Mini shortbread cookies or butter wafers also make a lovely addition, giving guests something to nibble on between bites of cheesecake. If you’re feeling creative, try a little dessert board—just like a charcuterie board but with sweets. Arrange the cheesecake cups with cookies, chocolates, caramel popcorn, and fruits for a playful, indulgent display.
Flavor Enhancers
To subtly enhance the flavors of the cheesecake cups, consider a drizzle of dark chocolate sauce or caramel over the top. You can even add a light dusting of cinnamon or nutmeg to bring out the spices in the Biscoff. For a refreshing twist, serve each cup with a small scoop of vanilla bean ice cream or gelato on the side.
Pairing your dessert thoughtfully not only rounds out the experience but also shows a little extra love and intention behind your presentation. Whether you go simple or all out, these cheesecake cups are the perfect anchor to build a beautiful dessert moment around.
Storage, Freezing & Reheating Instructions
One of the great things about this no-bake Biscoff cheesecake recipe is how well it stores, making it ideal for meal prepping ahead of a party or saving leftovers to enjoy later. With just a little planning, you can keep your cheesecake cups fresh, flavorful, and just as delicious as the day you made them.
Storing in the Fridge
After assembling the cheesecake cups, you should store them in the refrigerator for at least 4 hours or until fully set. If you’re not serving them immediately, cover each cup with plastic wrap or a reusable lid to prevent the filling from drying out or absorbing any other fridge odors.
Properly stored, these cheesecake cups will keep well in the refrigerator for up to 4–5 days. The texture remains creamy, and the topping stays glossy and smooth. Keep in mind that the crushed biscuits on top may soften slightly over time. If you prefer a crunchy finish, you can wait to add the top biscuit crumbs until just before serving.
Freezing the Cheesecake Cups
Yes, you can freeze these cheesecake cups. However, a few adjustments will help maintain their texture and flavor.
To freeze:
- Assemble the cheesecake cups as directed, but hold off on adding the melted Biscoff topping and crushed biscuit garnish.
- Place the assembled (but untopped) cups on a tray and freeze until firm.
- Once solid, wrap each cup tightly in plastic wrap and place them in a freezer-safe container or zip-top bag.
These cheesecake cups will keep in the freezer for up to 2 months. When you’re ready to serve, thaw the cups in the fridge overnight. Once fully thawed, add the melted Biscoff topping and biscuit crumbs right before serving for the best texture and appearance.
Reheating Instructions
Since this is a no-bake and chilled dessert, there’s no traditional reheating required. However, if the cups are frozen, make sure to allow them to thaw gradually in the fridge. Avoid microwaving them, as this can cause the filling to melt unevenly and separate.
With proper storage, your cheesecake cups will retain their creamy, rich flavor and beautiful presentation, whether you enjoy them immediately or weeks down the line.
Common Mistakes to Avoid
Even though this recipe is incredibly simple, there are a few key things to keep in mind to ensure the best results every time. Here are some common pitfalls to avoid when making your Lotus Biscoff cheesecake cups.
1. Not Softening the Cream Cheese
If your cream cheese is too cold when you begin mixing, it won’t blend smoothly and will leave lumps in your filling. Always allow the cream cheese to come to room temperature before using. This makes it much easier to whip into a silky texture that blends effortlessly with the Biscoff spread and whipped cream.
2. Overwhipping the Cream
Whipping the cream until it forms soft peaks is essential for a light and fluffy texture. However, if you whip it too long, the cream can turn stiff and grainy, making it difficult to fold into the filling. Keep a close eye and stop as soon as soft peaks form—where the cream holds its shape but still gently curls at the tip.
3. Not Folding Gently
When you combine the whipped cream with the Biscoff cream cheese mixture, it’s important to fold gently using a spatula. Stirring too aggressively can deflate the whipped cream, resulting in a dense, heavy filling instead of a light and airy one.
4. Skipping the Chill Time
These cheesecake cups need time to set in the fridge. If you try to serve them too soon, the filling may still be soft and not hold its shape. Plan ahead and chill them for at least 4 hours—overnight if possible—for the best texture and flavor.
5. Adding the Topping Too Early
If you’re making these cups ahead of time, wait to add the melted Biscoff topping and crushed biscuit garnish until just before serving. The spread can harden or separate in the fridge, and the crushed cookies may lose their crunch. Adding these elements at the last minute ensures they stay fresh and visually appealing.
Avoiding these common mistakes will help you create perfect cheesecake cups that look and taste amazing every single time.
Pro Tips
Want to take your Biscoff cheesecake cups to the next level? These pro tips will help you perfect the texture, enhance the flavor, and make the whole process even smoother.
1. Use a Piping Bag for Precision
Using a piping bag to fill your dessert cups makes for cleaner layers and a more professional appearance. It’s especially useful if you’re making multiple servings for a party or special occasion. No piping bag? You can use a zip-top bag with a corner snipped off.
2. Chill Your Mixing Bowls
For best results when whipping cream, chill your bowl and beaters in the fridge or freezer for 10–15 minutes beforehand. Cold equipment helps the cream whip faster and stay stable longer, which is essential for maintaining the light texture of your filling.
3. Flavor Boosts
If you want to tweak the flavor profile, try adding a pinch of cinnamon or nutmeg to the cream cheese mixture. You could also add a few drops of caramel or toffee flavoring for even more depth.
4. Get Creative with Layers
For a fun twist, alternate layers of cheesecake filling and crushed cookies in each cup. You can even add a layer of caramel sauce or chocolate ganache for a flavor surprise in the middle.
5. Presentation Matters
A simple garnish goes a long way. Reserve a few whole Biscoff cookies and insert one into each cup just before serving. This adds a beautiful finishing touch and gives your guests an edible “spoon” to scoop up all the goodness.
With these tips in hand, you’ll not only feel more confident in the kitchen but also impress anyone who’s lucky enough to get a taste of your cheesecake creations.
Frequently Asked Questions (FAQs)
When you’re trying a new recipe, especially a no-bake dessert like these Lotus Biscoff cheesecake cups, it’s totally normal to have questions. Whether you’re wondering about substitutions, storage, or techniques, this FAQ section is here to make your cooking process stress-free. Below, you’ll find answers to some of the most common questions to help you master this recipe with ease.
1. Can I use store-brand cookies instead of Lotus Biscoff?
Yes, you can substitute store-brand speculoos cookies or caramel-flavored biscuits if Lotus Biscoff isn’t available. Just make sure the cookies have a similar crunchy texture and warm spiced flavor. However, keep in mind that Biscoff has a very distinct taste, and using a different cookie may slightly alter the final flavor of the dessert.
2. Is there a dairy-free option for this Lotus Biscoff Cheesecake Cups recipe?
Absolutely. You can substitute the cream cheese with a dairy-free alternative, such as cashew cream cheese or almond-based cream cheese. For the whipped cream, use canned coconut cream or a dairy-free whipping cream. Just ensure that any non-dairy substitutes are unsweetened or lightly sweetened to maintain flavor balance.
3. Can I make these cheesecake cups in advance?
Yes, these are a perfect make-ahead dessert. You can prepare the entire recipe (minus the topping) up to 2 days in advance. Add the melted Biscoff topping and crushed biscuit garnish just before serving for the freshest presentation and best texture.
4. What if I don’t have a piping bag?
No worries! If you don’t have a piping bag, you can use a zip-top plastic bag with the corner cut off to pipe the filling into the cups. Alternatively, you can simply use a spoon to scoop the filling in—your dessert will still taste just as amazing.
5. Can I double or halve this Lotus Biscoff Cheesecake Cups recipe?
Yes, this recipe is easy to scale. To double the batch, simply double all the ingredients. If halving the recipe, be sure to adjust measurements precisely and consider using a kitchen scale for accuracy. The chill time remains the same regardless of batch size.
6. Will the cheesecake cups hold up at room temperature?
While they are best served chilled, the cheesecake cups can sit out at room temperature for about 30 to 45 minutes, especially in cooler environments. However, prolonged exposure to warmth will soften the texture, so try to keep them refrigerated until just before serving.
7. Can I add fruit to this dessert?
Yes! Fresh berries, such as raspberries or sliced strawberries, pair beautifully with the caramel flavor of the Biscoff. You can layer the fruit between the cheesecake filling or simply add it on top as a garnish for a pop of freshness and color.
8. What if I don’t have powdered sugar?
If you’re out of powdered sugar, you can make your own by blending granulated sugar in a high-speed blender until it reaches a powdery consistency. This DIY powdered sugar works well in this recipe, though the texture may be slightly different.
9. How do I keep the topping smooth?
To get a silky, pourable consistency for the Biscoff topping, microwave the spread for about 20–25 seconds and stir well. If it’s still too thick, add a few drops of milk or cream and stir until it loosens. Be careful not to overheat, as this can cause the oils in the spread to separate.
10. Can I use this recipe to make a full-sized cheesecake?
Yes, you can adapt this recipe into a full 9-inch no-bake cheesecake. Press the crushed Biscoff cookies into the base of a springform pan, spread the filling evenly on top, and refrigerate for at least 6 hours or overnight before adding the topping. Slice and serve as you would with any classic cheesecake.
This FAQ section should help you feel more confident and prepared as you make your own batch of Biscoff cheesecake cups. And remember, part of the joy of cooking is experimenting—so don’t be afraid to make the recipe your own.
Conclusion & Call to Action
By now, you’re probably already imagining yourself digging into a cold, creamy, caramel-spiced cheesecake cup topped with that irresistible Biscoff crunch. And the best part? You’re just a few simple steps away from making it happen.
These No-Bake Lotus Biscoff Cheesecake Cups are everything we love in a dessert: rich but not too heavy, elegant but incredibly easy to prepare, and layered with flavors that make every bite memorable. Whether you’re planning a party, celebrating a special occasion, or just looking for something to satisfy a sweet craving, this recipe has you covered.
From the first time I made these for my family, they became a staple in our dessert rotation. There’s something about that combination of creamy cheesecake, spiced cookies, and smooth spread that keeps everyone coming back for more. It’s become one of those go-to recipes that I know I can always count on to impress—with minimal effort and maximum flavor.
Now it’s your turn. Grab those Biscoff cookies, pull out the cream cheese, and give this recipe a try. Trust me, once you see how easy and delicious it is, you’ll be making it again and again.
If you do try this recipe, I’d love to hear how it turned out for you. Feel free to share your results in the comments, send me a message, or tag me on social media with a photo of your cheesecake creations. Whether it’s your first time making a no-bake dessert or you’re already a pro, I hope this recipe brings as much joy to your kitchen as it has to mine.
Ready to get started? Let’s make dessert the best part of the day. Happy no-baking!
Print
Lotus Biscoff Cheesecake Cups – Easy No-Bake Desserts
- Total Time: 4 hours 20 minutes (including chilling)
- Yield: 8 individual cups 1x
- Diet: Halal
Description
These no-bake Lotus Biscoff cheesecake cups are creamy, rich, and layered with spiced cookie crumbs and a smooth caramel-like topping. Perfect for make-ahead entertaining or a quick and elegant dessert.
Ingredients
-
10–15 Lotus Biscoff biscuits, crushed
-
8 oz cream cheese, softened
-
1¼ cup cold heavy whipping cream
-
1 tsp vanilla extract or vanilla bean paste
-
½ cup powdered sugar
-
¾ cup Lotus Biscoff spread
-
½ cup Biscoff spread (for topping), melted
-
6 Biscoff biscuits, crushed (for garnish)
Instructions
-
Crush Biscoff biscuits and divide among 8 dessert cups.
-
Whip softened cream cheese until smooth. Mix in ¾ cup Biscoff spread.
-
In a separate bowl, whip heavy cream with vanilla and powdered sugar until soft peaks form.
-
Fold whipped cream into the cream cheese mixture.
-
Pipe about ¼ cup of the filling into each cup.
-
Melt ½ cup Biscoff spread and spoon over each cup.
-
Garnish with crushed Biscoff biscuits.
-
Chill for at least 4 hours or overnight. Serve chilled.
Notes
-
For extra crunch, don’t add the top cookie garnish until right before serving.
-
You can make these up to 2 days in advance and refrigerate.
- Prep Time: 20 minutes
- Cook Time: 0 minutes
- Category: Dessert
- Method: No-Bake
- Cuisine: American, Fusion