
There’s something truly magical about the smell of a tart baking in the oven. The buttery aroma wafting through your kitchen, the delicate golden color forming on the edges, and the anticipation of that first flaky bite — it’s pure comfort. But here’s the real secret: the foundation of any great tart isn’t the filling, it’s the crust. A well-made homemade tart crust transforms a simple dish into a showstopper.
While store-bought versions offer convenience, they often lack the depth of flavor and flaky texture that comes from making it yourself. That’s why this homemade tart crust recipe is such a game-changer. It’s based on the classic French pâte brisée, which literally translates to “broken dough.” Don’t let the name intimidate you — it just means the butter is broken down into the flour, creating layers that puff and flake beautifully when baked.
What makes this recipe so special is its simplicity. It’s built on a basic 3:2:1 ratio — that’s three parts flour, two parts butter, and one part water. This formula makes it easy to remember and even easier to scale. Plus, it gives you consistent, reliable results every time.
But beyond the numbers, this homemade tart crust is versatile. You can keep it classic and neutral for savory quiches or add herbs and spices like oregano or paprika to give it an aromatic kick. Whether you’re making a spring vegetable tart, a creamy mushroom quiche, or even a sweet custard tart, this crust has you covered.
In this guide, we’ll walk through everything — from the ingredients to foolproof techniques and essential tips — so you’ll feel totally confident tackling this from-scratch tart dough. Whether it’s your first time making pastry or you’re a seasoned baker looking to level up, this crust will become your go-to.
Let’s get started — flaky perfection is just a few steps away.
Why You’ll Love This homemade tart crust Recipe
There are plenty of reasons to fall in love with this tart crust recipe, and once you try it, you’ll wonder why you didn’t make your own sooner. It’s more than just a crust — it’s a canvas for all your favorite fillings, from rich and savory to light and sweet.
It’s Foolproof with a Simple Ratio
One of the best things about this recipe is the structure. It follows the classic 3:2:1 ratio: three parts flour, two parts butter, and one part water. This not only makes it easy to memorize but also ensures the perfect balance of texture and flavor every single time. You can scale it up or down depending on the size of your tart or how many you’re making.
Buttery, Flaky Texture Every Time
Thanks to the cold butter, this crust bakes up with beautiful layers — tender enough to cut through with a fork, but strong enough to hold your filling without getting soggy. Whether you’re blind baking it for a fruit tart or filling it with a creamy custard, the crust stays crisp and golden.
Versatile for Sweet or Savory Dishes
This recipe is incredibly adaptable. Want to make a savory quiche? Add some dried thyme or cumin to the dough. Looking for something sweet? A dash of cinnamon or a sprinkle of sugar goes a long way. The neutral base works with both flavor profiles, giving you total freedom in the kitchen.
Perfect for Beginners
If you’ve never made pastry before, this is a fantastic place to start. We’re breaking down every step, offering helpful tips, and walking you through any potential hiccups. You don’t need fancy tools or years of experience — just a little patience and a love for good food.
Make-Ahead Friendly
Planning a brunch or holiday gathering? You can prepare this crust in advance and refrigerate or freeze it until you’re ready to bake. That means one less thing to stress about when you’re juggling multiple dishes.
Customizable Flavor
Herbs, spices, even finely grated cheese — this crust welcomes your personal touch. Whether you want a crust with an herby backbone or a bit of heat from chili flakes, there’s room to experiment.
Impressively Delicious
This crust doesn’t just look impressive; it tastes impressive too. You’ll get compliments on the buttery flakiness and perfect texture, and only you have to know how easy it was to make.
Health Benefits
While the words “homemade tart crust” and “health” might not often appear in the same sentence, making your own crust actually comes with a few health-conscious perks, especially compared to processed, store-bought options.
Fewer Additives and Preservatives
When you make pastry from scratch, you know exactly what’s going in it. No hidden hydrogenated oils, artificial flavors, or shelf-stabilizing chemicals — just flour, butter, salt, and water. If you’re conscious about avoiding processed foods, this homemade crust is a major win.
Control Over Ingredients
Making your own crust gives you complete control over the ingredients. Want to use organic flour? Go for it. Prefer grass-fed or unsalted butter? Totally your choice. Even the salt level can be adjusted to your preference or dietary needs.
Option for Whole-Grain Flour
If you’re looking to boost the fiber and nutrient content, you can easily swap out part of the all-purpose flour for whole wheat or spelt flour. It will give the crust a slightly nuttier flavor and a bit more texture while still holding its shape and flake.
Lower Sodium
Many store-bought pastry crusts contain a significant amount of sodium. This homemade version uses just half a teaspoon of salt for the whole recipe, which keeps it flavorful but not overly salty. You can even omit the salt entirely if you’re following a low-sodium diet.
Halal and Customizable for Dietary Needs
This recipe is completely halal, with no wine or pork-derived products. Plus, you can make it dairy-free by using plant-based butter, or gluten-free by subbing in a gluten-free flour blend (with a little experimentation). It’s flexible enough to fit a range of diets and preferences.
Encourages Mindful Eating
There’s something about making pastry from scratch that encourages you to slow down and appreciate the process of cooking. It’s a hands-on experience that connects you with your food and makes the final dish even more satisfying.
So while this might not be a “health food” in the traditional sense, it’s definitely a healthier, more mindful, and nourishing alternative to pre-made options. And with the power to customize every component, you can easily make it work for your health goals.
Preparation Time, Servings, and Nutritional Information
Before you dive into the mixing and rolling, let’s go over the basic time commitment and nutritional breakdown for this tart crust. Knowing what to expect can help you plan your baking session more smoothly and confidently.
Total Preparation and Cooking Time
Here’s a realistic breakdown of how much time you’ll need from start to finish:
- Prep Time (hands-on): 20 minutes
- Resting/Chilling Time: 2 hours (divided into 10 min rest + 1 hr chill before shaping, and 1 hr chill after lining the pan)
- Baking Time: 15–20 minutes (blind baking, depending on your oven)
- Total Time: Approximately 2 hours and 40 minutes (much of it is hands-off)
If you plan ahead, you can even prepare the dough the night before and bake it fresh the next day.
Yield
This recipe makes one 9-inch tart crust — perfect for a standard tart or quiche pan. It serves 6–8 people, depending on how generous your slices are and what you’re serving alongside it.
Nutrition Information (Per Serving, assuming 8 servings)
- Calories: 220 kcal
- Total Fat: 15g
- Saturated Fat: 9g
- Cholesterol: 40mg
- Sodium: 150mg
- Carbohydrates: 18g
- Fiber: 1g
- Sugars: 0g
- Protein: 2g
Keep in mind, these numbers are for the crust alone. What you choose to fill it with — whether it’s vegetables, meats, or custards — will adjust the final nutritional profile.
This tart crust strikes a good balance between indulgence and moderation, offering all the flakiness and buttery richness you crave without going overboard.
Ingredients List
When it comes to pastry, the ingredients are minimal, but the quality and how you handle them make all the difference. Let’s break down what you’ll need for this homemade tart crust, why each ingredient matters, and how to get the most out of every one.
Core Ingredients (for 1 Tart Crust)
- 200g (1⅓ cups) plain/all-purpose flour
This is the backbone of your crust. All-purpose flour has just the right amount of protein to give structure without making the dough tough. Make sure to spoon the flour into the measuring cup and level it off — packing it can lead to a dry dough. - ½ teaspoon salt
Salt enhances the overall flavor of the crust, even in sweet applications. It balances the butter and brings out the subtle taste of the flour. - 100g (7 tablespoons) very cold unsalted butter, cubed
Butter is what makes your crust tender and flaky. The key here is temperature. Cold butter creates steam during baking, which forms those coveted flaky layers. Cut the butter into small cubes and keep it in the fridge or freezer until just before using. - 65ml (¼ cup) very cold water, added gradually
Water binds everything together, but you want to use just enough to make the dough come together. Too much can make it sticky, and too little can cause cracking. Add it slowly and stop as soon as the dough holds when squeezed.
Optional Additions (Flavor Enhancers)
If you’d like to boost the flavor of your homemade tart crust to match the filling, consider mixing in any of the following:
- ½ teaspoon dried oregano or thyme – for an herby crust that works beautifully with cheese or roasted vegetables.
- ¼ teaspoon paprika or chili flakes – for a savory, lightly spiced variation.
- ½ teaspoon ground cumin – great for Middle Eastern or spiced vegetable tarts.
- 1 tablespoon grated Parmesan – adds umami and richness to the dough.
These are completely optional but highly recommended if you want to customize your crust beyond the basics.
Ingredient Tips
- Use the best quality butter you can afford — since butter is a major flavor component, high-fat European-style butter makes a noticeable difference.
- Always chill your ingredients — the colder your butter and water, the flakier your crust.
- Avoid self-rising flour — the leavening agents in self-rising flour will change the texture and structure of the dough.
With your ingredients gathered and prepped, it’s time to dive into the most important part — actually making the tart crust.
Step-By-Step Cooking Instructions
This is where the magic happens. Making tart dough might sound intimidating, but I promise, with this guide you’ll have all the tools you need to succeed. Whether you’re using a food processor or working by hand, these steps are written for total clarity. Let’s break it all down.
Step 1: Prepare Your Ingredients
Before you do anything else, make sure your butter is cold, your water is ice cold, and your flour is measured properly. Cube the butter into small pieces and place it back in the fridge or freezer until you’re ready to use it. Cold ingredients are non-negotiable for pastry success.
Step 2: Combine Dry Ingredients
- In a food processor (or a large mixing bowl if working by hand), add the flour and salt.
- Pulse or whisk briefly to combine.
Why this matters: Even distribution of the salt ensures your crust is seasoned evenly throughout.
Step 3: Add Cold Butter
- Add the cold cubed butter to the flour mixture.
- Pulse 6–8 times in short bursts until the mixture looks like coarse sand with pea-sized bits of butter.
- If working by hand, use a pastry cutter, two forks, or your fingertips to rub the butter into the flour until you reach the same texture.
Tip: Don’t overmix — visible flecks of butter are what give you that flaky texture in the finished crust.
Step 4: Add Ice-Cold Water, Gradually
- Slowly drizzle in cold water, one tablespoon at a time, pulsing between each addition.
- Stop adding water as soon as the dough just begins to come together. You’ll know it’s ready when you pinch a bit of dough between your fingers and it holds without crumbling.
Important: You may not need all 65ml of water, or you might need just a touch more depending on your flour and kitchen conditions.
Step 5: Form the Dough
- Turn the dough out onto a clean surface.
- Gather it into a rough ball without kneading — just press it gently together with your hands.
- Flatten into a disc about 1 inch thick.
Why this matters: Flattening the dough now helps it chill faster and makes it easier to roll out later.
Step 6: Rest the Dough
- Wrap the dough disc in parchment paper or plastic wrap.
- Let it rest at room temperature for 10 minutes (this helps relax the gluten slightly).
- Then refrigerate for at least 1 hour.
Why chill? Cold dough is easier to roll and keeps the butter solid until baking, which is crucial for flakiness.
Step 7: Roll the Dough
- Place the chilled dough between two large sheets of parchment paper.
- Roll it out evenly to about 3–4 mm thick (around ⅛ inch), rotating the dough as you go to keep it circular and prevent sticking.
Tip: If the dough cracks at the edges, that’s okay — just pinch it back together gently. A little cracking is normal, especially with all-butter crusts.
Step 8: Transfer to Tart Pan
- Peel off the top parchment, then gently flip the dough over into your tart or quiche pan (ideally 9-inch).
- Press the dough gently into the base and up the sides without stretching it. Trim the edges neatly with a knife or kitchen scissors.
Why this matters: Stretching the dough can cause it to shrink when baked.
Step 9: Dock and Chill Again
- Use a fork to dock the base (poke small holes across the bottom).
- Place the lined tart pan in the fridge for at least 1 hour before baking. This final chill helps prevent shrinkage and keeps the crust crisp.
Step 10: Blind Bake the Crust
- Preheat your oven to 180°C (350°F).
- Line the chilled crust with parchment paper and fill it with baking beans, rice, or pie weights.
- Blind bake for 15–20 minutes, or until the edges start to lightly brown.
- Carefully remove the weights and parchment, then bake for another 5–10 minutes to dry out the base.
Optional: For a crisper finish, you can brush the base with a beaten egg yolk and bake for 2 more minutes. This creates a moisture barrier for wet fillings.
Step 11: Cool Before Filling
- Let the homemade tart crust cool completely before adding your filling, especially if it’s custard or cream-based.
At this point, you’ve got a beautiful, golden, buttery crust ready to be filled with anything your heart (or recipe) desires.

How to Serve this homemade tart crust
Now that your homemade tart crust is baked to golden perfection, the next question is — how do you serve it? The beauty of this versatile crust is that it fits right in at breakfast, lunch, dinner, or dessert. Because it has a neutral, buttery flavor, it pairs well with a wide variety of fillings and works for both sweet and savory recipes.
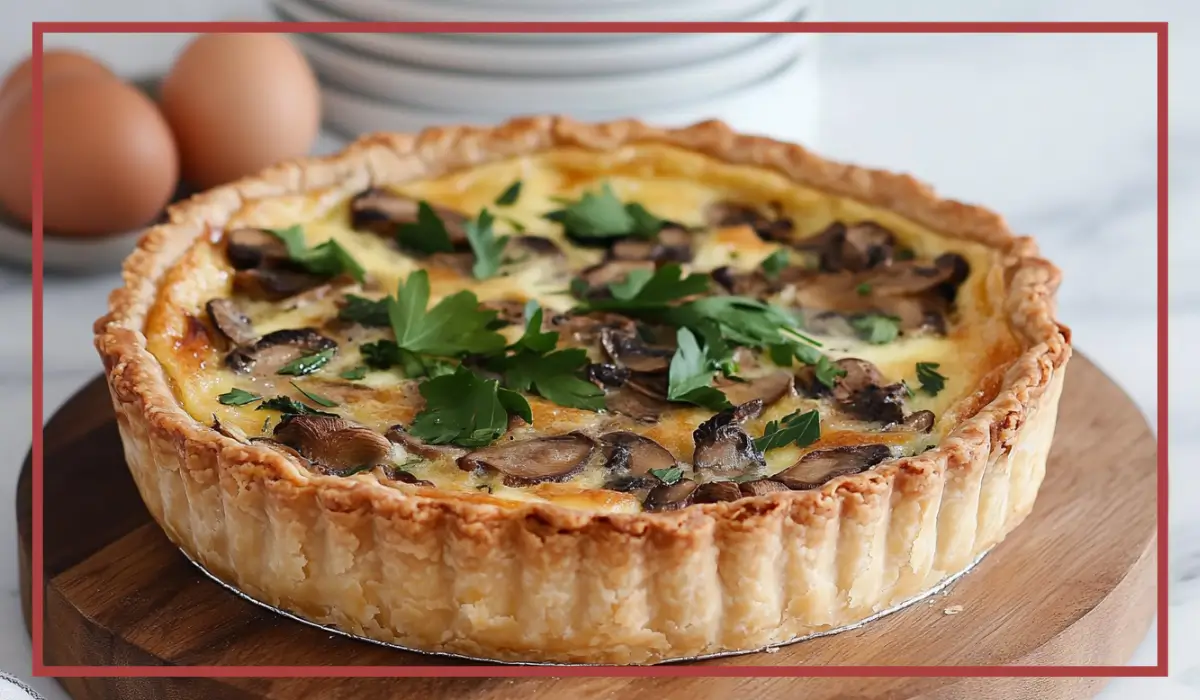
For savory dishes, this homemade tart crust is the ideal base for quiches, vegetable tarts, or savory galettes. Once cooled, simply add your filling — think sautéed spinach and mushroom, roasted butternut squash and goat cheese, or a classic tomato and mozzarella tart — then bake as your filling recipe requires. The crisp crust holds everything together while adding just the right amount of rich texture.
For sweet applications, consider a pastry cream and fresh fruit combo, a chocolate ganache tart, or a baked custard with seasonal fruit. If you’re going this route, you can add a little sugar or vanilla bean to the dough before chilling to slightly sweeten the base, but it’s not necessary.
When it comes to plating, this crust holds its shape beautifully, so each slice comes out clean and photo-worthy. To serve, use a sharp knife to slice and a pie server to lift each piece gently from the pan. You can serve savory tarts warm or at room temperature, which makes them great for brunch spreads, picnics, or casual lunches. Sweet tarts are typically best served chilled or at room temperature for a clean, firm finish.
For a bit of flair, add toppings just before serving. Fresh herbs like basil or thyme can elevate a savory tart, while a dusting of powdered sugar or a drizzle of honey gives sweet tarts a polished touch. No matter how you choose to fill and serve this crust, it’s guaranteed to impress.
Pairing Suggestions
A great tart deserves equally thoughtful pairings, and the right accompaniments can elevate the entire meal. Whether you’re serving your tart as a main dish or as part of a spread, pairing it with complementary sides and drinks brings balance and variety to the table.
For savory homemade tart crust like quiche or vegetable-based tarts, a crisp salad is always a winner. A simple arugula salad tossed with lemon vinaigrette adds freshness and acidity to cut through the richness of the crust and filling. You could also try a shaved fennel salad with orange segments for something a little different. If you’re going for a heartier meal, roasted vegetables like carrots, zucchini, or asparagus work wonderfully on the side.
Soup is another fantastic pairing, especially for lunch or light dinner. A creamy tomato soup, a rustic lentil stew, or even a chilled gazpacho can provide a satisfying contrast in texture and temperature. These pairings work especially well during cooler seasons when you crave something warm and filling.
If your tart is the star of a brunch table, pair it with light breakfast sides like fruit salad, yogurt with honey and nuts, or soft scrambled eggs. For something a little indulgent, flaky croissants or mini scones complement the crust without overwhelming the palate.
Now, if you’re leaning into the sweet side of things, the pairings shift. A fruit tart made with this crust goes beautifully with whipped cream or a scoop of vanilla bean ice cream. A drizzle of caramel or dark chocolate sauce can turn a simple tart into a plated dessert. For drinks, herbal tea or a lightly spiced chai complements sweet tarts wonderfully.
And finally, if you’re looking for a halal-friendly beverage to pair, try a sparkling water infused with citrus, a cold hibiscus tea, or a homemade lemonade with mint. These drinks balance the richness of the tart and keep things refreshing and light.
Storage, Freezing & Reheating Instructions
Tart crust is one of those lovely kitchen creations that lends itself well to both make-ahead prep and leftovers. Whether you’re storing baked crusts or freezing unbaked dough, a few simple steps will keep your pastry tasting fresh and flaky.
To store a fully baked homemade tart crust, allow it to cool completely after blind baking. Once cool, wrap the crust — still in the tart pan — tightly in plastic wrap or foil and refrigerate for up to 3 days. When you’re ready to use it, simply fill and bake according to your tart recipe. This makes hosting or meal prep incredibly easy, as your crust is ready to go when you are.
For longer-term storage, this dough freezes beautifully. You can freeze it in two ways: either as a flattened disc of unbaked dough, or rolled out and already placed in the tart pan. If you’re freezing the dough disc, wrap it in two layers of plastic wrap followed by a layer of foil, then label and date it. It will keep well in the freezer for up to 3 months. When you’re ready to use it, thaw it overnight in the refrigerator before rolling it out.
If you’ve already rolled out and shaped your dough in a tart pan, you can freeze the entire unbaked crust. Just make sure the pan is freezer-safe. Wrap it tightly and freeze as is. When you’re ready to bake, no need to thaw — just blind bake it straight from frozen, adding a few extra minutes to the baking time.
Reheating is simple if you’re working with a pre-baked, filled tart. Place the tart in a preheated oven at 160°C (325°F) for 10–15 minutes to warm through. This helps the crust regain some crispness without overbaking the filling. Avoid reheating in the microwave, as it tends to make the crust soggy.
If you’re reheating just the crust to refresh it before filling, 5–7 minutes in a hot oven will help it crisp up nicely. Remember, whether baked or unbaked, always cool the crust completely before wrapping or storing to prevent condensation and sogginess.
Common Mistakes to Avoid
Even with a simple ingredient list, making pastry dough can trip up even experienced cooks if a few key details are overlooked. Here are the most common tart crust mistakes and how to avoid them for a perfect bake every time.
One major mistake is using butter that’s too warm. When the butter starts to soften or melt before baking, it blends too thoroughly into the flour, leaving you with a dense, greasy crust instead of flaky layers. Always start with cold butter and chill your dough thoroughly before baking.
Another pitfall is adding too much water. It’s easy to keep adding water until the dough feels more workable, but too much can make your crust chewy instead of tender. Add it slowly and stop as soon as the dough holds together when pressed.
Overworking the dough is another common misstep. It can be tempting to knead it like bread, but this develops gluten and makes the crust tough. Instead, mix just until the dough comes together, then stop.
Some bakers forget to dock the crust before baking. Docking — or poking holes in the base with a fork — allows steam to escape during baking, preventing air bubbles and ensuring an even, flat crust.
Skipping the final chill before baking is another easily overlooked but critical step. Chilling the shaped crust helps it hold its shape in the oven, preventing shrinking or slumping sides. Be sure to give it at least an hour in the fridge before blind baking.
Lastly, baking at too low a temperature can result in a soggy or undercooked crust. Always preheat your oven fully and bake at the recommended 180°C (350°F). If your crust looks pale after blind baking, leave it in a few extra minutes until golden.
By steering clear of these common pitfalls and following the recommended steps, you’ll be setting yourself up for pastry success every time.
Pro Tips
Sometimes it’s the little things that make a big difference. These tips are the kind that pastry chefs swear by — and once you use them, you’ll never go back.
Always use ice water — not just cold, but icy. You can fill a small cup with ice cubes and water, then measure out the water as needed. The colder the water, the better your butter stays intact while mixing.
If you don’t have a food processor, a pastry cutter or even a couple of forks work just fine. The goal is to cut the butter into the flour without melting it with your hands. If you do use your hands, make sure they’re cool and work quickly.
A great trick to prevent sticking when rolling out your dough is to roll between two sheets of parchment paper. This not only makes cleanup easier, but it also keeps the dough from picking up extra flour, which can toughen the crust.
To ensure a super crisp bottom crust, preheat your baking sheet in the oven and place the tart pan directly on it. This kickstarts the cooking process from below and helps prevent sogginess — especially helpful if you’re using juicy fillings.
If you want to seal the crust before adding wet fillings, brush the blind-baked base with a beaten egg yolk and return it to the oven for 2 minutes. This creates a moisture barrier and helps keep the crust crisp.
And finally, don’t skip the rest periods. Letting the dough rest after mixing and again after rolling relaxes the gluten, which means less shrinking and a more tender texture. It also makes the dough easier to handle and roll.
These small but mighty tips can really elevate your crust from good to great. Once you try them, they’ll become second nature in your baking routine.
Frequently Asked Questions (FAQs)
Even with detailed instructions, questions naturally come up — especially if you’re making tart crust for the first time. Here are some of the most frequently asked questions, with clear and reassuring answers to help you get the best results.
Can I make this dough ahead of time?
Absolutely. In fact, this tart dough is perfect for making ahead. You can prepare the dough and keep it wrapped in the refrigerator for up to three days. If you want to store it longer, just freeze it. Thaw overnight in the fridge before using. The resting time actually improves the dough, making it easier to handle and roll out.
Can I freeze the tart dough?
Yes, this dough freezes beautifully. After forming it into a disc and wrapping it well in plastic wrap and foil, you can freeze it for up to three months. You can also freeze the dough already rolled and fitted into a tart pan — just make sure the pan is freezer-safe. When you’re ready to use it, bake directly from frozen, adding a few extra minutes to the blind baking time.
What if I don’t have a food processor?
No problem! You can make the dough by hand using a pastry cutter, two knives, or even your fingers (just make sure your hands are cool and work quickly). The goal is to break the butter down into the flour until it resembles coarse crumbs. It might take a little more effort, but it works just as well.
Can I use salted butter instead of unsalted?
Yes, but be sure to reduce the added salt in the recipe. Start by omitting the ½ teaspoon of salt entirely. Salted butter also has a slightly different moisture content, so add water carefully and stop as soon as the dough comes together.
How do I know when to stop adding water?
Once the dough starts clumping together and holds its shape when you squeeze a small handful, you’ve added enough. It should still look a bit crumbly in the bowl but hold together when pressed. It’s better to err on the side of a slightly dry dough than to add too much water.
Why is my homemade tart crust shrinking in the oven?
Shrinkage usually happens because the dough wasn’t chilled long enough before baking or was stretched while being placed in the tart pan. Make sure to chill the crust after lining the pan and avoid pulling or stretching it during shaping. Resting the dough helps relax the gluten, which also helps prevent shrinking.
Do I have to blind bake the crust?
If you’re filling the tart with a wet mixture like custard, fruit compote, or vegetables, blind baking is essential to prevent a soggy bottom. If you’re using the crust for something like a no-bake filling or want to ensure the crust stays crisp, always blind bake it first.
Can I make this crust gluten-free?
Yes, but it will take a little experimentation. Use a high-quality gluten-free all-purpose flour blend that includes xanthan gum or add a binder to help with structure. The texture may be slightly different, but it can still turn out beautifully flaky with the right balance.
Can I use this crust for sweet tarts?
Absolutely. This crust is neutral, so it works for both sweet and savory applications. For sweet tarts, you can add 1 tablespoon of sugar to the dough and optionally a pinch of cinnamon or vanilla bean paste to enhance flavor.
How thick should I roll the dough?
Aim for 3–4 mm thick, which is about ⅛ inch. This gives you a crust that’s sturdy enough to hold the filling but still tender and flaky. Rolling too thin can cause cracking, while too thick may lead to underbaked sections.
With these questions covered, you should feel well-equipped to tackle tart crusts like a pro. If you ever feel unsure, remember — practice makes perfect, and pastry gets easier (and more intuitive) each time you make it.
Conclusion & Call to Action
There’s something incredibly satisfying about making homemade tart crust from scratch. You start with just four simple ingredients — flour, butter, salt, and water — and end up with something so delicious, so buttery, so crisp and flaky that it transforms your entire dish. Whether you’re filling it with savory quiche, roasted vegetables, or a silky chocolate ganache, this crust is the foundation that makes everything shine.
But beyond the flavor and texture, there’s something even more rewarding: the confidence you build each time you work with dough. The feel of the flour between your fingers, the rhythm of rolling it out, the satisfaction of watching it puff and crisp in the oven — it’s cooking at its most hands-on and rewarding.
This recipe was designed to be approachable, reliable, and endlessly adaptable. It’s built on the tried-and-true 3:2:1 ratio, meaning you can scale it up or down as needed and always get consistent results. And with tips to customize the flavor, make ahead, store, and freeze, this crust fits into your schedule as easily as it fits into your favorite tart pan.
Now it’s your turn. Grab your flour and butter. Chill your water. Take your time and enjoy the process. Whether this is your first tart crust or your fiftieth, you’re going to nail it — and the result will be something you’ll be proud to share.
Once you’ve baked your tart crust, I’d love to hear how it turned out. Did you add any herbs or spices? What filling did you choose? Did you go savory or sweet? Leave a comment, share your creation on social media, or tag me in your photos — I’m always excited to see what you’re making in your kitchen.
You’ve got this. Flaky, golden tart crust perfection is officially within reach. Happy baking!
Print
Homemade Tart Crust (Pâte Brisée) – Flaky, Buttery & Foolproof
- Total Time: 2 hours 40 minutes (includes chilling)
- Yield: 1 9-inch tart crust (serves 6–8) 1x
- Diet: Vegetarian
Description
This classic homemade tart crust recipe uses a simple 3:2:1 ratio for a flaky, buttery, and versatile pâte brisée. Ideal for sweet and savory tarts, quiches, and more!
Ingredients
-
200g (1⅓ cups) all-purpose flour
-
½ tsp salt
-
100g (7 tbsp) very cold unsalted butter, cubed
-
65ml (¼ cup) very cold water (add gradually)
-
Optional: dried herbs or spices (cumin, paprika, oregano, chili flakes)
Instructions
-
Pulse flour and salt in a food processor.
-
Add cold butter and pulse until mixture resembles coarse crumbs.
-
Gradually add cold water while pulsing until dough begins to clump.
-
Form dough into a disc. Let rest for 10 minutes at room temp.
-
Roll out to 3–4 mm thickness between parchment paper.
-
Chill dough in the fridge for 1 hour.
-
Transfer to tart pan, trim edges, and dock the base with a fork.
-
Chill again for another hour.
-
Blind bake at 180°C (350°F) for 15–20 minutes with weights.
-
Remove weights and bake 5–10 more minutes. Cool before filling.
Notes
-
For extra crispiness, brush base with egg yolk and bake 2 more minutes.
-
Add herbs or spices to match your filling.
-
Don’t skip chilling — it prevents shrinkage and tough texture.
- Prep Time: 20 minutes
- Cook Time: 20 minutes
- Category: Basics, Pastry
- Method: Baking
- Cuisine: French, European