
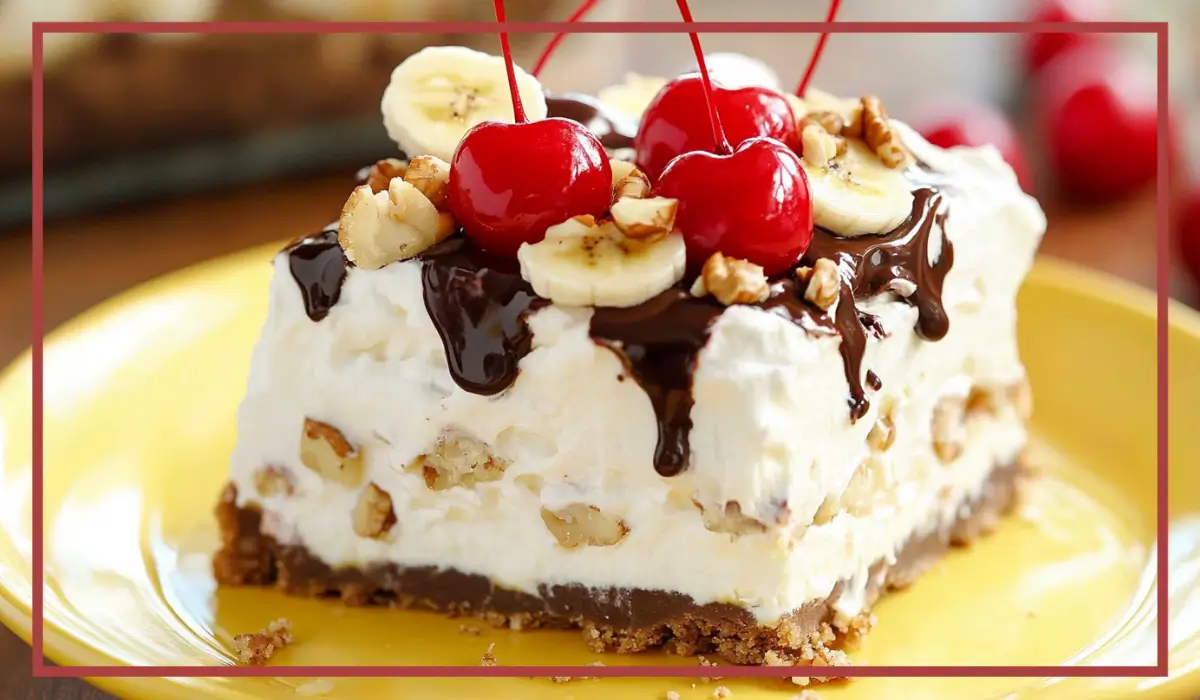
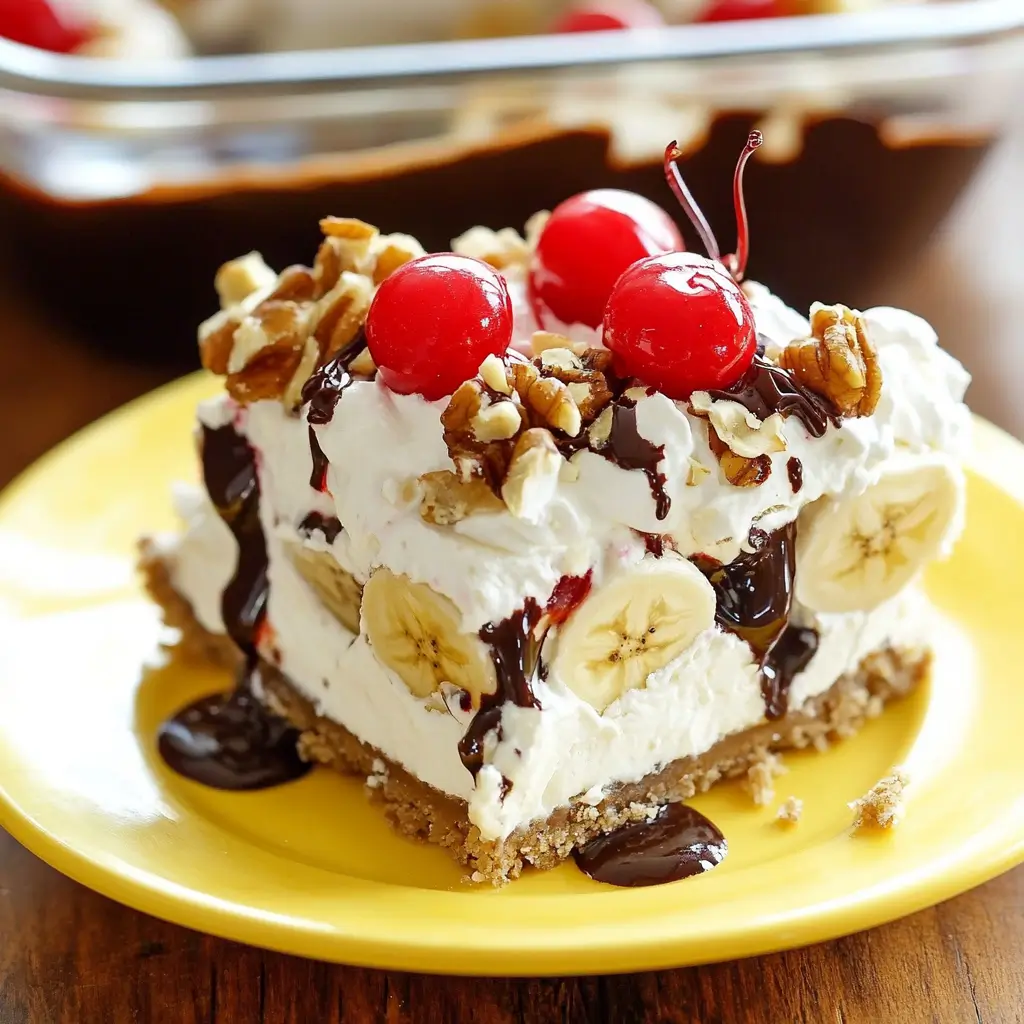
There’s something magical about desserts that require absolutely no baking. They’re easy, fuss-free, and just as delicious (if not more!) than their baked counterparts. Enter the No-Bake Banana Split Cake—a dreamy, creamy dessert that brings all the best flavors of a classic banana split into a perfectly layered, chilled masterpiece. Whether it’s a family gathering, potluck, or weekend treat, this dessert is always a hit.
I first came across this recipe during a family reunion where my aunt brought out a chilled tray of what looked like pure heaven. One bite and I was hooked. The combination of a buttery graham cracker crust, luscious cream cheese layer, fresh bananas, sweet pineapple, and creamy whipped topping made me wonder why I’d never tried this before. And the best part? It’s ridiculously easy to make.
This No-Bake Banana Split Cake has quickly become a go-to recipe in my household. It’s the kind of dessert you can throw together the night before a party and know it will be the star of the show. Plus, it’s versatile—you can dress it up with cherries, nuts, or even chocolate syrup for extra decadence. It’s also the perfect dessert to make with kids since there’s no need to deal with a hot oven. Just layer, chill, and enjoy!
Ready to make this delightful treat part of your dessert rotation? Keep reading to find out why you’ll love it, the health benefits (yes, there are a few!), and all the tips you need for sweet success.
Why You’ll Love This Recipe
There are so many reasons to fall in love with this No-Bake Banana Split Cake, and once you make it, you’ll be hooked for life.
First of all, it’s incredibly easy to prepare. Even if you’re not a seasoned baker, you’ll find this recipe totally approachable. There’s no need to worry about preheating the oven or dealing with finicky pie crusts. Just mix, layer, and chill. It’s that simple.
Another reason this dessert is such a winner is its crowd-pleasing nature. Whether you’re serving kids, adults, or picky eaters, everyone seems to love this dessert. The creamy filling paired with the refreshing fruit and crunchy graham cracker crust offers a satisfying combination of textures and flavors.
What’s even better is how versatile it is. You can personalize it by adding your favorite toppings. Love chocolate? Drizzle some chocolate syrup over the top. Prefer a bit of crunch? Sprinkle on some chopped walnuts or pecans. Looking to add a burst of color? Maraschino cherries and rainbow sprinkles do the trick.
Plus, this recipe makes a generous amount, making it perfect for sharing. It’s ideal for parties, family gatherings, and potlucks. And if you’re lucky enough to have leftovers, they keep well in the fridge for a couple of days—though that’s a rare occurrence in my house.
The ease of preparation, delightful flavor, and visual appeal of this dessert make it a must-try. It’s a treat you’ll be making over and over again, and your friends and family will constantly request it.
Health Benefits
You might be surprised to learn that while this dessert is certainly indulgent, it does offer a few health benefits, thanks to its fruit content. Let’s break down some of the benefits:
Bananas are rich in potassium, an essential mineral that helps regulate blood pressure and supports heart health. They’re also a good source of vitamin B6, which is important for brain development and function. The bananas in this dessert not only add sweetness but also a nutritional boost.
Pineapple, another star ingredient, is packed with vitamins and minerals. It’s high in vitamin C, which is crucial for a healthy immune system and skin health. Pineapple also contains bromelain, an enzyme known for its anti-inflammatory properties and potential digestive benefits.
If you opt to add walnuts, you’re adding a great source of omega-3 fatty acids, antioxidants, and fiber. Walnuts are fantastic for brain health and can even help reduce inflammation in the body.
While the creamy filling and crust are undoubtedly rich, the fruit layers offer some redeeming nutritional value. And if you’re looking to make this dessert a tad healthier, there are some easy substitutions you can try. For example, you can swap the Cool Whip for homemade whipped cream made with less sugar or use reduced-fat cream cheese.
So yes, it’s a dessert, and yes, it’s indulgent. But you can feel a little better knowing that there are a few nutritious elements hiding within all that creamy goodness.
Preparation Time, Servings, and Nutritional Information
This recipe is a lifesaver when you’re short on time but still want to impress your guests. Let’s break down the essential details:
Preparation Time:
- Crust Preparation: 10 minutes
- Creamy Filling Preparation: 10 minutes
- Layering and Assembling: 10 minutes
- Chilling Time: At least 4 hours (overnight is even better)
- Total Time: Approximately 30 minutes of hands-on work, plus chilling time
Servings:
This recipe generously serves 10 people, making it perfect for parties and gatherings.
Nutritional Information (per serving):
- Calories: Approximately 380
- Protein: 4g
- Carbohydrates: 45g
- Fat: 22g
- Sugar: 28g
- Fiber: 2g
- Sodium: 220mg
The calorie count may vary depending on your choice of toppings and specific brands of ingredients used.
Ingredients List
Here’s everything you’ll need to make this dreamy No-Bake Banana Split Cake:
For the Crust:
- 2 cups graham cracker crumbs
- 1/2 cup unsalted butter, melted (1 stick)
For the Creamy Filling:
- 1 (8 oz) block plain cream cheese, softened
- 16 oz Cool Whip, thawed (or 4 cups heavy whipping cream, whipped)
- 1/2 cup powdered sugar
- 1 teaspoon vanilla extract
For the Toppings:
- 4 bananas, sliced
- 1 (20 oz) can crushed pineapple, drained
- Chopped walnuts (optional)
- Maraschino cherries (optional)
- Chocolate syrup or sprinkles (optional)
Step-By-Step Cooking Instructions
Now for the fun part—assembling this fabulous dessert! Just follow these steps, and you’ll have a delicious treat ready to go in no time.
Step 1: Prepare the Crust
- Spray a 9×13-inch baking dish with non-stick spray to ensure easy removal when serving.
- In a medium-sized bowl, mix together the graham cracker crumbs and melted butter until well combined. The mixture should resemble wet sand.
- Press the graham cracker mixture firmly into the bottom of the prepared baking dish, using the back of a spoon or the bottom of a glass to pack it down evenly.
- Place the dish in the refrigerator to chill while you prepare the creamy filling.
Step 2: Make the Creamy Layer
- In a large mixing bowl, beat the softened cream cheese, thawed Cool Whip (or whipped heavy cream), powdered sugar, and vanilla extract together until smooth and fluffy. A hand mixer works best for this step.
- Once the mixture is creamy and well-combined, spread it evenly over the chilled crust using a spatula.
- Return the dish to the refrigerator to allow the creamy layer to firm up slightly while you prepare the fruit layers.
Step 3: Add the Fruit Layers
- Remove the baking dish from the refrigerator and arrange the sliced bananas evenly over the creamy layer. Make sure the bananas cover as much surface area as possible, but don’t worry if there’s some overlap.
- Open the can of crushed pineapple and drain it thoroughly to prevent the dessert from becoming too watery. Press it lightly with a spoon or paper towel to remove excess moisture.
- Spread the drained pineapple evenly over the banana layer. This tropical touch adds sweetness and freshness to the dessert, making it feel extra special.
Step 4: Top with Whipped Cream
- Spread the remaining Cool Whip (or freshly whipped cream if you opted for that) over the fruit layers. Use a spatula to smooth the surface evenly.
- Cover the baking dish with foil or plastic wrap and refrigerate for at least 4 hours. Chilling allows the layers to set properly, making it easier to slice and serve. For best results, leave it overnight.
Step 5: Garnish and Serve
- Just before serving, add your preferred toppings. Sprinkle chopped walnuts over the whipped cream layer if you want a crunchy contrast.
- Decorate with maraschino cherries and drizzle with chocolate syrup or sprinkle rainbow sprinkles for a festive touch.
- Slice into squares and serve chilled. Watch everyone’s faces light up with delight!
And that’s it! You’ve just made a sensational No-Bake Banana Split Cake. But we’re not done yet. Keep reading to learn the best ways to serve, pair, store, and even customize this dessert.
How to Serve
Serving this No-Bake Banana Split Cake is as fun as making it. It’s versatile enough to be dressed up or kept simple, depending on the occasion. Here are a few of my favorite ways to serve it:
- Party-Style: Arrange the cake on a decorative tray with extra toppings on the side. Let guests drizzle chocolate syrup, sprinkle extra nuts, or add more cherries as they please.
- With Ice Cream: Yes, it’s already creamy, but why not go all out? Serve each slice with a scoop of vanilla or chocolate ice cream for an ultra-decadent experience.
- In Individual Cups: For a creative twist, prepare the layers in individual dessert cups or mason jars. This way, everyone gets their own perfect portion, and it looks super cute at parties.
- On a Bed of Fresh Fruit: If you want to lighten things up a bit, serve the slices over a bed of sliced strawberries or mixed berries. It adds freshness and looks beautiful.
- As a Topping for Waffles or Pancakes: Turn breakfast into dessert by adding a slice of this cake on top of warm waffles or pancakes. Pure bliss.
However you choose to serve it, this dessert is guaranteed to be a hit. Just be sure to have a good knife ready for cutting, as the creamy filling can get a little sticky.
Pairing Suggestions
Now that you know how to serve this masterpiece, let’s talk about what pairs well with it. Here are some of my favorite pairings:
- Beverages: Since this dessert is sweet and creamy, it goes well with a strong, hot drink like coffee or espresso. If you’re serving it during the summer, try pairing it with an iced coffee or a cold glass of milk.
- Fruit Salad: For a refreshing side, serve a simple fruit salad made with strawberries, blueberries, and sliced kiwi. The tartness of the fruit contrasts beautifully with the rich dessert.
- Nutty Snacks: Toasted almonds or pecans served alongside the dessert can add a delightful crunch that complements the creamy texture of the cake.
- Lightly Sweetened Tea: A chilled, lightly sweetened herbal or green tea provides a refreshing balance to the sweetness of the dessert.
- Tropical Vibes: If you want to enhance the pineapple element, serve this dessert with a coconut smoothie or a chilled mango juice. It gives the whole experience a tropical, vacation-like feel.
This dessert is already loaded with flavor, so keep the sides and drinks simple. Anything too rich or sweet might overpower the banana split cake itself.
Storage, Freezing & Reheating Instructions
Making this dessert ahead of time is one of its greatest perks. Here’s how to store, freeze, and enjoy it later:
Storage:
- Once prepared, the No-Bake Banana Split Cake should be covered with plastic wrap or foil and stored in the refrigerator.
- It will stay fresh for up to 3 days, though the bananas may start to brown slightly after the first day. To prevent this, consider brushing the banana slices with a little lemon juice before layering them in the dessert.
- Avoid leaving it at room temperature for extended periods, especially if using fresh whipped cream.
Freezing:
- While this dessert is best enjoyed fresh, you can freeze it for up to one month if needed.
- To freeze, cover the dish tightly with plastic wrap and then with a layer of aluminum foil.
- Thaw the dessert in the refrigerator overnight before serving. Note that the texture of the bananas may change slightly, but the dessert will still taste delicious.
Reheating:
- Thankfully, there’s no need to reheat this dessert. It’s meant to be served chilled and enjoyed in all its creamy, refreshing glory.
- However, if you’re feeling adventurous and want to transform leftovers into a warm dessert topping, you could try spooning a portion over warm pancakes or waffles.
Proper storage and handling ensure your dessert remains tasty and fresh for days.
Common Mistakes to Avoid
Making a No-Bake Banana Split Cake is straightforward, but a few mistakes can lead to a less-than-perfect result. Here’s what to watch out for:
- Not Draining the Pineapple Properly: If you leave excess moisture in the pineapple, it can make your creamy layer runny and mess up the texture. Be sure to drain the pineapple thoroughly before spreading it over the bananas.
- Using Warm Butter for the Crust: The butter should be fully melted but not hot. Using hot butter can cause the crust to become too greasy and difficult to press into the dish.
- Skipping the Chill Time: This dessert needs at least 4 hours in the fridge to set properly. Skipping this step will make it difficult to cut clean slices.
- Overloading the Toppings: While it’s fun to add all the extras, too many toppings can overwhelm the delicate flavors of the dessert. Keep it balanced for the best taste.
- Using Overripe Bananas: While bananas should be ripe, avoid using bananas that are too soft or overripe. They’ll turn mushy and may affect the overall texture of the dessert.
Now that you know what not to do, let’s get into some pro tips to make this recipe even better.
Pro Tips
If you want to make your No-Bake Banana Split Cake truly exceptional, consider these helpful tips. They’ll guide you through the process and ensure the best possible results:
- Use Freshly Whipped Cream for Extra Richness:
While Cool Whip is convenient and delicious, you can achieve an even richer flavor by whipping your own heavy cream. Simply whip 4 cups of heavy cream with 3 tablespoons of powdered sugar until stiff peaks form. This substitution adds a fresh, luxurious touch to your dessert. - Toast Your Graham Cracker Crust (Optional):
Although this is a no-bake recipe, toasting the graham cracker crust in a 350°F oven for about 8–10 minutes can enhance the flavor and give it a more sturdy texture. Just make sure to let it cool completely before adding the creamy layer. -
Prevent Bananas from Browning:
To keep your bananas looking fresh and appealing, brush them lightly with lemon juice before layering them onto the dessert. This will prevent them from browning, especially if you’re making the dessert a day in advance. - Layering Technique for Perfect Presentation:
Use a spatula or offset knife to spread the creamy layer evenly over the crust. Smooth it out as much as possible to create a clean, flat surface. Doing this will make your fruit and whipped cream layers look neat and appealing. - Go Nuts with the Toppings:
If you’re a fan of texture, consider adding chopped nuts not just as a topping but also as part of the filling. Adding a thin layer of finely chopped walnuts between the bananas and pineapple can enhance both the flavor and texture. - Chill Overnight for Best Results:
While a 4-hour chill time is the minimum, letting the dessert chill overnight gives the flavors a chance to meld together beautifully. The crust will also firm up more, making it easier to slice cleanly. - Serve with Style:
For a fancy presentation, serve individual slices with an extra dollop of whipped cream and a drizzle of chocolate syrup. Garnish each piece with a maraschino cherry for that classic banana split look.
These pro tips will help you get the most out of your dessert-making experience. But if you’re still feeling unsure, don’t worry! The FAQs section is coming right up to address any lingering questions you might have.
Frequently Asked Questions (FAQs)
To ensure your No-Bake Banana Split Cake turns out perfect every time, let’s go through some common questions that might pop up:
1. Can I make this dessert ahead of time?
Absolutely! This dessert actually tastes even better after chilling overnight. It allows the layers to set firmly, making it easier to cut and serve. Just make sure to cover it tightly with foil or plastic wrap before refrigerating.
2. What if I don’t have Cool Whip?
No problem! You can substitute Cool Whip with freshly whipped cream. To do this, whip 4 cups of heavy whipping cream with 3 tablespoons of powdered sugar until stiff peaks form. This homemade version will add extra richness to your dessert.
3. Can I freeze this dessert?
Yes, you can freeze the No-Bake Banana Split Cake for up to one month. Just wrap it tightly with plastic wrap and foil before freezing. Thaw it in the refrigerator overnight before serving. However, note that the bananas’ texture might change slightly after freezing.
4. How do I prevent the bananas from turning brown?
Brushing the banana slices with a little lemon juice before layering them onto the dessert will prevent them from browning. This simple step will keep your dessert looking fresh and appetizing.
5. Can I make a gluten-free version?
Yes! Simply use gluten-free graham crackers or cookie crumbs for the crust. Everything else in the recipe is naturally gluten-free.
6. What if I don’t have a 9×13-inch baking dish?
You can use a smaller dish if needed, but keep in mind that the layers will be thicker. Alternatively, you can split the recipe between two smaller dishes if that’s what you have on hand.
7. Can I use other fruits in this recipe?
Certainly! While bananas and pineapple are classic choices, feel free to experiment. Sliced strawberries, fresh blueberries, or even raspberries would be delicious additions or substitutions.
8. How do I know when the dessert is ready to serve?
The dessert is ready when it has chilled for at least 4 hours and the creamy layer has firmed up enough to cut cleanly. Overnight chilling provides the best results.
9. Can I add chocolate or caramel sauce to the creamy filling?
Yes! Mixing in a little chocolate or caramel sauce to the cream cheese mixture before spreading it over the crust can add extra flavor. Just keep the amount moderate so the mixture remains thick and fluffy.
10. Can I turn this recipe into a layered trifle?
Definitely! If you want to create a trifle version, simply layer the crust mixture, creamy filling, bananas, pineapple, and whipped cream in a large glass trifle dish. Repeat the layers until all the ingredients are used up.
Hopefully, these answers help you feel confident about making this fabulous dessert. But if you’re still feeling unsure, don’t worry—there’s plenty of room for creativity and adjustment with this recipe.
Conclusion & Call to Action
The No-Bake Banana Split Cake is the kind of dessert that brings smiles to everyone’s faces. It’s creamy, fruity, and indulgent, with the perfect combination of textures to make each bite utterly satisfying. From the buttery graham cracker crust to the smooth, sweet cream cheese layer topped with bananas, pineapple, and whipped cream, it’s a true showstopper.
But what makes this dessert truly special is how easy it is to prepare. No complicated techniques or fancy equipment required. Just simple, delicious ingredients coming together to create something truly spectacular.
Now that you’ve got all the steps, tips, and variations, it’s time to give this recipe a try. Whether you’re making it for a family gathering, a special occasion, or just because you’re craving something sweet, this dessert is sure to impress.
I’d love to hear how your No-Bake Banana Split Cake turns out! Feel free to leave a comment below or share a photo of your creation. And if you have your own fun twist on the recipe, definitely let me know. Happy dessert-making!
Print
No-Bake Banana Split Cake – Easy and Creamy Dessert Recipe
- Total Time: 4 hours 30 minutes (includes chilling time)
- Yield: 10 servings 1x
- Diet: Vegetarian
Description
This No-Bake Banana Split Cake is the perfect dessert for any occasion. It has a buttery graham cracker crust, rich cream cheese filling, fresh bananas, sweet pineapple, and a whipped cream topping. Best of all, it’s super easy to make—no oven required!
Ingredients
For the Crust:
-
2 cups graham cracker crumbs
-
1/2 cup unsalted butter, melted (1 stick)
For the Creamy Filling:
-
1 (8 oz) block plain cream cheese, softened
-
16 oz Cool Whip, thawed (or 4 cups heavy whipping cream, whipped)
-
1/2 cup powdered sugar
-
1 teaspoon vanilla extract
For the Toppings:
-
4 bananas, sliced
-
1 (20 oz) can crushed pineapple, drained
-
Chopped walnuts (optional)
-
Maraschino cherries (optional)
-
Chocolate syrup or sprinkles (optional)
Instructions
-
Prepare the Crust:
-
Spray a 9×13-inch baking dish with non-stick spray.
-
Mix graham cracker crumbs and melted butter until well combined.
-
Press mixture firmly into the bottom of the baking dish. Chill in the fridge while preparing the creamy layer.
-
-
Make the Creamy Layer:
-
In a large bowl, beat cream cheese, Cool Whip, powdered sugar, and vanilla extract until smooth and fluffy.
-
Spread the mixture evenly over the chilled crust. Refrigerate again while preparing the fruit layers.
-
-
Add Fruit Layers:
-
Arrange sliced bananas evenly over the creamy layer.
-
Spread drained crushed pineapple over the banana slices.
-
-
Top with Whipped Cream:
-
Spread the remaining Cool Whip or whipped cream over the fruit layer.
-
Cover with foil and chill for at least 4 hours (overnight is best).
-
-
Garnish & Serve:
-
Just before serving, top with chopped walnuts, cherries, chocolate syrup, or sprinkles.
-
Slice and enjoy!
-
Notes
-
For best results, chill the dessert overnight to allow layers to set properly.
-
Brushing banana slices with lemon juice helps prevent browning.
-
Store leftovers in the refrigerator for up to 3 days.
- Prep Time: 30 minutes
- Cook Time: 0 minutes (No baking required)
- Category: Dessert
- Method: No-Bake
- Cuisine: American