
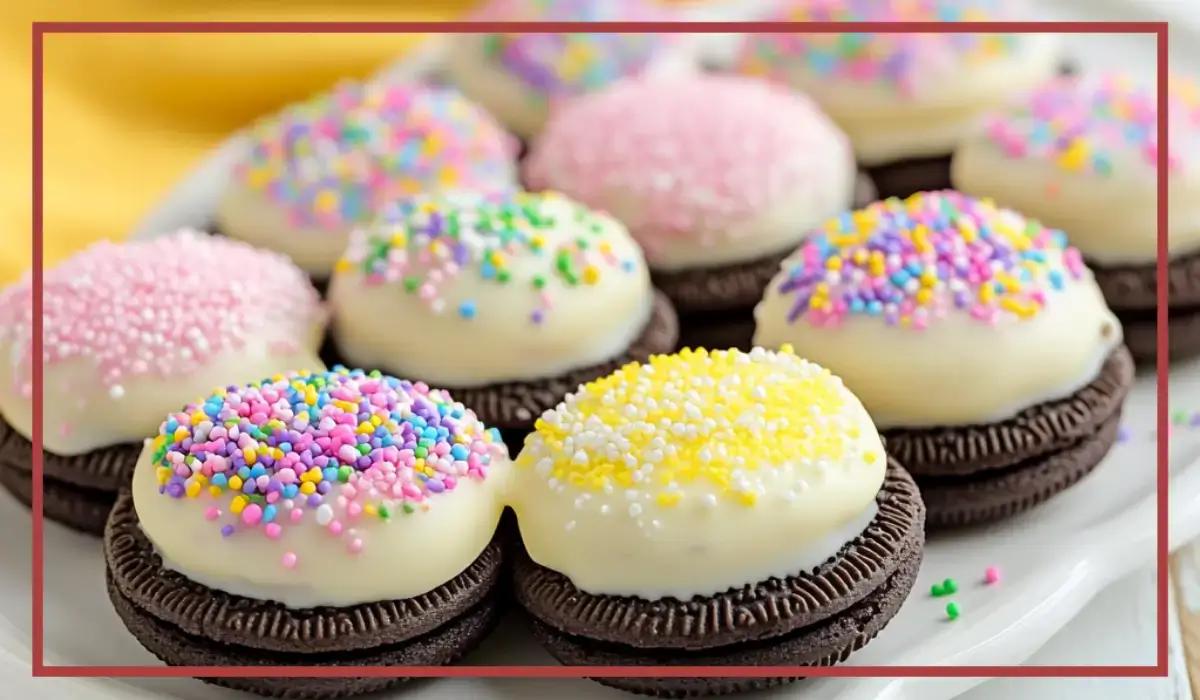
There’s something absolutely magical about turning a simple Oreo cookie into a beautifully decorated, chocolate-covered treat. It’s one of those little joys that instantly makes any occasion feel special. And when you add a vibrant, spring-themed twist with colorful candy melts and sprinkles, it becomes a delightful chocolate-covered-oreo-cookies perfect for Easter celebrations, baby showers, birthday parties, or just a fun afternoon activity with the kids.
What I love most about this recipe is how effortlessly simple it is. Seriously, you don’t need to be a pastry chef or have any fancy equipment. If you have a microwave, a bowl, and a little creativity, you’re already halfway there. Plus, it’s the kind of recipe that kids absolutely love to help with. Who wouldn’t want to dip cookies in melted chocolate and cover them with colorful sprinkles?
The best part? These Spring-Themed Chocolate-Covered Oreos are super versatile. You can use Golden Oreos for a vanilla twist or stick with Classic Oreos if you prefer that rich, chocolatey goodness. The white chocolate or candy melts provide the perfect blank canvas for any decorations you dream up. And the crunch of the cookie with the creamy sweetness of the chocolate? Pure bliss.
Whether you’re making these for a special occasion or just because you need a sweet treat to brighten your day, this recipe is sure to become a go-to favorite. And once you see how easy and fun it is, you’ll be finding every excuse to make another batch. Let’s dive into why you’ll absolutely love these colorful little delights.
Why You’ll Love This Recipe
There’s a lot to love about these Spring-Themed Chocolate-Covered Oreos, and here’s why they’re sure to become a staple in your dessert rotation.
Incredibly Easy to Make: This recipe is as simple as it gets. If you can melt chocolate and dip a cookie, you can make these. There’s no baking, no fussing with complicated techniques—just pure, sweet simplicity. The entire process takes less than an hour, even if you’re decorating dozens of cookies. And since you don’t need any fancy kitchen gadgets, it’s perfect for both beginners and seasoned bakers.
Fully Customizable: The beauty of this recipe is that you can get as creative as you want. Go for a rainbow of candy melts for a bright and cheerful display, or stick to pastel shades for a soft, elegant look. You can even switch things up by using dark chocolate, milk chocolate, or even flavored candy melts. Plus, there’s always the option to add fun toppings like crushed nuts, edible glitter, or even mini marshmallows.
Perfect for Kids and Families: If you have little ones, this is a great recipe to get them involved in the kitchen. They’ll have a blast dipping the cookies and sprinkling them with fun, colorful decorations. And you’ll love seeing the excitement on their faces as they proudly show off their creations.
Great for Gifting and Parties: These treats are a hit at any gathering. Arrange them on a decorative platter for parties, package them in cute little bags for gifts, or even use them as edible place settings at a special dinner. They make fantastic gifts or party favors that feel thoughtful and special.
Absolutely Delicious: The combination of crunchy Oreo cookies with creamy, smooth chocolate coating is simply irresistible. It’s the perfect balance of textures and flavors that will have everyone reaching for seconds.
Now that you know why this recipe is a must-try, let’s talk about how it’s not just fun and delicious, but can also be made with some healthy considerations in mind.
Health Benefits
While Spring-Themed Chocolate-Covered Oreos are definitely a sweet treat, there are still some health aspects worth noting. Of course, moderation is key, but you can feel a little better knowing that this dessert isn’t all bad. Here’s why:
Antioxidant Benefits from Chocolate: Chocolate, particularly dark chocolate, offers several health benefits when consumed in moderation. If you choose to use dark chocolate instead of white chocolate or candy melts, you can benefit from its rich antioxidant content. Antioxidants help protect your cells from damage caused by free radicals, which can contribute to various health issues. Additionally, dark chocolate has been shown to improve heart health by improving blood flow and lowering blood pressure.
Boost of Energy from Carbohydrates: Oreos themselves, while not exactly a health food, do offer some energy-boosting qualities. The carbohydrates in the cookie provide a quick source of energy, which can be helpful if you need a little pick-me-up.
Customizable for Dietary Preferences: If you opt for gluten-free or reduced-sugar Oreo alternatives, you can tailor this recipe to suit dietary preferences or needs. Plus, candy melts are often available in sugar-free varieties, making it easier to create a slightly healthier version.
Portion Control and Mindful Eating: Making treats like these at home allows you to control the portion sizes. Instead of mindlessly snacking on a whole bag of cookies, you’re more likely to enjoy one or two decorated Oreos and truly savor the experience.
Psychological Benefits of Creating and Sharing: Engaging in fun, creative activities like making and decorating cookies can have psychological benefits. It’s a form of stress relief and a great way to spend quality time with family or friends. The joy you feel while making and sharing these treats can be just as nourishing as the ingredients themselves.
While these treats are best enjoyed as an occasional indulgence, there’s something special about knowing you made them yourself. And if you want to sneak in a little more nutritional value, consider dipping your Oreos in dark chocolate or adding some finely chopped nuts as decorations.
Preparation Time, Servings, and Nutritional Information
Before we dive into the ingredient list and step-by-step instructions, let’s get the essential details out of the way. Knowing the preparation time, servings, and nutritional information will help you plan your dessert-making adventure with confidence.
Preparation Time:
Melting Chocolate: 5 minutes
Dipping & Decorating: 30 minutes
Setting Time: 30 minutes (at room temperature) or 10 minutes (in the fridge)
Total Time: Approximately 1 hour
Servings:
This recipe makes about 24 chocolate-covered Oreos. However, the actual number will depend on how many Oreos you choose to decorate and how thickly you coat them with chocolate.
Nutritional Information (Per Serving – 1 Chocolate-Covered Oreo):
Calories: 120
Protein: 1.5g
Carbohydrates: 16g
Sugars: 11g
Fat: 6g
Saturated Fat: 3.5g
Cholesterol: 0mg
Sodium: 75mg
Keep in mind that the nutritional information will vary based on the type of chocolate or candy melts you use. If you choose to use dark chocolate or reduced-sugar options, the calorie and sugar content may be slightly lower.
Additionally, if you plan to make a gluten-free version, double-check the nutritional content of the specific gluten-free cookies you use. This breakdown is meant to be a general guide and can be adjusted to suit your dietary preferences.
Now that you have all the essential details, it’s time to gather your ingredients and dive into the fun part—making these beautiful Spring-Themed Chocolate-Covered Oreos! Let’s take a closer look at everything you’ll need.
Ingredients List
Before you start creating these beautiful Spring-Themed Chocolate-Covered Oreos, it’s essential to gather all your ingredients. This recipe is super flexible, so feel free to adjust the quantities based on how many cookies you plan to make. Here’s everything you need:
Oreo Cookies: 1 package (Golden or Classic—your choice! You can also use gluten-free Oreos if needed.)
White Chocolate or Candy Melts: 12 ounces (Use pink, yellow, blue, or any spring-themed colors you love. You can also use dark or milk chocolate if you prefer a richer taste.)
Assorted Sprinkles: About 1/4 cup (Choose from flowers, pastel confetti, or any fun, spring-themed shapes. Feel free to mix and match.)
Parchment Paper or Silicone Baking Mat: For easy cleanup and to prevent sticking.
Optional Toppings: Crushed nuts, mini marshmallows, edible glitter, or colored sugar for extra decoration.
Ingredient Tips:
Using high-quality chocolate or candy melts will make a noticeable difference in both flavor and texture. Brands like Ghirardelli or Wilton are excellent choices.
If you prefer a healthier option, dark chocolate is a great alternative that adds extra richness and antioxidants.
Want to make them extra fancy? Try drizzling contrasting colors of melted chocolate over the cookies for a beautiful finishing touch.
Now that you have everything you need, it’s time to get started! Let’s walk through the step-by-step process of making these adorable treats.
Step-By-Step Cooking Instructions
This is where the real fun begins. Don’t worry if you’ve never made chocolate-covered treats before—these instructions will guide you every step of the way. Just remember to relax, have fun, and get creative!
Step 1: Prepare Your Workspace
Line a baking sheet with parchment paper or a silicone baking mat. This will make it much easier to remove the cookies once the chocolate hardens. Make sure your countertop or table is clean and spacious enough for decorating.
Step 2: Melt the Chocolate
Place your white chocolate or candy melts in a microwave-safe bowl. Microwave in 30-second intervals, stirring well between each interval until the chocolate is smooth and fully melted. This usually takes about 1.5 to 2 minutes total, depending on your microwave’s power.
Tip: Be careful not to overheat the chocolate. If it seems a little thick, you can add a teaspoon of vegetable oil or coconut oil to help achieve a smoother consistency.
Step 3: Dip the Oreos
Using a fork or dipping tool, carefully dip one Oreo cookie at a time into the melted chocolate. Make sure to coat the entire cookie for that irresistible creamy shell.
Lift the cookie out of the chocolate, gently tapping the fork against the side of the bowl to remove any excess chocolate. This step helps prevent the chocolate from pooling around the base of the cookie.
Step 4: Decorate the Cookies
While the chocolate is still wet, place the dipped Oreo onto the prepared baking sheet. Immediately sprinkle with your chosen decorations—whether it’s pastel confetti, flower-shaped sprinkles, or a dash of edible glitter.
For an extra-fancy look, drizzle melted candy melts of a different color over the cookie. Simply transfer the melted candy to a small zip-top bag, snip off a tiny corner, and drizzle away.
Step 5: Let Them Set
Allow the cookies to cool and harden completely. This usually takes about 30 minutes at room temperature, but if you’re in a hurry, you can pop them in the fridge for around 10 minutes.
Once the chocolate is firm, carefully peel the cookies off the parchment paper or silicone mat.
Step 6: Serve and Enjoy
Your beautiful Spring-Themed Chocolate-Covered Oreos are now ready to be enjoyed! Arrange them on a decorative plate, gift them to friends and family, or keep them all to yourself. No judgment here.
Step 7: Clean Up
One of the best parts of this recipe is the easy cleanup. Simply throw away the parchment paper or rinse off your silicone mat, and you’re done!
And that’s it! You’ve just made a gorgeous batch of spring-themed cookies that are as delicious as they are beautiful. But how exactly should you serve them to make the most of their charm? Let’s explore some ideas.

How to Serve
Serving your chocolate-covered-oreo-cookies can be just as fun as making them. Here are a few creative ideas to present your sweet creations:
On a Dessert Platter: Arrange your decorated cookies on a colorful serving tray surrounded by fresh flowers for a charming, spring-inspired look.
As Party Favors: Package each cookie in a small clear bag, tied with pastel-colored ribbons. These make delightful party favors for birthdays, baby showers, and even weddings.
Gift Boxes: Place your cookies in a decorative gift box lined with parchment paper or tissue paper. This makes a thoughtful, homemade gift perfect for friends, family, or teachers.
With Afternoon Tea or Coffee: Serve these cookies alongside a steaming cup of tea or coffee for a delightful afternoon pick-me-up.
Edible Place Settings: For a festive dinner or brunch, place a beautifully decorated Oreo at each guest’s place setting for a charming, edible touch.
The possibilities are endless! And because they’re so easy to make, you can whip up a batch any time you want to add something special to a gathering or celebration. Now, let’s take it a step further and explore some pairing suggestions to enhance your cookie experience.
Pairing Suggestions
Although these chocolate-covered-oreo-cookies are delicious on their own, pairing them with the right beverages or complementary treats can elevate the experience. Here are some delightful options:
Tea: Serve with delicate, floral teas like chamomile or lavender to complement the light and sweet nature of the cookies.
Coffee: Enjoy them with a hot latte, cappuccino, or iced coffee for a rich, satisfying treat.
Milkshakes: Pair these cookies with vanilla or strawberry milkshakes for a fun, kid-friendly dessert experience.
Hot Chocolate: For a decadent treat, serve them with creamy hot chocolate topped with whipped cream.
Fruit Platters: Balance the sweetness of the cookies with a fresh fruit platter featuring strawberries, blueberries, and pineapple.
Ice Cream: Crumble a few decorated Oreos over vanilla or chocolate ice cream for a fabulous sundae topping.
These pairing ideas will take your Spring-Themed Chocolate-Covered Oreos to the next level. But what if you have leftovers or want to make them ahead of time? Let’s discuss how to properly store, freeze, and reheat them to keep them fresh and delicious.
Absolutely! Let’s keep going with the same engaging and detailed style.
Storage, Freezing & Reheating Instructions
One of the great things about these chocolate-covered-oreo-cookies is their shelf life. They can be made in advance and stored for days without losing their delicious taste or charming appearance. Here’s how to store, freeze, and reheat them for maximum freshness.
Storing Your Cookies
If you plan to enjoy your cookies within the next few days, storing them at room temperature is perfectly fine.
Place the chocolate-covered Oreos in an airtight container lined with parchment paper. This prevents them from sticking together.
Separate layers of cookies with additional sheets of parchment paper if you’re stacking them.
Store the container in a cool, dry place away from direct sunlight. When properly stored, your cookies will stay fresh for up to one week.
Refrigerating Your Cookies (Optional)
If your kitchen is particularly warm, or if you prefer your cookies with a slightly firmer chocolate shell, you can store them in the refrigerator.
Place the cookies in an airtight container lined with parchment paper.
Refrigerate for up to two weeks. However, keep in mind that moisture from the fridge can sometimes cause the chocolate to develop a slight white coating known as “bloom.” This won’t affect the taste but can make the appearance less appealing.
Freezing Your Cookies for Long-Term Storage
If you want to make a big batch of these cookies ahead of time, freezing them is a great option.
Arrange the cookies in a single layer on a baking sheet lined with parchment paper.
Place the baking sheet in the freezer for about an hour or until the cookies are fully frozen.
Transfer the frozen cookies to a freezer-safe airtight container or zip-top bag.
Label the container with the date and freeze for up to three months.
Reheating (If Desired)
Although these chocolate-covered-oreo-cookies are best enjoyed at room temperature, you can gently warm them if you prefer the chocolate coating to be softer.
Microwave the cookie on a microwave-safe plate for about 5–10 seconds.
Be careful not to overheat the cookie, as the chocolate may melt too much and become messy.
Now that you know how to properly store and preserve your cookies, let’s talk about some common mistakes to avoid to ensure you achieve perfect results every time.
Common Mistakes to Avoid
Making chocolate-covered-oreo-cookies is a straightforward process, but a few common mistakes can cause frustration or unsatisfactory results. Here’s what to watch out for and how to avoid them.
Overheating the Chocolate
One of the most common mistakes is overheating the chocolate or candy melts. If the chocolate gets too hot, it can seize and become thick and grainy. To avoid this, always melt your chocolate in 30-second intervals, stirring well in between.
If your chocolate does seize, you can try adding a teaspoon of vegetable oil or coconut oil to help restore its smooth consistency.
Not Using Proper Dipping Tools
Dipping Oreos by hand can be messy and leave unattractive fingerprints on the chocolate coating. Instead, use a fork or a specialized dipping tool to achieve a smooth, even coating.
Gently tap the tool against the edge of the bowl to remove excess chocolate and prevent clumps.
Skipping the Parchment Paper or Silicone Mat
It’s essential to place your dipped cookies on parchment paper or a silicone baking mat to prevent sticking. Without this protective layer, your cookies will likely become glued to the surface as they cool.
Allowing Chocolate to Harden Too Quickly
If you’re decorating your chocolate-covered-oreo-cookies with sprinkles or drizzle designs, you need to do so before the chocolate sets. Work quickly to add your decorations while the coating is still wet.
If you’re using multiple colors of melted candy, have everything prepared and ready before you start dipping.
Improper Storage
Storing your cookies in a warm or humid environment can cause the chocolate to melt or develop unattractive spots. Always store them in a cool, dry place and use an airtight container to keep them fresh.
Now that you know what to avoid, let’s make sure you’re set up for success with some helpful pro tips!
Pro Tips
To make your Spring-Themed Chocolate-Covered Oreos absolutely stunning and delicious, here are some extra tips to consider.
Use High-Quality Chocolate or Candy Melts
If you want your chocolate-covered-oreo-cookies to have a beautifully smooth and creamy coating, opt for high-quality chocolate. Brands like Ghirardelli, Callebaut, or Merckens are excellent choices.
Candy melts are also great for achieving vibrant colors, but if you prefer to use white chocolate and color it yourself, make sure to use oil-based food coloring to avoid seizing.
Work in Small Batches
To prevent your melted chocolate from hardening too quickly, work with a few cookies at a time instead of trying to dip the entire batch at once.
If the chocolate begins to thicken as you work, simply reheat it in the microwave for 10–15 seconds to restore its smoothness.
Experiment with Toppings and Decorations
Don’t be afraid to get creative! Besides sprinkles, you can decorate your cookies with edible pearls, gold leaf, chocolate shavings, or crushed candy pieces.
For a natural touch, consider sprinkling finely chopped nuts, shredded coconut, or dried fruit over the chocolate before it hardens.
Use a Piping Bag for Drizzles
To achieve neat and elegant drizzle designs, transfer melted candy melts or chocolate into a piping bag or zip-top bag with a tiny corner snipped off.
Drizzle the chocolate over the cookies in a zigzag pattern for a polished, professional look.
Make Ahead for Convenience
If you’re preparing these cookies for a special event, feel free to make them a day or two in advance. This will save you time and allow you to focus on other party preparations.
Just be sure to store them properly to keep them fresh and beautiful.
Now that you have all the knowledge and tips you need, let’s answer some frequently asked questions that may pop up during the cookie-making process.
Frequently Asked Questions (FAQs)
- Can I use dark chocolate or milk chocolate instead of white chocolate or candy melts?
Absolutely! Dark and milk chocolate both work beautifully for this recipe. Just keep in mind that dark chocolate will provide a richer, slightly bitter taste, while milk chocolate will be sweeter and creamier. - Can I make these cookies in advance?
Yes! You can make them up to two weeks ahead if you refrigerate them, or freeze them for up to three months. Just be sure to store them in airtight containers to maintain their freshness. - What if I don’t have parchment paper or a silicone mat?
If you’re in a pinch, you can use wax paper instead. However, parchment paper or a silicone mat is recommended for the best results. - How can I make these cookies healthier?
You can use gluten-free or reduced-sugar Oreos, dark chocolate instead of candy melts, and top them with nuts or dried fruit instead of sugary sprinkles. - Why did my chocolate develop white spots or streaks?
This is called “bloom,” which occurs when the fat or sugar in the chocolate separates due to moisture or temperature changes. To avoid this, keep your cookies stored in a cool, dry place.
How long will these cookies last at room temperature?
Stored properly in an airtight container, they will stay fresh for up to a week at room temperature.
Conclusion & Call to Action
Congratulations! You’ve just learned how to make the most delightful chocolate-covered-oreo-cookies. Not only are they adorable and absolutely delicious, but they’re also incredibly easy to prepare. Whether you’re making them for a special occasion, giving them as gifts, or simply satisfying your sweet tooth, this recipe is sure to impress.
The beauty of these chocolate-covered-oreo-cookies lies in their versatility. You can make them as simple or as elaborate as you want. From pastel-colored candy melts to vibrant, bold hues, the creative possibilities are endless. Plus, they’re a fantastic activity to do with kids or friends when you’re in the mood for something fun and low-effort.
But the best part of all? These cookies are guaranteed to bring smiles. There’s something so special about taking a plain Oreo and turning it into a little masterpiece of sweetness. And when you share them with loved ones, you’re not just giving them a treat—you’re sharing a piece of your creativity and joy.
I encourage you to give this recipe a try and let your imagination run wild. Mix and match colors, add your favorite toppings, or even experiment with different cookie flavors. And if you’re feeling extra generous, make a batch to gift to someone special. Trust me, they’ll appreciate the thoughtful, homemade touch.
I’d love to hear how your Spring-Themed Chocolate-Covered Oreos turn out! Feel free to leave a comment sharing your experience, creative twists, or even troubleshooting tips you discovered along the way. And if you’re on social media, be sure to tag me in your photos—I can’t wait to see your gorgeous, colorful creations!
Now, it’s time to gather your ingredients, melt that chocolate, and start dipping. Happy cookie-making!
Print
chocolate-covered-oreo-cookies – Easy and Fun Dessert Recipe
- Total Time: 1 hour (including setting time)
- Yield: 24 cookies 1x
- Diet: Vegetarian
Description
These adorable chocolate-covered-oreo-cookies are perfect for any occasion. Coated in colorful candy melts and decorated with sprinkles, they’re a fun, easy, and versatile treat that everyone will love. Perfect for Easter, birthday parties, baby showers, or just because you need something sweet and pretty!
Ingredients
- 1 package of Oreo Cookies (Golden or Classic, or gluten-free if preferred)
- 12 ounces of white chocolate or candy melts (pink, yellow, blue, or any spring-themed colors)
- Assorted sprinkles (flowers, pastel confetti, or spring-themed shapes)
- Parchment paper or silicone baking mat
- Optional: Crushed nuts, mini marshmallows, edible glitter, or colored sugar for decoration
Instructions
- Prepare Workspace: Line a baking sheet with parchment paper or a silicone baking mat.
- Melt the Chocolate: Microwave the white chocolate or candy melts in a microwave-safe bowl at 30-second intervals, stirring well between each interval until smooth.
- Dip the Oreos: Using a fork or dipping tool, dip each Oreo into the melted chocolate, coat completely, and gently tap off excess chocolate.
- Decorate: Place dipped cookies on the prepared baking sheet and immediately decorate with sprinkles. Drizzle additional colored chocolate if desired.
- Let Them Set: Allow the cookies to cool and harden for about 30 minutes at room temperature or 10 minutes in the fridge.
- Serve & Enjoy: Your beautiful cookies are ready to be enjoyed or gifted!
Notes
- To keep the chocolate smooth, add a teaspoon of vegetable oil if it becomes too thick.
- Store cookies in an airtight container at room temperature for up to one week, or refrigerate for up to two weeks.
- For long-term storage, freeze cookies for up to three months.
- Prep Time: 15 minutes
- Cook Time: 5 minutes (melting chocolate)
- Category: Dessert
- Method: No-Bake
- Cuisine: American