
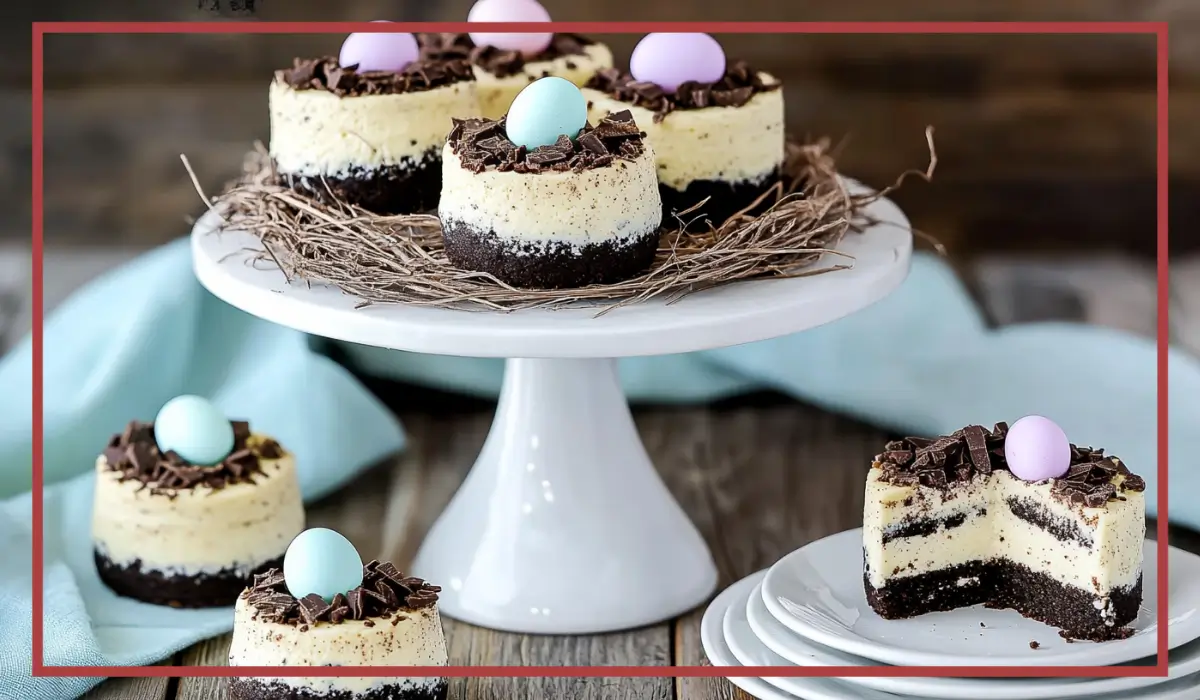
Easter is a time for celebration, and what better way to bring joy to the table than with a batch of adorable Bird’s Nest Mini Oreo Cheesecakes? These delightful mini cheesecakes are the perfect blend of creamy, crunchy, and chocolatey goodness, making them a must-have dessert for Easter gatherings, spring parties, or just a fun family baking day.
The combination of an Oreo cookie base, a smooth and velvety cheesecake filling, and a chocolate-coconut nest topping creates an irresistible treat. The final touch of colorful candy eggs transforms these cheesecakes into an edible work of art, perfect for the holiday season.
Aside from their visual appeal, these mini cheesecakes are incredibly easy to make. There’s no water bath required, and they bake up in a fraction of the time compared to a traditional cheesecake. They’re individually portioned, making them great for sharing at parties or serving at an elegant Easter brunch.
Whether you’re an experienced baker or a beginner looking for an easy yet impressive recipe, you’ll love how simple and rewarding these cheesecakes are to make. With basic pantry staples and a few special ingredients, you can whip up a batch that’s guaranteed to be a hit.
In this article, we’ll walk you through everything you need to know about making these mini cheesecakes, from ingredients and preparation to baking and decorating. We’ll also share tips on how to store, freeze, and reheat them, as well as common mistakes to avoid so your cheesecakes turn out perfect every time.
Let’s dive in and create some Easter magic in the kitchen!
Why You’ll Love This Recipe
There are countless reasons to love these Bird’s Nest Mini Oreo Cheesecakes, but let’s break down some of the most exciting ones.
First, they are visually stunning. The combination of a rich cheesecake filling, a crunchy Oreo crust, and a nest-like topping creates a dessert that is both adorable and impressive. The candy eggs on top bring an extra pop of color, making these cheesecakes a festive addition to any Easter spread.
Second, they are easy to make. Unlike traditional cheesecakes that require a water bath and long baking times, these mini versions bake quickly and don’t need any complicated steps. The Oreo crust eliminates the need for crushing cookies, making preparation even faster.
Another reason to love this recipe is its versatility. You can customize the toppings by using different types of candy eggs, swapping out coconut for chocolate sprinkles, or even adding a chocolate drizzle for extra richness.
These cheesecakes also store well, meaning you can make them ahead of time for a party or event. They can be refrigerated or frozen and still taste just as delicious when served.
Lastly, they are individually portioned, which means no messy slicing or serving. They’re perfect for kids and adults alike, making them a crowd-pleaser at any gathering.
If you love creamy cheesecakes, crunchy textures, and fun decorations, this recipe is for you!
Health Benefits
While these cheesecakes are an indulgence, they do have some surprising benefits, especially when compared to other desserts.
First, cheesecake contains protein and calcium from the cream cheese and eggs. These ingredients contribute to bone health and muscle maintenance, making this treat slightly more nutritious than traditional cake.
Second, dark chocolate chips (if used in the nest topping) provide antioxidants that help protect the body against oxidative stress. Antioxidants play a role in reducing inflammation and improving heart health.
Additionally, coconut contains healthy fats, particularly medium-chain triglycerides (MCTs), which can help with energy levels and metabolism.
If you opt for low-fat cream cheese or Greek yogurt instead of full-fat cream cheese, you can reduce the calorie content while still enjoying a delicious treat.
Although these cheesecakes should be enjoyed in moderation, they can be a more satisfying dessert due to their protein and fat content, which can help reduce sugar cravings.
Preparation Time, Servings, and Nutritional Information
Preparation Time
- Prep Time: 15 minutes
- Cook Time: 18 minutes
- Chill Time: 2 hours
- Total Time: Approximately 2 hours 30 minutes
Servings
- Makes 12 mini cheesecakes
Estimated Nutritional Information (Per Mini Cheesecake)
- Calories: 250-300
- Carbohydrates: 24g
- Protein: 4g
- Fat: 16g
- Sugar: 18g
Ingredients List
To make these Bird’s Nest Mini Oreo Cheesecakes, you’ll need the following ingredients:
For the Crust
- 12 Oreo cookies (whole, no need to remove the filling)
The Cheesecake Filling
- 16 oz cream cheese, softened
- ½ cup sugar
- 1 tsp vanilla extract
- 2 large eggs
The Bird’s Nest Topping
- 1 cup chocolate chips, melted
- 1 cup shredded coconut, toasted
- Candy eggs (such as Mini Cadbury Eggs or M&M eggs)
Step-By-Step Cooking Instructions
Step 1: Prepare the Muffin Tin
Preheat your oven to 325°F (163°C). Line a 12-cup muffin tin with paper cupcake liners. This will make removing the cheesecakes easier.
Step 2: Make the Crust
Place one whole Oreo cookie at the bottom of each liner. This will serve as the crust, so there’s no need to crush the cookies.
Step 3: Prepare the Cheesecake Filling
In a large bowl, beat the cream cheese until smooth. Add the sugar and vanilla extract, mixing until well incorporated.
Next, add the eggs, one at a time, beating just until combined. Overmixing can introduce too much air, causing cracks in the cheesecake.
Step 4: Fill the Muffin Cups
Spoon the cheesecake mixture evenly over each Oreo cookie, filling each cup almost to the top.
Step 5: Bake the Cheesecakes
Bake in the preheated oven for 15-18 minutes, or until the cheesecakes are set but slightly jiggly in the center.
Step 6: Cool and Chill
Let the cheesecakes cool to room temperature, then refrigerate for at least 2 hours before adding the toppings.
Step 7: Prepare the Bird’s Nest Topping
Toast the shredded coconut in a dry skillet over medium heat for 2-3 minutes, stirring frequently until golden brown. Melt the chocolate chips in a microwave-safe bowl in 30-second intervals, stirring in between.
Step 8: Assemble the Nests
Mix the toasted coconut into the melted chocolate. Spoon small amounts on top of each cheesecake, shaping them into a nest-like shape.
Step 9: Add Candy Eggs and Serve
Place three candy eggs in each chocolate nest. Chill the cheesecakes for another 30 minutes before serving.

How to Serve of this Bird’s Nest Mini Cheesecakes
Once your Bird’s Nest Mini Cheesecakes have been fully chilled and set, it’s time to serve them. These adorable little treats are perfect for a variety of occasions, and how you present them can enhance their appeal even more.
One of the best ways to serve these cheesecakes is on a decorative Easter-themed platter. You can arrange them in a circular pattern and scatter extra candy eggs or shredded coconut around them to create a nest-like effect. If you’re hosting an Easter brunch or a spring gathering, place them on a tiered dessert stand for a beautiful display.
For an extra festive touch, serve each cheesecake with a small dollop of whipped cream on the side. You can also drizzle a little melted chocolate or caramel over the top for added flavor and visual appeal.
If serving these at a children’s party, consider placing each mini cheesecake in a colorful cupcake liner or wrapping them individually in cellophane bags with a ribbon. This makes them easy to grab and adds to the excitement of enjoying them.
These cheesecakes are best served chilled. Remove them from the refrigerator 10-15 minutes before serving so they’re at the perfect creamy texture.
To make the experience even more special, serve them alongside a hot cup of coffee, tea, or milk. The combination of the rich cheesecake, crunchy Oreo base, and chocolatey nest topping pairs wonderfully with warm beverages.
If you’re serving these as part of a larger dessert spread, they go well with fruit-based desserts like strawberry shortcake, lemon bars, or a fresh berry salad.
Pairing Suggestions
Pairing these mini cheesecakes with the right beverages and side treats can enhance their flavor and elevate the dessert experience. Here are some great pairing ideas:
Beverage Pairings
- Coffee & Espresso: The richness of cheesecake pairs beautifully with hot espresso, cappuccino, or a strong cup of black coffee. The bitterness of coffee contrasts with the sweetness of the cheesecake, balancing the flavors.
- Tea: A fragrant earl grey, chamomile, or green tea complements the creamy texture of the cheesecake. If you prefer a stronger tea, chai or spiced black tea works well too.
- Hot Chocolate: For a super indulgent treat, serve these cheesecakes with a warm mug of hot chocolate. You can even add whipped cream and a sprinkle of cocoa powder for an extra festive touch.
- Milk & Milkshakes: A cold glass of milk is a classic pairing, especially for kids. Alternatively, you can serve these with a vanilla or cookies-and-cream milkshake for a fun dessert duo.
Side Desserts & Snacks
- Fresh Berries: The tanginess of strawberries, raspberries, or blueberries contrasts beautifully with the richness of the cheesecake. Serve them on the side or as a garnish on top.
- Chocolate-Dipped Pretzels: The salty crunch of pretzels covered in chocolate makes a great contrast to the creamy cheesecake.
- Lemon or Passionfruit Bars: If you want to offer a citrusy dessert alongside your cheesecakes, lemon or passionfruit bars are a refreshing choice.
- Vanilla Ice Cream: A scoop of vanilla ice cream alongside your mini cheesecake can add another level of indulgence.
Storage, Freezing & Reheating Instructions
If you have leftovers or want to prepare these cheesecakes in advance, proper storage is key to maintaining their flavor and texture.
Refrigeration
These mini cheesecakes should be stored in an airtight container in the refrigerator. They will stay fresh for 3-4 days. Before serving, allow them to sit at room temperature for 10-15 minutes to soften slightly.
Freezing Instructions
To freeze these cheesecakes:
- Let them cool completely and chill in the refrigerator for at least 2 hours before freezing.
- Place them in a single layer on a baking sheet and freeze for about 1 hour until firm.
- Once frozen, transfer them to an airtight container or freezer-safe bag, placing parchment paper between layers to prevent sticking.
- Label them with the date and store in the freezer for up to 2 months.
Thawing & Reheating
- To thaw, transfer the frozen cheesecakes to the refrigerator and let them defrost overnight.
- If you’re in a hurry, leave them at room temperature for 30-45 minutes before serving.
- Avoid microwaving as this can ruin their texture.
Common Mistakes to Avoid
Even though this recipe is simple, a few common mistakes can affect the final result. Here’s what to watch out for:
1. Overmixing the Cheesecake Batter
Overmixing introduces too much air into the batter, which can cause cracks in the cheesecake. Mix just until the ingredients are combined for a smooth texture.
2. Not Softening the Cream Cheese Properly
Cold cream cheese doesn’t blend well and can leave lumps in the batter. Make sure your cream cheese is at room temperature before mixing.
3. Skipping the Cooling & Chilling Time
Cheesecake needs time to set properly. Rushing this step can result in a runny texture. Always allow at least 2 hours for chilling.
4. Overbaking the Cheesecakes
These mini cheesecakes should be slightly jiggly in the center when removed from the oven. Overbaking will result in dry, cracked cheesecakes.
5. Using Too Much Chocolate for the Nest
If you use too much melted chocolate for the topping, it can harden into a thick layer, making the cheesecake difficult to bite into. Use just enough to coat the coconut lightly.
Pro Tips
To ensure your cheesecakes turn out perfectly, keep these pro tips in mind:
- Use Full-Fat Cream Cheese: For the best texture and flavor, always use full-fat cream cheese rather than reduced-fat versions.
- Toast the Coconut: Toasting the shredded coconut before mixing with chocolate enhances its nutty flavor and adds extra crunch.
- Customize the Candy Eggs: Try using different kinds of chocolate eggs or even mini peanut butter eggs for a unique twist.
- Make in Advance: These cheesecakes taste even better the next day, so they’re a great make-ahead dessert.
Frequently Asked Questions (FAQs)
1. Can I make these without an Oreo crust?
Yes! You can use graham crackers, vanilla wafers, or even a brownie base instead of Oreos.
2. What if I don’t like coconut?
You can replace the coconut with chocolate sprinkles, crushed pretzels, or thin chocolate shavings for a nest-like effect.
3. Can I use white chocolate instead of dark chocolate?
Absolutely! White chocolate gives a sweeter, creamier taste that pairs well with the cheesecake filling.
4. How do I prevent cracks in my cheesecakes?
Avoid overmixing, do not overbake, and let them cool gradually in the oven with the door slightly open.
5. Can I make these gluten-free?
Yes! Use gluten-free Oreos or a gluten-free cookie crust for a completely gluten-free dessert.
Conclusion & Call to Action
These Bird’s Nest Mini Oreo Cheesecakes are a delightful and festive treat, perfect for Easter and springtime celebrations. Their adorable appearance, creamy texture, and crunchy chocolate-coconut topping make them irresistible to both kids and adults.
Now that you have all the steps, tips, and storage instructions, it’s time to get baking! Gather your ingredients, follow the easy steps, and enjoy the process of creating these adorable mini cheesecakes.
If you try this recipe, share your results! Post a photo on social media and tag us with #MiniOreoCheesecakes. We’d love to see your creations!
Happy baking!
Print
Bird’s Nest Mini Oreo Cheesecakes – Easy Easter Dessert Recipe
- Total Time: 2 hours 30 minutes (including chilling time)
- Yield: 12 mini cheesecakes 1x
- Diet: Vegetarian
Description
These Bird’s Nest Mini Oreo Cheesecakes are the cutest Easter dessert! A creamy vanilla cheesecake sits on a crunchy Oreo crust, topped with a chocolate-coconut nest and candy eggs. Perfect for Easter brunch, spring parties, or family baking fun. Easy to make, no water bath needed, and kid-approved!
Ingredients
For the Crust:
- 12 Oreo cookies (whole, do not remove the filling)
For the Cheesecake Filling:
- 16 oz cream cheese, softened
- ½ cup sugar
- 1 tsp vanilla extract
- 2 large eggs
For the Bird’s Nest Topping:
- 1 cup chocolate chips, melted
- 1 cup shredded coconut, toasted
- Candy eggs (Mini Cadbury Eggs or M&M eggs)
Instructions
- Preheat the oven to 325°F (163°C) and line a 12-cup muffin tin with cupcake liners.
- Place one whole Oreo cookie at the bottom of each liner to serve as the crust.
- Prepare the cheesecake filling: Beat the cream cheese, sugar, and vanilla until smooth. Add eggs, one at a time, mixing just until combined.
- Fill each muffin cup with cheesecake batter, covering the Oreo crust.
- Bake for 15-18 minutes until set but slightly jiggly in the center. Let cool completely.
- Make the bird’s nest topping: Toast shredded coconut and mix with melted chocolate.
- Spoon the chocolate-coconut mixture on top of each cheesecake, shaping it into a nest.
- Decorate with candy eggs and chill for at least 2 hours before serving.
Notes
- Use room temperature cream cheese for a smoother batter.
- Do not overmix the batter to prevent cracks.
- For a nutty twist, add crushed almonds or hazelnuts to the nest mixture.
- Make ahead: These cheesecakes stay fresh for 3-4 days in the fridge and freeze well for up to 2 months.
- Prep Time: 15 minutes
- Cook Time: 18 minutes
- Category: Dessert
- Method: Baking
- Cuisine: American