
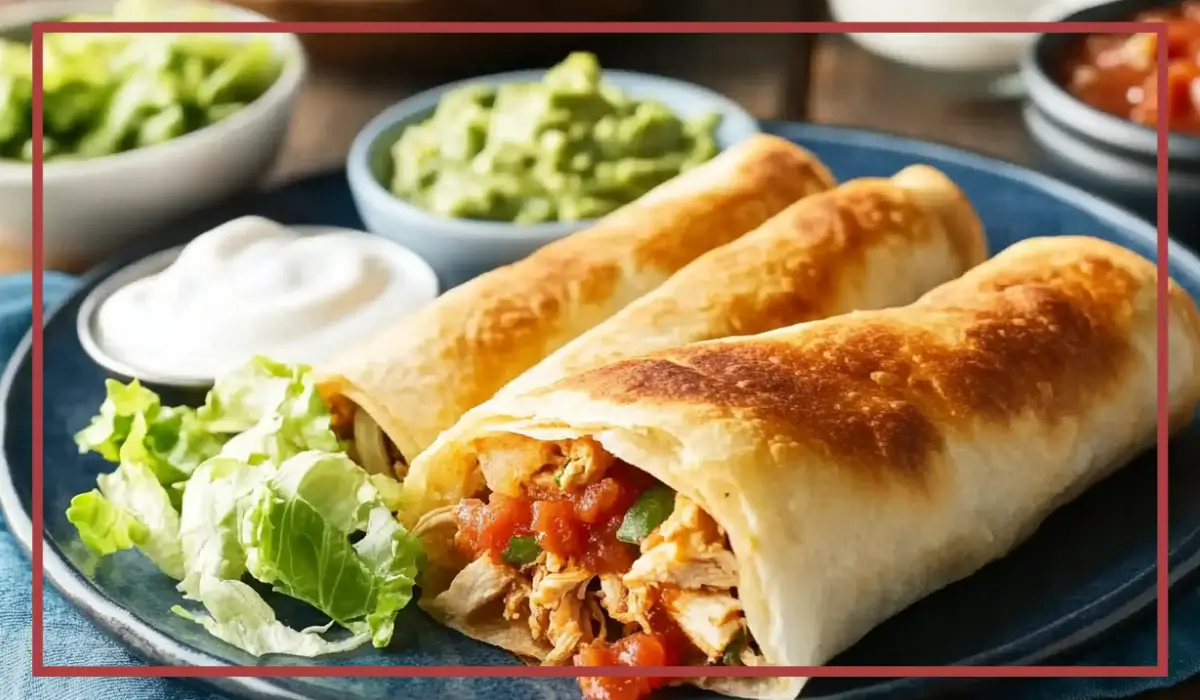
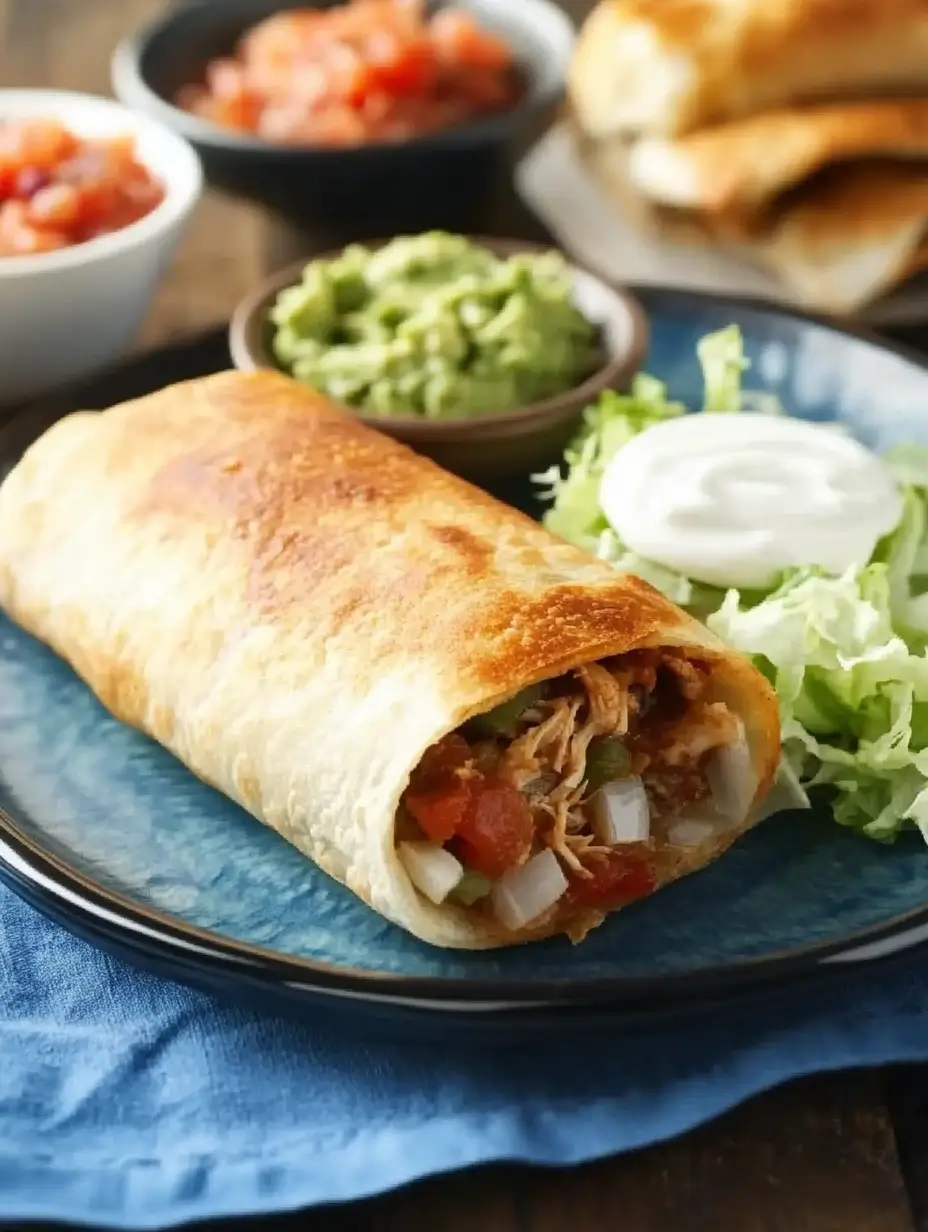
There is something undeniably satisfying about biting into a Instant Pot Chimichangas. The crunch of the tortilla, the gooey melted cheese, and the flavorful, seasoned chicken all come together in perfect harmony. But here’s the catch—traditional chimichangas are deep-fried, which can be messy, time-consuming, and not exactly the healthiest option. That’s where the Instant Pot comes in to save the day.
These Instant Pot Chimichangas are everything you love about the classic Mexican dish but without the hassle of deep frying. Instead, we use the Instant Pot to create the most tender, flavorful shredded chicken filling, then crisp up the tortillas in the oven or air fryer. The result? A perfectly crispy, cheesy, and ridiculously delicious chimichanga that’s better than takeout.
I love making these for weeknight dinners because they come together so quickly, and everyone in my family devours them. The best part is that they’re incredibly customizable—add more spice, switch up the cheese, or pile on your favorite toppings like guacamole and sour cream. Plus, they’re great for meal prep and freezer-friendly, making them a must-have in your recipe rotation.
If you’re looking for a restaurant-quality meal that’s easy to make and bursting with flavor, you’re in the right place. Let’s dive into why you’ll absolutely love these Instant Pot Chimichangas!
Why You’ll Love This Instant Pot Chimichangas Recipe
There are so many reasons to love this recipe, and once you try it, you’ll see why it has quickly become a household favorite.
1. Easy to Make with Minimal Effort
With the Instant Pot doing most of the heavy lifting, there’s no need to stand over a stove for hours. The chicken cooks quickly, and all you have to do is assemble and crisp up the chimichangas in the oven or air fryer.
2. No Deep Frying Required
Traditional chimichangas are deep-fried in oil, which can be messy and add unnecessary calories. This version achieves that same crispy texture without the grease, thanks to the oven or air fryer.
3. Packed with Flavor
The combination of chili powder, garlic, onion, and salsa infuses the chicken with bold, savory flavors. Plus, the cheese melts beautifully inside the tortilla, creating an irresistible bite every time.
4. Perfect for Meal Prep and Freezing
These chimichangas store well in the fridge and freezer, making them a great option for busy weeknights. Simply reheat and enjoy!
5. Family-Friendly and Customizable
Everyone in the family will love these, and you can easily tweak the ingredients to suit different tastes. Want it spicier? Add jalapeños. Prefer a milder version? Use a mild salsa.
Now that you’re convinced these chimichangas are a must-try, let’s talk about the health benefits of this dish!
Health Benefits of these Instant Pot Chimichangas
While chimichangas aren’t typically considered a “health food,” this version is a much lighter and more balanced take on the classic. Here’s why:
1. Lean Protein from Chicken
Chicken breast is an excellent source of lean protein, which helps build muscle, keeps you full, and supports overall health.
2. Reduced Oil Content
Since we skip the deep frying, this recipe significantly reduces the amount of unhealthy fats compared to traditional chimichangas.
3. Fiber-Rich Tortillas
Using whole wheat or high-fiber tortillas can add extra nutrients to your meal, making it a more balanced choice.
4. Nutritious Toppings
By adding toppings like avocado (healthy fats), Greek yogurt (a protein-packed sour cream alternative), and fresh salsa (antioxidants), you can boost the nutritional value of this dish.
Now that we know why these chimichangas are a great addition to your meal plan, let’s go over the time, servings, and nutritional breakdown.
Preparation Time, Servings, and Nutritional Information
Time Breakdown
- Prep Time: 10 minutes
- Instant Pot Cook Time: 12 minutes (plus 5 minutes natural release)
- Bake/Air Fry Time: 10-20 minutes
- Total Time: ~35-40 minutes
Servings
This recipe makes 6 chimichangas, perfect for a family meal or leftovers.
Nutritional Information (Per Chimichanga)
- Calories: ~350
- Protein: 28g
- Carbohydrates: 32g
- Fat: 12g
Now that we have all the details covered, let’s take a look at the ingredients you’ll need.
Ingredients List of these Instant Pot Chimichangas
For the Chicken Filling:
- 2 boneless, skinless chicken breasts
- 1 teaspoon salt
- ½ teaspoon black pepper
- 1 teaspoon chili powder
- 1 teaspoon garlic powder
- ½ teaspoon onion powder
- 1 cup salsa (mild or spicy, depending on your preference)
- ½ cup chicken broth
For the Chimichangas:
- 6 large flour tortillas
- 1 cup shredded cheese (cheddar, Monterey Jack, or a blend)
- 1 tablespoon olive oil (for brushing)
Toppings (Optional but Highly Recommended!):
- Guacamole
- Pico de gallo
- Sour cream or Greek yogurt
- Chopped cilantro
With all our ingredients ready, let’s move on to the step-by-step cooking instructions.
Step-By-Step Cooking Instructions of these Instant Pot Chimichangas
1: Cook the Chicken in the Instant Pot
- Place the chicken breasts in the Instant Pot.
- Season with salt, pepper, chili powder, garlic powder, and onion powder.
- Add salsa and chicken broth to keep the chicken moist and flavorful.
- Close the lid and set to Pressure Cook (Manual) for 12 minutes.
- Once done, let the pressure release naturally for 5 minutes, then manually release the rest.
2: Shred the Chicken
- Remove the chicken from the Instant Pot and place it on a plate.
- Use two forks to shred the chicken into bite-sized pieces.
- Return the shredded chicken to the Instant Pot, mixing it with the sauce.
3: Assemble the Chimichangas
- Lay out a tortilla on a clean surface.
- Add a generous scoop of shredded chicken in the center.
- Sprinkle shredded cheese on top.
- Fold in the sides and roll the tortilla tightly like a burrito.
- Place seam-side down on a baking sheet or air fryer basket.
4: Crisp the Chimichangas
Oven Method:
- Preheat oven to 400°F (200°C).
- Brush the chimichangas with olive oil.
- Bake for 15-20 minutes, flipping halfway.
Air Fryer Method:
- Preheat air fryer to 375°F (190°C).
- Brush with olive oil.
- Air fry for 8-10 minutes, flipping halfway.
Step 5: Serve and Enjoy!
- Remove from the oven or air fryer.
- Top with guacamole, pico de gallo, and sour cream.
- Serve immediately and enjoy!
Now that your chimichangas are ready, let’s talk about how to serve them in the most delicious way possible.
How to Serve these Instant Pot Chimichangas
Now that your crispy, golden chimichangas are fresh out of the oven or air fryer, it’s time to take them to the next level with delicious toppings and sides. The best part about this dish is how versatile it is—you can keep it simple with just a drizzle of sour cream, or go all out with a spread of toppings and side dishes that turn it into a restaurant-style feast.
Best Toppings for Instant Pot Chimichangas
Adding toppings is where you can get really creative and make each chimichanga your own. Here are some must-try toppings that enhance the flavors and textures:
- Guacamole – The creaminess of mashed avocado pairs beautifully with the crispy tortilla and savory filling.
- Pico de Gallo – Fresh chopped tomatoes, onions, and cilantro add a burst of freshness.
- Sour Cream or Greek Yogurt – A cooling contrast to the warm, spicy chicken.
- Shredded Lettuce – For some extra crunch and a fresh balance to the richness.
- Diced Jalapeños – If you like some heat, fresh or pickled jalapeños are a great addition.
- Chopped Cilantro – Brings a bright, herby freshness to every bite.
- Cotija or Queso Fresco – These crumbly Mexican cheeses add a delicious salty kick.
Serving Suggestions
Chimichangas are incredibly filling on their own, but if you want to round out your meal, here are some great side dishes to serve with them:
- Mexican Rice – A classic side that soaks up all the extra sauce and flavors.
- Refried Beans or Black Beans – A protein-packed addition that pairs well with the crispy tortillas.
- Grilled Vegetables – Roasted bell peppers, onions, and zucchini add a healthy, flavorful touch.
- Corn Salad – A bright and refreshing side with a mix of sweet corn, lime, and cilantro.
- Tortilla Chips & Salsa – Perfect for scooping up any extra filling or toppings.
With all these options, you can easily turn your meal into a Mexican-inspired feast that will impress your family and guests. Now, let’s talk about the best drinks and pairings to go with your chimichangas.
Pairing Suggestions
A great meal deserves the perfect drink or side pairing to enhance the flavors even more. Whether you’re serving these chimichangas for a casual dinner or a festive gathering, here are some perfect drink and side pairings to complete your meal.
Best Drinks to Serve with Chimichangas
Pairing the right drink can elevate your dining experience. Here are some great options:
- Hibiscus Agua Fresca (Agua de Jamaica) – A refreshing, slightly tart drink made from dried hibiscus flowers, perfect for cutting through the richness of the chimichangas.
- Horchata – A creamy, cinnamon-infused rice milk drink that complements the spices in the dish.
- Mango or Pineapple Smoothie – A tropical, sweet pairing that balances the heat from the chimichangas.
- Sparkling Limeade – A zesty and bubbly drink that adds a refreshing contrast.
- Iced Tea with Lemon – A simple yet classic pairing for any Mexican dish.
Side Dish Pairings for a Complete Meal
If you want to create a well-rounded meal, try pairing your chimichangas with these complementary sides:
- Mexican Street Corn (Elote) – Grilled corn on the cob with a creamy, cheesy, and spicy topping.
- Chopped Avocado Salad – A light and refreshing salad with avocado, cucumbers, and lime dressing.
- Sautéed Peppers and Onions – A flavorful side that works well with the chimichangas.
- Cheesy Queso Dip – Perfect for dipping extra tortillas or chips.
Now that you know how to serve and pair your chimichangas, let’s talk about how to store, freeze, and reheat them so you can enjoy them anytime.
Storage, Freezing & Reheating Instructions
One of the best things about this recipe is that chimichangas store beautifully, making them a great option for meal prep. Whether you have leftovers or want to make a big batch ahead of time, here’s how to properly store, freeze, and reheat them for the best results.
How to Store Leftovers
If you have extra chimichangas, follow these steps to keep them fresh:
- Allow the chimichangas to cool completely before storing them.
- Wrap each chimichanga in foil or plastic wrap to prevent them from drying out.
- Store in an airtight container in the refrigerator for up to 3 days.
How to Freeze Chimichangas
Freezing chimichangas is a great way to have a quick, ready-to-eat meal on hand. Here’s how to do it:
- Let the chimichangas cool completely.
- Wrap each chimichanga tightly in plastic wrap, then in aluminum foil to prevent freezer burn.
- Place them in a zip-top freezer bag and store for up to 3 months.
How to Reheat Chimichangas
Reheating chimichangas properly ensures they stay crispy and delicious.
- Oven Method (Best for Crispiness): Preheat oven to 375°F (190°C) and bake for 15-20 minutes until heated through.
- Air Fryer Method: Place frozen or refrigerated chimichangas in the air fryer at 375°F (190°C) for 8-10 minutes.
- Microwave Method (Fastest): Heat in 30-second intervals until warm, but keep in mind they won’t be as crispy.
Now that you know how to store and reheat your chimichangas, let’s go over some common mistakes to avoid to ensure your dish turns out perfect every time.
Common Mistakes to Avoid
Even though this recipe is simple, there are a few common mistakes that can impact the final result. Here’s what to watch out for:
1. Overfilling the Tortillas
Adding too much filling can make the chimichangas difficult to roll and may cause them to burst open while cooking. Keep a moderate amount of filling in the center for best results.
2. Not Brushing with Oil
Skipping the oil brushing step will result in dry, chewy tortillas instead of crispy, golden ones. Make sure to lightly brush with olive oil before baking or air frying.
3. Using Cold Filling
If your chicken filling is too cold, it may not heat evenly inside the chimichanga. If using leftovers, slightly warm the chicken before assembling.
4. Skipping the Flipping Step
To ensure even crispiness, flip the chimichangas halfway through baking or air frying. This prevents one side from becoming too soft.
5. Not Allowing Them to Cool Before Storing
If you store chimichangas while they’re still hot, they may become soggy from trapped steam. Let them cool for at least 10 minutes before storing.
Avoiding these mistakes will help you make the perfect chimichangas every time! Now, let’s move on to some pro tips to take this dish to the next level.
Pro Tips for the Best Instant Pot Chimichangas
To make sure your chimichangas turn out crispy, flavorful, and absolutely perfect, here are some expert tips that will take your cooking game to the next level.
1. Use Fresh, High-Quality Tortillas
Not all tortillas are created equal! Choose soft, pliable flour tortillas that won’t crack when rolling. If your tortillas are a bit stiff, warm them up in the microwave for 10-15 seconds to make them easier to work with.
2. Toast the Tortillas Before Assembling
For extra crispiness, lightly toast the tortillas in a dry skillet before filling them. This helps prevent sogginess and adds a slightly nutty flavor.
3. Drain Excess Liquid from the Chicken Filling
If your chicken mixture is too watery, it can make the tortillas soggy. Before assembling the chimichangas, use a slotted spoon to drain any excess liquid from the shredded chicken.
4. Roll the Chimichangas Tightly
A loose roll will lead to filling spilling out while cooking. Start by folding in the sides, then roll tightly from the bottom up to create a secure wrap. Place them seam-side down on the baking sheet or air fryer basket to keep them from unraveling.
5. Don’t Skip the Oil Brushing Step
Brushing the chimichangas with olive oil or melted butter before baking or air frying is key to achieving that signature crispy exterior. You can also spray them with cooking spray if you’re short on time.
6. Broil for an Extra Golden Finish
If you want your chimichangas to have a restaurant-style golden-brown crust, place them under the broiler for 1-2 minutes after baking. Keep an eye on them to prevent burning!
7. Add More Flavor with a Seasoned Butter Wash
For an extra boost of flavor, mix melted butter with a pinch of garlic powder, paprika, and cumin before brushing it onto the tortillas. This gives them a rich, deep flavor and a gorgeous golden color.
8. Keep the Chimichangas Warm Until Serving
If you’re making a large batch, keep the cooked chimichangas warm by placing them on a baking sheet in a 200°F (95°C) oven while you finish cooking the rest.
9. Customize the Filling
This recipe is super versatile! You can switch things up by adding:
- Black beans or refried beans for extra heartiness.
- Sautéed bell peppers and onions for a fajita-style twist.
- Diced jalapeños or hot sauce for an extra spicy kick.
- Leftover rotisserie chicken if you’re short on time.
10. Make a Dipping Sauce for Extra Flavor
While these chimichangas are amazing on their own, they’re even better with a dipping sauce! Try serving them with:
- Spicy Chipotle Mayo – Mix mayo with chipotle sauce for a smoky heat.
- Avocado Crema – Blend avocado, sour cream, lime juice, and garlic for a creamy dip.
- Homemade Queso Dip – A cheesy, gooey sauce for dunking.
Now that you have all the pro tips, let’s go over some frequently asked questions to make sure your cooking process goes smoothly.
Frequently Asked Questions (FAQs)
1. Can I Use Corn Tortillas Instead of Flour?
Corn tortillas aren’t ideal for chimichangas because they tend to crack when rolled and don’t get as crispy. If you prefer corn tortillas, you may want to make taquitos instead!
2. How Do I Make This Recipe Spicier?
If you love spice, here are some ways to kick up the heat:
- Add diced jalapeños or hot sauce to the chicken filling.
- Use spicy salsa instead of mild.
- Sprinkle crushed red pepper flakes into the seasoning mix.
3. Can I Make This Recipe in Advance?
Yes! You can prepare the chicken filling a day in advance and store it in the fridge. When ready to eat, simply assemble and bake or air fry the chimichangas.
4. Can I Use a Different Meat Instead of Chicken?
Absolutely! This recipe works great with:
- Shredded beef (slow-cooked for tenderness).
- Ground turkey or beef (cooked with taco seasoning).
- Shredded rotisserie chicken for a quick option.
5. Can I Make This Recipe Dairy-Free?
Yes! Simply use dairy-free cheese or skip the cheese altogether. The chimichangas will still be flavorful and delicious.
6. What’s the Best Way to Reheat Chimichangas?
For the best results, reheat in the oven at 375°F (190°C) for 10-15 minutes or in the air fryer at 375°F for 8 minutes. Avoid the microwave unless you’re in a hurry—it can make them soft instead of crispy.
7. How Do I Keep My Chimichangas from Getting Soggy?
To prevent sogginess:
- Drain excess liquid from the chicken filling.
- Brush the tortillas with oil before baking.
- Reheat in the oven or air fryer instead of the microwave.
8. Can I Freeze Uncooked Chimichangas?
Yes! Assemble the chimichangas but don’t bake them. Wrap them tightly in plastic wrap and store in a freezer-safe bag for up to 3 months. When ready to eat, bake straight from frozen at 375°F (190°C) for 20-25 minutes.
9. Can I Add Rice Inside the Chimichangas?
Definitely! Adding Mexican rice or cilantro lime rice makes them even more filling. Just be careful not to overstuff the tortillas.
10. What If I Don’t Have an Instant Pot?
No worries! You can cook the chicken:
- In a slow cooker on low for 6 hours.
- On the stovetop by simmering for 25 minutes.
- Using pre-cooked rotisserie chicken for an easy shortcut.
Now that we’ve covered all the FAQs, let’s wrap up with some final thoughts and encouragement for you to try this amazing recipe!
Conclusion & Call to Action
These Instant Pot Chimichangas are the perfect combination of crispy, cheesy, and packed with bold, savory flavors. They’re quick, easy, and healthier than deep-fried versions, making them a fantastic choice for busy weeknights or weekend gatherings.
Whether you bake them in the oven or crisp them up in the air fryer, they come out golden-brown and delicious every single time. Plus, with all the customizable toppings and side pairings, you can easily turn this into a restaurant-worthy meal right at home.
Now it’s your turn to try this recipe! I’d love to hear how your chimichangas turned out.
If you make these, leave a comment below and tell me what toppings you used!
Snap a photo and tag me on social media—I love seeing your delicious creations!
Happy cooking, and enjoy your crispy, cheesy Instant Pot Chimichangas!
Print
Instant Pot Chimichangas – Easy, Crispy & Flavorful Recipe
- Total Time: 30 minutes
- Yield: 6 chimichangas 1x
- Diet: Halal
Description
These Instant Pot Chimichangas are crispy, cheesy, and packed with seasoned shredded chicken. Cooked quickly in the Instant Pot and finished in the oven or air fryer for a golden-brown crunch, they’re an easy and healthier twist on the classic deep-fried favorite.
Ingredients
- 2 boneless, skinless chicken breasts
- 1 tsp salt
- ½ tsp black pepper
- 1 tsp chili powder
- 1 tsp garlic powder
- ½ tsp onion powder
- 1 cup salsa
- ½ cup chicken broth
- 6 large flour tortillas
- 1 cup shredded cheese (cheddar, Monterey Jack, or blend)
- 1 tbsp olive oil (for brushing)
Instructions
- Cook the Chicken: Add chicken, seasonings, salsa, and broth to the Instant Pot. Pressure cook for 12 minutes, then let the pressure release naturally for 5 minutes.
- Shred the Chicken: Remove the chicken, shred it with forks, and mix it back into the sauce.
- Assemble Chimichangas: Place shredded chicken and cheese in tortillas, roll tightly, and place seam-side down.
- Bake or Air Fry: Brush with oil and bake at 400°F (200°C) for 15-20 minutes, flipping halfway. For air frying, cook at 375°F (190°C) for 8-10 minutes.
- Serve: Top with guacamole, sour cream, and pico de gallo. Enjoy!
Notes
- For extra crispiness, broil for 1-2 minutes after baking.
- Swap chicken for beef, turkey, or beans for variety.
- Store leftovers in an airtight container for up to 3 days.
- Prep Time: 10 minutes
- Cook Time: 20 minutes
- Category: Main Dish
- Method: Instant Pot & Oven/Air Fryer
- Cuisine: Mexican-Inspired