
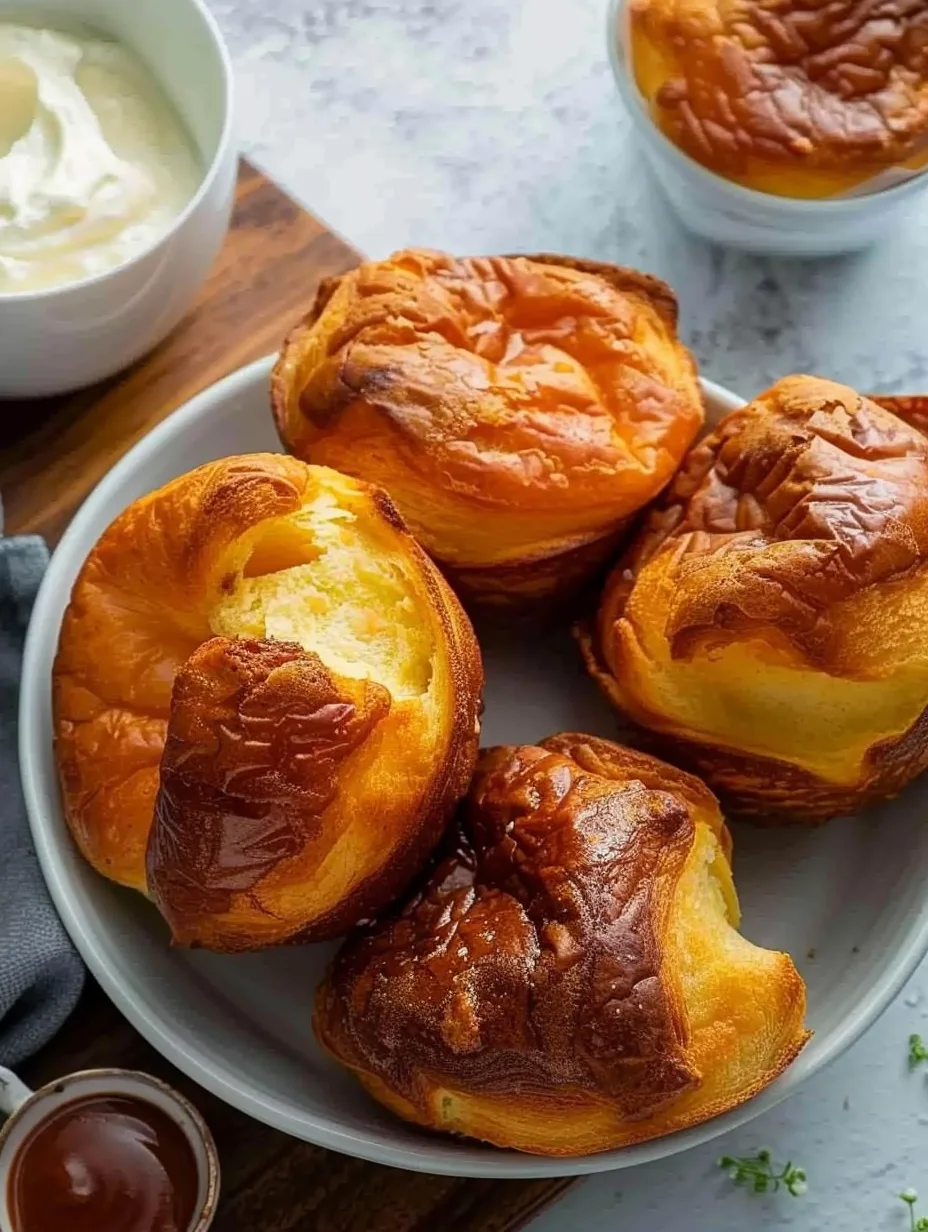
Light & Buttery Classic Popovers are a delightful addition to any meal. These airy, golden-brown pastries have a unique ability to impress both family and friends. With their impressive rise and soft, buttery texture, they are a true culinary wonder. Whether served alongside a hearty stew, as a standalone snack, or filled with sweet or savory fillings, popovers are versatile and quite easy to make. They transform any dining experience from ordinary to extraordinary.
If you’ve never tasted a popover, you’re in for a treat. The moment you cut into one, the steam escapes, revealing a hollow center that is perfect for holding soups, sauces, or even sweet whipped cream. This recipe is not just about baking; it’s about creating a memorable experience in your kitchen. With just a few simple ingredients, you can create an impressive dish that will leave everyone asking for seconds.
In this guide, you’ll discover why this recipe stands out, how to prepare it, and tips on serving your popovers perfectly. Whether you are a novice in the kitchen or an experienced chef, you’ll find this amazing recipe easy to follow and incredibly rewarding. Let’s dive into the world of Light & Buttery Classic Popovers!
Why You’ll Love This Recipe
Light & Buttery Classic Popovers are not just delicious; they are also fun to make. Here are a few reasons why this recipe will capture your heart:
1. Quick and Simple: With minimal ingredients and straightforward instructions, these popovers are easy to prepare.
2. Impressive Presentation: Their dramatic rise makes them visually stunning. Guests will be amazed by your baking skills!
3. Versatile: You can serve them sweet or savory, making them perfect for breakfast, lunch, or dinner.
4. Light and Airy Texture: The unique combination of ingredients results in a delightful texture that is hard to resist.
5. Family-Friendly: Kids love to watch the popovers puff up in the oven, making it a fun activity for families.
6. Perfect for Any Occasion: Whether for a casual brunch or a fancy dinner party, these popovers fit right in.
With these wonderful qualities, it’s easy to see why Light & Buttery Classic Popovers are a must-try recipe!
Preparation and Cooking Time
Making Light & Buttery Classic Popovers requires some time, but the results are definitely worth it. Here’s a breakdown of the time involved:
– Preparation Time: 15 minutes
– Cooking Time: 30-35 minutes
– Total Time: Approximately 45-50 minutes
Keep in mind that the baking time may vary slightly depending on your oven. It’s essential to keep an eye on them as they bake to achieve that perfect golden-brown color.
Ingredients
– 1 cup all-purpose flour
– 1 cup whole milk
– 3 large eggs
– 1/2 teaspoon salt
– 2 tablespoons unsalted butter (melted)
– Additional butter for greasing the popover pan
Step-by-Step Instructions
Creating Light & Buttery Classic Popovers is a simple process. Follow these steps to achieve perfect results:
1. Preheat your oven: Set your oven to 425°F (220°C). This high temperature is key to getting that impressive rise.
2. Prepare the pan: Generously grease a popover pan with butter, ensuring all the cups are well-coated. This will help the popovers release easily after baking.
3. Mix the batter: In a large bowl, combine the flour and salt. Whisk together until well mixed.
4. Add the wet ingredients: In a separate bowl, whisk together the eggs and milk until frothy. Then, slowly add the melted butter while continuing to whisk.
5. Combine: Pour the wet mixture into the dry ingredients and stir until just combined. Be careful not to overmix; a few lumps are okay.
6. Fill the pan: Pour the batter evenly into the prepared popover cups, filling each only halfway to allow for rising.
7. Bake: Place the pan in the preheated oven and bake for 30-35 minutes. Do not open the oven door during baking, as this can cause the popovers to deflate.
8. Check for doneness: The popovers should be golden brown and puffed up. A toothpick inserted into one should come out clean.
9. Cool slightly: Once baked, remove the pan from the oven and let the popovers cool in the pan for about 5 minutes before transferring them to a wire rack.
These steps will guide you in creating these incredible popovers effortlessly.
How to Serve
Serving Light & Buttery Classic Popovers can enhance the overall dining experience. Consider the following tips:
1. Presentation: Serve popovers warm, ideally straight from the oven. Place them in a basket lined with a cloth to keep them warm and inviting.
2. Accompaniments: Offer a selection of spreads such as butter, jam, or honey for sweet popovers. For savory options, consider serving with herbed butter or cheese.
3. Pairing: These popovers pair wonderfully with soups and stews. Their texture makes them great for soaking up delicious broths.
4. Garnishing: Sprinkle fresh herbs or a dusting of powdered sugar on top for a lovely finishing touch, depending on whether you’re serving them sweet or savory.
By focusing on presentation and pairing, you can elevate the experience of enjoying Light & Buttery Classic Popovers!
Additional Tips
– Use Room Temperature Ingredients: For the best texture, ensure your eggs and milk are at room temperature before mixing. This helps create a smoother batter.
– Avoid Overmixing: Gently combine the wet and dry ingredients to keep the batter light and airy. Overmixing can lead to dense popovers.
– Preheat Your Pan: If possible, place your greased popover pan in the oven for a few minutes before pouring in the batter. This extra heat helps create a better rise.
Recipe Variation
Get creative with your popovers! Here are some variations to consider:
1. Cheese Popovers: Add 1 cup of shredded cheese (like cheddar or Gruyère) to the batter for a savory twist.
2. Herb-Infused Popovers: Mix in fresh herbs such as chives, parsley, or thyme for added flavor.
3. Sweet Popovers: Incorporate a tablespoon of sugar and a teaspoon of vanilla extract for a sweet version, perfect for breakfast or dessert.
Freezing and Storage
– Storage: Keep leftover popovers in an airtight container at room temperature for 1-2 days. They are best enjoyed fresh.
– Freezing: If you want to freeze them, place cooled popovers in a freezer-safe bag or container. They can be frozen for up to 3 months. Reheat them in the oven at 350°F (175°C) for about 10-15 minutes to restore their texture.
Special Equipment
To make Light & Buttery Classic Popovers, you’ll need some essential tools:
– Popover pan: This specialized pan helps achieve the signature shape and rise of popovers.
– Mixing bowls: You’ll need at least two for mixing ingredients.
– Whisk: For combining wet and dry ingredients smoothly.
– Measuring cups and spoons: Accurate measurements are key to success.
Frequently Asked Questions
Can I use a muffin pan instead of a popover pan?
Yes, a muffin pan can work, but the popovers may not rise as dramatically.
What if my popovers don’t rise?
Ensure your oven is fully preheated, and avoid opening the door during baking. Room temperature ingredients also help.
Can I make the batter ahead of time?
It’s best to bake the batter immediately after mixing. If left to sit, it may lose its ability to rise.
What can I do with leftover popovers?
Leftover popovers can be repurposed into bread pudding or served with soups and stews.
Conclusion
Light & Buttery Classic Popovers are a delightful addition to any meal. With their airy texture and versatile nature, they can easily impress your guests or elevate a simple family dinner. Whether you stick to the classic recipe or explore variations, these popovers are sure to be a hit. Enjoy the process of making them and savor the delicious results!

Light & Buttery Classic Popovers: An Amazing Ultimate Recipe
- Total Time: 42 minute
Ingredients
– 1 cup all-purpose flour
– 1 cup whole milk
– 3 large eggs
– 1/2 teaspoon salt
– 2 tablespoons unsalted butter (melted)
– Additional butter for greasing the popover pan
Instructions
Creating Light & Buttery Classic Popovers is a simple process. Follow these steps to achieve perfect results:
1. Preheat your oven: Set your oven to 425°F (220°C). This high temperature is key to getting that impressive rise.
2. Prepare the pan: Generously grease a popover pan with butter, ensuring all the cups are well-coated. This will help the popovers release easily after baking.
3. Mix the batter: In a large bowl, combine the flour and salt. Whisk together until well mixed.
4. Add the wet ingredients: In a separate bowl, whisk together the eggs and milk until frothy. Then, slowly add the melted butter while continuing to whisk.
5. Combine: Pour the wet mixture into the dry ingredients and stir until just combined. Be careful not to overmix; a few lumps are okay.
6. Fill the pan: Pour the batter evenly into the prepared popover cups, filling each only halfway to allow for rising.
7. Bake: Place the pan in the preheated oven and bake for 30-35 minutes. Do not open the oven door during baking, as this can cause the popovers to deflate.
8. Check for doneness: The popovers should be golden brown and puffed up. A toothpick inserted into one should come out clean.
9. Cool slightly: Once baked, remove the pan from the oven and let the popovers cool in the pan for about 5 minutes before transferring them to a wire rack.
These steps will guide you in creating these incredible popovers effortlessly.
- Prep Time: 15 minutes
- Cook Time: 30-35 minutes
Nutrition
- Serving Size: 6-8 popovers
- Calories: 80 kcal per popover
- Fat: 3g
- Protein: 3g