
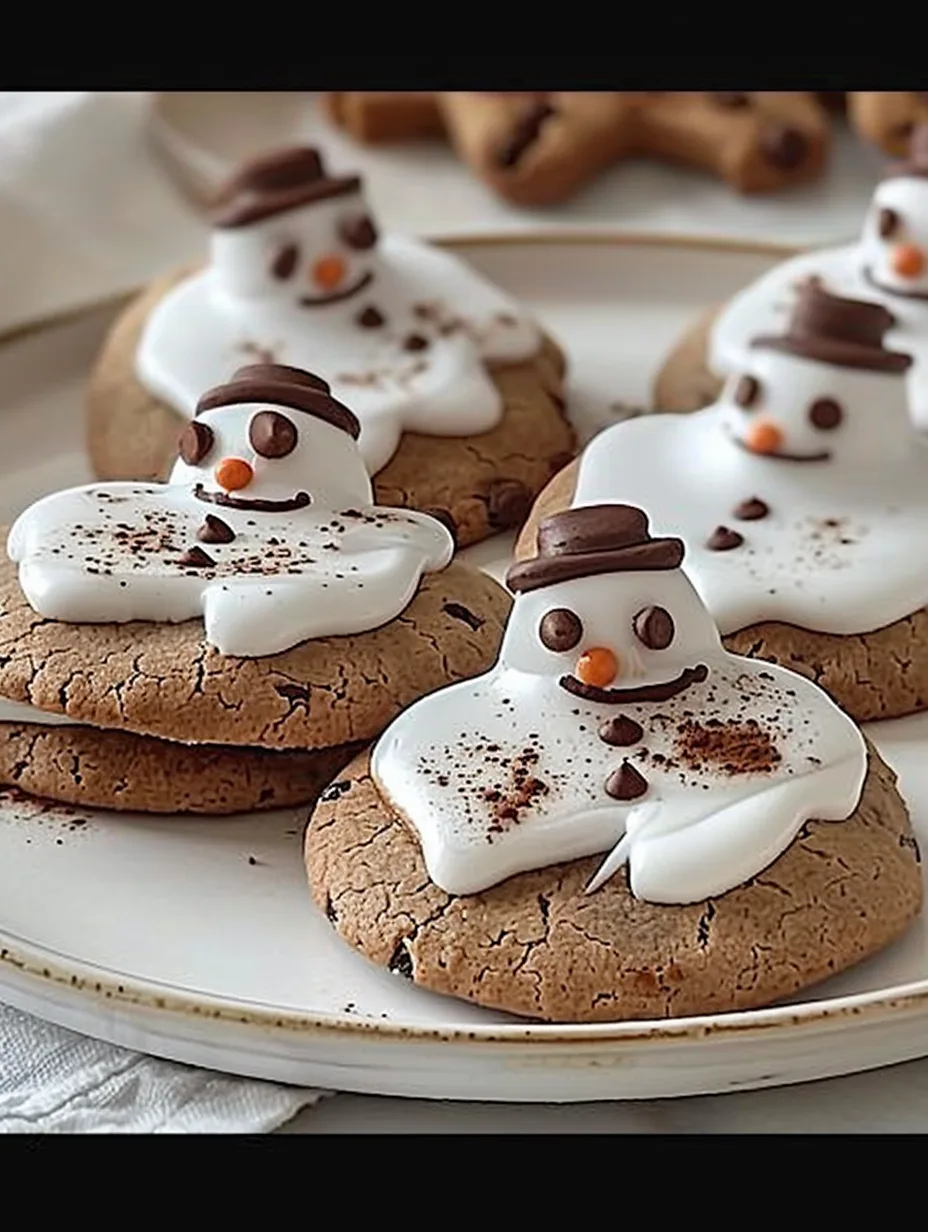
Melted Snowman Cookies are the perfect festive treat to brighten up your holiday celebrations. These delightful cookies not only look charming, but they are incredibly delicious, making them a favorite among both kids and adults. The whimsical design of a snowman appearing to melt away is both fun and creative, adding a playful touch to your dessert table. They are easy to make and can serve as a fun holiday activity for the whole family, bringing everyone together in the kitchen.
Imagine setting a tray of these adorable cookies in front of your guests at your next holiday gathering. Each cookie features a cute, melted snowman design, complete with icing drips and candy accessories. It’s not just a cookie; it’s an experience that evokes laughter and joy. As you bite into the soft, chewy cookie, the flavors of vanilla and almond dance on your palate, making them a delightful addition to your holiday traditions.
In this guide, you will discover why Melted Snowman Cookies are an essential recipe for the season, learn how to prepare and bake them, and find tips on serving these delightful treats. So, gather your ingredients and get ready for an incredible baking adventure that will leave your kitchen smelling wonderful and your loved ones smiling.
Why You’ll Love This Recipe
Melted Snowman Cookies are not just visually appealing; they also offer a wonderful combination of flavors and textures that make them irresistibly delicious. Here are a few reasons why you’ll love this recipe:
1. Simple Ingredients – Most ingredients are pantry staples, making this recipe easy to follow.
2. Fun for All Ages – Decorating these cookies is a fun activity for kids and adults alike, fostering creativity.
3. Perfect for Gifting – These cookies make for lovely gifts during the holiday season, beautifully packaged for friends and family.
4. Versatile Design – You can customize the snowman designs with different candies and colors.
5. Great for Parties – Their unique appearance makes them a conversation starter at any holiday gathering.
6. Easy to Store – These cookies can be made ahead of time and stored, allowing for stress-free holiday preparations.
With these delightful aspects in mind, it’s clear why Melted Snowman Cookies are a favorite holiday treat. Each bite not only satisfies your sweet tooth but also brings joy and fun to your festivities!
Preparation and Cooking Time
Creating Melted Snowman Cookies is a straightforward process, making it accessible for bakers of all skill levels. Here’s a breakdown of the time required:
– Preparation Time: 20 minutes
– Cooking Time: 10-12 minutes
– Cooling Time: 15 minutes
In total, you can expect to spend about 45-50 minutes preparing and baking these adorable cookies. This timeframe allows for a stress-free baking experience, letting you enjoy the fun of decorating them afterward!
Ingredients
– 2 ¾ cups all-purpose flour
– 1 teaspoon baking soda
– ½ teaspoon baking powder
– ¼ teaspoon salt
– 1 cup unsalted butter, softened
– 1 cup granulated sugar
– 1 cup brown sugar, packed
– 2 large eggs
– 2 teaspoons vanilla extract
– 1 teaspoon almond extract
– 3 cups powdered sugar (for icing)
– 2-3 tablespoons milk (for icing)
– Various candies (mini chocolate chips, orange candy slices, and pretzel sticks for decoration)
Step-by-Step Instructions
Creating Melted Snowman Cookies is simple and enjoyable. Follow these steps, and you’ll have a batch of delightful cookies ready to impress your family and friends:
1. Preheat Oven: Preheat your oven to 350°F (175°C). Line baking sheets with parchment paper.
2. Mix Dry Ingredients: In a bowl, whisk together the flour, baking soda, baking powder, and salt. Set aside.
3. Cream Butter and Sugars: In a large bowl, beat the softened butter, granulated sugar, and brown sugar together until light and fluffy.
4. Add Eggs and Extracts: Beat in the eggs one at a time, then add the vanilla and almond extracts, mixing until well combined.
5. Combine Mixtures: Gradually add the dry ingredients to the wet ingredients, mixing until just combined. Avoid overmixing.
6. Scoop Dough: Using a cookie scoop or spoon, drop rounded tablespoons of dough onto the prepared baking sheets, spacing them about 2 inches apart.
7. Bake: Bake in the preheated oven for 10-12 minutes, or until the edges are lightly golden. The centers may look slightly underbaked; that’s okay as they will continue to set while cooling.
8. Cool Cookies: Remove from the oven and let the cookies cool on the baking sheets for about 5 minutes before transferring them to wire racks to cool completely.
9. Prepare Icing: In a mixing bowl, combine the powdered sugar with 2-3 tablespoons of milk until you achieve a smooth, thick icing. Adjust the consistency by adding more milk or powdered sugar as needed.
10. Decorate the Cookies: Once the cookies are completely cool, drizzle the icing over the cookies to create a “melting snow” effect. Use mini chocolate chips for eyes, orange candy slices for noses, and pretzel sticks for arms to complete the snowman design.
How to Serve
Now that your Melted Snowman Cookies are beautifully decorated, it’s time to present them in style. Here are some tips to enhance your serving experience:
1. Presentation: Arrange the cookies on a festive platter or cake stand to showcase their whimsical designs. A simple decorative touch can elevate their appearance.
2. Accompaniments: Pair your cookies with hot cocoa, coffee, or tea for a cozy holiday treat. Consider adding whipped cream or marshmallows for an added touch of indulgence.
3. Creative Packaging: If gifting, place the cookies in clear cellophane bags tied with a ribbon. This adds a personal touch and makes them perfect for holiday gifts.
4. Themed Decor: Use winter-themed decorations, such as faux snow or holiday lights, to create an enchanting display around your cookies.
5. Serving Suggestions: Encourage guests to take a cookie or two and enjoy them with their favorite holiday beverage.
By following these serving tips, you’ll create a delightful experience that will make your Melted Snowman Cookies the highlight of any holiday gathering!
Additional Tips
– Use Quality Ingredients: For the best flavor, opt for high-quality butter and pure extracts. This will enhance the overall taste of your Melted Snowman Cookies.
– Chill the Dough: If the dough is too soft to handle, chill it for about 15 minutes. This makes it easier to scoop and shape.
– Experiment with Icing: Try adding food coloring to the icing for fun variations. You can make pink or blue snowmen for a unique twist.
– Don’t Overbake: Keep an eye on the cookies while they bake. Slightly underbaking them gives a chewy texture that complements the icing.
Recipe Variation
Feel free to get creative! Here are some fun variations to try:
1. Chocolate Snowmen: Substitute half of the all-purpose flour with cocoa powder for a chocolatey twist on your cookies.
2. Gluten-Free Option: Use a gluten-free flour blend to cater to those with gluten sensitivities.
3. Different Candy Decorations: Experiment with different candies for the snowman features, such as using gummy candies for noses or licorice for arms.
4. Spice It Up: Add a pinch of cinnamon or nutmeg to the dough for a warm, spicy flavor that’s perfect for the holidays.
Freezing and Storage
– Storage: Keep the cookies in an airtight container at room temperature. They last about 5-7 days.
– Freezing: You can freeze the unbaked dough for up to 3 months. Scoop the dough onto parchment paper, freeze until solid, then transfer to a ziplock bag. When ready to bake, simply add a couple of extra minutes to the baking time.
– Icing Storage: If you have leftover icing, store it in the refrigerator in a sealed container. Re-whip before using it again.
Special Equipment
To make your Melted Snowman Cookies, you will need the following essential tools:
– Mixing bowls
– Electric mixer or hand mixer
– Cookie scoop or spoon for portioning the dough
– Baking sheets lined with parchment paper
– Cooling racks for cooling the cookies
– Piping bag or squeeze bottle for icing decoration
Frequently Asked Questions
Can I use margarine instead of butter?
Yes, margarine can be used, but it may alter the flavor and texture slightly. Butter is recommended for the best results.
What if I don’t have almond extract?
You can simply omit it or substitute it with additional vanilla extract. The cookies will still be delicious!
How can I make the cookies more festive?
Consider adding sprinkles to the icing or using festive candy decorations to enhance their holiday appeal.
Can I make these cookies ahead of time?
Absolutely! You can bake and decorate them a few days in advance. Just store them in an airtight container.
What type of candies are best for decorating?
Mini chocolate chips, candy corn, and pretzel sticks work well, but feel free to get creative with your favorite candies!
Conclusion
Melted Snowman Cookies are a delightful addition to any holiday gathering. Their charming design and delicious flavor make them a favorite for both kids and adults. Not only are they fun to make, but they also bring joy and creativity into your kitchen. Whether you’re preparing them for a festive party or gifting them to friends, these cookies are sure to impress. Enjoy the process of baking and decorating, and make sure to share the joy they bring to your holiday celebrations!
Melted Snowman Cookies: An Amazing Ultimate Recipe
- Total Time: 24 minute
Ingredients
– 2 ¾ cups all-purpose flour
– 1 teaspoon baking soda
– ½ teaspoon baking powder
– ¼ teaspoon salt
– 1 cup unsalted butter, softened
– 1 cup granulated sugar
– 1 cup brown sugar, packed
– 2 large eggs
– 2 teaspoons vanilla extract
– 1 teaspoon almond extract
– 3 cups powdered sugar (for icing)
– 2-3 tablespoons milk (for icing)
– Various candies (mini chocolate chips, orange candy slices, and pretzel sticks for decoration)
Instructions
Creating Melted Snowman Cookies is simple and enjoyable. Follow these steps, and you’ll have a batch of delightful cookies ready to impress your family and friends:
1. Preheat Oven: Preheat your oven to 350°F (175°C). Line baking sheets with parchment paper.
2. Mix Dry Ingredients: In a bowl, whisk together the flour, baking soda, baking powder, and salt. Set aside.
3. Cream Butter and Sugars: In a large bowl, beat the softened butter, granulated sugar, and brown sugar together until light and fluffy.
4. Add Eggs and Extracts: Beat in the eggs one at a time, then add the vanilla and almond extracts, mixing until well combined.
5. Combine Mixtures: Gradually add the dry ingredients to the wet ingredients, mixing until just combined. Avoid overmixing.
6. Scoop Dough: Using a cookie scoop or spoon, drop rounded tablespoons of dough onto the prepared baking sheets, spacing them about 2 inches apart.
7. Bake: Bake in the preheated oven for 10-12 minutes, or until the edges are lightly golden. The centers may look slightly underbaked; that’s okay as they will continue to set while cooling.
8. Cool Cookies: Remove from the oven and let the cookies cool on the baking sheets for about 5 minutes before transferring them to wire racks to cool completely.
9. Prepare Icing: In a mixing bowl, combine the powdered sugar with 2-3 tablespoons of milk until you achieve a smooth, thick icing. Adjust the consistency by adding more milk or powdered sugar as needed.
10. Decorate the Cookies: Once the cookies are completely cool, drizzle the icing over the cookies to create a “melting snow” effect. Use mini chocolate chips for eyes, orange candy slices for noses, and pretzel sticks for arms to complete the snowman design.
- Prep Time: 15 minutes
- Cook Time: 10-12 minutes
Nutrition
- Serving Size: 24 cookies
- Calories: 150 kcal
- Fat: 7g
- Protein: 2g