
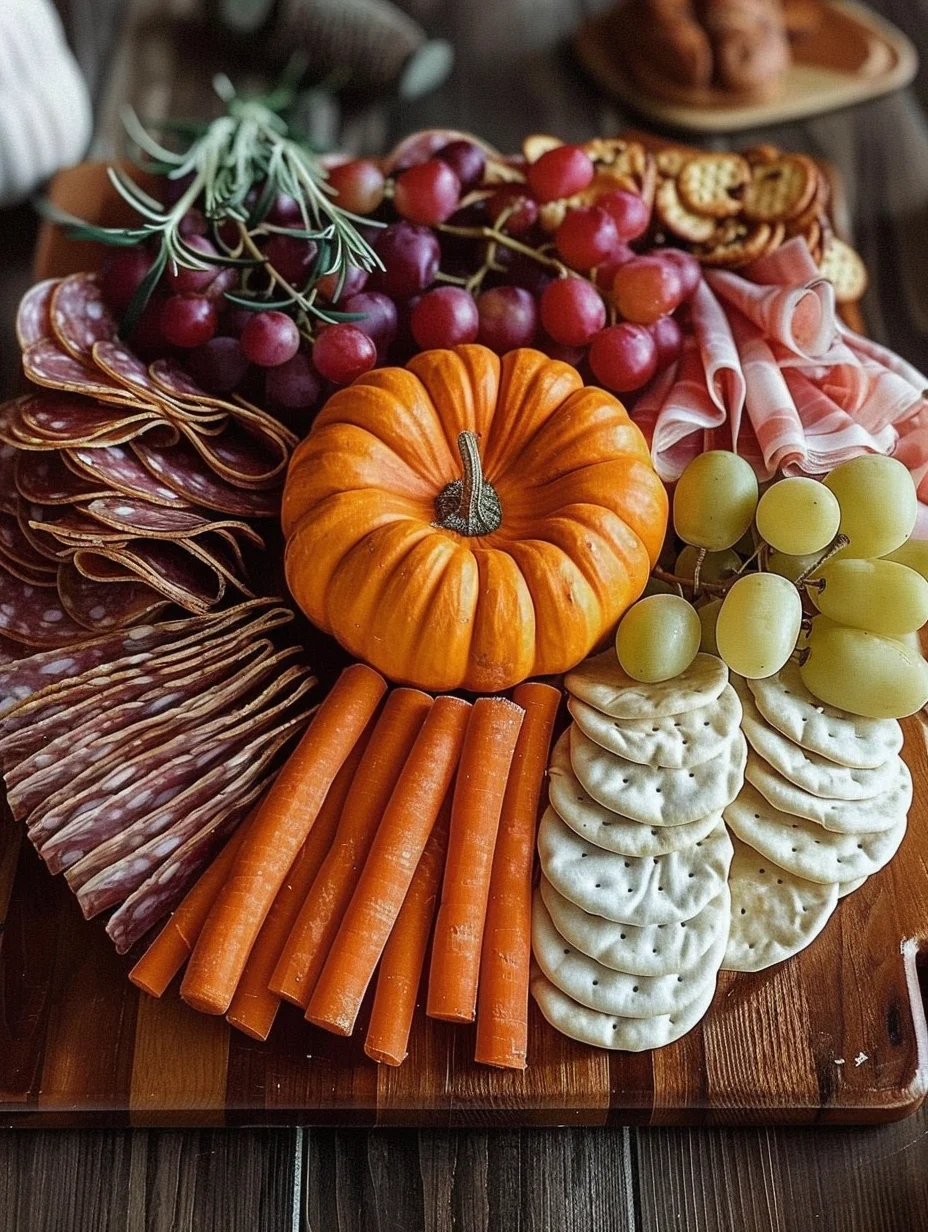
Pumpkin-Shaped Charcuterie Board is a delightful and visually stunning centerpiece for any gathering. This creative board brings together an assortment of delectable treats, perfect for fall festivities or Halloween parties. The vibrant colors and rich flavors make it an amazing addition to your table, captivating your guests and tantalizing their taste buds. Imagine a beautiful, pumpkin-shaped display filled with cheeses, meats, fruits, and nuts that not only looks fantastic but tastes incredible as well.
Creating a Pumpkin-Shaped Charcuterie Board is not just about the food; it’s an experience that promotes sharing and conversation. The unique shape adds a festive touch that elevates your presentation, making it ideal for family gatherings, holiday parties, or casual get-togethers. You can mix and match ingredients to suit your preferences, ensuring everyone finds something they love. In this guide, we will explore why you’ll adore this recipe, the preparation and cooking time, the essential ingredients needed, and a step-by-step guide to assembling your masterpiece.
By the end of this article, you’ll be equipped with everything you need to create an amazing Pumpkin-Shaped Charcuterie Board that will impress your friends and family. Let’s dive into the details and discover why this board is a must-try for your next event!
Why You’ll Love This Recipe
The Pumpkin-Shaped Charcuterie Board offers a delightful mix of flavors and textures that will surely impress anyone who lays eyes on it. Here are several reasons why this recipe should be at the top of your list:
1. Visually Stunning – The pumpkin shape adds a festive flair, making it perfect for fall celebrations.
2. Customizable Ingredients – You can tailor the board to meet various dietary preferences, including vegetarian or gluten-free options.
3. Easy to Assemble – With simple steps, you can create a beautiful board without any complicated cooking.
4. Perfect for Sharing – Charcuterie boards are meant to be enjoyed together, promoting a communal dining experience.
5. Endless Flavor Combinations – Mix and match cheeses, meats, fruits, and nuts to create a unique flavor profile every time.
6. Great for Any Occasion – Whether it’s a casual gathering, holiday party, or a picnic, this board fits right in.
7. A Conversation Starter – The unique presentation invites discussions about the ingredients, making it a focal point at any gathering.
With these benefits in mind, it’s easy to see why the Pumpkin-Shaped Charcuterie Board is an amazing choice for your next event.
Preparation and Cooking Time
Creating your Pumpkin-Shaped Charcuterie Board involves minimal cooking, making it a quick and enjoyable project. Here’s a breakdown of the time you’ll need:
– Preparation Time: 20-30 minutes
– Assembly Time: 15-20 minutes
Overall, you can have this beautiful board ready in about 45-50 minutes. This timeframe makes it convenient to whip up at the last minute or to plan for ahead of time.
Ingredients
– 1 large round cheese (such as Brie or Gouda)
– Variety of cured meats (salami, prosciutto, and pepperoni)
– Assorted crackers (flatbreads, breadsticks, or wheat crackers)
– Fresh fruits (grapes, apple slices, and figs)
– Dried fruits (apricots, cranberries, or raisins)
– Nuts (almonds, walnuts, or pecans)
– Fresh herbs (rosemary, thyme, or basil) for garnish
– Optional: pumpkin-shaped cookie cutter for decorative cheese
Step-by-Step Instructions
Creating a Pumpkin-Shaped Charcuterie Board is straightforward. Follow these steps to assemble your board beautifully:
1. Choose Your Base: Select a large wooden board or platter as the base for your charcuterie display.
2. Create the Pumpkin Shape: Place the large round cheese in the center of the board to form the pumpkin’s body.
3. Add the Stem: Use a smaller piece of cheese or a cucumber slice at the top of the large cheese to mimic the pumpkin stem.
4. Arrange Cured Meats: Fold or roll the cured meats and arrange them around the cheese, creating a colorful border.
5. Incorporate Crackers: Place assorted crackers around the meats, filling in any gaps on the board.
6. Add Fresh and Dried Fruits: Scatter fresh fruits like grapes and apple slices, as well as dried fruits, throughout the board for bursts of color and sweetness.
7. Finish with Nuts and Herbs: Fill any remaining spaces with nuts and garnish with fresh herbs for an aromatic touch.
By following these simple steps, your Pumpkin-Shaped Charcuterie Board will come together effortlessly and delight your guests!
How to Serve
When serving your Pumpkin-Shaped Charcuterie Board, consider these tips to enhance the experience:
1. Presentation: Place the board on a large table or island where guests can comfortably gather around it.
2. Utensils: Provide small cheese knives or spreaders for guests to easily serve themselves.
3. Pairing Suggestions: Offer a selection of beverages, such as wine or cider, that complement the flavors of the board.
4. Encourage Sharing: Remind guests to mix and match flavors for a fun and interactive tasting experience.
5. Leftovers: If there are any leftovers, store them in airtight containers to enjoy later.
With these serving suggestions, your Pumpkin-Shaped Charcuterie Board will be a hit at any gathering, leaving a lasting impression on your guests!
Additional Tips
– Use Seasonal Ingredients: Incorporate seasonal fruits like pomegranate or pears for added flavor and color.
– Mix Textures: Include a variety of textures, such as crunchy nuts, creamy cheeses, and juicy fruits, to enhance the eating experience.
– Plan Ahead: Prepare certain ingredients, like sliced fruits or arranged meats, a few hours in advance to save time on assembly.
Recipe Variation
Feel free to get creative with your Pumpkin-Shaped Charcuterie Board. Here are some variations to consider:
1. Sweet and Savory Twist: Add chocolate-covered pretzels or caramel-coated nuts for a sweet contrast.
2. Cheese Lovers Board: Focus on a variety of cheeses such as blue cheese, cheddar, and goat cheese for an all-cheese board.
3. Mediterranean Style: Swap out traditional cured meats for prosciutto and add olives, hummus, and pita chips.
Freezing and Storage
– Storage: Cover any leftovers with plastic wrap or place them in airtight containers. They should be consumed within 1-2 days for optimal freshness.
– Freezing: While it’s not ideal to freeze a charcuterie board, you can freeze leftover meat and cheese. Wrap them tightly in plastic and store them in the freezer for up to 2 months.
Special Equipment
To assemble your Pumpkin-Shaped Charcuterie Board, you don’t need much. Here are a few helpful items:
– Large wooden cutting board or serving platter
– Cheese knives for spreading and cutting
– Small bowls for dips or spreads
– Pumpkin-shaped cookie cutter (optional) for decorative cheese
Frequently Asked Questions
Can I make the Pumpkin-Shaped Charcuterie Board in advance?
Yes, you can prepare some components ahead of time. Slice fruits and arrange meats a few hours before serving.
What can I substitute for cheese?
If you want to skip cheese, consider using spreads like hummus or guacamole as a tasty alternative.
How do I ensure my board looks visually appealing?
Arrange items in clusters and vary the heights of ingredients. Use fresh herbs as a garnish to add a pop of color.
Can I include desserts on my charcuterie board?
Absolutely! Consider adding small cookies, chocolate truffles, or mini cupcakes for a sweet touch.
Is it okay to use frozen fruits?
While fresh fruits are preferred for texture and appearance, frozen fruits can be used if thawed and drained properly.
Conclusion
Creating a Pumpkin-Shaped Charcuterie Board is an exciting way to celebrate the flavors of fall. This unique presentation not only enhances your table setting but also promotes interaction among guests. With its delightful mix of textures and flavors, your board is sure to be a hit at any gathering. So gather your ingredients, follow the steps, and enjoy the process of assembling this festive masterpiece!
Pumpkin-Shaped Charcuterie Board: An Amazing Ultimate Guide to 7 Steps
- Total Time: 15 minutes
Ingredients
– 1 large round cheese (such as Brie or Gouda)
– Variety of cured meats (salami, prosciutto, and pepperoni)
– Assorted crackers (flatbreads, breadsticks, or wheat crackers)
– Fresh fruits (grapes, apple slices, and figs)
– Dried fruits (apricots, cranberries, or raisins)
– Nuts (almonds, walnuts, or pecans)
– Fresh herbs (rosemary, thyme, or basil) for garnish
– Optional: pumpkin-shaped cookie cutter for decorative cheese
Instructions
Creating a Pumpkin-Shaped Charcuterie Board is straightforward. Follow these steps to assemble your board beautifully:
1. Choose Your Base: Select a large wooden board or platter as the base for your charcuterie display.
2. Create the Pumpkin Shape: Place the large round cheese in the center of the board to form the pumpkin’s body.
3. Add the Stem: Use a smaller piece of cheese or a cucumber slice at the top of the large cheese to mimic the pumpkin stem.
4. Arrange Cured Meats: Fold or roll the cured meats and arrange them around the cheese, creating a colorful border.
5. Incorporate Crackers: Place assorted crackers around the meats, filling in any gaps on the board.
6. Add Fresh and Dried Fruits: Scatter fresh fruits like grapes and apple slices, as well as dried fruits, throughout the board for bursts of color and sweetness.
7. Finish with Nuts and Herbs: Fill any remaining spaces with nuts and garnish with fresh herbs for an aromatic touch.
By following these simple steps, your Pumpkin-Shaped Charcuterie Board will come together effortlessly and delight your guests!
- Prep Time: 15 minutes
- Cook Time: 0 minutes
Nutrition
- Serving Size: 8
- Calories: 350 kcal
- Fat: 20g
- Protein: 15g